FM Percs with FM8
Synthesising your own percussion sounds is a great way to add melodic percussive elements to a track. Here’s an audio example of the sound we’ll be creating:
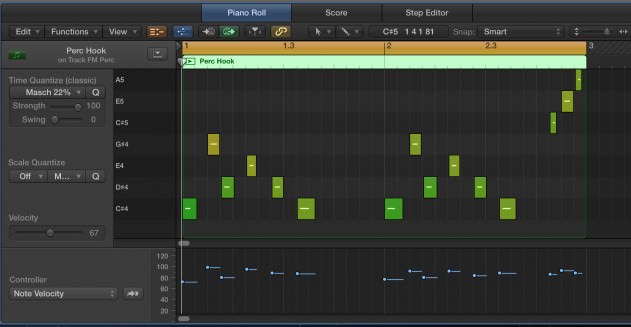
And here’s the MIDI we’ve used for this example:
Step 1
Begin by loading up an instance of FM8 on a new channel. Click on the Expert panel on the left to reveal our six operators (listed A-F), an overview of our noise operator and filter. Over to the right you will see the FM matrix.
Operator F is already routed to the output, playing a note you will hear as a simple sine wave. We need to make this sound more interesting by introducing more operators (in FM synthesis we deal with operators rather than oscillators).
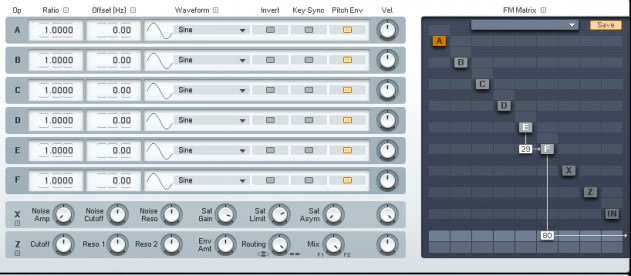
Turn on operator E by right clicking on the E in the FM matrix. Now click and drag up in the box underneath E until it reads 29. You will now see an arrow pointing to operator F, showing that we are modulating operator F with the output of operator E. You should hear the sound get slightly brighter now too.
Step 2
Let’s now introduce the noise operator into the sound. Noise is operator X in FM8. Click and drag up on the Noise Amp control until it’s fully clockwise (full volume), and also click and drag up on the Noise Cutoff until it’s at maximum.
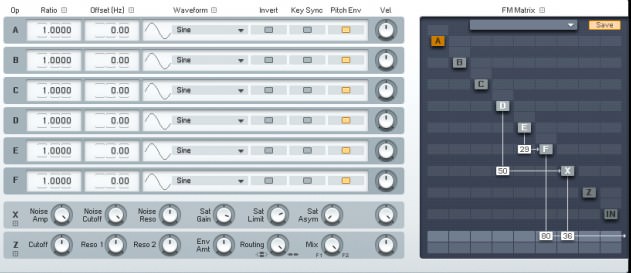
Now, over in the FM matrix, right-click on operator X (the noise) to turn it on. You will see a box numbered 80 at the bottom which means operator F is routed to the output at a volume of 80, click and drag up on the box to the right of this to route operator X to the output. Set this to around 36.
Next, right-click on operator D in the FM matrix to turn this on, and route this into operator X at 50, as shown below.
Step 3
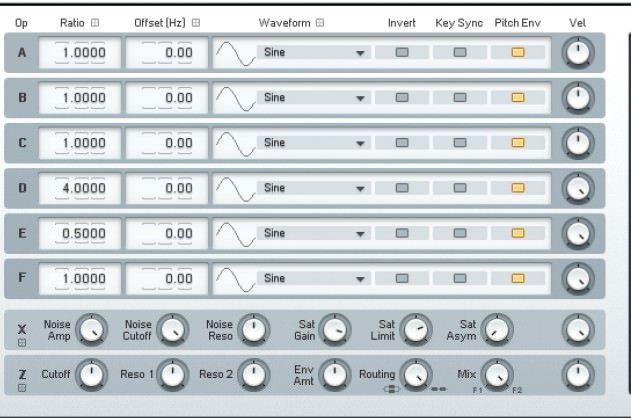
Over in the operator section you will see a Ratio column. This sets the pitch of the operators. At the moment they are all set to 1.0000. Halving or doubling this value will take the pitch of the operator up or down by an octave. Take the pitch of operator D up by 2 octaves by double-clicking on the ratio box next to D, typing 4 and pressing enter.
Now take the pitch of operator E down by one octave by double clicking on the ratio box next to E and typing 0.5, then pressing enter.
Next, in the Vel (velocity) column, click and drag up on the controls all the way for the 4 operators we’re using (D, E, F and X) so now our operators are velocity sensitive, essential for percussive sounds.
Step 4
Over to the left of the synth you will see a box titled Env. Click this to bring up our envelopes. We can set individual envelopes for each operator here, however we can also link envelopes together using the link column.
Click on the D envelope to bring it into focus, and now in the link column on the right, click the link boxes for operators E, F and X. Now all 4 envelopes are linked.
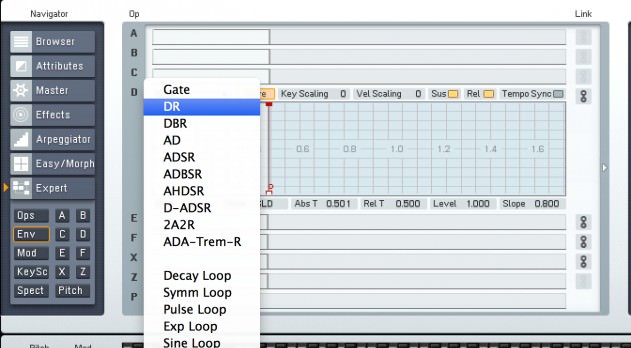
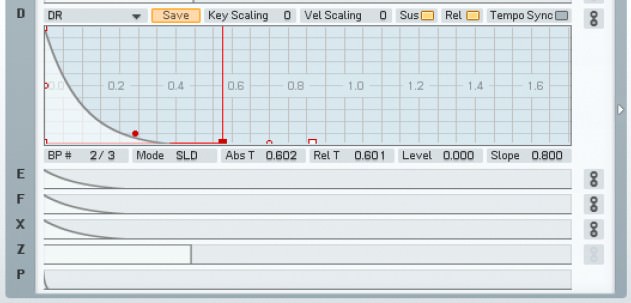
In the top left of the D envelope, you will see a drop-down menu box. Click this and select DR from the list, which creates a percussive envelope shape for all four envelopes.
Step 5
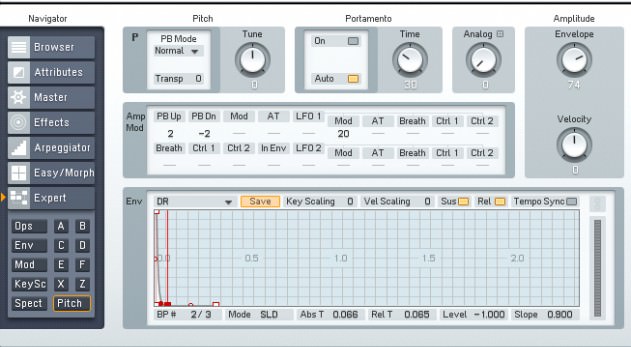
Now for the all-important pitch modulation to make this sound percussive. Click on the Pitch box in the Navigator section. This brings up our pitch, portamento, pitch amp, modulation and pitch envelope options.
In the envelope section, again click on the drop-down menu and select the DR envelope preset. However, this time the envelope needs to be edited to make it really percussive. You should see three white boxes in the envelope section. Click on the middle one and drag it so it’s towards the bottom left of the grid.
Click on the Slope box in the bottom right and change the parameter to 0.900, shortening the decay of the pitch envelope. Now on the third box, Rel T, click and drag to adjust the release. Adjusting the envelope times will have a huge effect on the percussive element of the sound, so be sure to experiment.
Step 6
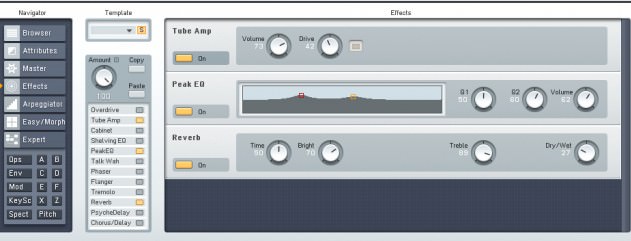
Next, click on the Effects box in the Navigator panel to bring up our effects section. Click on Tube Amp, PeakEQ and Reverb to load up these effects.
On the Tube Amp, take the volume parameter to 73 and the drive to 41.
On the Peak EQ, click and drag up and left on the red square to add some low mid to the sound, and click up and left on the yellow square to add some more mids to the sound. Also change the Q2 setting to 60 and push up the volume to 62.
On the Reverb, keep the time at 50, push up the brightness to 70, take the treble to 89 and pull down the dry/wet to 20.
These effects transform the sound. The tube distortion and EQ add body, while the reverb adds a nice sense of space to the sound.
Step 7
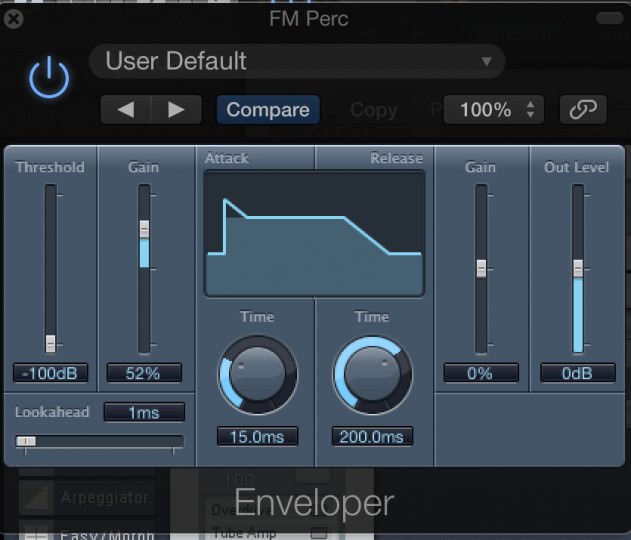
Finally, we’ve added Logic’s Enveloper to the sound, pushing up the gain on the attack section to 52% and changing the Time parameter to 15.0ms. This enhances the transient of our perc sound.
12.37 AM
Christmas just arrives for me ! Thanks a lot for all this tutorials !
01.51 AM
10 essential drum techniques??? 10 tutorials on how to do this or that using very particular DAWS and Plugins. Total waste of time.
02.52 AM
I do like Attack and despite me mainly being into underground hip hop I play disco and some nu disco (which is house haha) and still love techno as in the minimalist Detroit sound, not bloody tech house. I DJ and come from a great position clubwise. Growing up in South London in the 80’s there was the soul scene then the warehouse, hip-hop, funk, Boogie, disco anthems, Kiss FM when it was a pirate was our Bible and on a Tuesday night there were prob 5 good clubs to go to, on a Saturday, 25 maybe. who knows. Then I lived and loved through 88- to about 93 when the original Balearic, anything went, all about the tunes was starting to go slowly and it was about the DJs and had split into 1000 genres. Boys Own, Slam, and others still kept a more undergrounf scene going away from momeymakers like MOS. (only time I went there I lost my mates within about 20 mins and looked in vain for a few hours. That wasn’t what it was about. I was in Brighton then anyway and we had the wonderful Zap. Now what we got? A weekly decent hip hop night on a Tuesday, once a month clubs like Russ Dewbury’s terrific Soulful Strut where I do the odd slot.. All the sefront clubs which were once cool are now for the geezer and hen night crowd.Then there’s patterns. If there is a decent DJ it;s worth it. If not it;s the usual kid playing his perfect and completely broring seamless tech house set. The crowd don’t actuyally seem like they are having a particularly great time and most people in their 20’s just go to the pub and I’m not surprised. Your ‘What makes a great DJ’ was terrific as it so backed up what had happened. Itl;s turned on it’s head so instead of buying tunes as u knew they would be bangers I can tell that tracks are downloaded ‘cos they fit in with other tracks, I call it anti-DJing and it’s nice to see Attack interview some of the greats like Derrick May etc. You would think that the kids who think they are DJs now (despite there not being many places to DJ) would respect people like that. Indie kids in bands worship those who went before but no…they think they know best, they DJs who shock horror mixed with vinyl and would drop lots of banging tunes on the One as we punters couldn’t have cared less about the mixing really. It was all about the tunes, Depressing really. Good that the drum and bass scene and a few others have kept going by not becoming commercial. Sad thing is in Brighton there are loads of us that want to put proper small nights on with little risk like u used to be able to but there’s no where to hire out now.
Anyway I think all that was saying that you seem to be taking a more mature approach instead of articles like one I saw online which was “Is it possible to mix without using your EQ?” I just stared at it tbh in horror. The only time I tounch my EQ is when I turn the bass down for scratching. Oh couple of requests. How about a few more Beat Dissected on hip hop. The Underground has all kinds of leftfield beats and talented producers, and more minimalist techno. We of a certain age could make a house beat in our sleep. And can you please not make your tutorials so expensive plugin specific? We donl;t all use or can afford Ableton, Pro Tools, etc. I use Reaper, MPC Element and the best free plugins and synths that I have found. I’m sure Variety of Sound and Tokyo Dawn plugins could give a lot of commerial ones a run for their money. And making hip hop TyrellN6, Firebird and SQ8L certainly do the job. The only plugins I’be bought are the DopeVST Hip Hop romplers. And how about some tips on leftfield hip hop? Do people really still actually make ‘House Leads?’ I have about 50 in various presets that sound alright. Andy
08.19 PM
Thanks for all these tips, great article!
11.43 AM
This seems to be an advert for various (expensive) plugins rather than a tutorial on essential drum techniques. This should have been done using a DAW’s native plugins.