This channel is sponsored by
 Roland Cloud is your creative hub for Roland hardware and software. Access legendary recreations of Roland Classics, find new sounds for your favorite products, and download updates and companion apps to make music fast and easy. Visit Roland Cloud
We use Chordjam alongside Live’s Wavetable to make a pitch-bending synth progression. Chordjam has recently been updated to include MPE making it now possible to write polyphonic portamento chord changes in real-time or with the Chordjam sequencer.
Chordjam by Audiomodern is designed to intuitively build chords and progressions. If you’re familiar with Scaler or Captain Chords, you’re likely to have heard of Chordjam already. And with the latest update bringing MPE features to it, Chordjam offers something truly unique.
Audiomodern have a wide range of great kit. One of these is Playbeat, which like Chordjam, offers a great amount of control, in particular to producers who might not be confident playing or programming. If you’re reading this on an iPad you’ll also be pleased to know Chordjam is available also on iOS devices.
For the purposes of this tutorial, we’re making a deep house chord progression using Chordjam 1.5 and working with the new MPE features.
If you like this tutorial, Chordjam is on sale until Thursday June 8th:
- Mac and PC –
€49> €39 - iPad – €9.99
Chapters
What is MPE?
How do I get sound from Chordjam?
Chordjam Overview
Making A Track With Chordjam 1.5 MPE Features
Change The Sequence
Amend The Chords
Applying MPE
Parting Thoughts
As ever, click any image to enlarge!
What Is MPE?
If you’ve been following MIDI developments these past few years, MPE was largely popularised by ROLI. It stands for MIDI Polyphonic Expression.
It enables multidimensional controllers to control multiple parameters of every note within MPE-compatible software. And there’s been a huge increase in MPE-compatible synths and controllers. Many devices in Live are natively MPE-compatible. No live instruments that have MPE include Equator, Hive, Pigments and Serum. In short, if you are looking to add more expression to your performances then MPE is for you.
Prior to MPE, expressive gestures on synthesizers—such as pitch bending or adding vibrato—affected all notes being played. With MPE, every note a musician plays can be articulated individually for much greater expressiveness. And with Chordjam, you don’t even need a controller, as you can simply use the onboard sequencer.
How do I get Sound From Chordjam?
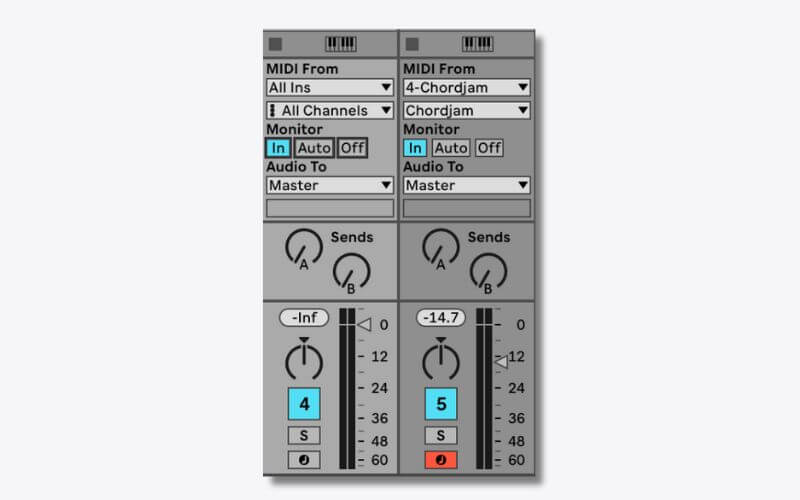
As Chordjam is a pure MIDI effect you’ll need to route sound to it. Across various music production software, there are many different ways to do this. However, in Live you need to route it as in the picture below.
- Load up Chordjam on a new MIDI track
- Load an instrument and set the MIDI track’s input to Chordjam
- The new MIDI track is triggered by the Chordjam MID
- Activate the “Input” of the Chordjam channel to be able to trigger Chordjam using your
MIDI keyboard
If you are not a Live user, refer to the Chordjam manual.
A Brief Overview Of Chordjam 1.5
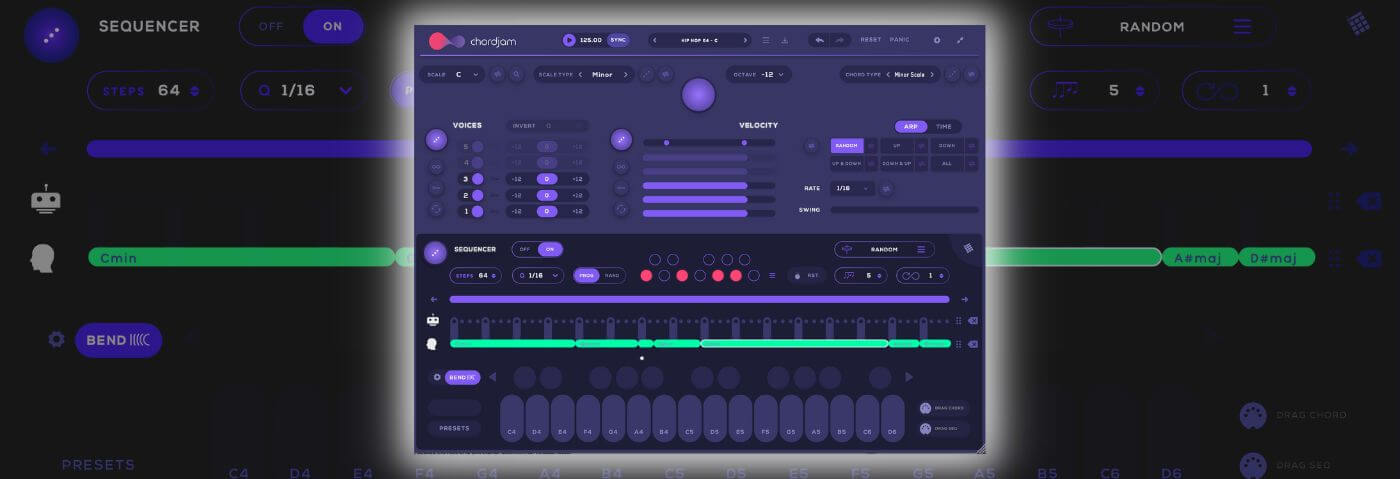
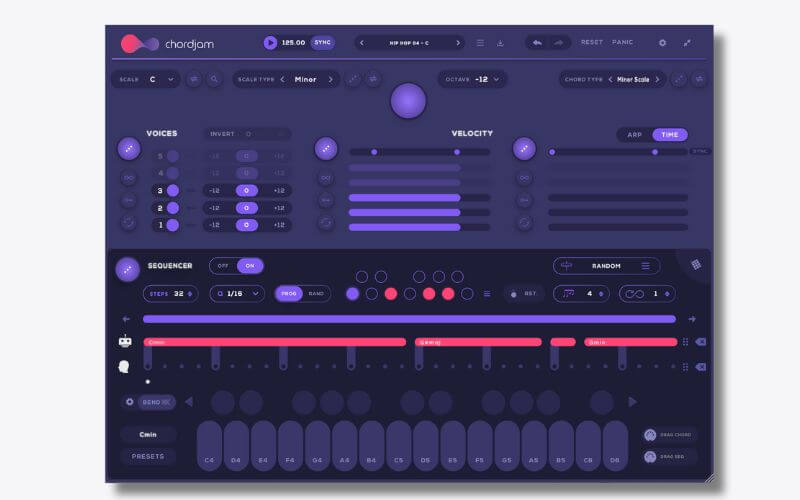
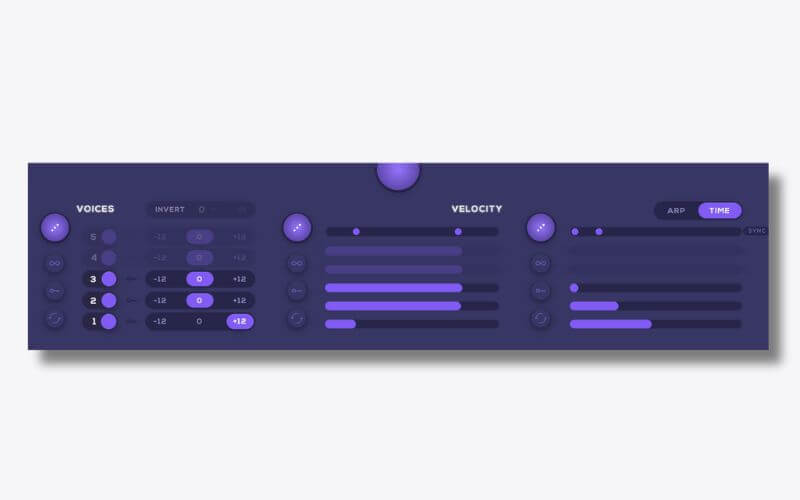
When you load Chordjam you’ll see the following:
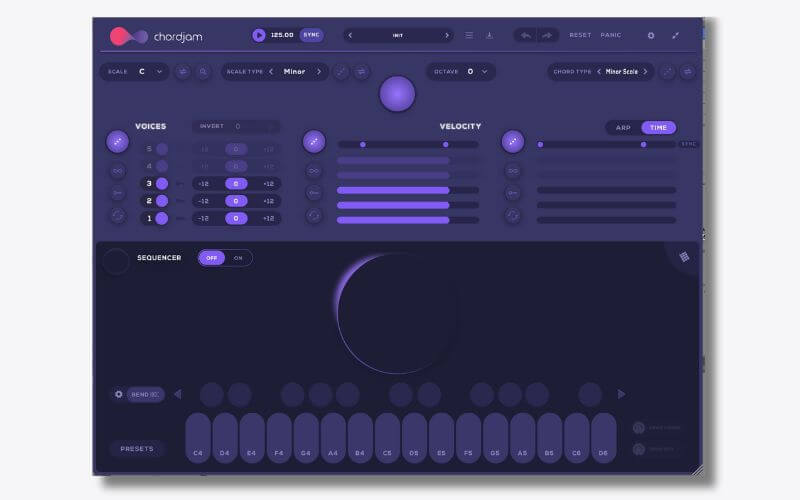
In the top half of the GUI is where you’ll choose your harmony settings. You can choose the SCALE, SCALE TYPE, OCTAVE AND OCTAVE TYPE. And there is plenty to choose from. For example, you can decide between a standard Minor scale all the way to the subtle differences of Spanish Gypsy and Hungarian Gypsy scales.
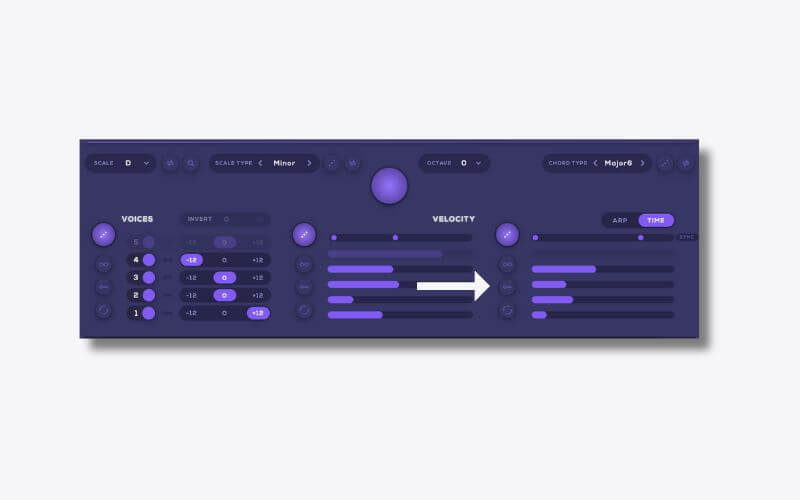
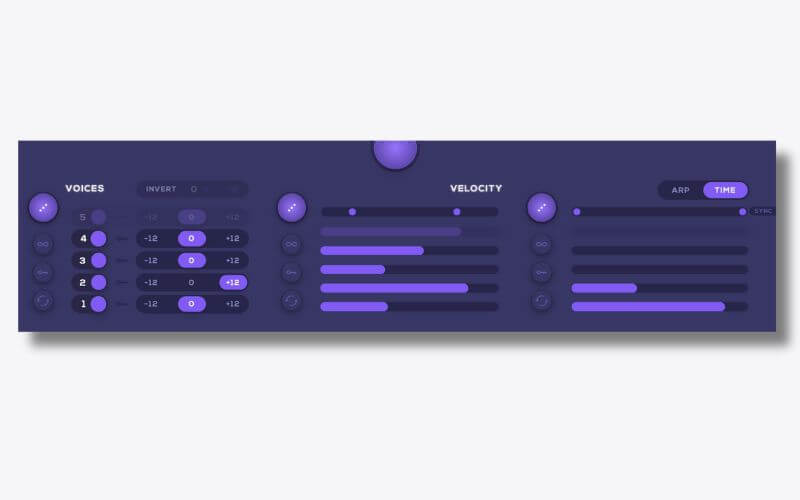
Underneath is your voicings and expression area. A chord can be comprised of 5 voices, and under VOICES you can amend the octave of each voice.
Moving along to VELOCITY, you can change the velocity settings of each voice. The final section, under ARP and TIME gives you the ability to apply an arpeggiator and you can even apply it to just one chord or across your whole chord sequence.
Finally you have the big purple button! This randomises everything for you. It toggles throuhg different settings till you land on something you don’t like. If you want to go back, you can underdo it (top right).
🔑 Quick Tip 🔑
If you are looking for jazz or house chords to sound smooth and real, first find your progression. Try the presets, there’s some great case studies.
Then use TIME to make the chord peformance more real. As a rule of thumb song starter, try increasing TIME the higher up the chord your notes appear. That will spread the notes out and up the register. On a bell sound, it’s going to be magic.
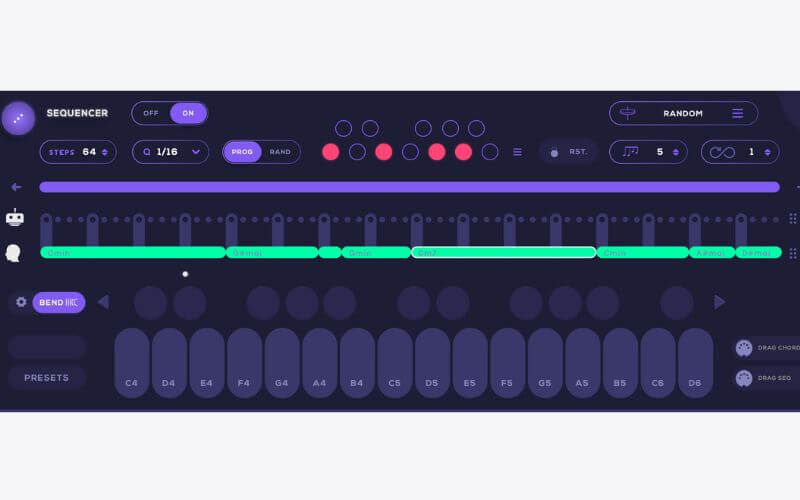
Underneath is the sequencer. If you toggle the OFF/ON button, and turn it on, it gives you a familiar-looking sequencer layout.
There are two modes, ROBOT mode, with the ROBOT logo, or User Sequencer mode. They are indicated with the purple arrow below.
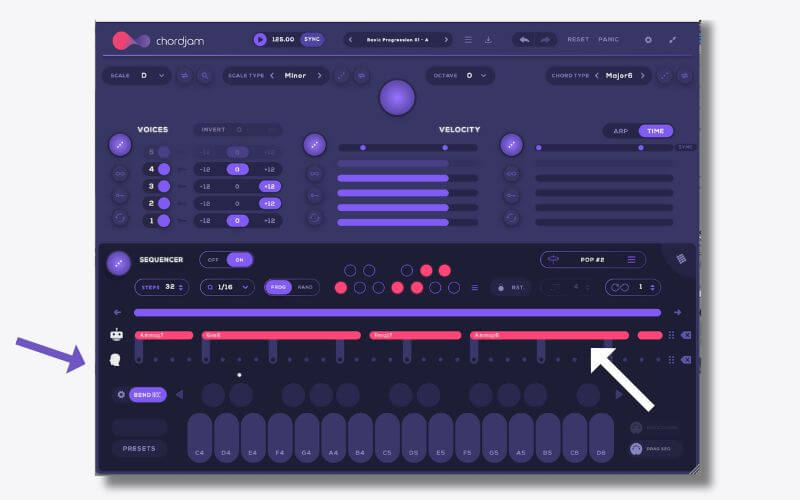
If you are programming your own, click on your inputted chords (white arrow in picture above) and then change any settings in the top half of the GUI. Each chord in your progression can have different settings.
For example, the audio below is playing the picture above:
It sounds great but in this next example, you’ll hear that in each chord I’ve affected the velocity, arpeggiator and register (octaves). It helps make it less ‘blocky’.
Here’s the result:
🔑 Quick Tip 🔑
Chordjam has a really useful ‘lock’ key. If you toggle it on and offm it locks the part of the interface you locked.
In real terms, if you like your velocity settings but wish to randomise everything else, simply hit the lock key in the VELOCITY section and your settings will remain while you explore.
Making A Track With Chordjam 1.5 MPE Features
Step 1: Choose a preset
We are going to stick with Wavetable but you can use any MPE-ready device. To begin with, make sure Wavetable is routed correctly as above or you will not get any sound!
Dial up any Wavetable sound you like. We are using Basic Digi Pad. It’s worth remembering that polyphonic portamento (glide) works best with polyphonic instruments. You might find you’ll hear better results with a pad or a synth rather than a 808 bassline for example. But don’t let that stop you trying! Be creative!
Next, tweak one of the many presets available. Jump into the menu and find HIP-HOP-04 C. That’s going to be our starting sequence.
We have reduced the Filter Cutoff on our pad, to reduce the brightness. For the drums, we are using the 808 Core Kit with some basic mixing and saturation.
Here’s how it sounds:
Step 2: Change The Sequence
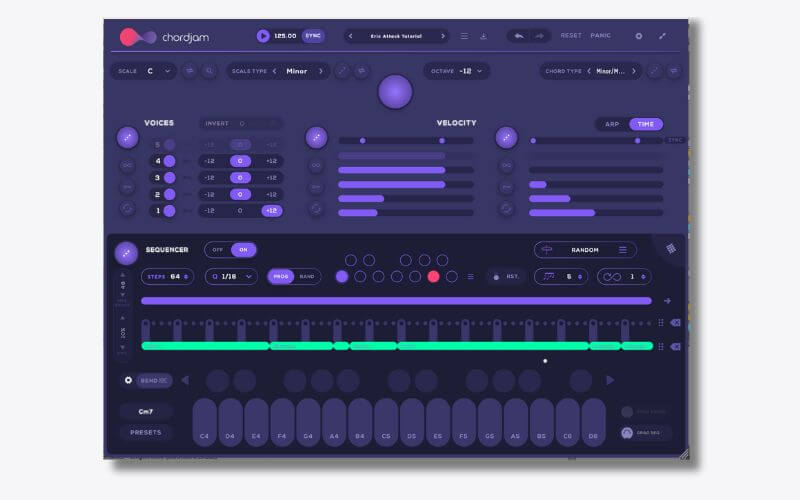
Start by changing the length of the sequence from 32 to 64 steps. Next on the far right, you’ll see a 6 dotted switch, hit that and the pattern will paste onto User Sequence, which we can edit. Remove what is left behind in ROBOT mode as we won’t need it from here.
Now make a pattern to fit the rest of the sequencer. To do so, click on the sequence to add a chord and drag out the chord to your preferred length. To select which chord in the scale, hit the keys at the bottom of the GUI and it will change the chord based on the key.
We’ve inputted a Cminor lasting 1 and 1/2 bars with two turnaround chords A#maj and D#maj at the end of the sequence. At this point, I should say I’ve played jazz keys my whole life, but using Chordjam does change almost everything in how you would approach it. You can push it far beyond what a human could play. However great you might be on the keys, even Herbie Hancock, Jacob Collier or Jesus Molina might struggle to keep up. AI – it’s the future…!
This is how it’s now sounding:
Step 3: Amend The Chords
This is where it gets really fun.
Let’s focus our attention on the Cmin chord in bar two. First, let’s change the settings. I love how messing with the timing, octaves and velocity can make it sound far more natural. By adding the TIME settings, as seen below, it performs much like a pianist would, playing each note at a time until you hit the full chord.
Next, let’s push it further.
Keeping with the Cminor, select it first, then choose Minor/Major7 from the CHORD TYPE menu.
This chord adds a major seventh note to our minor chord and immediately pricks up the ears. Now let’s reduce the length of this chord to just two beats and follow the chord with the same Cminor that starts the progression. It should now look like this.
Next, select the second chord in the sequence, G#maj. We want it to shine some more. To achieve this, select it and push VOICE 1 up an octave and reduced the velocity of it. Heading to the far right we’ve decreased the TIME settings and then made VOICE 1 the last to be played.
It should now sound like this:
Step 4: Applying MPE
Even like this, it’s sounding great. But the MPE is the coup de grace that’s going to take this sound to the next level.
🔑 Quick Tip 🔑
It’s good practice, but not mandatory, to set tyour MPE level to be the same in your instrument and Chordjam. Both are set by default to 48. We’re going to leave it like that.
To start bending your chords, hit the new feature on Chordjam 1.5, where it says BEND. That activates pitch bend and you do not need an MPE controller to do this.
If you click the settings wheel on the left of BEND, it opens up a neat menu with two ptions. They are the amount of pitch bend (how long it takes to bend between chords) and the pitch bend range (how high or low you want it to bed. We have kept both as they are for now.
It should sound like this:

It’s really as simple as that!
In the last example, we have added some basic filter automation to our synth and a rudimentary bassline to help you contextualise it. It now sounds like this:
Parting Thoughts
What you might want to consider is automating the amount. For example, you might want more PITCH BEND at the drop than you do in the sequence. You can simply draw in automation to reflect this.
Another top tip is to use the PRESETS area and build a few sequences for your song. You can alternate between a standard progression and then use BEND in the breakdown or build up towards a drop. It might help elevate the tension. Lastly, using a controller, you can assign presets and trigger them on the fly.
Have fun!
Follow Attack Magazine
*Attack Magazine is supported by its audience. When you purchase through links on our site, we may earn an affiliate commission. Learn more.
Tutorials is sponsored by
Roland Cloud is your creative hub for Roland hardware and software. Access legendary recreations of Roland Classics, find new sounds for your favorite products, and download updates and companion apps to make music fast and easy.