u-he are makers of award-winning software synthesisers and effects including Diva, Repro-1, Zebra2, Hive, Bazille, Presswerk and Satin.
Visit U-he
Technique » Synth Secrets »
Use Hive 2 & Diva To Learn How To Make Synth Patches In The Style Of Maceo Plex
This channel is sponsored by

This time on Synth Secrets, we’ll be walking you through how to create an FM bell sound and an aggressive analogue bass in the style of Maceo Plex’s ‘Destination Mars’.
In today’s Synth Secrets, we’ll be cooking up two patches using u-he’s fantastic suite of synthesizers. We want to heavily emulate the feel and sound of Maceo Plex’s ‘Destination Mars’, a 2019 release on Adam Beyer’s Drumcode label that features contributions from legend Josh Wink.
We’ll start by using Hive 2 and its highly usable wavetables to emulate true FM synthesis and get some dizzy, dissonant bells. Then we’ll use Diva, u-he’s modern classic analogue modelling synthesizer, to create a thick and wide bass that is really the star of the track.
Here are the two patches in the context of a track:
Want to follow along? Download the session below:
First things first, change your DAW’s tempo to 130, create an instrument track, program a MIDI clip as you see below, and pull up an instance of Hive 2. If you don’t already own it, grab the demo at u-he’s website.

As ever, click any image in enlarge!
Step 1: The Basics
First things first, click on the preset browser and go all the way to the bottom, selecting “init” to initialize the patch and start fresh.
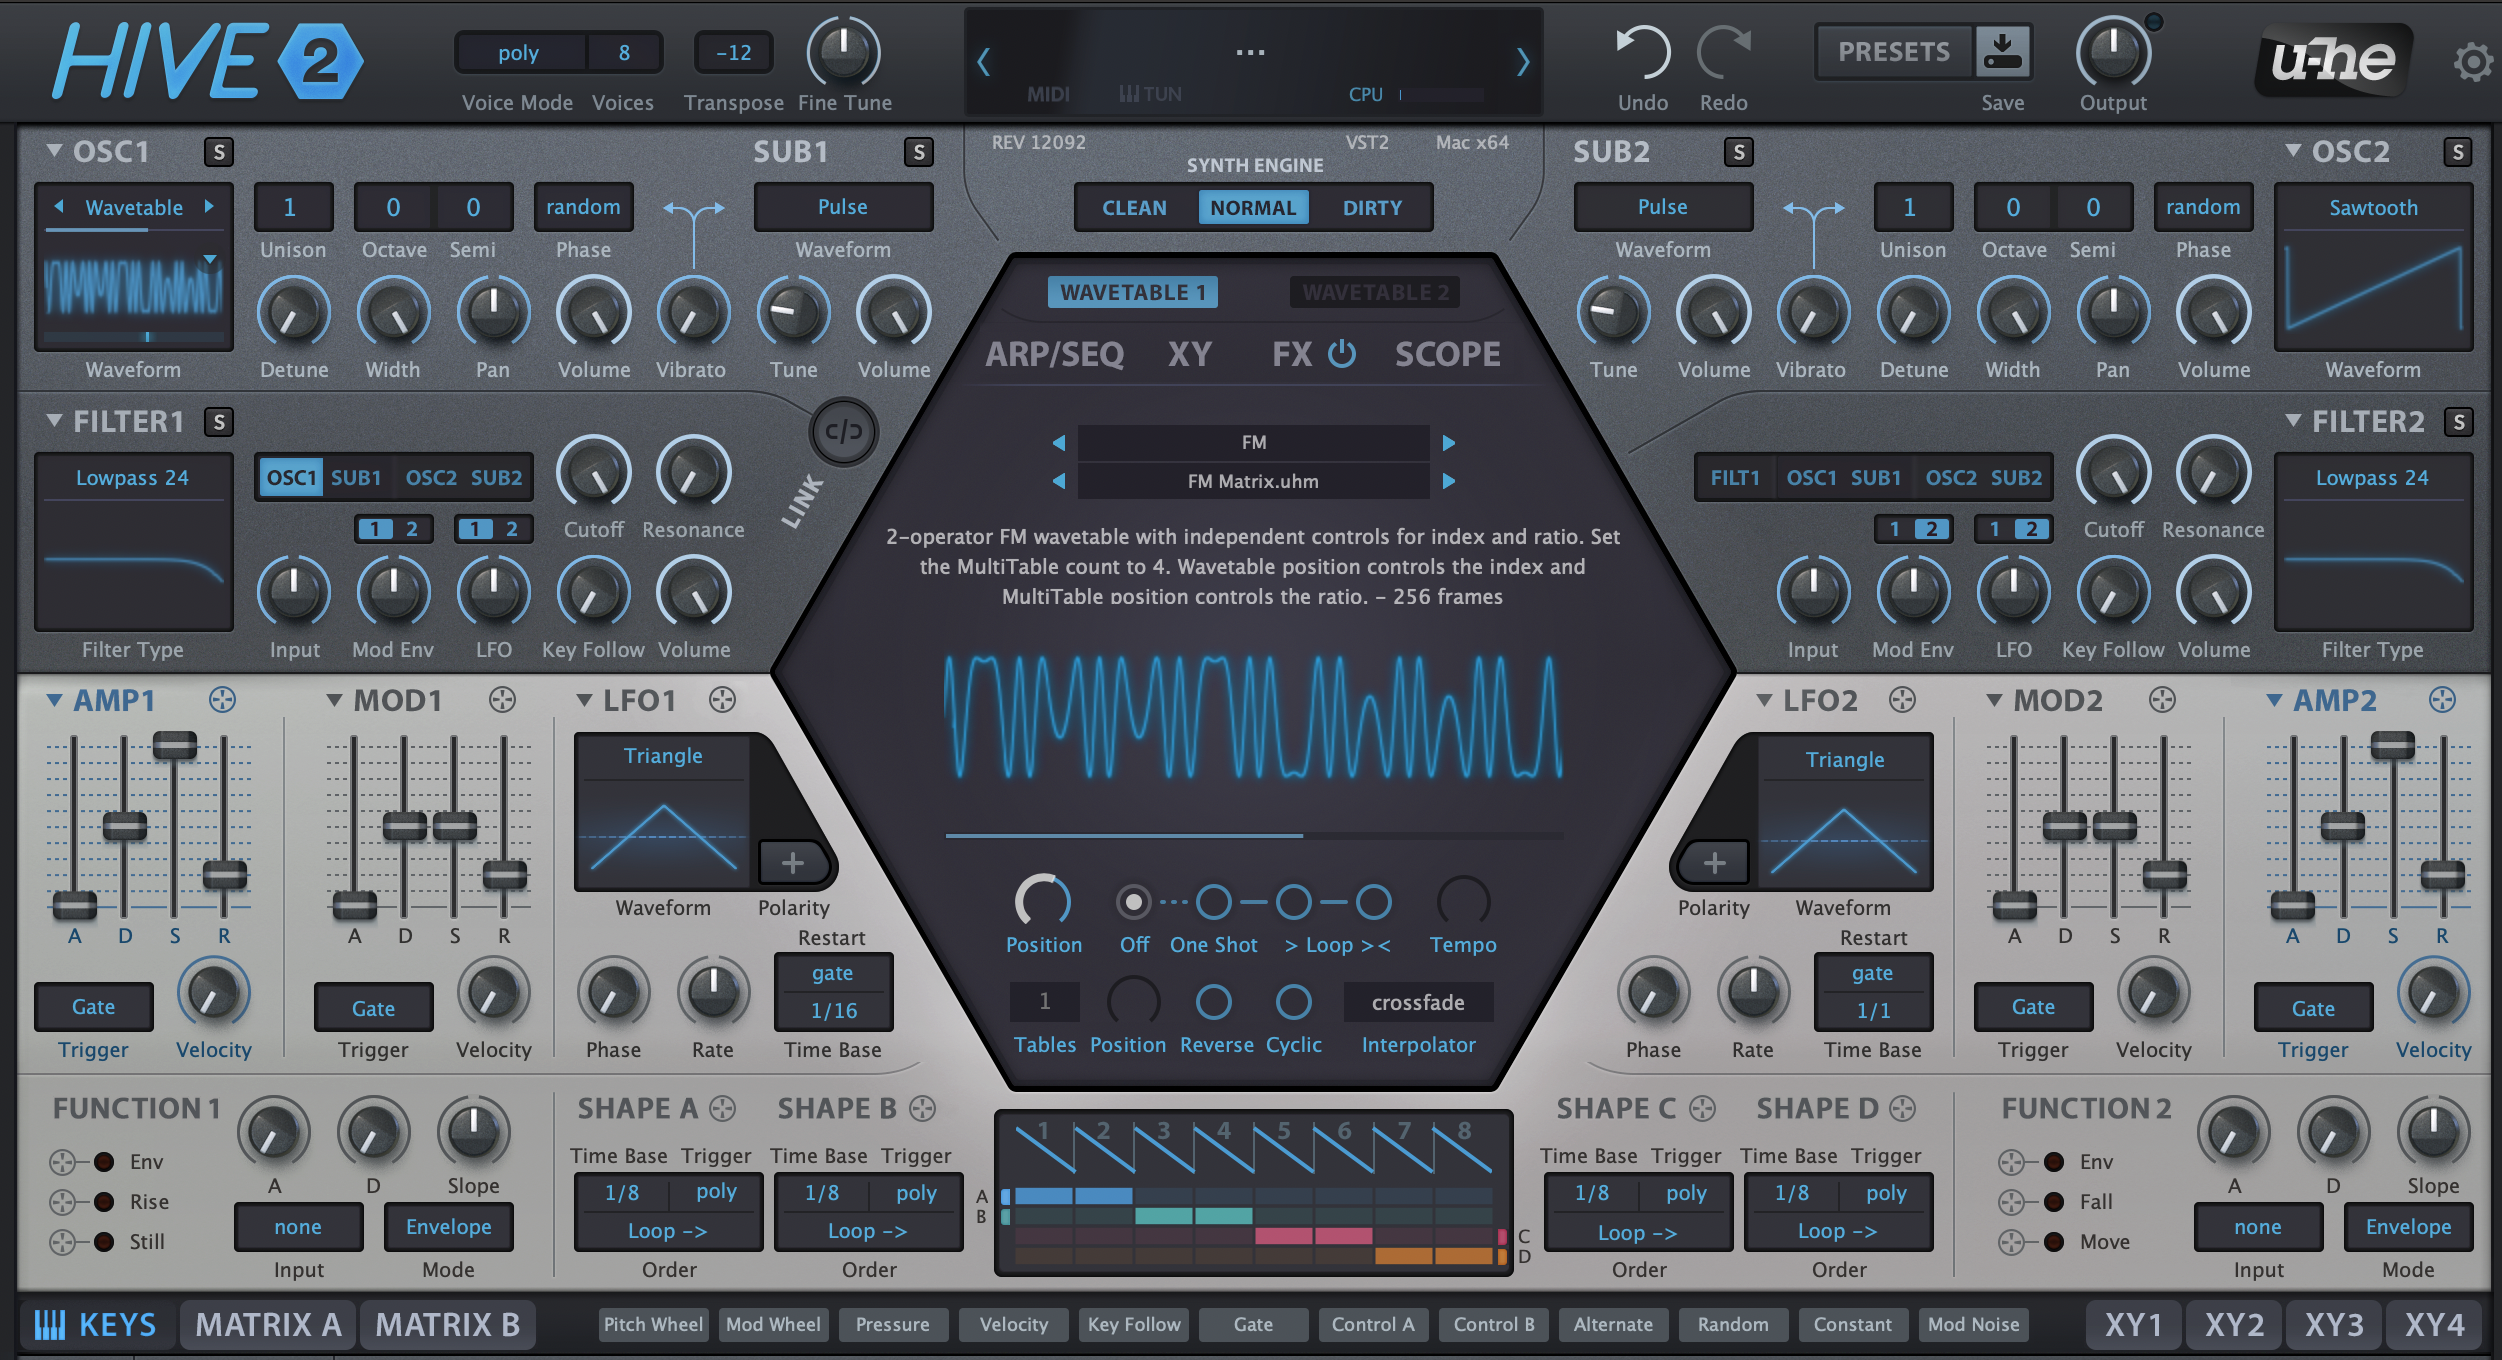
Then we’ll move directly to OSC1, clicking on the word “sawtooth” in the waveform selector to pop open the menu where we’ll select “wavetable.” Now in the centre of the interface, you’ll notice that the words “WAVETABLE 1” at the top are lit up. Click on that button to open the Wavetable editor.
Open the wavetable browser menu, select the FM category and then select the wavetable entitled FM Matrix.uhm. Finally, set the wavetable Position knob to between 1 and 2 o’clock.
Our progress so far:
Step 2: Filter Flex
We’re going to take a few steps to set filter 1 and filter 2 up in series. Filter 1 will be a low pass filter, shaving off some aggressive high-end, and filter 2 will be a high pass filter, pulling out a lot of extraneous bass.
Filter 1 is already set up as a low pass by default, so all we have to do is boost the resonance to about 10 o’clock and pull the cutoff down to about 2 o’clock and we’ll have what we need there.
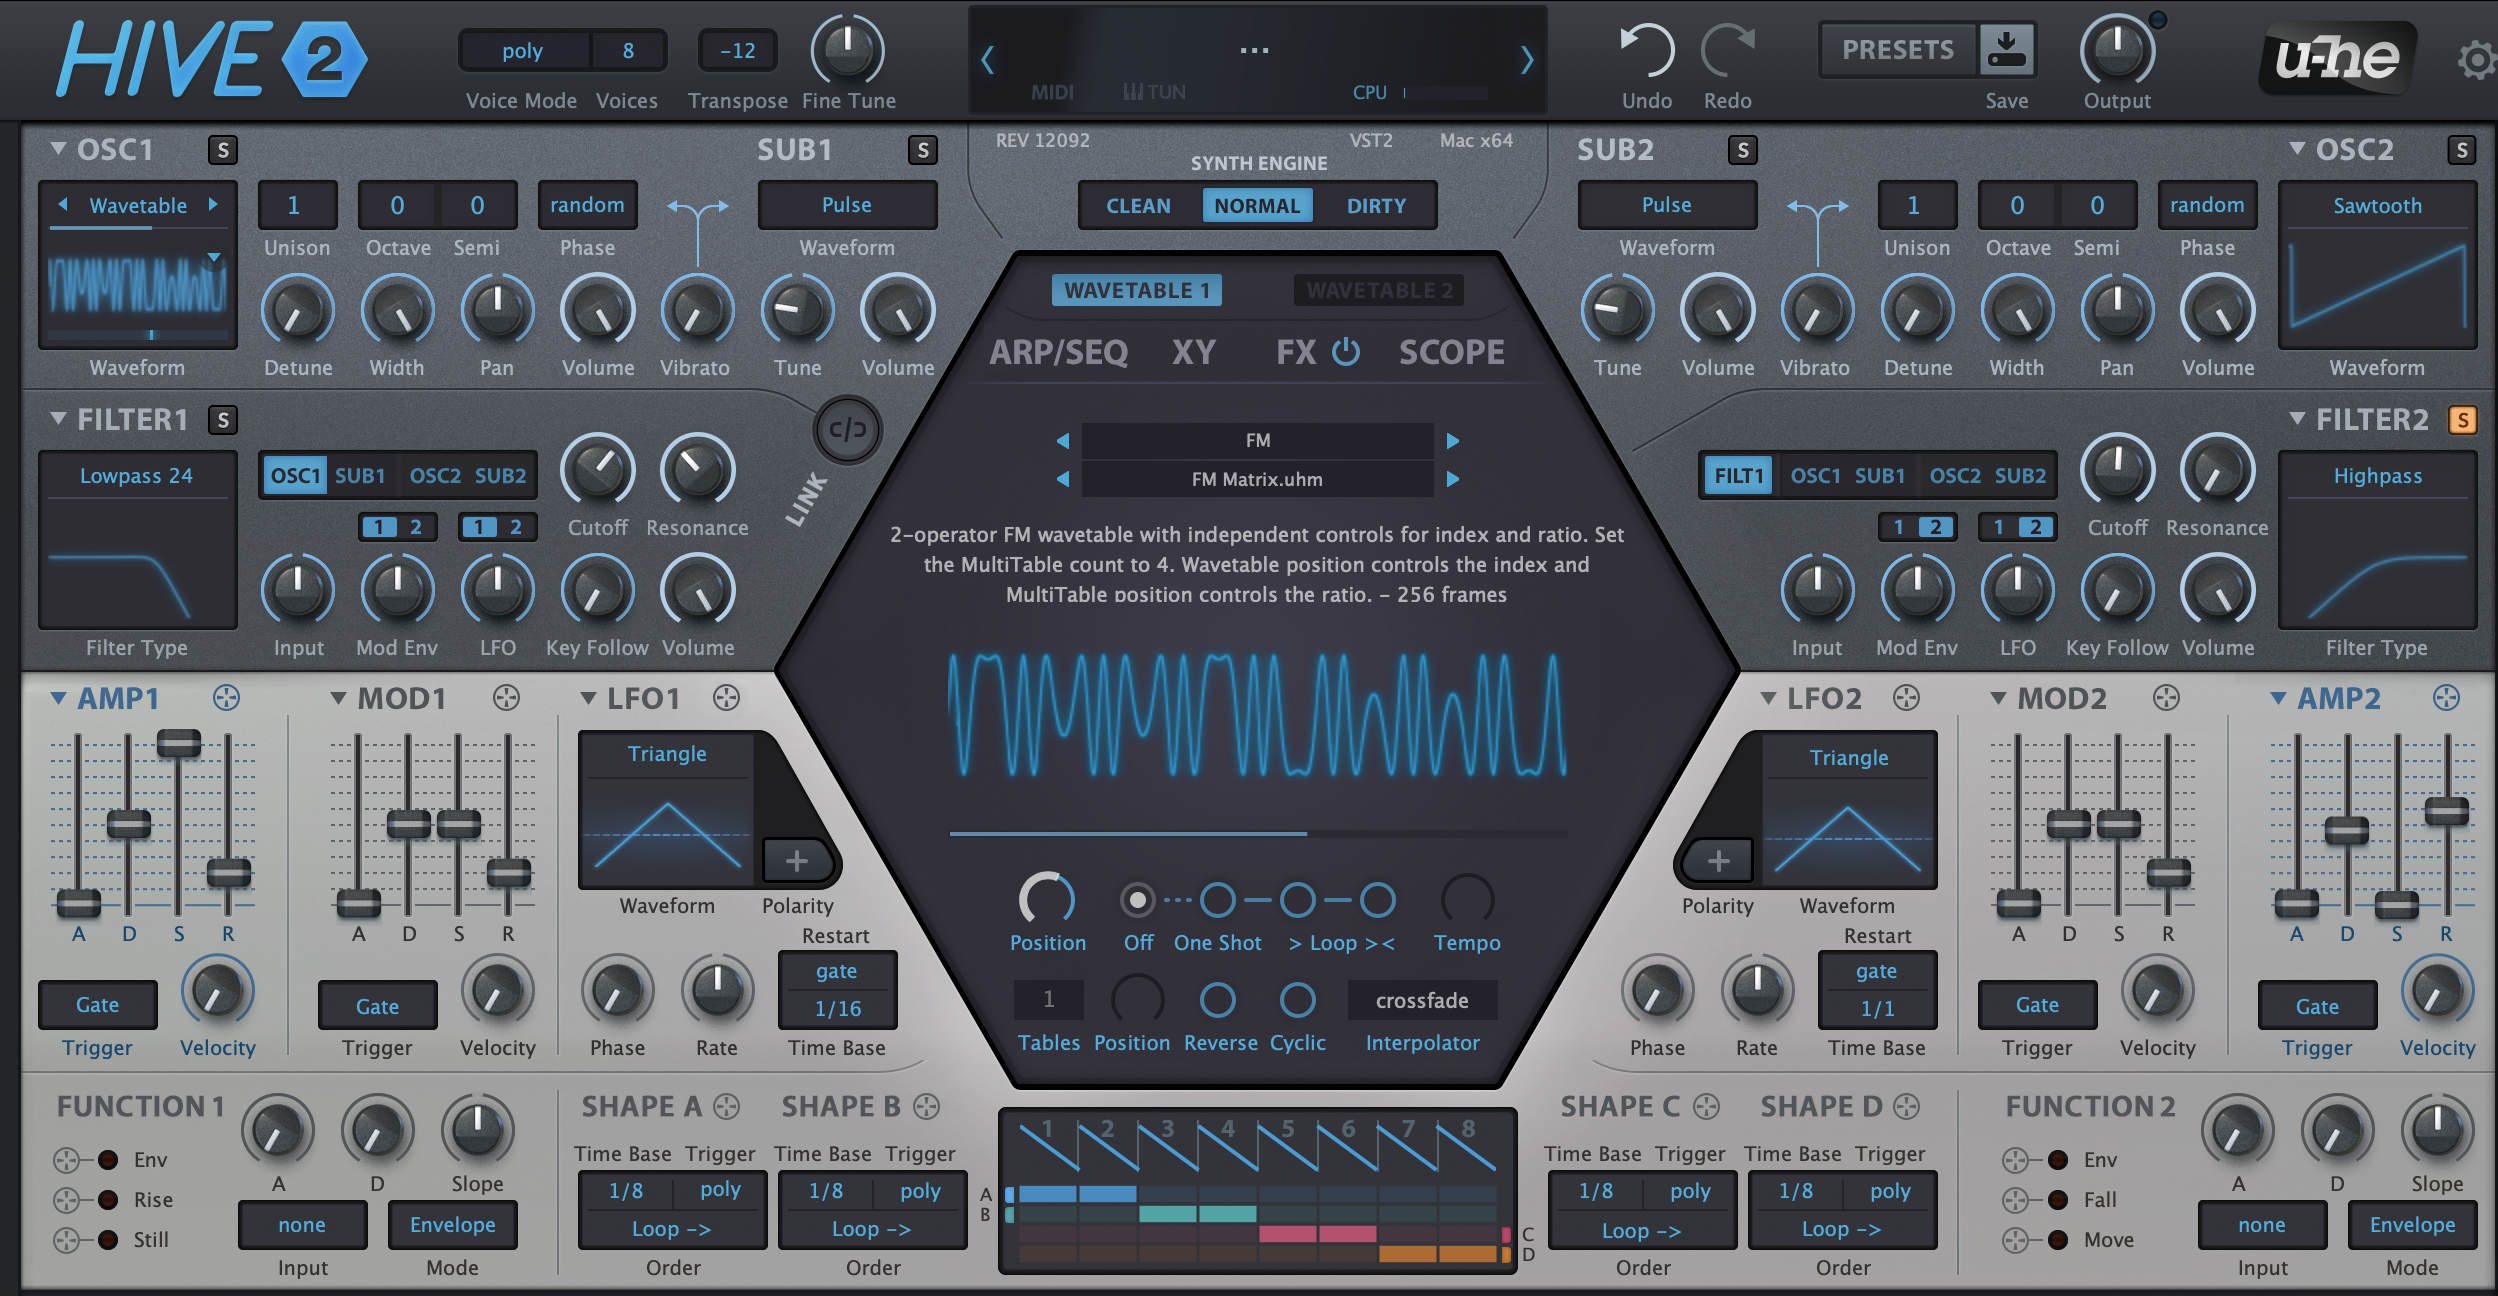
Then we’ll move over to the right side of the interface in the section labelled Filter 2. We’ll click the word FILT1 in the small menu next to the cutoff and resonance knobs. Activating this routes the output of filter 1 to the input of filter 2. Now as it is, both filter 1 and filter 2 are passing audio to the main outputs. Let’s hit the small s next to the word “FILTER2” to solo filter 2’s output. Now we’re hearing both filters in series.
Now set filter 2 to high pass and put the cutoff at about 12 o’clock.
One last part for this step; the output of filter 2 goes to the input of amp 2, so let’s shape the amp envelope a bit. In the AMP2 section, pull the decay down to about 40%, the sustain to 0, and increase the release to about 55%. Now we have something resembling bells.
Step 3: Add motion
These bells are much too static and need some evolution. We’ll do a couple of things to achieve this. First, we’ll use an envelope to modulate the wavetable position. Next to AMP1, you’ll see MOD1. That’s the envelope we’ll use.
First, route MOD1 to the wavetable position by clicking and dragging the crosshairs from MOD1 to the Position knob in the wavetable editor. Then you can click on the newly-appearing orange dot in the middle of the position knob and drag it upwards to increase the effect of the MOD1 envelope on the wavetable position. Don’t overdo it – in fact, it’s a tiny change we’re making. While you’re dragging, you’ll see the modulation strength value displayed in the top centre of Hive 2’s interface. Only set it to a strength of about 10.
Then increase the decay and sustain on the MOD1 envelope to max, and increase the release to about 75%. Hit play and you’ll hear (and see) a subtle change occurring each time the note hits.
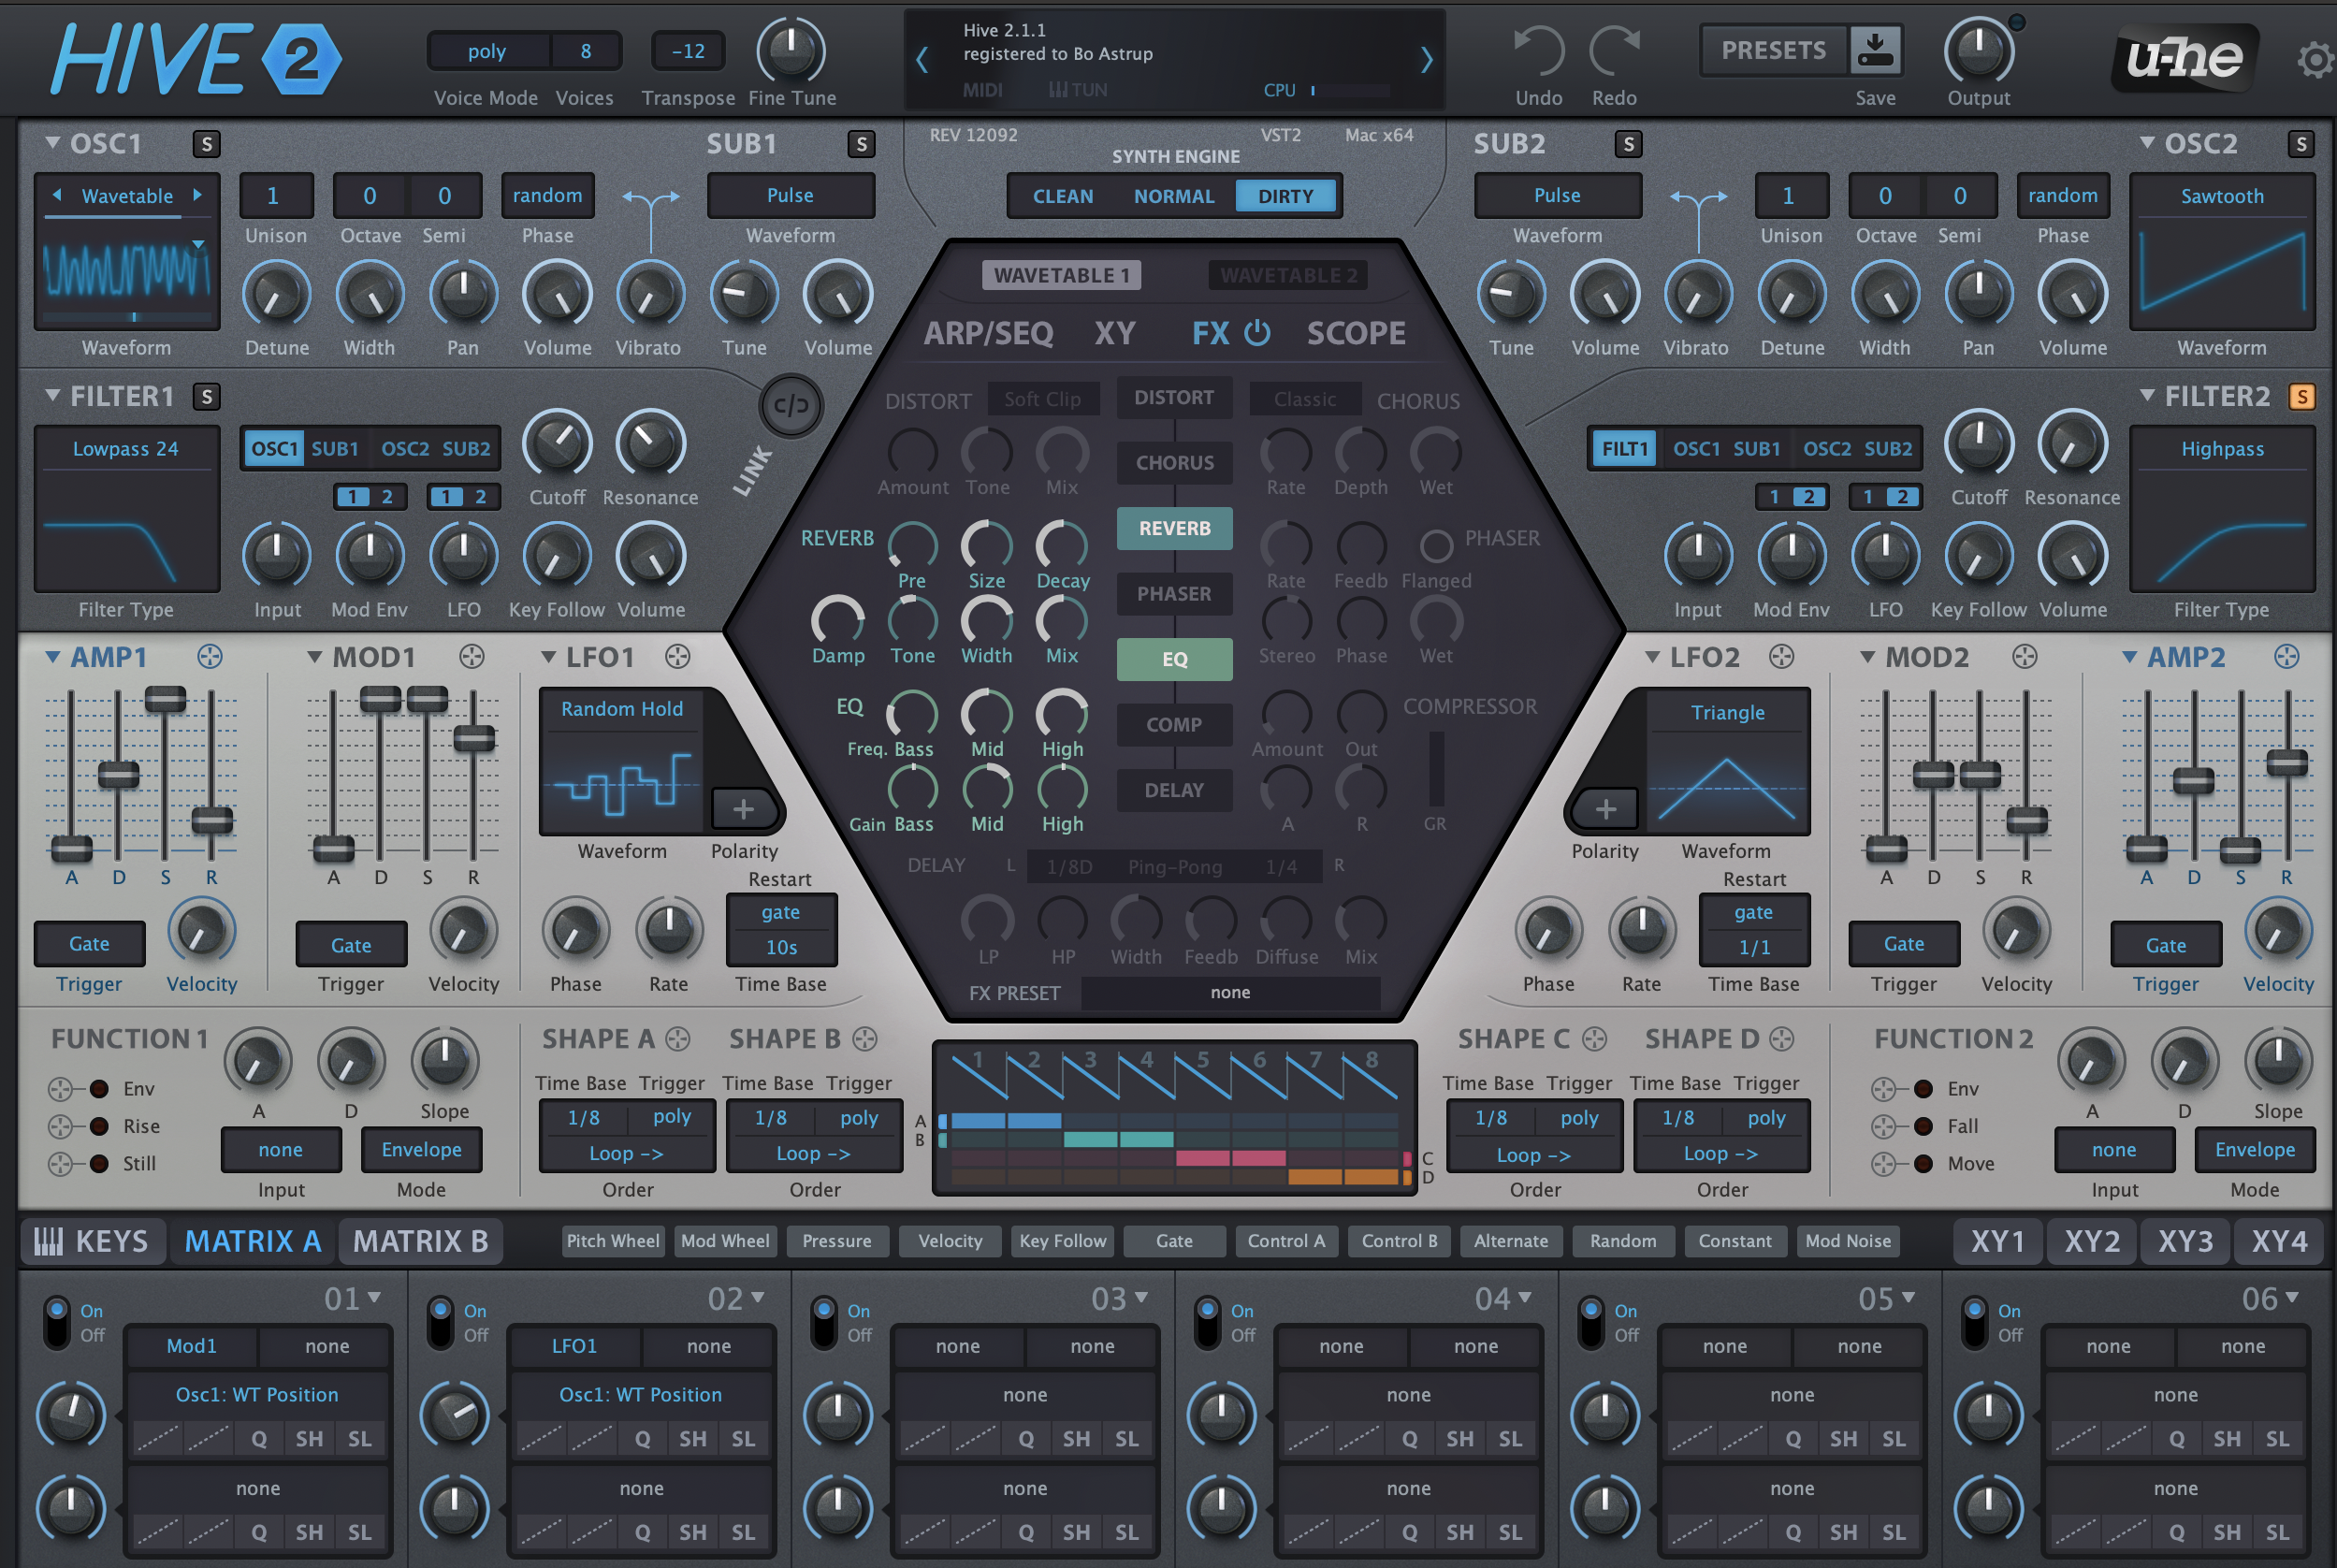
To add some more life to this thing, we’ll also use LFO1. Set LFO1’s mode to “random hold,” and the Time Base to “10s.” Then set the modulation strength to 40 by either clicking and dragging on the orange dot, or by using the mod matrix at the bottom of the interface. Either way, we’ll land right about here:

Step 4: Finishing touches
At the very top of the interface, set the synth engine to “dirty.” I’m not 100% sure I even hear the difference in this context but it just feels right.
Next, click on FX in the centre section to go to the FX mixer. Activate reverb and EQ. Turn the reverb mix up to about 50%, and boost the mids on the EQ by turning the mid gain knob up to about 2 o’clock.
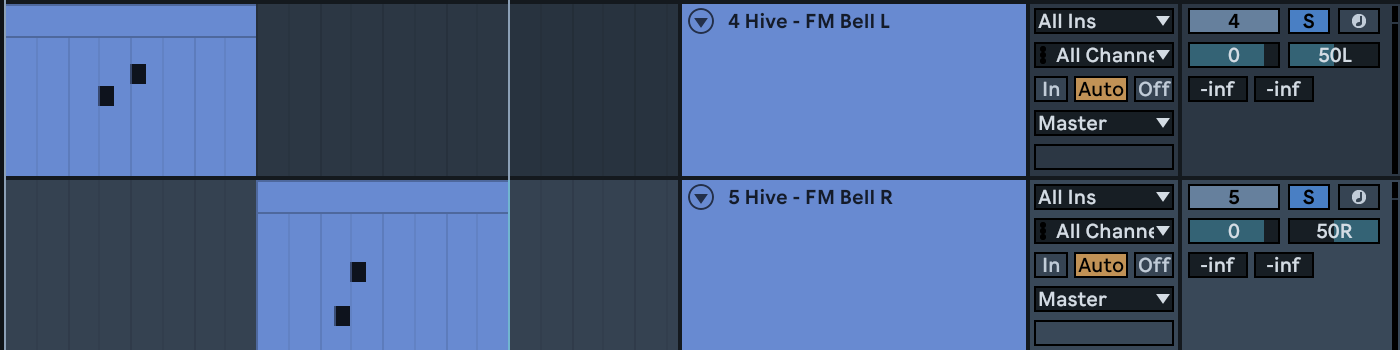
Finally, duplicate this track in your DAW so you have two of the same instrument playing the same MIDI clip. Pan one track hard left and the other hard right. Then cut the MIDI region in half and drag one half to the new track you just created. Now you’ve got a really cleanly-separated wide-panned FM bell that evolves over time.
AND NOW FOR THE BASS
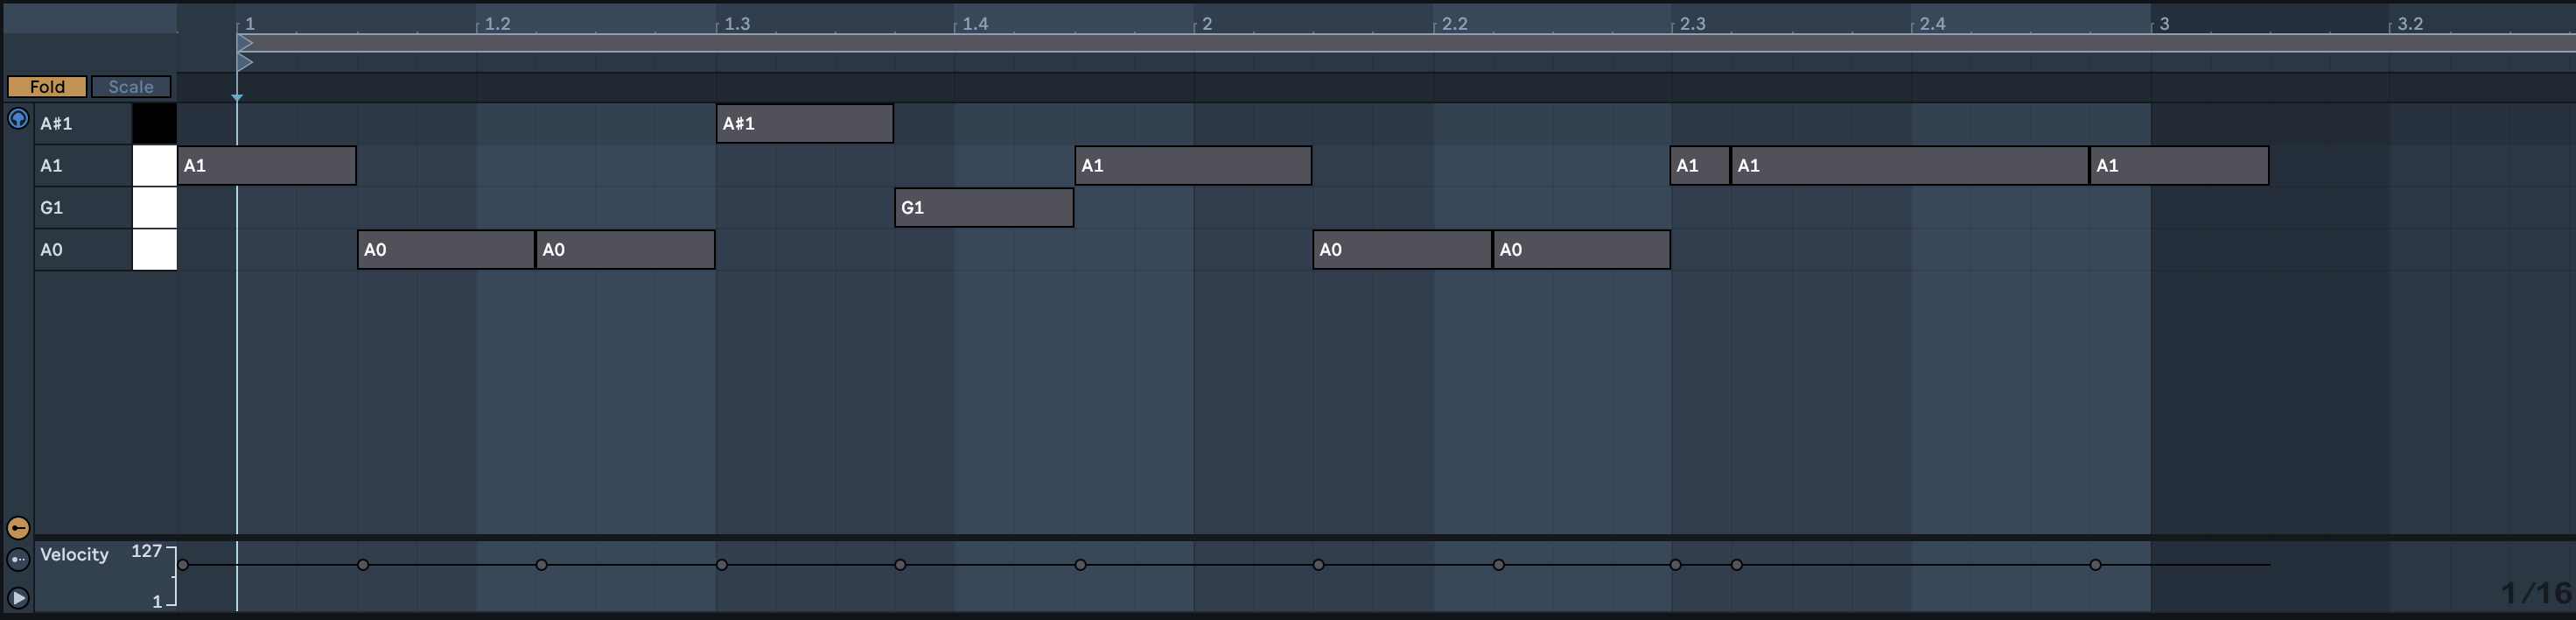
Let’s get to the main event. Create a new instrument track and open an instance of Diva. Use the following MIDI and let’s get started. Note that the last note hangs over the end of our loop, and the first note begins before the play marker. That allows us to have a pickup note in the bass that sounds before the downbeat of the “1.”
Step 5: Bass basics. Bassics.
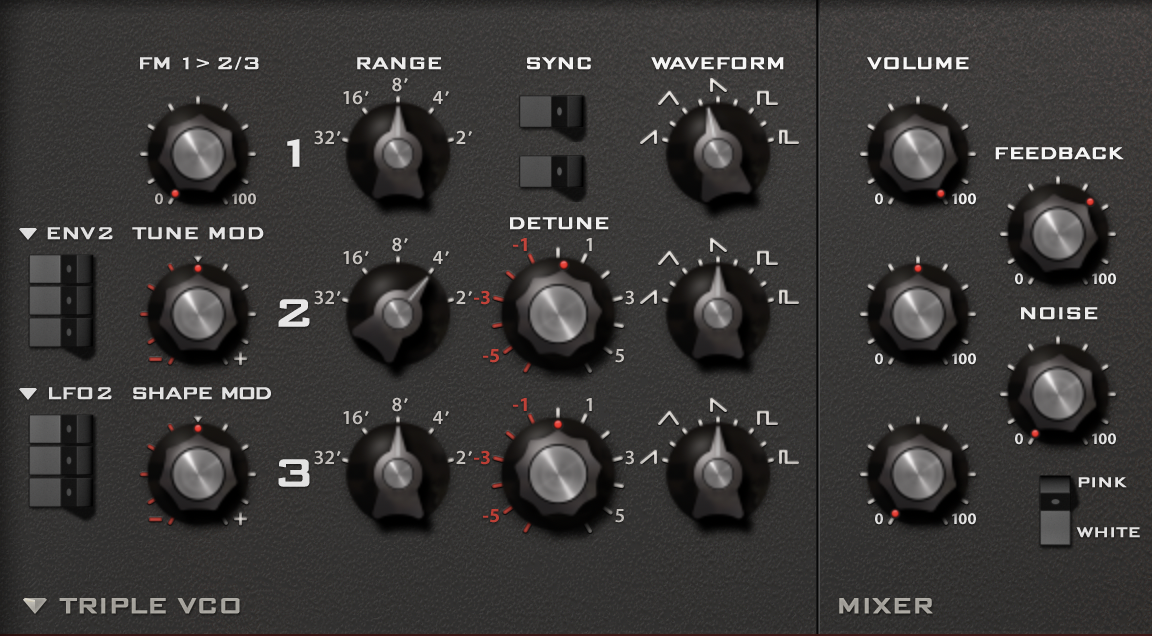
First things first, initialize the patch using the same procedure we used in Hive. Then move over to the WAVEFORM knob for oscillator 1 and move it a tiny bit to the left, not even one full notch, to subtly change the sawtooth wave.
Move down to oscillator 2 and change the octave from the default 8’ to 4’ (one octave higher). Then detune oscillator 2 just a hair, not even a third of a notch.
Now in the mixer section, set the volume for oscillator 2 to about half and turn oscillator 3 down to nothing. Finally, crank the feedback up to 2 o’clock and we have the initial basis (bass-is?) for our sound.
Step 6: Gotta have my filter
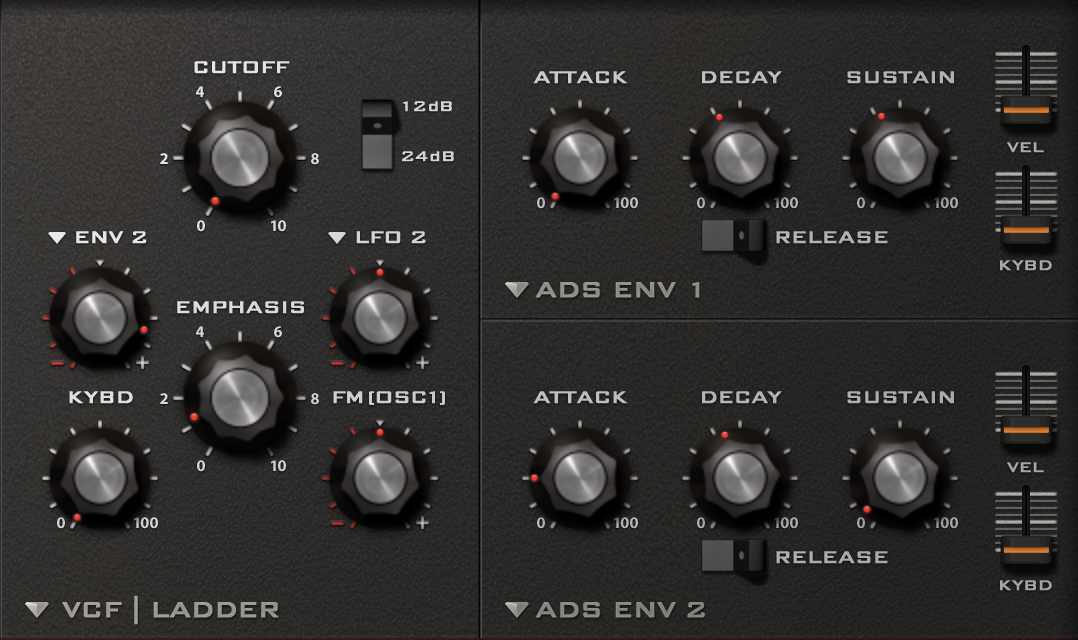
Let’s move to the next section of the synthesizer. The VCF section is set by default to the Ladder setting and we’ll leave it there in all its Moogish goodness. We’re going to modulate the filter a bit with envelope 2, so move the ENV 2 knob to about 4 o’clock, then set CUTOFF to 0 and EMPHASIS to about 8 o’clock.
Now to the envelopes. ENV 1 is automatically set to ADS (attack decay sustain) mode and that will work fine for our purposes. On ENV 1 set decay and sustain both to about 11 o’clock.
Then move down to ENV 2, set attack to 9 o’clock, decay to 11 o’clock, and set sustain just above 0.
Now we’re quite close:
Step 7: Wide as the ocean
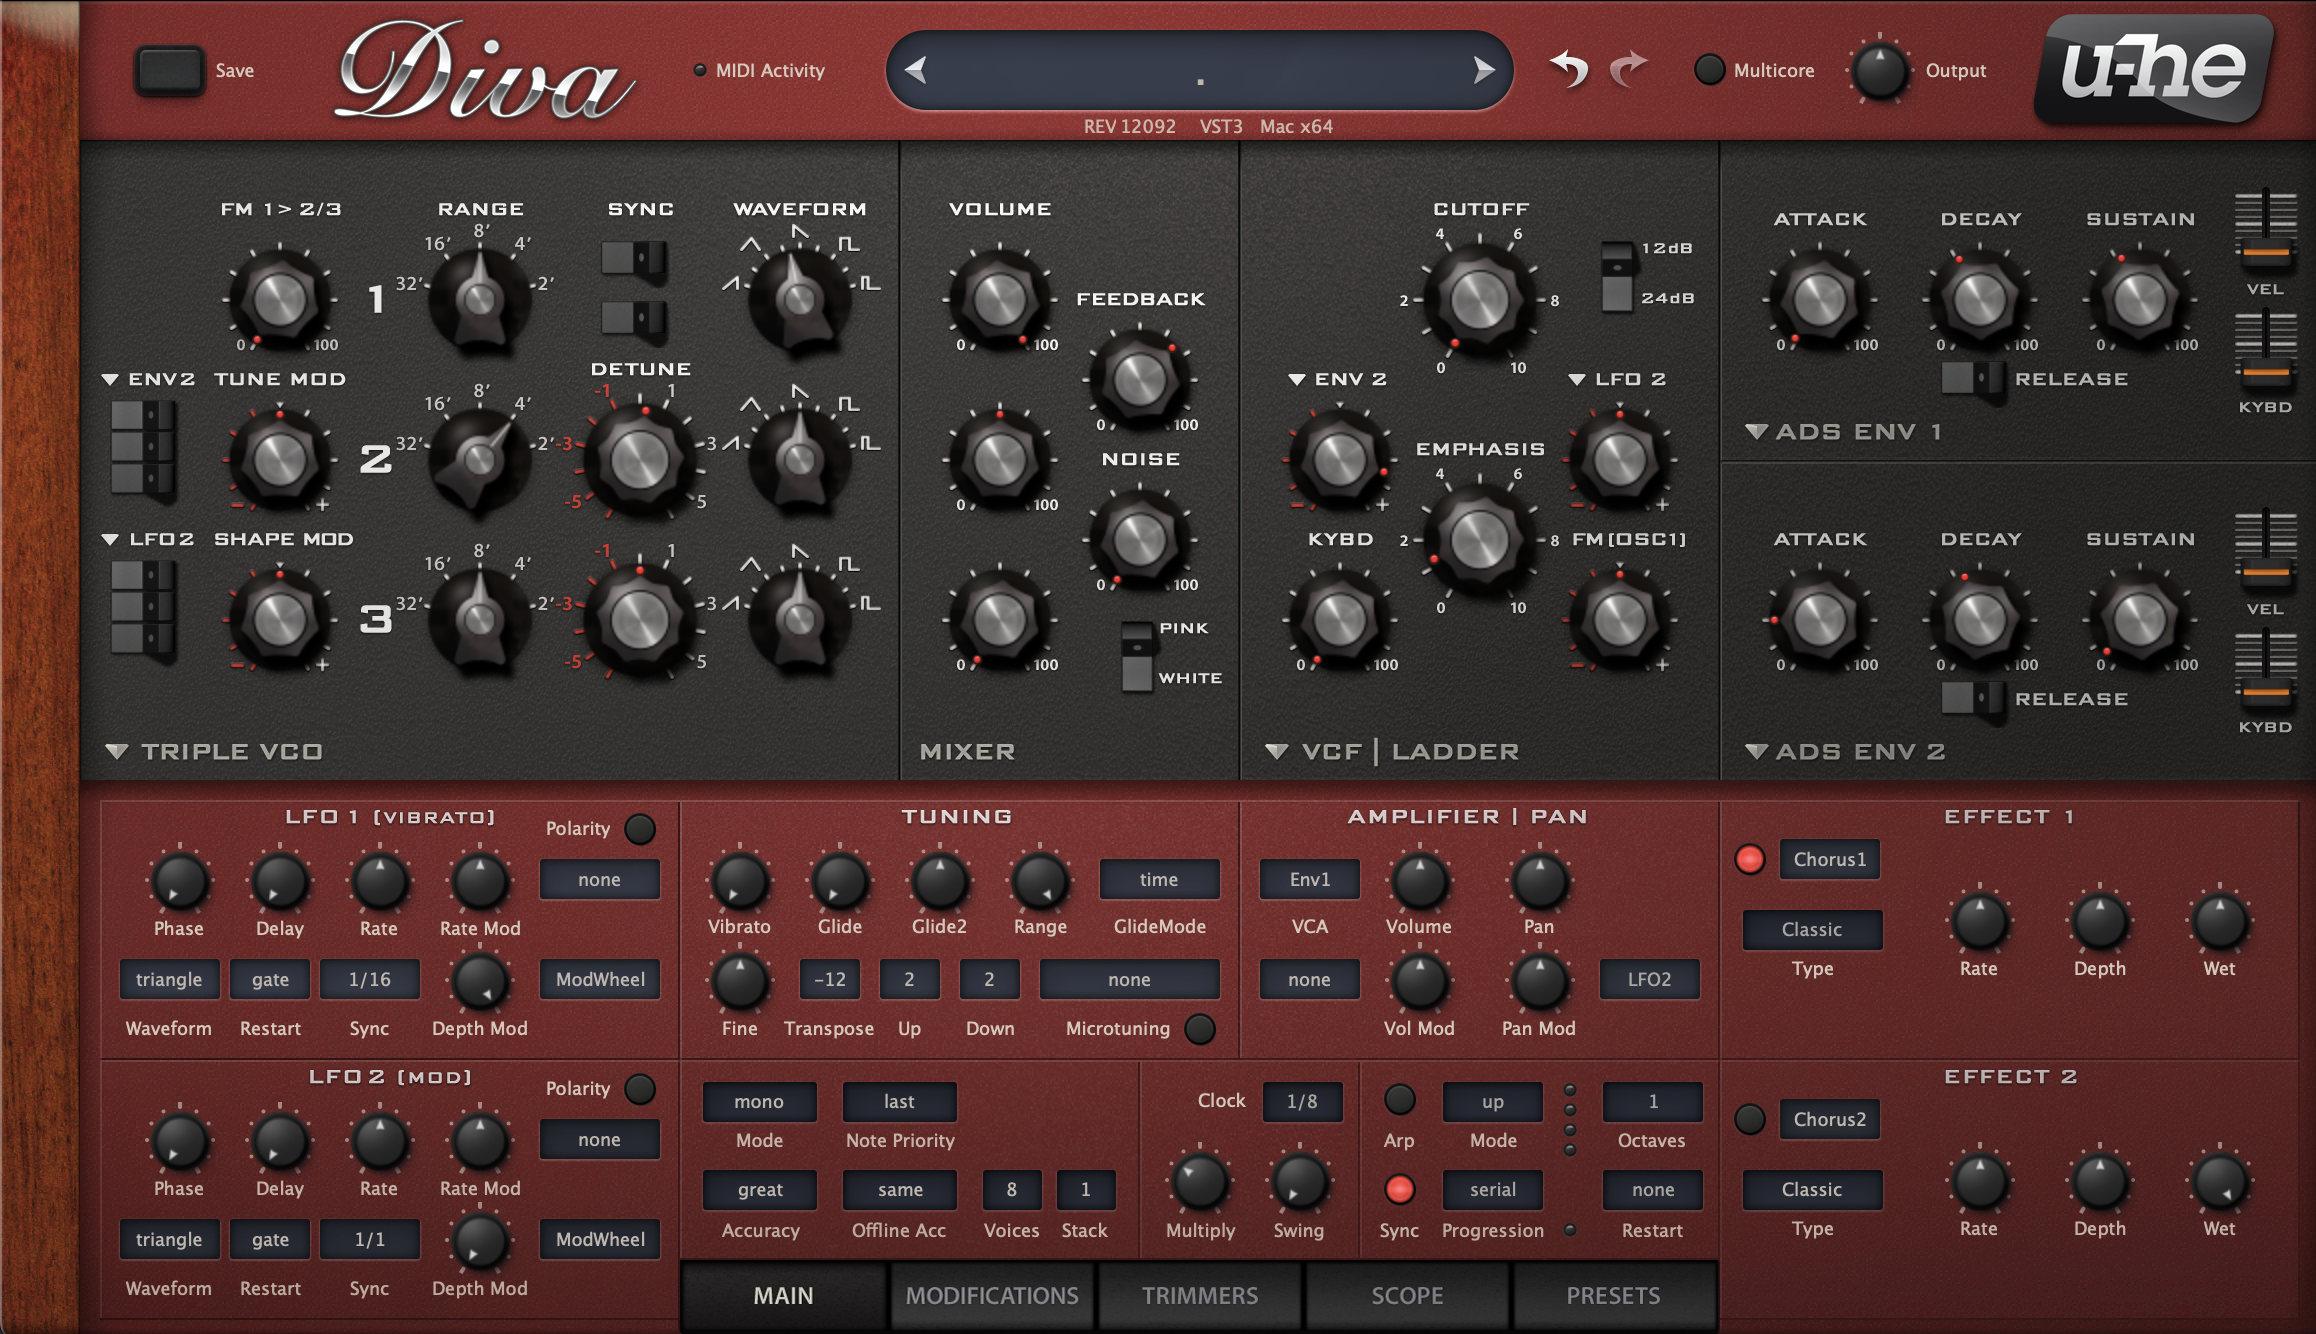
This bass needs to be wide. Very wide. That’s simple enough; just move over to EFFECT 1, activate the chorus, and leave all settings the same besides the dry/wet balance which you’ll change to about 50/50.
For some final touches, change the Mode to mono, in the global section underneath Tuning at the bottom centre of Diva.
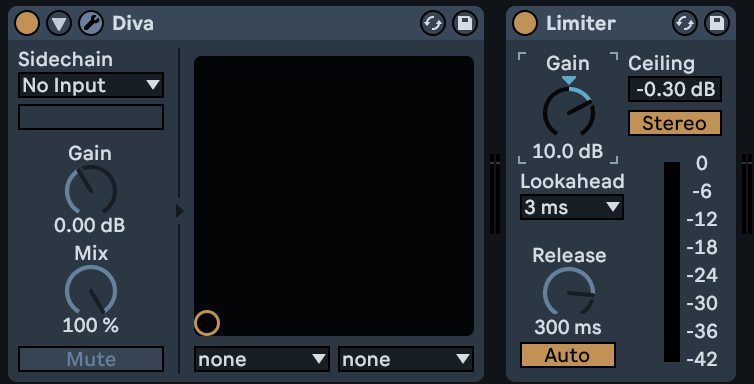
Then, on your instrument track, bring in a limiter and push the gain a bit, to level off any peaks and give the patch a very uniform, gritty, high-volume presence.
Here it is with our FM bell patch, a bit of ambience from Ableton’s Spectral Textures pack, and a simple techno beat for context:
Clearly, it’s quite fast and easy to make truly useful patches in u-he’s synths which is why many top-billed artists continue to deploy them alongside their favourite hardware. Hopefully, you’ve found some tactics and inspiration you can use to build something lovely yourself.
Want more u-he sound design tutorials? Be sure to check out Attack’s tutorial on creating acid leads with u-he’s Diva.
Want to support us?

The Secrets of Dance Music Production
The world-leading book on dance music production. Comes with samples too.


Replicants – Elektron Analog Rytm Sample Pack
Electro sounds for the Elektron Analog Rytm. Free your spirit.

The Producer’s Manual
Everything you need to take a mix, from initial recording to final master.

Follow Attack Magazine
Synth Secrets is sponsored by
u-he are makers of award-winning software synthesisers and effects including Diva, Repro-1, Zebra2, Hive, Bazille, Presswerk and Satin.
Download the demos and try them for yourself at www.u-he.com