u-he are makers of award-winning software synthesisers and effects including Diva, Repro-1, Zebra2, Hive, Bazille, Presswerk and Satin.
Visit U-he
Technique » Synth Secrets »
Learn How To Make Noisia-Inspired Synths With Ableton’s Operator
This channel is sponsored by

In this Synth Secrets, we’ll be showing you how to make an explosive FM lead sound inspired by Noisia’s remix of ‘Hold Your Colour’.
Pendulum’s 2005 track ‘Hold Your Colour’ is a favourite of many drum & bass die-hards. It only stands to reason that Noisia’s 2018 remix of the same tune would be a dance floor devastator, and Noisia surely didn’t disappoint.
In today’s Synth Secrets, we’re going to make a lead sound heavily inspired by Noisia’s work on the track. It’s a straight-ahead, hard-hitting lead that can sound deceivingly simple when you listen in the club or in the car, but you quickly realize upon critical listening in the studio that there are many layers employed in Noisia’s sound design that make the track what it is.
Now we’ll have a go at making a heavily layered aggressive lead as you hear on the drop in Noisia’s Hold Your Colour remix using Ableton’s stock devices and a few easily sourced samples.
The sound on its own:
The sound in the context of a complete track (rebuilt entirely using Live stock instruments and a handful of samples):
Want to follow along? Download the session for free:
Beware, this is a complex sound that requires a lot of layering and processing to get it where it needs to be. It’s not for the faint of heart. ❣️
If you’re ready, get your session BPM to 174 and let’s get started using the MIDI information below.

As ever, click any image to enlarge!
Step 1 – The Basics
We will use Ableton’s Operator, a very popular FM synth, for the basis of the sound. Go ahead and disable oscillators C and D, we won’t be using them. Now let’s start with oscillator A. We’ll increase the amp envelope’s attack to 65 milliseconds.
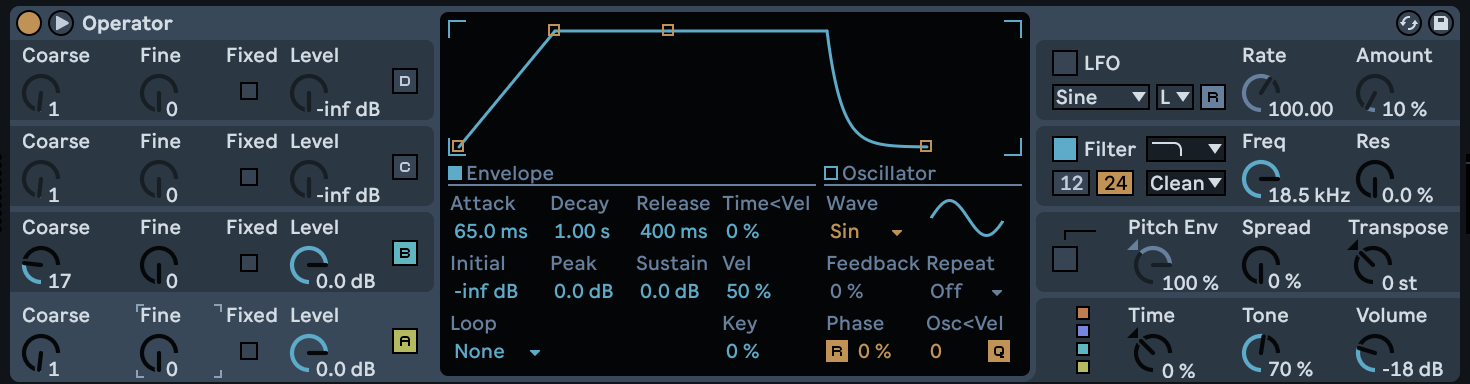
Hop up to oscillator B and turn the Level knob up to max. Then turn the Coarse knob up to 17 to increase its pitch. Then move over to its amp envelope and reduce the Peak value to -24.
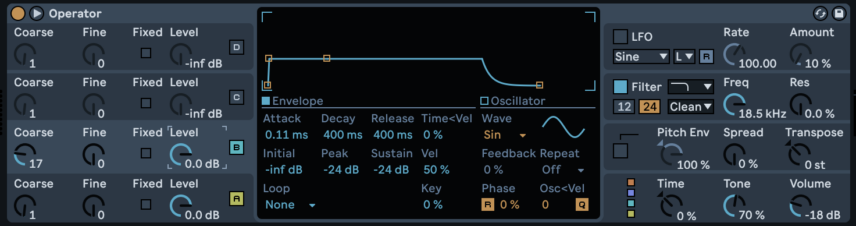
Then move over to the filter section, increase the cutoff frequency to 18.5 KHz, and decrease the resonance to 0%. This gives us a bit of harmonic complexity compared to just a simple sine wave.
Then move over to the Volume knob on the bottom right of Operator’s interface and set it to -9 dB.
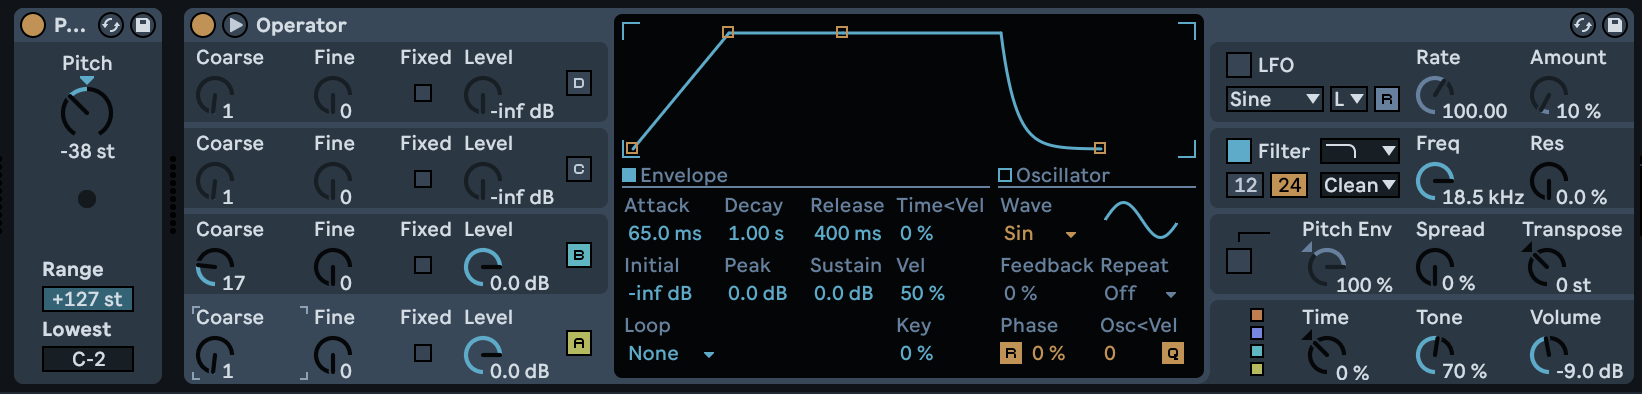
The last part of this step is to drop the pitch more than three octaves (–38 semitones, to be exact), using Live’s Pitch MIDI effect, so the overtones fall from the very high frequencies into the mid-range, taking centre stage.
Step 2 – Grit
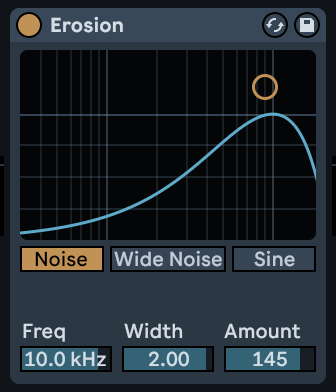
There are many things that Noisia is good at. One of those things is distorting sounds until they’re something completely different. Let’s do that. This will happen in a couple of phases. Start with an instance of Erosion. Set it to Noise mode, then set frequency, width, and amount parameters to 10 KHz, 2.0, and 145, respectively.
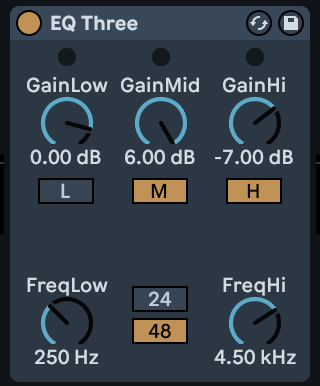
Then we’ll give this sound an edge by using an instance of EQ Three and killing the low frequencies entirely. We’ll disable the lows, boost the mids by 6 dB, and cut the highs by 7 dB. We’ll also change the high crossover frequency to 4.5 kHz using the FreqHi knob.
We’re getting somewhere…
Step 3 – Grit, continued
You can get some special results when you add ambience to a sound and then crush the ambience. The result is otherworldly. We want that kind of thing, so we’ll start by using an instance of Hybrid Reverb.
Set the reverb to all convolution and no algorithm by turning the Blend knob all the way left to 100/0. Then select the Convolution IR category Halls and choose the IR BigClear. Then reduce Decay all the way to 425 ms and turn Dry/Wet down to 12%.
Finally, turn the Stereo knob down to 35% to narrow and focus the reverb in the stereo field. This effect is very subtle on its own but once compressed and saturated, it adds a tremendous amount to the sound.

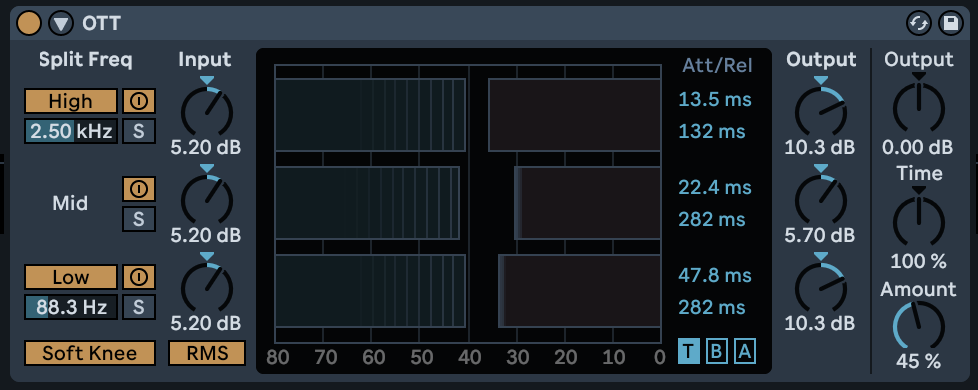
So let’s finish that process. Find the OTT preset for Live’s Multiband Dynamics module by searching in the browser. Double-click on it, then pull the Amount knob down to 45%.
Then add a Saturator, push the drive up to max, switch the mode to Soft Sine, and then turn the Dry/Wet knob down to 12%. We should have something that sounds like the sound below – now listen to it in your session and, while it’s on loop, take the reverb in and out of bypass. You can hear for yourself what a profound difference the saturation makes in terms of pulling subtle reverb to the front of the mix.

Step 4 – Another layer
Select all the devices we just created, then group them (using Command+G or selecting “Group” from the edit menu). This groups everything into an Instrument Rack. Some new “handles” and buttons appear at the very left side of the chain – click the one on the bottom, the Show/Hide Chain List button. This allows us to see all the instruments living on one instrument track. Currently, it’s just one.
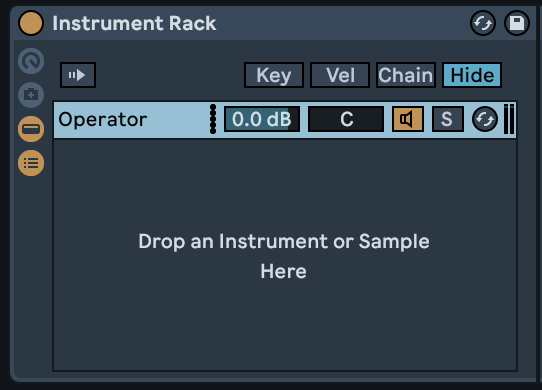
So let’s add another. Create a new chain with an instance of Simpler on it by finding Simpler in Live’s browser, and clicking and dragging it into the chain list.
Quick tangent – a great way to get your ear on different components that make up a layered sound is to add an instance of Auto Filter to the sound you’re analyzing, switch it to bandpass (BP) mode, and scan up and down the frequency spectrum to spot different sounds.
If you do it on the lead in Noisia’s ‘Hold Your Colour’ remix, you’ll detect something that sounds like… a xylophone? Even if they didn’t actually use a xylophone in their track, there are some definite xylophone overtones in there, so let’s drag a xylophone one-shot into Simpler.
The one I’m using comes from a Roland TD-7, and you can find that sample for free at https://samples.kb6.de (visit the site and donate generously!). When you solo the Xylophone layer you might wonder “what are we doing here?” Follow along to find out…
Step 5: Sample Mangling, Part I
We don’t actually want our patch to sound like a xylophone, but we want some of those harmonics. Let’s manipulate the sample to make it blend into our Operator patch and make something we want to use.
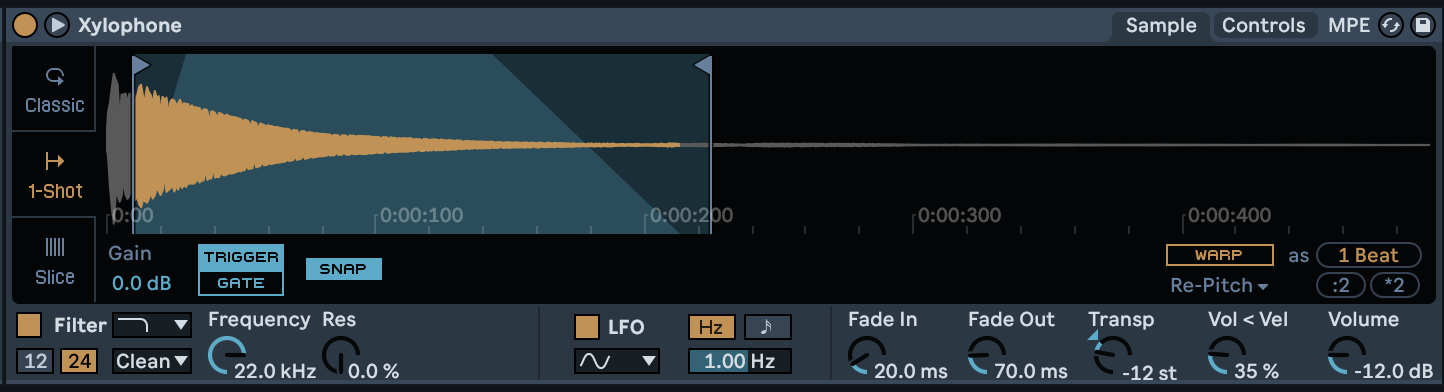
First, change Simpler’s mode from Classic to 1-shot. Move the sample start marker forward a bit so we skip the sharp transient of the sound. Then pull the sample end marker back to about 0:00:150.
Then head over to the five controls on the bottom right of the instrument and set Fade In, Fade Out, and Transp to 20 ms, 70 ms, and -12 respectively. Believe me, we’re getting somewhere.
Step 6: Sample Mangling, Part II
Now we’re going to apply some of those tricks we used on our Operator patch on our Simpler. We’re going to add EQ, saturation, and dynamics processing.
First, add an instance of EQ Eight to the chain (make sure you add it only to the xylophone chain by either dropping EQ Eight onto the word “Xylophone” in the Chain Viewer on the right or dropping it directly into the signal flow after Simpler but before the right “handle” that denotes the end of the instrument chain).
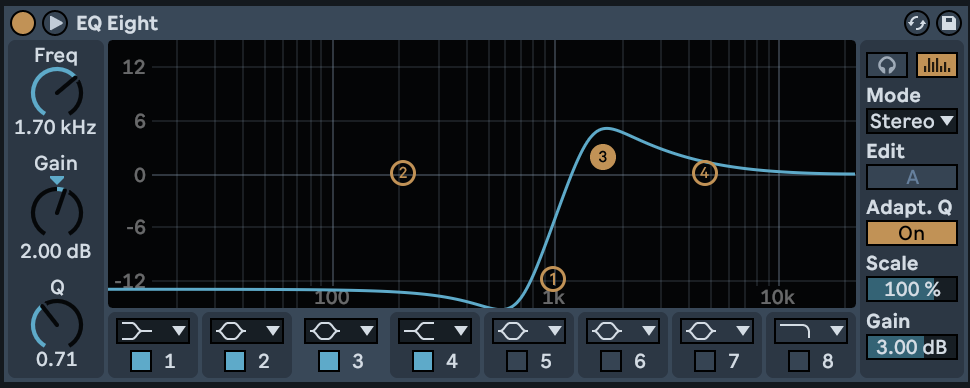
Select band 1, then change the frequency to 1.00 kHz and the gain to -13.0 dB. Then select band 3, set the frequency to 1.7 kHz and boost the gain by 2 dB. Then set the overall output gain of the module to 3.00 dB using the Gain knob on the bottom right.
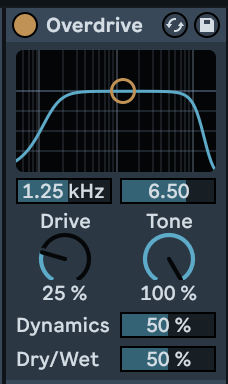
After the EQ, add an Overdrive audio effect, turn Drive to 25% and Tone to 100%.
Finally, drop another OTT on that chain, this time leaving the Amount knob at 100%.
Let’s listen to our xylophone layer soloed:
And now blending it with our operator layer, you’ll start to hear why we did what we did. It’s subtle, but it adds a lot.
Step 7: Add Impact
There’s a third layer to this sound. There’s definitely a noisy, washy, impact-type element here. We’ll get that by layering a percussion sound that’s soaked in reverb to our instrument rack. Create another chain on this track, add Simpler to the chain, and this time drag in the sample ‘TSP_NOISIA_snare_808_casper_clapster’ which is easily found and bought on Splice. You could use any good percussion sound but using Noisia in Noisia just seemed fitting.
Leave all of Simpler’s settings as-is. Then add a Hybrid Reverb to the chain, select the Berliner Hall LR impulse from the Halls category, turn the Blend knob to 100/0, pull the decay down to 750 ms, and crank the Dry/Wet balance to 100%.
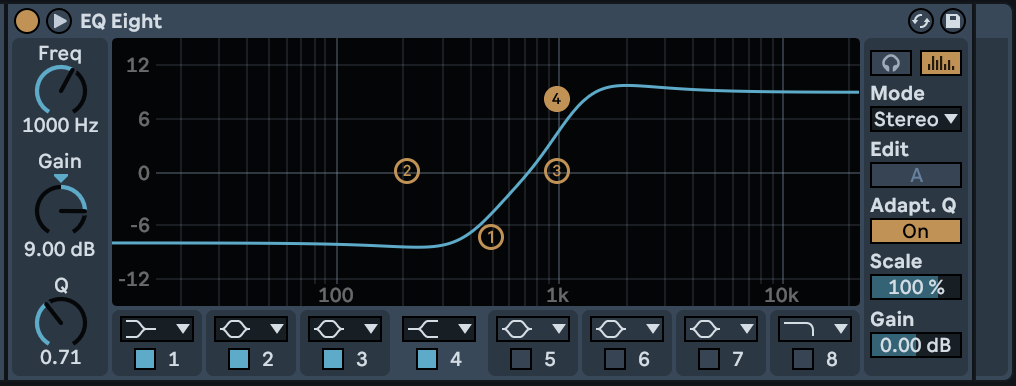
For the next effect, add an EQ Eight, set band 1’s frequency to 500 Hz and gain to -8 dB. Then select band 4 (the high shelf), set the frequency to 1000 Hz and gain to 9 dB, brightening the sound drastically. We’re getting close!

Step 8: Now Make It Gel
Finally, we’re going to add some buss processing to glue everything together. Each effect we’ve used so far has only affected one chain. Now we’ll add effects to our instrument track after the instrument rack, affecting all chains.
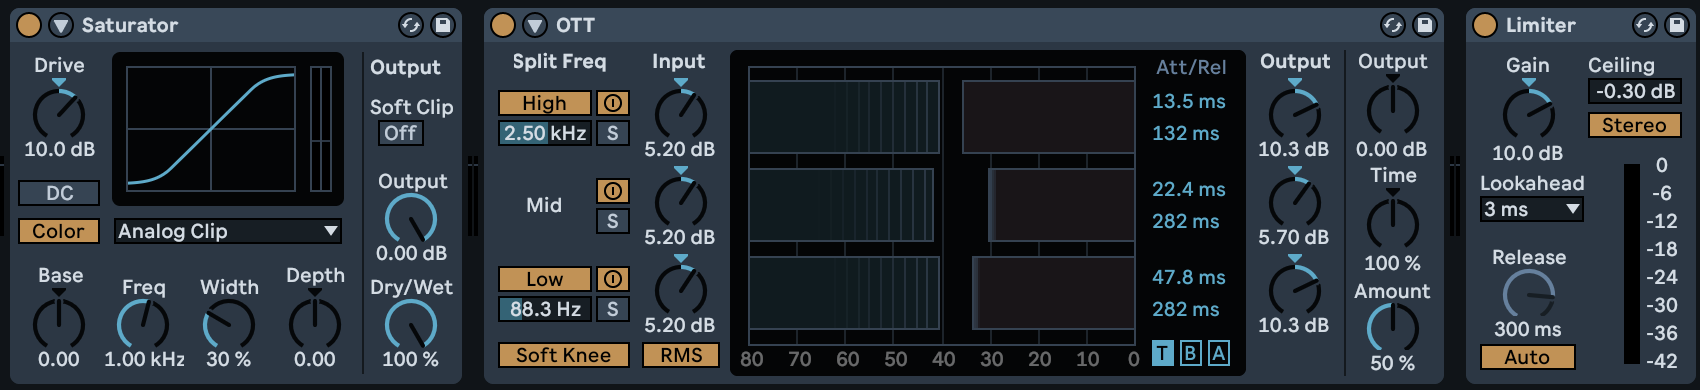
It’s simple stuff – just add a Saturator and turn the drive up to 10 dB, then add another OTT (remember, that’s a preset for Live’s Multiband Dynamics effect that comes with Live Suite. OTT stands, of course, for Over The Top, which it is) and set the Amount knob to 50%. Finally, add a Limiter and set the gain to 10 dB. Now we’re crushing the daylights out of it.
Once again, let’s hear it in the context of a mix, with a bit of master 2-buss processing added:
To see what else we’ve done to pull the mix together, sign up for emails and download the session!
Want more sound design tutorials? Make sure to check out the rest of Attack’s Synth Secrets.
Attack Store

Push Turn Move
Push Turn Move celebrates the art and science of interface design in electronic music by exploring the functional, artistic, philosophical and aesthetic worlds within the mysterious link between player and machine
49.99

Patch & Tweak with Moog
An immersive modular synthesis experience which makes a lovely gift.

Follow Attack Magazine
Synth Secrets is sponsored by
u-he are makers of award-winning software synthesisers and effects including Diva, Repro-1, Zebra2, Hive, Bazille, Presswerk and Satin.
Download the demos and try them for yourself at www.u-he.com