Using a Synth’s built-in sequencer TO creaTE melodies
When creating new synth melodies, most of us probably reach for the keyboard to get ideas down. However, many soft synths features built-in sequencers that can provide creativity of a different kind and sometimes present us with ideas we wouldn’t normally create using the keyboard.
Each built-in sequencer works differently, but in this walkthrough we’ll be using D16’s Phoscyon synth, a Roland TB-303 emulation, to create this acid-style hook:
Step 1
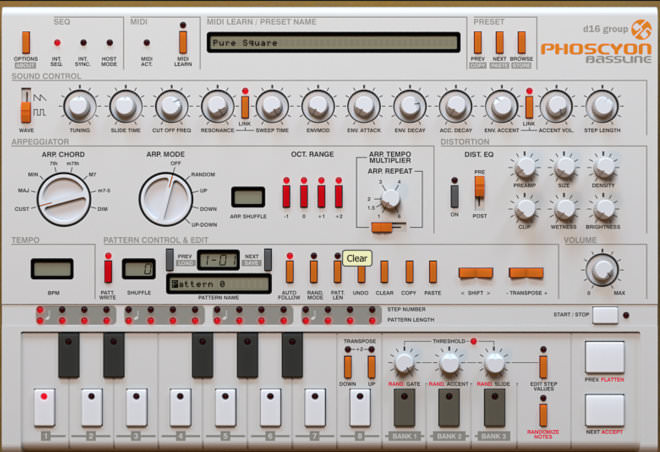
To get started, load an instance of Phoscyon in your DAW. By default, a pattern is already loaded and will trigger on playback. Importantly, the Seq settings in the top left of the synth are set to INT.SEQ, with INT. SYNC and HOST MODE turned off, this means the internal sequencer will trigger the synth but it will sync to the host tempo of the DAW.
We want to create our own pattern here, so in the PATTERN CONTROL & EDIT section, turn on the red PATT. WRITE button, and also click the orange CLEAR button, this gives us an empty pattern to create our hook.
Step 2
In order to program sequences in Phoscyon, we can first select the STEP NUMBER we want to edit (from 1-16), then select the note for that step using the keyboard. To the right we can TRANSPOSE the note DOWN or UP by octave increments, and we also have three grey keys that trigger GATE, ACCENT and SLIDE. It’s a very similar setup to a real TB-303.
For Step 1, we keep the note as a C, turn on the GATE so the note triggers and also turn on the ACCENT for this step. Adding an accent means the note will play back slightly louder, which enables us to have some nice dynamics in the sequence.
We program Step 2 with the same settings as Step 1, and again for Step 3 except for this step we move the note to F. For Step 4, we keep the note set to C, turn on the gate and slide (but not the accent) and transpose it up by one octave.
Step 3
We then proceed to programme our 16 Step sequence with the following pattern:
Step 5 – C, Gate, Accent.
Step 6 – F, Gate
Step 7 – G#, Gate, Accent, Slide
Step 8 – C, +1 Octave, Gate, Slide
Step 9 – C, Gate, Accent
Step 10 – C, -1 Octave, Gate, Accent, Slide
Step 11 – C, +1 Octave, Gate, Accent, Slide
Step 12 – F, Gate, Accent
Step 13 – C, +1 Octave, Gate, Slide
Step 14 – G, Gate, Accent, Slide
Step 15 – G, Gate, Accent
Step 16 – C, +1 Octave, Gate
For any of the steps where we change the octave, we make sure we activate the slide function. This creates that classic acid portamento effect when the sequence jumps up or down an octave.
Step 4
With our sequence created, we can now start tweaking other parameters of the synth to our liking. On the top right of Phoscyon, we can browse different presets using the NEXT and PREV buttons. We select the ‘Prophet’ preset.
Now below in the SOUND CONTROL section, we crank the RESONANCE right up, pull down the CUT OFF FREQ (for automation at a later stage), take the SLIDE TIME down to halfway, and push up the ENVMOD to three quarters of the way round.
Step 5
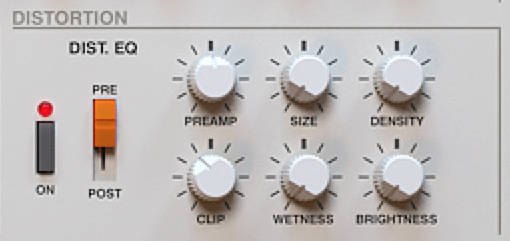
Over in the DISTORTION section, we first activate the effect, then increase the PREAMP setting to half way and the CLIP to two thirds. This adds to that classic acid vibe. We can now start automating the cutoff frequency and experimenting further with the sequencer to develop the idea into a new track.


03.54 AM
Really nice tutorials thank you !
Any way to do the tutorial number 4 with only Ableton ?
08.53 AM
In session view, right click on your audio region and select ‘Convert Audio to New MIDI Track’
10.12 AM
In this case, “Convert Audio to new Midi Track” is going to slice the audio up. If you want to extract the melody, just right click and select “Convert Melody to new Midi Track”
05.40 PM
Thanks for clearing that up Ben!
07.22 PM
I think its fair to say most people can get nice loops going, but moving beyond that can be the problem, fleshing out an idea can be difficult – and loop-mong often sets in…… better off doing some tutorials about that subject………
08.14 PM
This was GREAT! Thanks for all the ideas. I love the fact that I can record my voice and create a midi track out of it.
12.36 PM
Thanks you Ben and Jonny Striate !
08.29 AM
Genius. Thanks for the tips!
09.55 AM
audio doesn’t appear to be working for these examples?
11.05 AM
Thanks for pointing this out Craig.
It appears to be working for us.
Which browser are you in?
Is it all the examples?
06.30 PM
The last tip is really really great, never thought about it.
02.49 PM
I have done this couple of times myself. It’s great trick how to kick off creative process. I never understood why it works so well but recently someone told me that it’s not melody (or notes) itself that is catchy, it’s the rhythm. It might be most boring chord progression ever, but if you play it in cool fashion, add some swing… You’ve got yourself a banger