u-he are makers of award-winning software synthesisers and effects including Diva, Repro-1, Zebra2, Hive, Bazille, Presswerk and Satin.
Visit U-he
Technique » Synth Secrets »
How To Remake ‘Flash Light’ By Parliament
This channel is sponsored by

In this Synth Secrets, we use Ableton’s Wavetable to remake the bonafide head-nodding funk Parliament classic, ‘Flash Light’. We might not all have the magic touch of Bernie Worrell’s fingers but we can get pretty close with Ableton Live’s Wavetable...
Parliament’s “Flash Light” is one of those iconic tracks that you can reliably identify in one note. The classic owes so much of its signature sound to the synthmanship and melodic sensibilities of Bernie Worrell, who played the synth rather than just playing a keyboard – building and modifying his patches on his Moog, in real-time, on stage – which lent his sounds a feeling of life. His playing had a way of making it sound like the synth was talking, singing, or laughing. What’s not to love.
So much of the magic was, of course, in Bernie’s fingers, but a lot of it lies in simply knowing something about his approach and the tools he used. We’ll dive into Bernie’s method by recreating and exploring a few of ‘Flashlight’s’ key synth parts using Ableton’s Wavetable synth.
Here’s what we’re creating today:
And here it is in the context of the track as a whole:
So set your project tempo to 105 BPM – or even better, download the session at the link below to get helpful extras (like a drum loop to work with) – and let’s dive in.
Step 1: Start with the Flash Light ‘dah dah’ bass
Bernie was one of the earliest users of the Minimoog monophonic synth which you hear prominently featured on this track.
Besides the repeating wordless vocal motif (dah dah dah DEE dah dah dah dah dah dah dahhhhh), the bassline is probably the most easily identifiable element of the tune. Let’s dig into the sound.
Reference the MIDI sequence below to get the notes right. If possible, play the notes in with a swung feel to get the organic groove. Flash Light isn’t our usual house or techno fare and it’s played rather than programmed. Nothing about the tune is completely on the grid and that makes it feel good.
If you simply draw the MIDI onto the piano roll, make sure to apply a groove to the MIDI by visiting the “grooves” section of Ableton’s browser. Locate “Swing 16ths 59” and drag that groove onto the MIDI loop you’ve sequenced which looks just like this:

Call up an instance of Ableton’s Wavetable instrument on this track. For starters, we’ll get the oscillator section right.
Starting from the left, just get it over with and turn the sub oscillator on, and pull the tone setting up to about 25%. Set the octave to 0 rather than the -1 default.
Then move over to Oscillator 1, choose the Vintage category of wavetables, and then select the Miniwaves wavetable to get an assortment of Minimoog sounds. Move the oscillator position to 40% (or just click on the saw wave on the graphical interface). Now jump all the way to the right of the synth and switch the voicing mode from the default Poly setting to Mono, and set the glide to 45 ms.
We should have something like this:
Step 2: Bringing in oscillator 2, balancing the sound and refining the amp envelope
Though what we have right now sounds fat, it isn’t quite right yet.
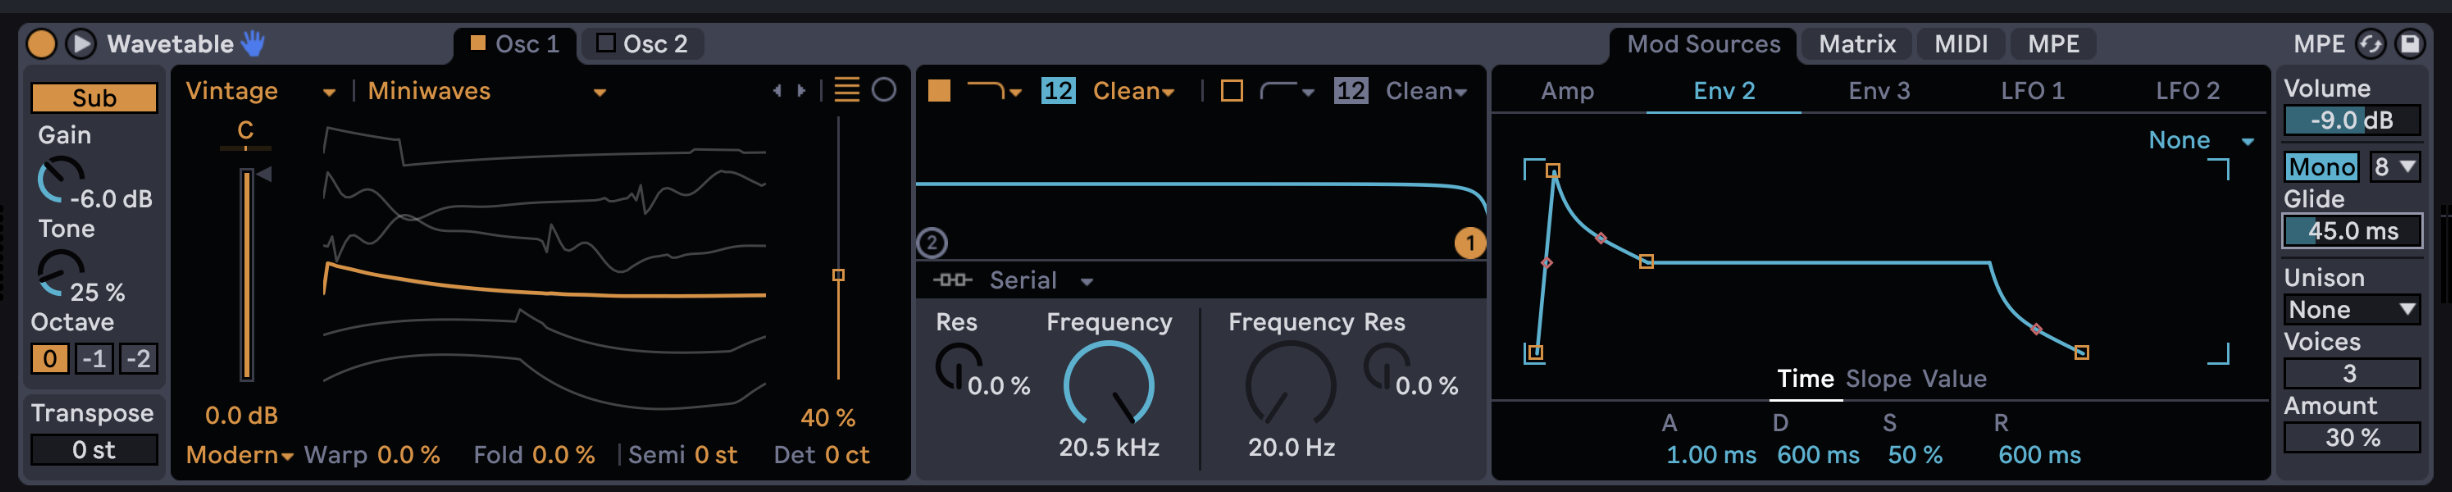
Click on the Oscillator 2 tab, activate the oscillator with the button up top, and again select the Vintage category and the Miniwaves wavetable. This time we’re selecting the square wave at the top at oscillator position 100%. We’re also going to change the pulse width by moving to the bottom of the oscillator section, changing the oscillator effect setting from None to Modern, then setting the Warp value to -25%. Just a bit to the right, set the Semi value to -12 to transpose this oscillator down one octave.
Then move over to the amp envelope section and pull the release down to about 15-20 ms to get a tighter, punchier bass. Finally, to balance the tone out a bit, pull the volume down on oscillator 2 about 3 dB, and move back over to oscillator 1 and pull it way down, in the neighborhood of 17 dB. This will drastically alter the sound and get us in the ballpark of where we want to be.
Here’s our progress so far:

Step 3: Filter flavour
You can’t talk about the sound of a Moog without talking about the sound of its filter. The Moog Ladder Filter is a critical part of its sound. So in the filter section of Wavetable, switch from the Clean filter type to PRD, which Ableton describes as “A ladder circuit without resonance limiting.” That’s the ticket.
Set the resonance to about 20% and the frequency around 1500 Hz. You can go lower for a darker tone if you like. Then we’ll use the amp envelope to modulate the filter cutoff. Open up the Matrix tab in the modulation section, click on the frequency knob in the filter section to force Filter 1 Freq to become available as a modulation destination, then set the Amp column value to 15 on the Filter 1 Freq row.
And now we’ve got the sound.

Step 4: Play that funky mod wheel
For this Flash Lights Synth Secrets, we wanted to go beyond the usual realms of the series and cover a few more things to get that Parliament sound. We wanted to squeeze in another standout feature. Though the main bassline doesn’t make use of this feature, you hear it used in other licks peppered throughout the song.
This part works best if you’re inputting notes with a MIDI controller but it can also be perfectly handy if you’re going to program automation to liven up the sound. A classic and extremely common trick on a synth patch is to add vibrato that’s activated by the mod wheel. To accomplish this in Wavetable, first click on the MIDI tab in the modulation section, and note in the Mod column that there’s a value of 100 in the Osc 1 Pos row. By default, the mod wheel is programmed to change the oscillator’s wavetable position. Select that value and delete it.
Then click on the “matrix” tab and set the value in the LFO 1 column and the pitch row to 1. Now the LFO will bend the synthesizer’s pitch by one semitone.
Then click on the words LFO 1 in the matrix to take you to LFO 1’s controls. Change the rate to something like 8 Hz. While you’re there, click on the Amount value – don’t adjust it, leave it at 100%, just click on it. This will make “amount” an available value in the Matrix, MIDI, and MPE sections. Click on the MIDI tab and set the value at the intersection of Mod and LFO 1 Amount to 100. Now, when you move the mod wheel you should get a lively vibrato.
With funky playing and copious use of the pitch and mod wheel, maybe you can cop the same animated vibe that Bernie did.
Here’s the funky mod wheel:

Step 5: Add strings
A standard part of Bernie Worrell’s Flash Light arsenal is the string pad, and you hear it all over Flash Light, starting in the first bar. It’s a simple sound that Bernie likely got by using an Arp Solina String Ensemble. Though it would be nice to have such a lovely vintage piece of kit, it’s, fortunately, a somewhat simple machine that has instant recall presets made up of relatviely simple saw and square waves with loads of chorus on tap.
First things first, get the notes right – create an instrument track and sequence a loop that looks like this:

Then drop an instance of Wavetable on the track and let’s get to it.
Let’s start in the oscillator section by selecting the JUP SawPulse wavetable from the Vintage category and set the oscillator position to about 65%. This vintage tone evokes the vibe of the Roland Jupiter 8 and it’s just what we need. Then set the amp envelope up so that the attack (A) reads about 25 ms, decay (D) about 1.00 s, sustain (S) reads about -4 dB, and release about 125 ms.
Here’s our progress:

Step 6: Add complexity
This sound is obviously a bit too in-your-face to make a passable string patch. We need some complexity, some funky phase relationships, some things that soften and widen the sound.
For starters, activate oscillator 2. Select that same JUP SawPulse wave, set the Semi to -12 st, which transposes this oscillator down one octave, set the oscillator volume to about -4.0 dB and the wavetable position to about 75. Play a few notes, then set the detune (Det) setting to about 8 ct, which gives just enough detune to give oscillators 1 and 2 a kind of chorusing effect when played together.
Here’s our progress so far:

Step 7:
Now move over to the filter section. The low pass filter is already turned on, but we want to switch the high pass filter on as well. Set the resonance on both filters to about 50%, set the frequency on the low pass filter to about 4.5 KHz and set the high pass to about 1.5 KHz. This gives the whole thing a kind of nasal sound that fits the vintage vibe.
Now pull the volume on the whole synth down to about 20 dB. This is a pad after all, we don’t need it slapping the listener in the face.
For final touches, drop on an instance of Ableton’s Chorus-Ensemble audio effect. Select the “ensemble” setting, set width to 100%, bring the rate to 2.20 Hz, crank the warmth up to 100%, and leave everything else the same. Then throw on a Reverb audio effect pull the Dry/Wet mix down to about 40 and now you’ve got a pretty good stand-in for a vintage string machine.

Turn The ‘Flash Light’ On
Here is our music part’s played on solo:
…and in the context of the track
Hopefully, this gives you some vintage synth inspiration!
For more Synth Secrets and specifically Wavetable tuition, follow this link. Enjoy!
While you're here, you may enjoy...

The Secrets of Dance Music Production
The world-leading book on dance music production. Comes with samples too.

Replicants – Elektron Analog Rytm Sample Pack
Electro sounds for the Elektron Analog Rytm. Free your spirit.


Synth Secrets is sponsored by
u-he are makers of award-winning software synthesisers and effects including Diva, Repro-1, Zebra2, Hive, Bazille, Presswerk and Satin.
Download the demos and try them for yourself at www.u-he.com