u-he are makers of award-winning software synthesisers and effects including Diva, Repro-1, Zebra2, Hive, Bazille, Presswerk and Satin.
Visit U-he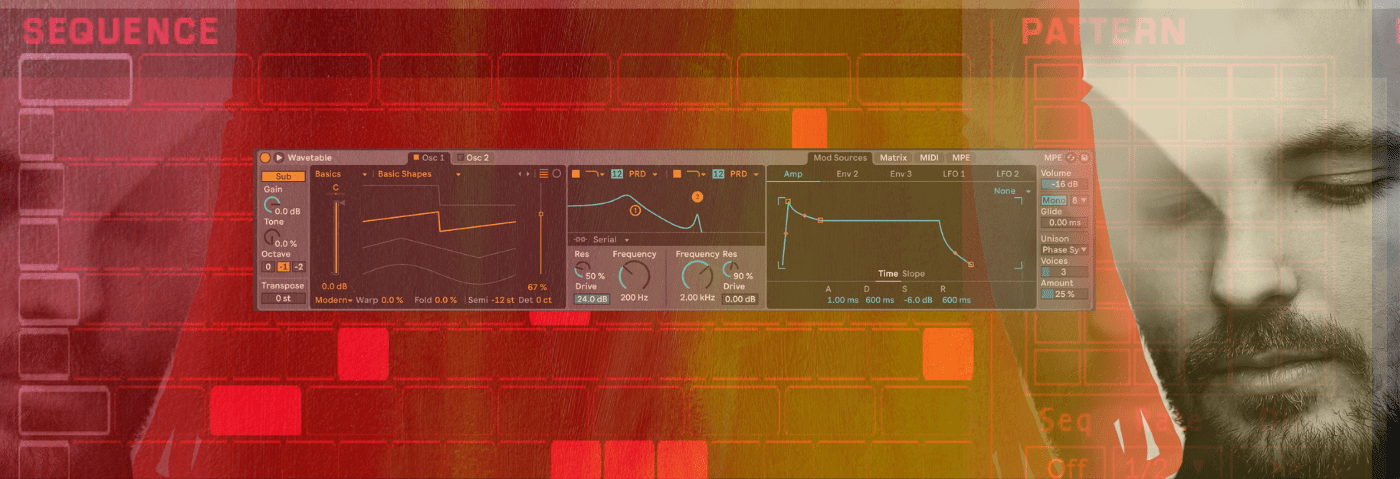
Technique » Synth Secrets »
Undulating Modular Bass In The Style Of Blawan’s 993 Using Wavetable
This channel is sponsored by

In our latest Synth Secrets we tackle the sounds of an undisputed heavyweight, Blawan, and make a synth patch heavily inspired by his brilliant track ‘993’. We’re going to use Step Divider and Wavetable to bring it to life.
For over a decade we’ve appreciated Blawan’s approach to music production – undulating, angular, raw and saturated. Even in his breakout dubstep single “Fram,” there was clear foreshadowing of the sound that would become his signature style, a style that was distilled and presented in his 2018 debut album “Wet Will Always Dry.” A style that one could describe as undulating, saturated, uneasy, but thoroughly enjoyable techno.
online pharmacy buy arimidex online with best prices today in the USA
In order to make what he makes, Blawan relies heavily on modular synthesizers and the chaotic interplay between those components. His 2017 release “993” is another great look into his sound, and in today’s Synth Secrets we’re going to explore how to recreate a similar sound to that track without using a single piece of modular hardware, but instead by using Ableton Live and Ableton’s native instruments and effects, nothing more, nothing less. Ableton Live is, at its heart, a powerful modular software system that offers a lot of what a modular hardware system does if you know where to look.
Here’s what we’re creating today:
We’re taking a different approach than we usually do in these articles when it comes to triggering our synthesizer. Rather than feeding our instrument a MIDI clip, we’ll be triggering the synthesizer using Step Divider, a sequencer included in Ableton’s Probability Pack which comes free with Live Suite. Make sure to download and install the pack from Ableton’s site before we get started.
You’ll notice that in tracks like 993, you can’t pin down a specific melody or rhythm. It’s constantly changing because the synthesizer you’re hearing is being triggered by multiple sequences of different lengths… and we’ll get to that in a bit.
To download the session and follow along. Give the email a few moments to arrive! A successful submission will redirect to homepage.
Want to watch instead? Now you can using YouTube. Follow us over there too:
Now set your project’s tempo to 130 BPM and let’s dive in. 🤿
Let’s get to it and remember to click any image to enlarge!
Step 1: Getting Sound
Step Divider is in essence a Euclidian sequencer, a type of sequencer that’s quite popular in the modular synthesizer world, which allows us to create interweaving rhythms that never play the same way twice. Since we can’t get any sound without the sequencer, let’s start there.
Pull up an instance of Step Divider as well as an instance of Wavetable on the same MIDI track. In Wavetable, set the oscillator shape in Wavetable to a sawtooth wave and change the voicing of the synth from Poly to Mono. Hit play in Ableton. You’ll hear nothing.
Now on the bottom two rows of Step Divider, set the note value to F. On the bottom row, change the Div (for divisions) value from 8 to 18. On the next row up, change the Div value to 10. What we’ve done is told the sequencer that instead of two very traditional 8 step sequences, we want an 18 step sequence and a 10 step sequence to play in tandem. Now activate some of the steps in the sequence to match what you see below and hit play.
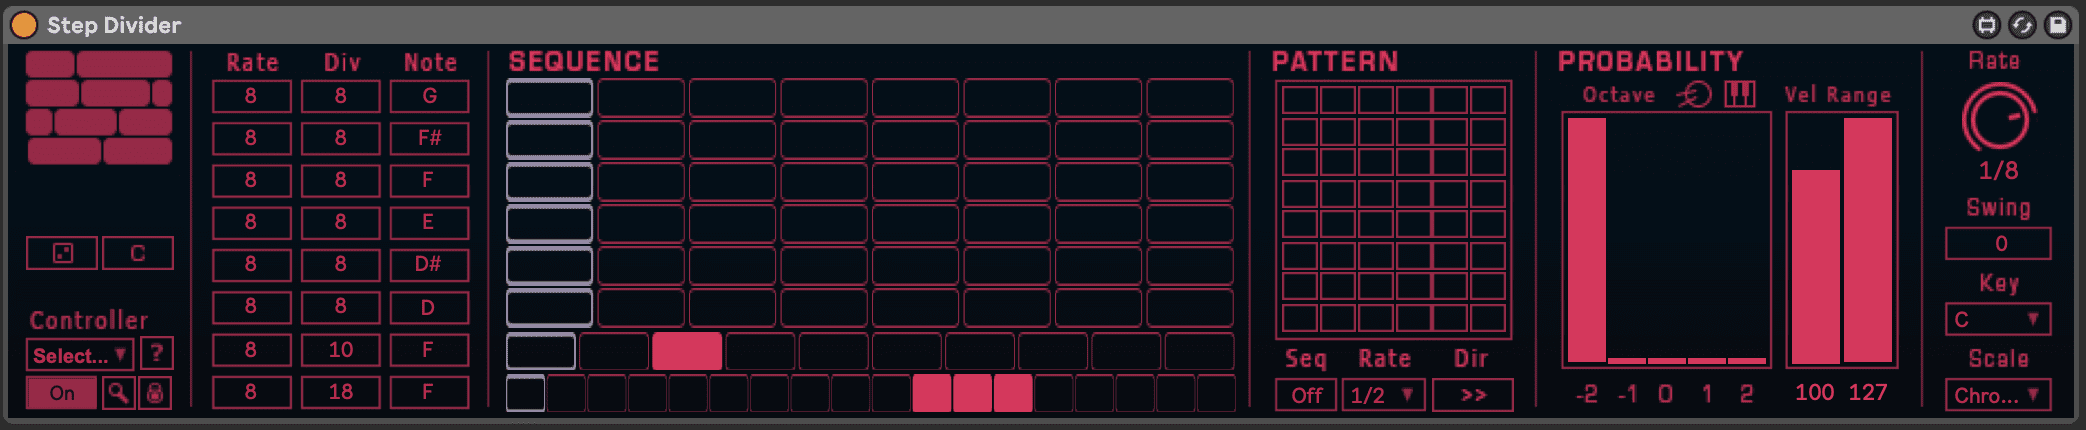
Now we’re getting sound. Listen to a few bars of this up against a four-to-the-floor kick pattern and you’ll start to see how this type of sequence gives you results that change over time.
Here’s our progress so far:
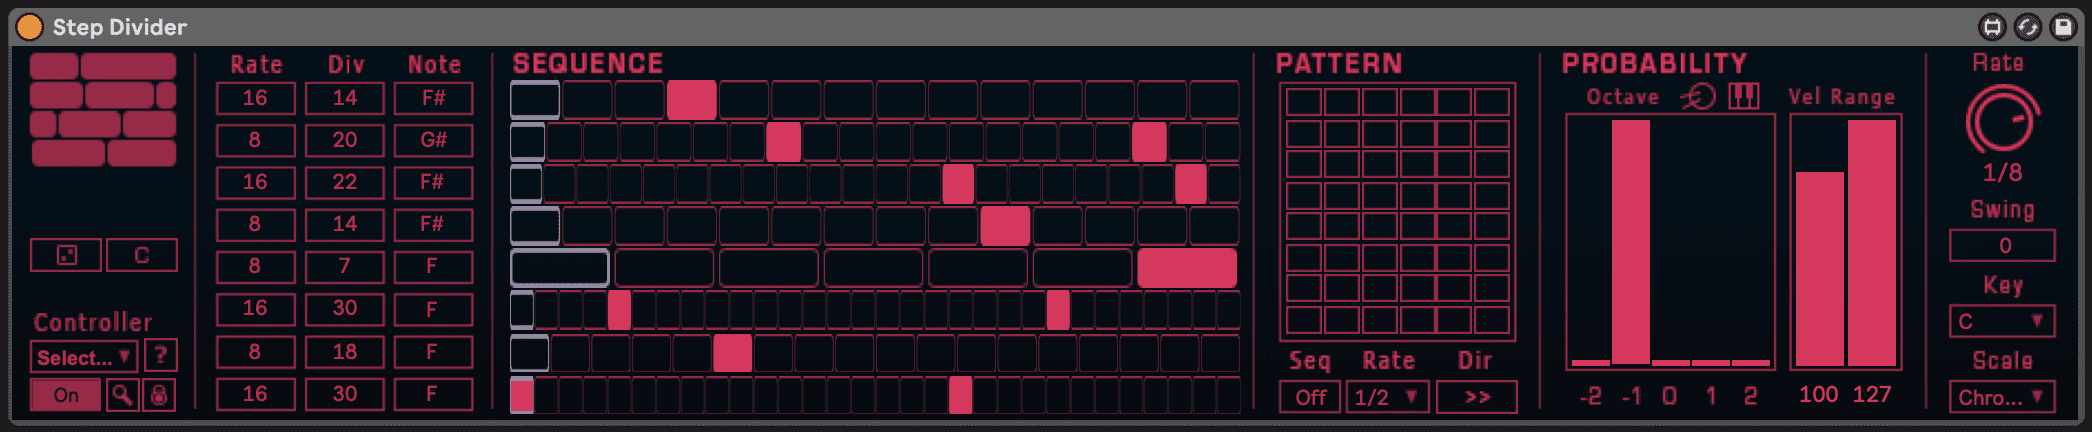
Now we’ll complicate the pattern a bit. Make your sequence match the image below, paying specific attention to the Rate, Div, and Note columns, and activate the same steps in the sequence. It’s a humble start, but we’re building.

Here’s our progress so far:
Step 2: Adding another sequencer
Our first sequencer simply drives the bass of the sound. We’re going to add a second instance of Step Divider that will trigger the higher notes in the sequence. Pull in a second instance of Step Divider onto the same track and build the sequence like so:
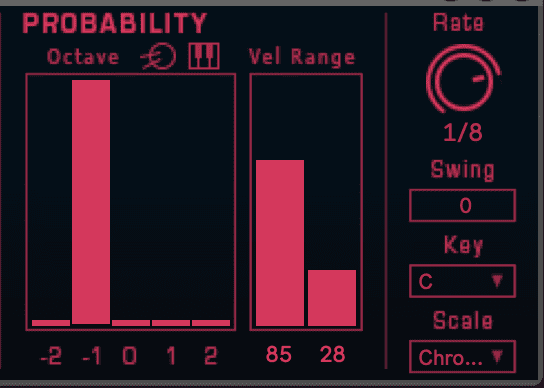
This is important – notice the change in the Octave section, right under the word “Probability” toward the right hand side. We’ve moved the slider down to zero in the first column labeled -2, and we’ve moved the slider all the way up in the second column labeled -1.
What we’ve done is told the second sequencer to trigger notes one octave higher than the first sequencer, 100 percent of the time. Hit play and you’ll be met with a chaotic warbling. The only thing giving any hint of structure is the kick drum. But don’t worry, we’ll now set about taming this synth and making something useful out of it.
Here’s our progress so far:
Step 3: Shaping the sound
Beginning from the left, engage the sub-oscillator and push the gain all the way up. Now move to the oscillator section and set the Semi parameter to -12, shifting the synthesizer’s pitch down a full octave.
Now move over to the filter section. Change the filter circuit style from Clean to PRD, set the resonance to about 50%, and the drive to max. Then set the cutoff frequency to about 200 Hz. The PRD circuit is a bit of a nasty one when pushed that gets us some much-needed grit and resonance.
We’ll also activate the second filter, change it from a high pass to a low pass filter, set its circuit style to PRD as well, set the cutoff frequency to about 2000 Hz and set the resonance to about 90%.
On the far right pull the volume down to about -20 dB, set the unison mode to Phase Sync at about 25%, and set the glide to about 25%.
Your patch should look something like what you see below, and the sound it creates is finally starting to resemble techno.

Soloing the synth, here’s our progress so far:
Step 4: Animating the filter
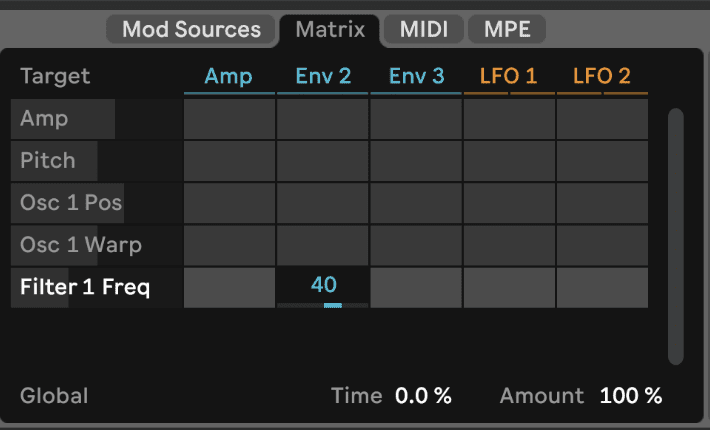
We need to add some movement and interest to this sound so our next step will be to add some filter modulation.
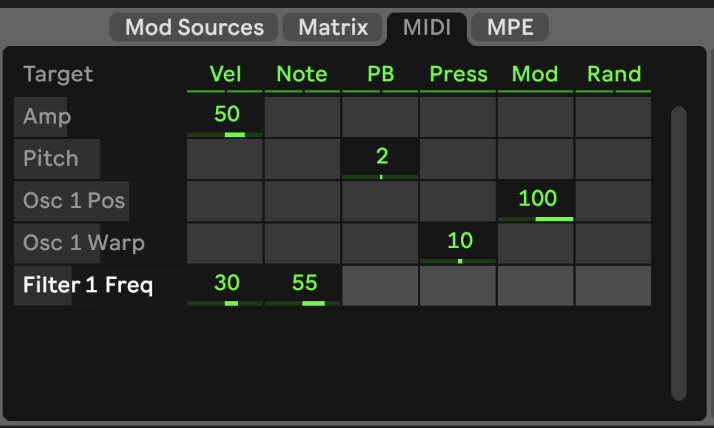
First we’re going to visit the Matrix tab of the modulation section and we’re going to briefly click on the frequency knob for filter 1, which will make Filter 1 Freq appear as a row in the matrix. Assign a value of 40 in that row under the Env 2 column, causing the filter to open and close each time a note is struck.
Then we need to visit the mod matrix section of Wavetable and select the MIDI tab. Set the value in the Vel column of the Filter 1 Freq row to 30. Now, variations in note velocity will cause variations in filter cutoff frequency.
Then, set the value of the Note column to 55. Now, the filter will open and close based on the pitch of the incoming note.
Finally, we’re going to change the values in the Vel Range section of our sequencers. Step Divider outputs a random velocity value between the two values in the Vel Range section every time a note is triggered. We want to make sure our bass sequence isn’t firing off high velocity notes that open the filter too much, and conversely, we want our second sequencer to have a bit more of an undulating and unpredictable sound, so a lot of velocity variation will help us achieve that.
The velocity range section of our first sequencer:

The velocity range section of our second sequencer.
Our progress thus far:
Step 5 – Shaping the sound, part II
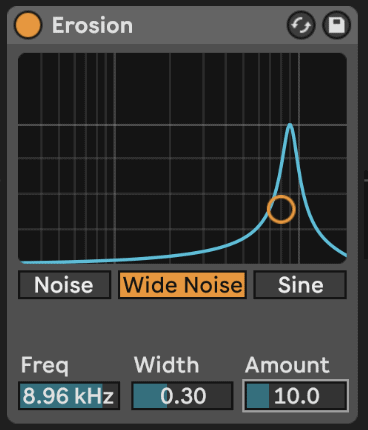
Time to add some grit. Pull in an instance of Erosion, a great audio effect that distorts incoming signal. Set the mode to Wide Noise, and set the Freq parameter to about 9000 Hz. Make sure the width is at .30 and bring the amount up to 10. That should add some character.
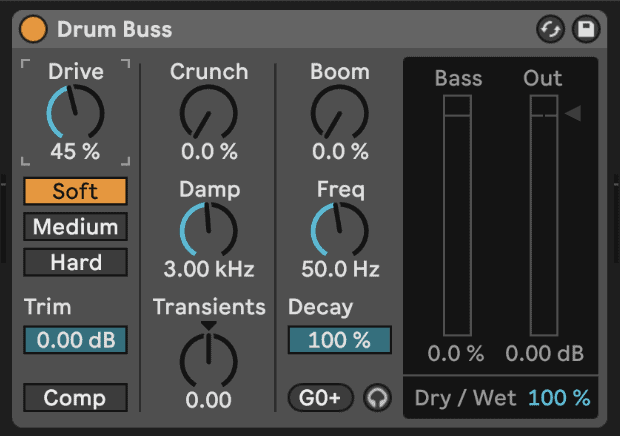
And let’s add a Drum Buss as well, which gives us another analog-sounding gain stage we can drive to add some life to the sound. Set the drive to about 45% and the Damp to 3.00 Khz. We’ll get some nice saturation this way, and the damping feature allows us to roll off a lot of unnecessary high frequency information and warm up the sound.
Here’s our progress so far:
Step 6: Subtle Touches
Ableton’s Hybrid Reverb is a great effect that combines lush algorithmic reverb and convolution reverb based on real spaces. The convolution reverb section is a surefire tool for adding subtle space to a sound and bringing it to life.
Pull a Hybrid Reverb in on your track, choose the Made for Drums category of impulse responses, and select The Metal Garage. Bring the mix to about 25%. Then, move the Blend knob all the way to the left, which effectively mutes the algorithmic reverb and solos the convolution section.
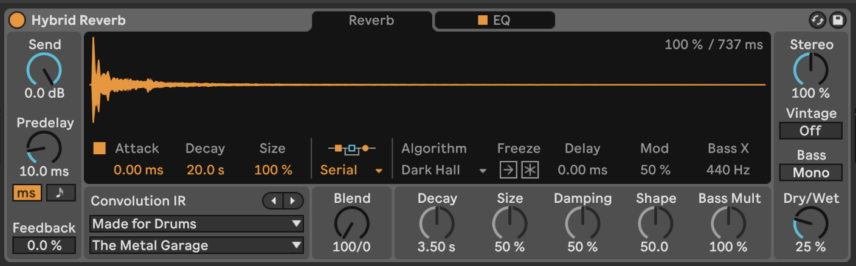
Next pull in an instance of Echo. We’re going to use it for vintage the sonic character it lends rather than for its delay functionality. Disable the tempo sync function by clicking Sync and then pull the delay time down to about 30 ms. Set the feedback to 0.0%. Then set the Dry/Wet mix to about 25%. Then turn the Filter HP setting up to 5.00 Khz, eliminating any low and mid frequency content from the delayed signal. Turn the Filter LP up to 20.0 Khz, allowing high frequencies generated by the Echo effect to pass on down the signal chain. Finally, click on the Character tab, activate noise, and turn it up to about 40%. Now you’ll hear a subtle tape-like hiss.
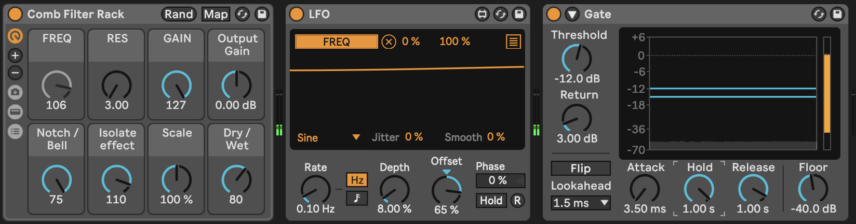
We do this to set up for the last effect in our chain, an LFO-modulated comb filter. Adding noise here gives the filter constant audio content to work with, emphasizing the effect and giving the sound a feeling of constant motion.
Our progress thus far:
Step 7: Final Filter
The final and very audible change we’ll make to this sound is to apply our modulated filter at the end of the chain. Use the free comb filter rack you downloaded at the top of this article, or any capable filter plugin such as Kilohearts Comb Filter, to accomplish this step. For the purposes of this article, we’ll use a free rack created by Woochia – you can download his whole collection of filter racks here and we love his work so we hope you support him – that makes use of Live’s Auto Filter and Audio Effects Rack devices to accomplish a great sound.
Add Woochia’s Comb Filter 2xEQ rack to the end of your synth’s signal chain. Then add an LFO Max For Live device to your channel. Click “Map” on the LFO, then click on the frequency knob of the filter rack. You’ll hear a whooshing sound issuing from your speakers that persists even when the session is paused. That’s the way it’s supposed to work! Now set the LFO rate to 0.10 Hz, the depth to 8%, and the offset to 65%. You’ll notice that the effect is drastically tamed, and now when you play the synth part, it has a modulating vowel-like quality.
Finally, feel free to add a gate to the very end of the chain and set both Hold and Release to a high value like 1.00 second so that when your session isn’t playing, the noise dies off slowly but the gate doesn’t affect the signal in any other way.
Here’s our final sound:
And here it is with a simple 808 beat for context:
Final Word
Feel free to experiment with other settings; turn up the resonance on the synthesizer’s filter for instant acid or try different parameters on the comb filter rack for drastic effect. Try different sequences in Step Divider and adding different audio effect chains. Get creative and enjoy the chaotic possibilities.
While you're here, you may enjoy...

The Secrets of Dance Music Production
The world-leading book on dance music production. Comes with samples too.

Replicants – Elektron Analog Rytm Sample Pack
Electro sounds for the Elektron Analog Rytm. Free your spirit.


Synth Secrets is sponsored by
u-he are makers of award-winning software synthesisers and effects including Diva, Repro-1, Zebra2, Hive, Bazille, Presswerk and Satin.
Download the demos and try them for yourself at www.u-he.com