
In this tutorial, we explore using a channel strip plugin to recreate mixer distortion.
Things were much simpler in the ‘90s. Techno was made largely with few pieces of gear. Just a synth or sampler, a drum machine, an outboard compressor (if you were lucky), and a mixer. Options for distortion were particularly limited, especially for drums. You couldn’t just reach for a distortion plugin and be done with it. Sure, you could always run it through a distortion pedal but that would obliterate the transients. For most techno producers of the ‘90s, distortion was achieved with the mixer itself.
The key was managing the gain on each channel. Where volume controls how much sound goes out of a channel, gain determines how much comes in. When a hot signal hits the limit set by the volume, clipping occurs. In the analogue domain, this can sound great. When the red overload LED comes on, you know you’re in good territory. Think early Luke Slater, Joey Beltram and ‘Energy Flash’ or Drexciya’s ‘Black Sea’.
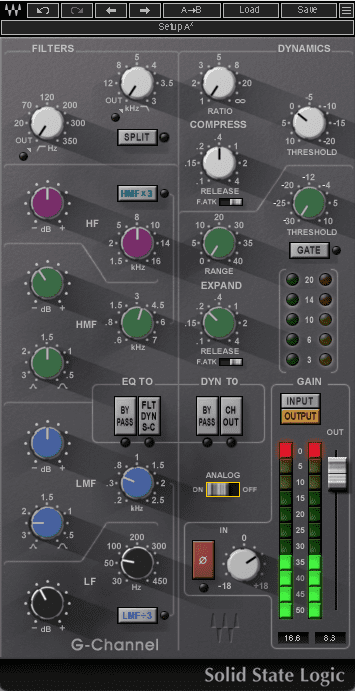
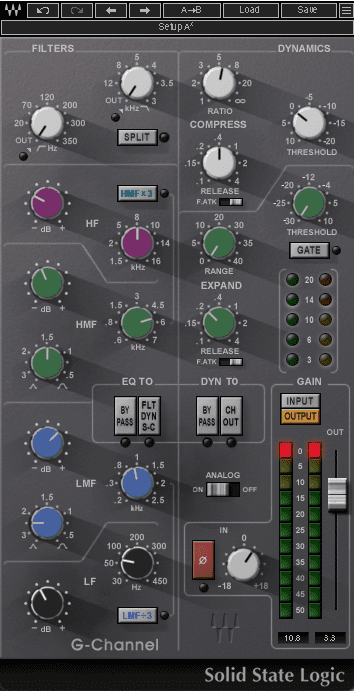
Let’s explore how to recreate this effect in the box. For this, we’ll need a channel strip plugin with a separate gain knob. We’re using Waves’ SSL G-Channel, a recreation of a single channel on the SSL G-series mixing desk. As a challenge, we’re going to try to keep this as authentic as possible and restrict ourselves to the kinds of gear producers would have had back in the day. As always, click on any image to see a larger version.
We’ll go from this standard 909 beat:
To this blown out rhythm:
Let’s get to it and remember, red means go.
Step One – Mixer Setup
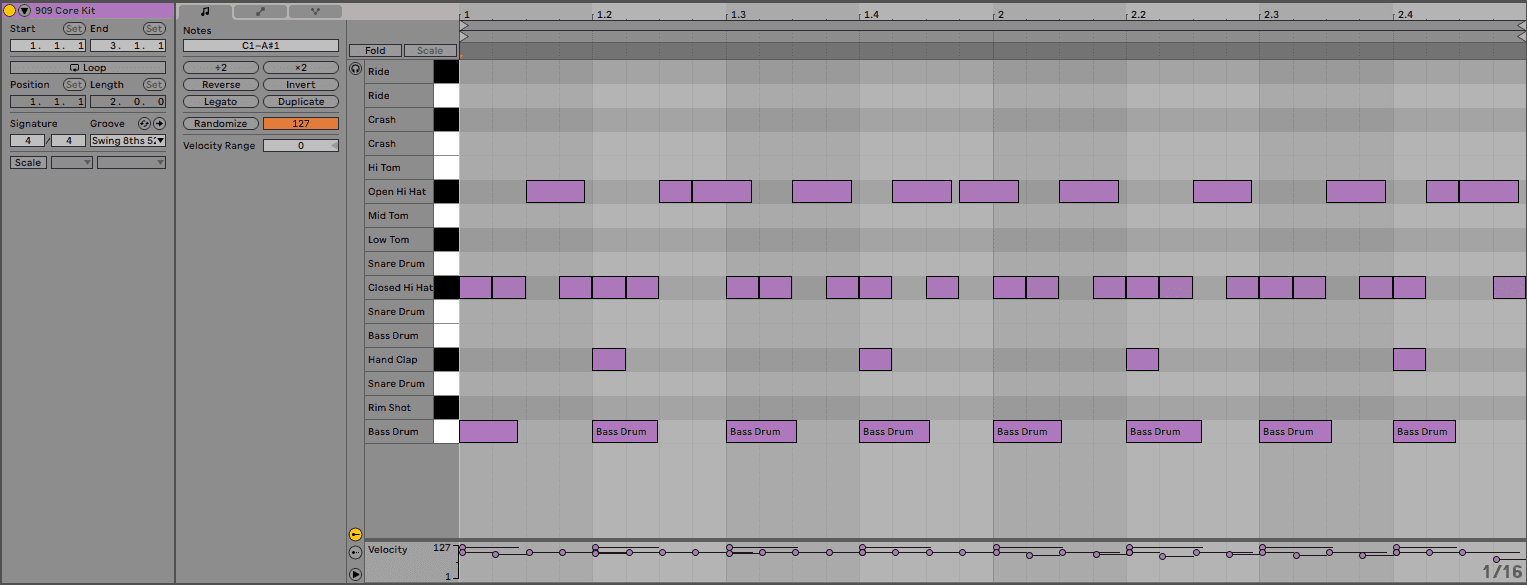
First, let’s get our virtual mixing desk prepped. We’re using the Core 909 pack in Drum Rack in Ableton Live to simulate a Roland TR-909 but you can use any instrument or set of samples you want. We program an appropriate ‘90s techno rhythm using the kick, clap, and closed and open hats.
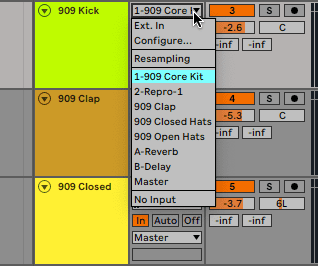
The original 909 had individual outs so we’re going to ape this style and send each sound to its own audio track. Create four new audio tracks (or however many you need). Next, on each audio track, select 909 Core Kit from the input dropdown menu. In the next dropdown menu, choose the individual sound. We’ve gone for a pre-FX input as we want to start with a sound as close to the original as possible. Do the same for each percussion sound. Turn off the output on your Drum Rack track and you should hear each sound coming through its own audio track.


Step Two – The Kick
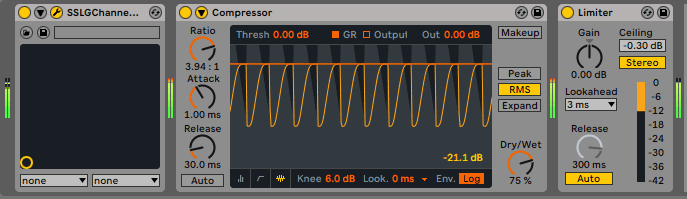
Let’s start with the kick, as it’s arguably the most important element of any techno track. Remember, we want to get it punchy and distorted without losing any punch. Drop an instance of SSL G-Channel on the track. Let’s put a limiter on there too, as things are going to get loud. Ableton’s stock Limiter is perfect in its default state.
Open SSL G-Channel and take a look. There are a lot of options here. We aren’t going to use everything but it’s good to know what we have to work with. On the left is the EQ section, with shelving filters at the top and then general EQ, from high to low moving down. On the top right is the compressor, followed by the gate, and lastly volume control. Let’s start with volume.
First, engage the Analog switch for authenticity (why not, right?) and then crank that knob marked In all the way up. This is the gain. You can already hear what it’s doing to the signal. Next, turn up the volume as well. Don’t worry about getting too loud – that’s what the limiter is there for. It’s sounding nice and dirty already.
Let’s do some tone shaping. Techno producers in the ‘90s didn’t have access to surgical EQs. They had to make broad adjustments on the mixing desk itself. Let’s use the onboard EQ to boost the high frequencies a few dB at 8kHz, cut the high-mids at 4.5kHz, boost the low mids at 1.5kHz and boost the lows at 100Hz. There’s nothing scientific about this. We’re just tweaking until it sounds good.
Lastly, we whack the stock Ableton Compressor into the signal chain after the SSL G-Channel to catch the peaks that have managed to get through.
Here’s the kick before gaining it out:
And after:

Step Two – The Clap
Next, let’s smash the clap. As before, place an SSL G-Channel plugin on the audio channel followed by the stock limiter. Put the channel plugin in Analog mode and crank the gain right up. We can let the limiter hold it in check.
Let’s do some tonal shaping using those EQ pots. We cut the high mids a touch at 4.5kHz and the lows at 60Hz. That sounds pretty good.
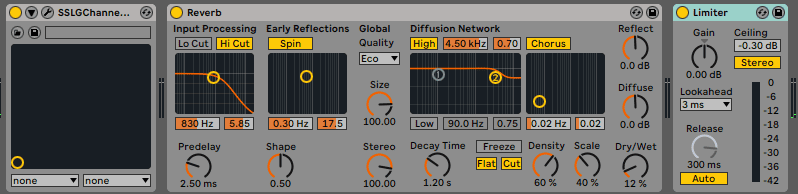
Next, let’s add a reverb to the chain to extend the claps for a heavy vibe. We use Ableton 11’s new Hybrid Reverb with the Clap Hybrid preset and change out the Convolution IR to Made for Drums. We reduce the decay to 200ms and the dry/wet mix right down to around 7%. Lastly, we chuck a compressor onto the chain to squash the clap even more and glue the reverb on to it.
Here’s our anemic clap before:
And after slamming it through the channel plugin:


Step 3 – Closed Hats
Let’s keep working on our beat by tackling closed hats next. Again, load up SSL G-Channel and the Ableton Limiter.
We need to strike a balance here between hot and sizzly and just plain burnt. Hit that Analog switch, turn up the gain to around +9dB and the volume to around 8dB. That’s a good balance of heat and flavour.
Let’s use the EQ to help it jump out of the mix. Turn down the high mids a bit at 4.5kHz, and give those low frequencies a cut at 60Hz as well. Now it’s sharp and punchy.
Our hats before channel processing:
And after:
Step 4 – Open Hats
We’re almost finished. Put another instance of SSL G-Channel on the closed hat audio channel as well as the usual limiter.
As with the closed hats, we want to hype the sound without obliterating it. We engage Analog mode, turn up the gain to +5 and the volume to around 3dB. We’ve successfully added harmonic distortion while maintaining transients and punch.
Let’s see how the EQ can help us shape the open hats. First, we cut 7dB of high frequencies at 8kHz to darken things up. Next, we cut 3dB of high mids at 5kHz and boost low mids by 6dB at 1kHz for body. Finally, we roll-off 3.5dB of lows at 60Hz. This is the way.
Lastly, let’s replicate our clap reverb trick on the open hats. We add an instance of Ableton’s Reverb after the channel plugin but before the limiter. We play with the decay time and Dry/Wet knob until we get something that sounds good.
Here’s our open hats before:
Here they are after mixer distortion and reverb. They’re much more present now.
Lastly, we throw another copy of SSL G-Channel on the master bus with just a hint of compression and gain boost to glue it all together.
Here’s our final result with a bassline courtesy of U-he Repro – run through the SSL G-Channel of course.
