
This channel is sponsored by
 Roland Cloud is your creative hub for Roland hardware and software. Access legendary recreations of Roland Classics, find new sounds for your favorite products, and download updates and companion apps to make music fast and easy. Visit Roland Cloud
In this tutorial, we use Surreal Machines’ Dub Machines plugins to turn a dry beat into delay-soaked dub madness.
Dub is so ridiculously influential on modern bass music it’s not even funny. Not only was it the first remix style (dubs are essentially live remixes of vocal tracks), the emphasis on bass and rhythm can still be felt in genres like jungle and drum and bass, garage, and even hip-hop. And of course, dub techno, which gets its name from the Jamaican reggae offshoot.
The techniques pioneered by King Tubby, Prince (later King) Jammy and Lee ‘Scratch’ Perry – mainly spring reverb, tape delay, and analogue effects – can be applied to really any dance music genre. They can be used as a way to spice things up or completely transform a track.
We’ll be using the two plugins in Surreal Machines’ Dub Machines bundle, Modnetic and Diffuse, to dub out a rhythm. Modnetic is a 1970s-style tape delay with spring reverb, although it can do a lot more, as we’ll see. Diffuse is a mashup of an analogue delay and digital reverb, the kinds you might find in Jamaican studios in the 1980s. We’ll be using them both to transform a dry steppers riddim into something with more flavour and groove.
Our beat before Dub Machines:
And after:
As always, click any image to see a larger version.
Step 1: Setting Up
We start by making a 140bpm beat in Ableton Live using the Garage Kit in Drum Rack. We’ve sent each sound out to its own audio channel so they can be processed independently. Note that every sound will get its own Dub Machines plugin except for the kick, as we want this to be the anchor that holds the beat down.
We’ve also grouped all of the drum sounds into one drum bus for eventual processing.
Here’s the beat with no processing:
Step 2: Snare
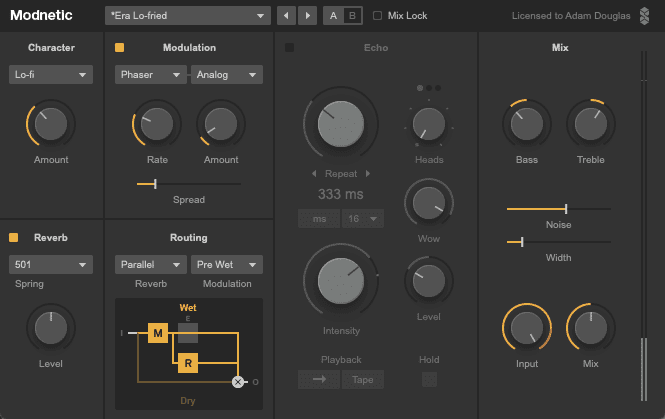
Let’s add some spring reverb to our snare. Add an instance of Modnetic to the channel. We’re not going to use any delay so turn off the Echo section. Make sure Reverb and Modulation are on though. Set the reverb to 501 Spring for an emulation of a classic tape delay reverb. Next, let’s give the reverb some motion. In the Modulation section, choose Phaser and Analog. Set the Rate to about 30% (not too fast!) and Amount to 10%. Lastly, pull the Spread slider to the right to give the effect some stereo width. That sounds great.
Let’s finish up the sound. In the Mix section, turn down the Bass and turn up the Treble to emphasize the highs. Increase the Noise amount for dirt and Width to open up the imaging. Finally, crank up the Input to saturate the signal. Adjust the Mix to taste. We went with a 50/50 split.
Our dry snare:
And with plenty of modulated spring reverb:
Step 3: Rimshot
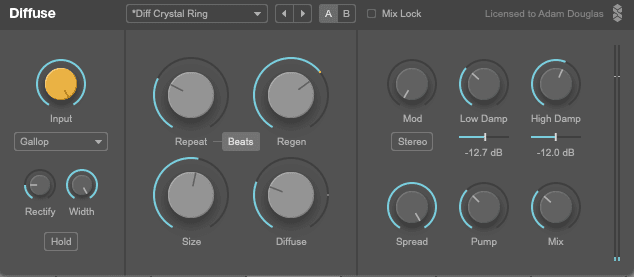
Rimshots are a staple in reggae and dub rhythms. Let’s use digital hardware-style effects to bring our boring rimshot to life. Start by dropping Diffuse onto the rimshot’s audio channel. Diffuse emulates digital and analogue effects hardware and is something of a hybrid between a delay and a reverb. Let’s see how it can add movement and interest to the sound.
Start with the Repeat knob. Set it to Beats and give it a time of 7/32. Next, put Regen up to a generous 100%. Push Size just past halfway so we get a good mix of delay and reverb. Finally, set Diffuse to around 25% to bring in lots of reverb-like diffusion from the repeats.
On the left side, choose Gallop from the dropdown menu. This creates a gallop-like rhythmic pattern for the delays. Turn up Rectify a bit to add some harmonics and increase Width all the way to spread the wet signal out around the stereo spectrum.
On the far right side, adjust the dampening controls to favour the highs, make sure Spread is all the way up, and Pump and Mix are around 10 o’clock. Now our rimshot ricochets around the stereo spectrum.
Dry rimshot:
And with Diffuse:
Step 4: Hats
We’ve programmed a basic eighth-note closed hi-hat pattern but it could use some spicing up. Let’s use tape-style delay to create intricate additional rhythms with the hats.
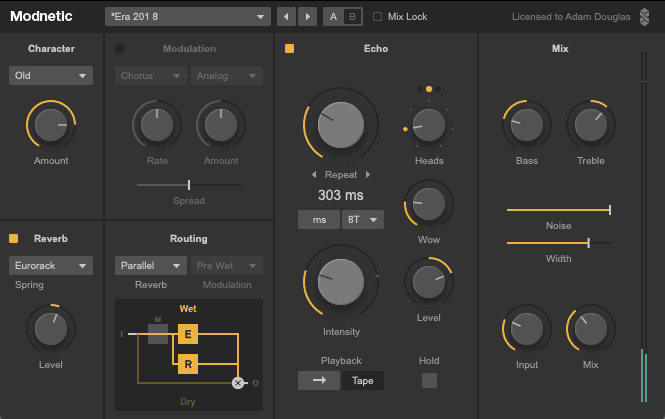
Add a copy of Modnetic to the hats track. We’re going to use both delay and reverb this time. Set the Reverb in the lower left to Eurorack and increase the Level a touch. Note that our routing is set to Parallel so the reverb and echo happen independently of each other. We can skip Modulation this time as we’re going to use the parameters in the Echo section to take care of movement.
Make sure Echo is engaged and set the Repeat to 303ms. This creates a nice groove. Next, play around with the Heads dial. Modnetic has three virtual tape heads. Which head (or combination of heads) you choose will affect the delay. We’ve gone with the middle head only. We’ve also increased Wow to about 9 o’clock to add tape-style warble to the delay. An Intensity (feedback) of 35% and Level of about +7dB sounds good. If you plan to work with higher feedback levels, a limiter on the channel is a good idea to prevent the self-oscillation from getting out of hand.
Adjust tone controls, Noise and Width to taste. We’ve gone for extreme Noise settings to give it a real degraded sound. Finally, play around with the Character dial in the upper left. We settled on Old to mimic ‘70s technology but choose the one that sounds best with your production.
Our dry closed hats:
And with tape-style delay:
Step 5: Crash
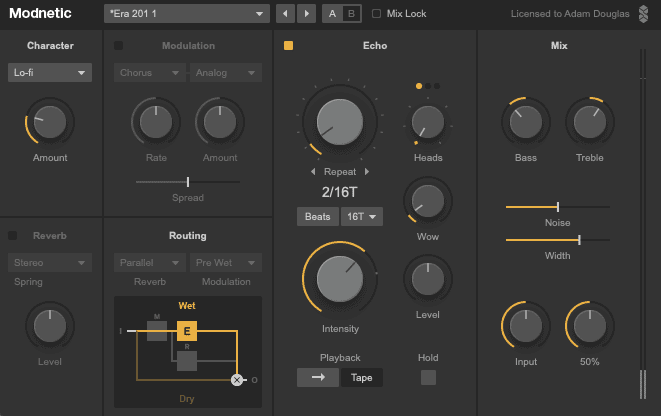
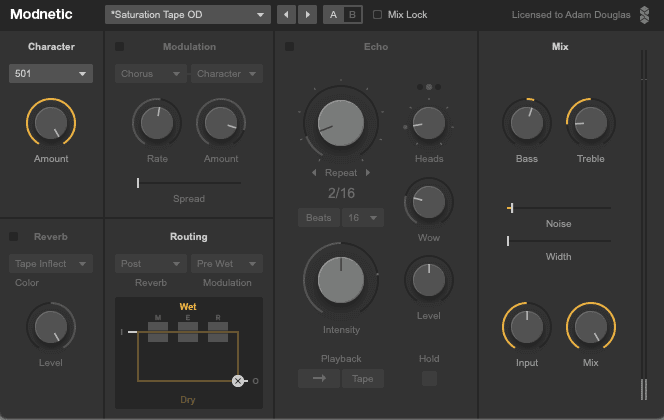
Adding tape-style delay to a crash is a great way to bring some atmosphere to a drum part. As before, put Modnetic on the audio channel. We’re only using delay this time, so make sure Reverb and Modulation are off.
In the Echo section, go with a Repeat setting of 2/16T (make sure you hit the Beats button and choose 16T, or triplet sixteenth-notes). We want a simple delay so just the single, first tape head is good enough. We do want plenty of feedback though so the delays continue throughout the rhythm. A setting of 85% sounds good. A little bit of Wow adds some motion to the delays. We want a grungy effect, so we’ve chosen Lo-fi in the Character setting. Finally, set the tone and mix controls as you see fit.
Top Tip: Automate the feedback amount and push it into self-oscillation at key moments in your song.
Crash with no delays:
And with:
Step 6: Drum Bus Saturation
Modnetic also makes an excellent saturator. Let’s use it to help glue our drum bus together with parallel saturation.
Add Modnetic to an auxiliary send channel and crank the Mix amount to 100%. Bring up the send amount on the drum bus channel to almost halfway. Now we should hear the drum bus being affected by the plugin. We don’t need any effects other than Character, so be sure and turn off Reverb, Modulation and Echo. Set Character to 501 for tape saturation and twist that knob all the way to the right to bring up some subtle but sticky tape saturation. In the Mix section, we’ve boosted the Bass and decreased the Treble to mimic the EQ curve of tape. A small amount of Noise completes the effect.
Drum bus with no parallel saturation:
And with. Note that the effects is subtle:
Finally, here’s the full beat with a dub bassline courtesy of Live’s Operator and some light processing on the master bus.
Tutorials is sponsored by
Roland Cloud is your creative hub for Roland hardware and software. Access legendary recreations of Roland Classics, find new sounds for your favorite products, and download updates and companion apps to make music fast and easy.