
This channel is sponsored by
 Roland Cloud is your creative hub for Roland hardware and software. Access legendary recreations of Roland Classics, find new sounds for your favorite products, and download updates and companion apps to make music fast and easy. Visit Roland Cloud
Artificial intelligence can help balance a track by working across mix groups. We use Sonible’s smart:EQ3 and smart:comp to take a vocal house song over the finish line.
Artificial intelligence – it isn’t just for ‘90s sci-fi movies anymore. AI is now part of the software we use on a daily basis, and this includes music production apps. Software company Sonible incorporates artificial intelligence into its ‘smart’ series of plugins. Let’s use smart:EQ3 and smart:comp to help balance the mix of a vocal house track.
The two plugins will help us go from this:
To this fuller, warmer mix:
Remember to click any image to see a larger version.
A Quick Overview of smart:comp
At its heart, smart:comp is a normal compressor, complete with the usual dynamics parameters, but it adds two features to this: spectral compression and artificial intelligence.
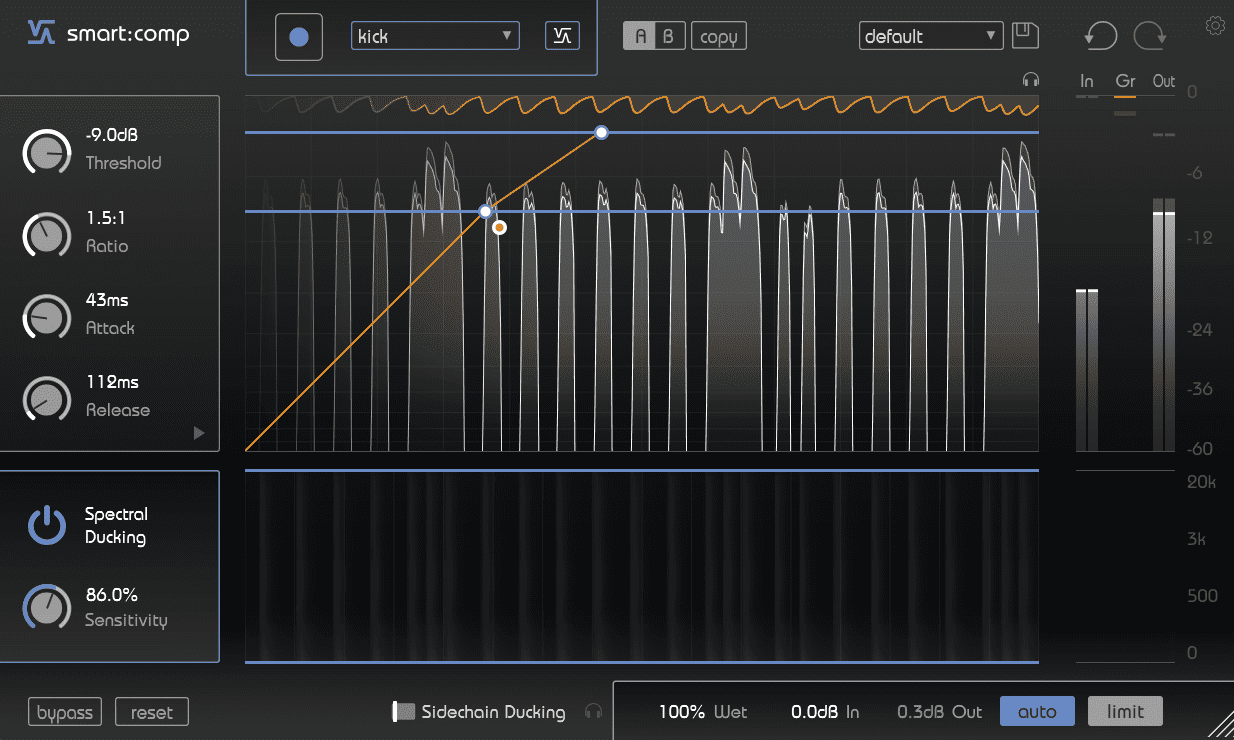
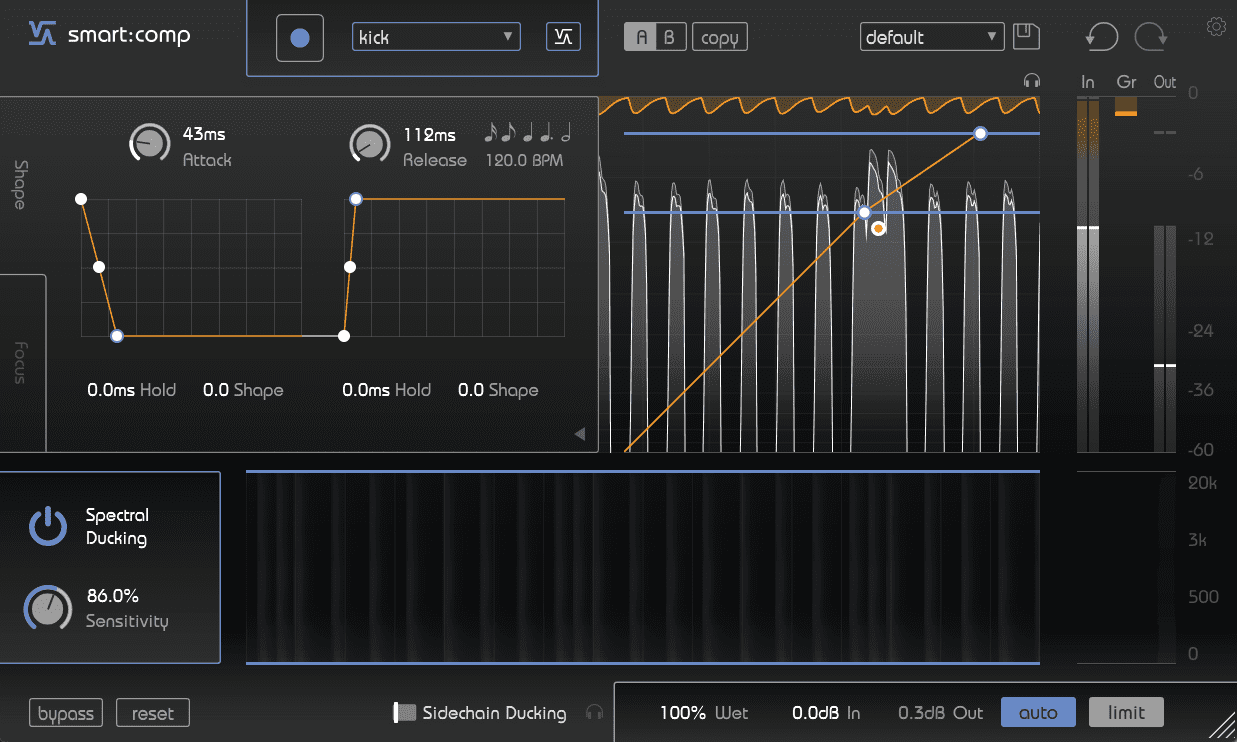
The main section, the time-domain compressor, behaves as you might expect a compressor to, with controls for threshold, ratio, attack and release. There’s a graphical display that shows exactly what’s happening, with the input and output signals scrolling from right to left and gain reduction displayed at the top. You can interact directly with the display and adjust threshold, ratio and knee from here as well. Click on the arrow below the Release knob to reveal a graphical representation of the attack and release envelope. Attack shape and hold, and release shape and hold, can all be adjusted individually.
Below the time-domain compressor is the spectral compressor, which applies compression only where tonally needed. You can toggle this on or off, adjust the sensitivity, and limit the affected frequency band.
Finally, at the top is the automatic parametrization section, which you can use via the sound profiles to help the smart:engine ‘learn’ the specifics of your sound. It will then create sound-appropriate settings that you are free to adjust.
A Quick Overview of smart:EQ3
smart:EQ3 looks much like any other EQ you’re familiar with, with nodes for adjusting filter frequencies. What is different is the AI, which (as with the smart:comp) listens to your signal and then makes adjustments based on its tonal qualities.
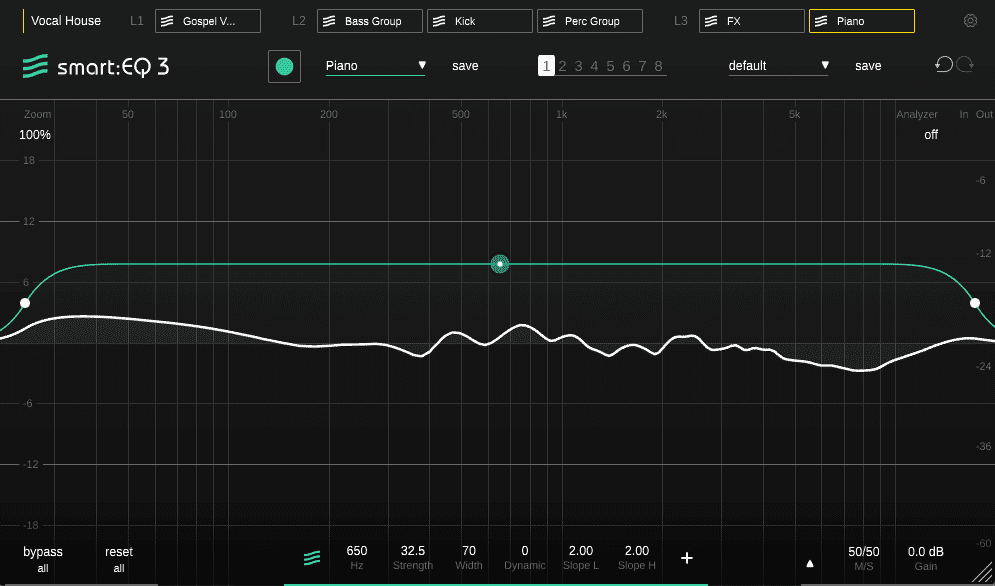
Use the learn section at the top to start the process. There are preset profiles, such as kick, snare, or vocals, to give the AI a head start. Once it has made its calculations, you’re presented with an EQ curve. You can add nodes to this and create new cuts and boosts, and by right-clicking on a filter ‘thumb’ you’re given a widget to changes filter types, solo or delete a filter. There’s also an overall intensity level that you can adjust up or down. You’re free to move the edges toward the centre and stop if affecting certain frequencies.
Finally, smart:EQ3 is capable of grouping up to six separate instances of the plugin. This will spectrally balance them to each other and remove masking. You decide the focus of the mix by choosing which sounds should be highlighted and which play more supporting roles.
Let’s see and hear how these two plugins work in action.
Step 1: Drum Bus Compression
Let’s start with compression. We’re working with quite a few samples from Splice so we don’t need too much compression on individual sounds but we would like to help the elements in our drum bus (sans kick) sit together.
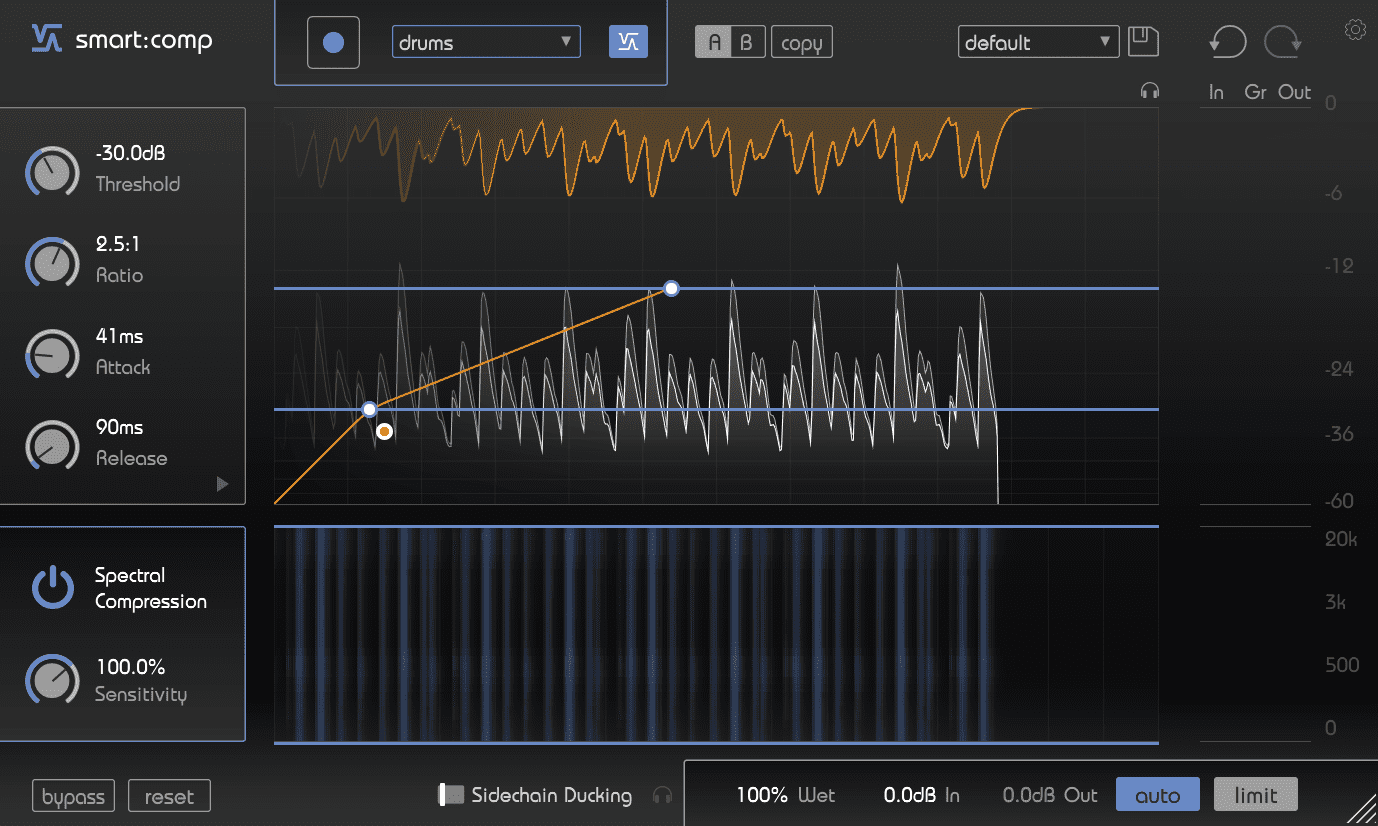
We start by adding an instance of smart:comp to the drum bus, which includes the snare sample ‘fh_snare_simi.wav’ and the topper ‘fh_drm125_shuffler4.wav’ from the Splice French House sample pack, and the percussion loop, ‘ph_120_percussion_loop_ensemble.wav’ from Piano House.
Next, we choose the Drums profile at the top, click the Learn button, and press play on our DAW, Ableton Live. It gives us a Threshold of -30.0dB and a ratio of 2.5:1. It’s also given us suitably fast attack and release settings as befitting a drum bus. We leave Spectral Compression engaged, as it adds a nice sheen to the sound.
Here is the drum bus before compression:
And after:
Step 2: Sidechaining the Bass and Kick
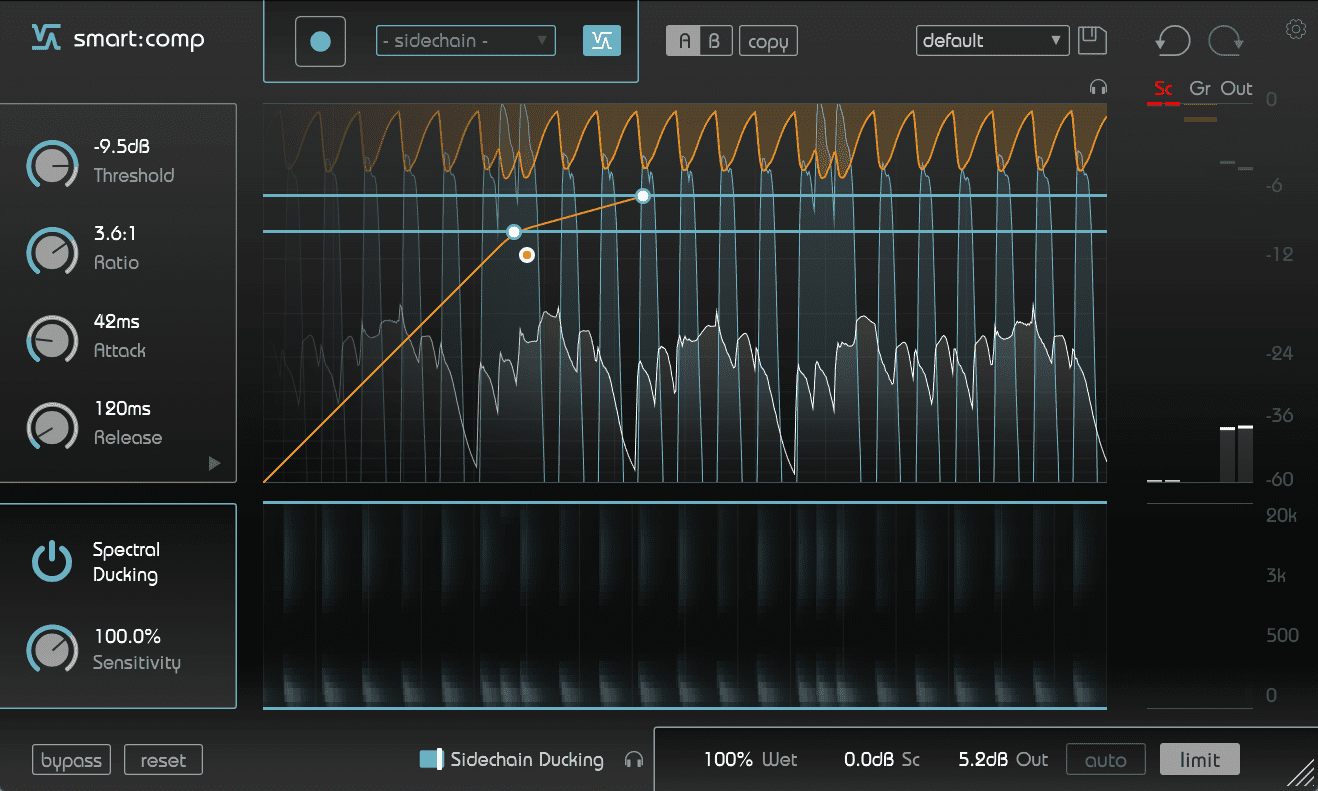
Let’s tackle the bass next. Our track actually has two bass sounds, both made with Arturia Pigments. One is a midbass Moog-style disco line and the other is a low, more simple affair. They follow the chord progression of the piano line so we want them to be punchy and full but also have a melodic presence.
We’d like to sidechain our bass group to the kick. With smart:comp, we can do this using spectral processing which creates a more natural effect than just shoving down the volume of the bass. We start by choosing the kick channel from the sidechain routing section on the wrapper of the plugin. Next, we engage the Sidechain Ducking switch at the bottom of smart:comp. We need to train the AI by letting it listen to the kick, so at the top, we hit the newly changed Sidechain Learn button. smart:comp generates new settings for the time-domain compressor so it ducks naturally.
The bass group before compression:
With sidechain compression:
And together with the kick:
Step 3: Kick EQ
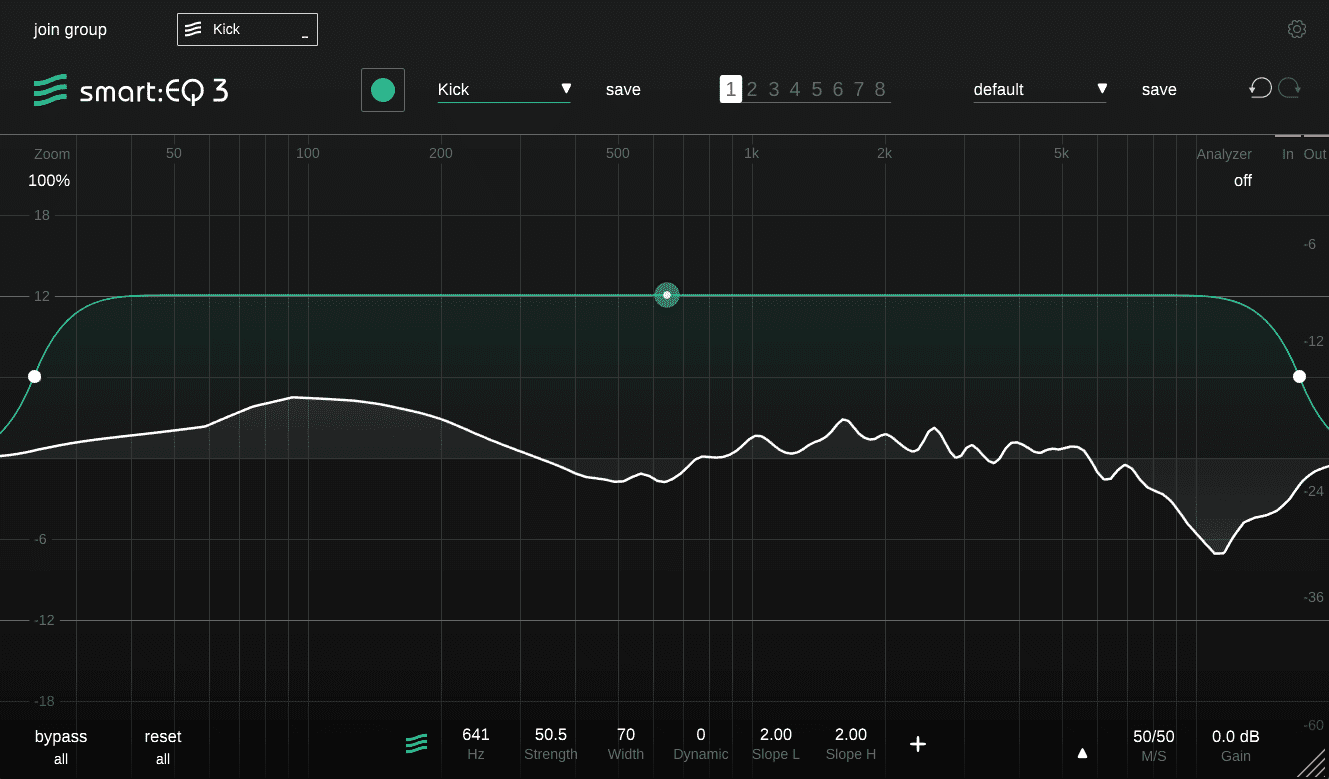
Next, let’s get smart:EQ3 involved and EQ each of the channels. Let’s start with the kick, which is the sample ‘fh_kick_fizzy.wav’ from Splice’s French House pack.
We place smart:EQ3 on the kick channel, choose the Kick profile at the top, and let the AI hear the kick by pressing the Learn button and hitting play on the DAW’s transport bar. The original kick is heavy on the highs and light on the lows but smart:EQ3 has corrected this, giving it a nice boost around 100Hz and taming the top end.
The original kick:
And after smart:EQ3:
Step 4: Drum Bus EQ
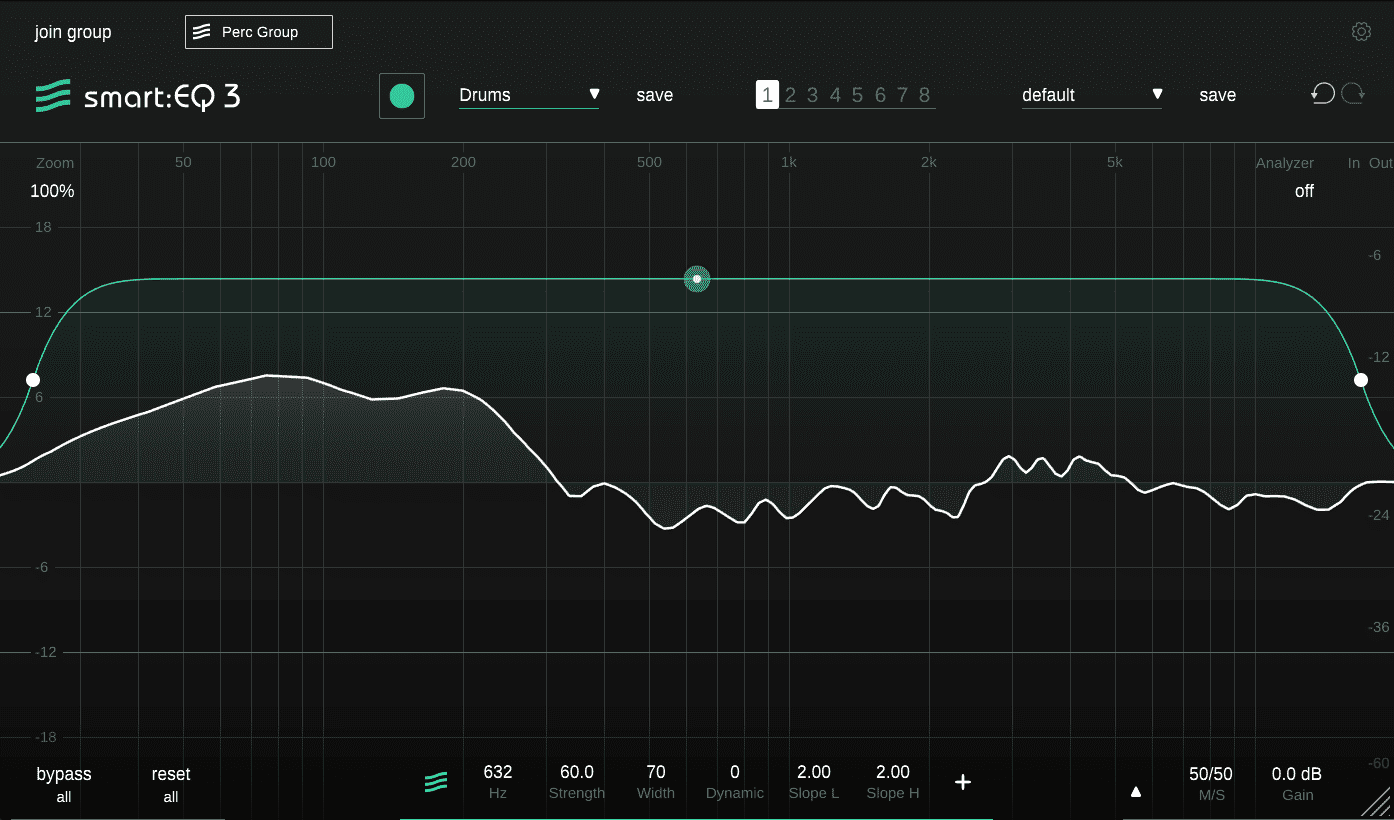
For the next step, we apply smart:EQ3 to the drum bus after the compressor. This time, we choose the Drums profile to help train it. Similar to the kick, it’s pulled up the bass, particularly in the 100Hz and 200Hz regions. This has boosted the presence of the snare. It’s also tamed the highs as well as the mids.
The drums before EQ:
And after:
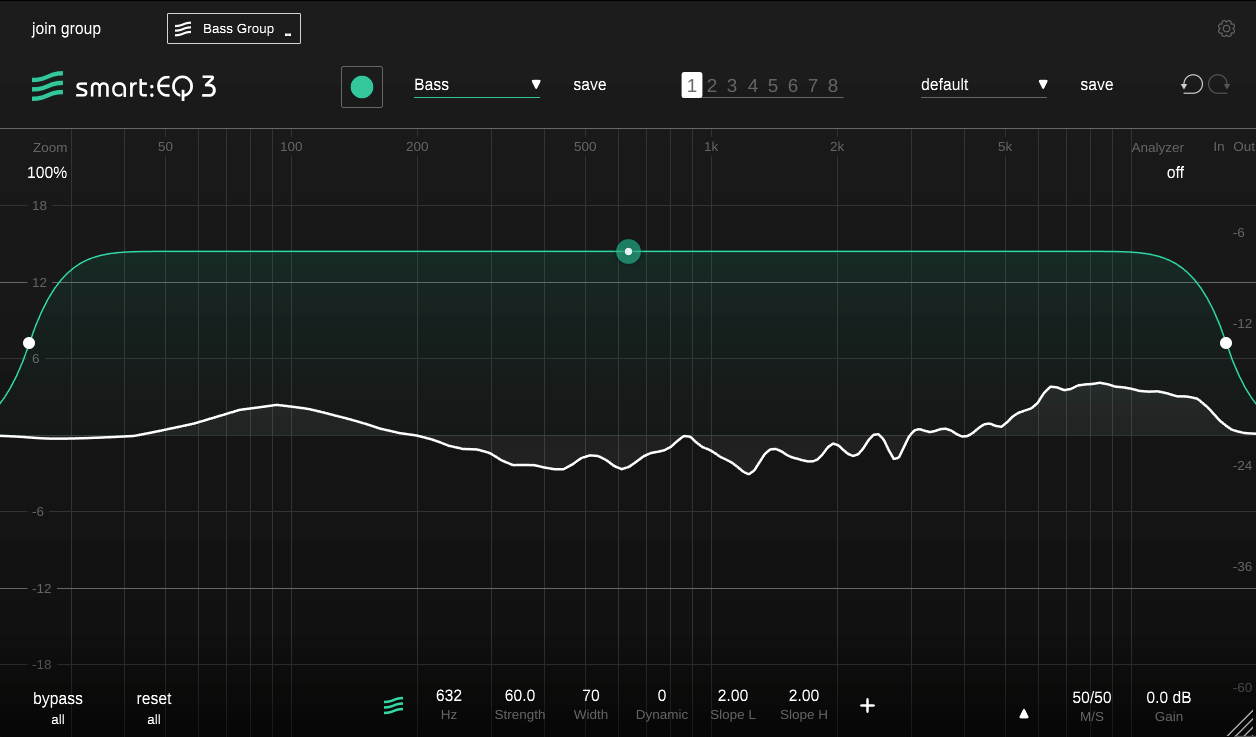
Step 5: Bass Bus EQ
Moving on, we place a new copy of smart:EQ3 after the smart:comp on the bass bus. We choose the Bass profile and play the audio. The results are less dramatic this time, although it has given us a slight boost around 100Hz and a nice lift in the highs.
You may have noticed that there’s been quite a bit of boosting in the 100Hz region so far. Normally, we would be carving this back ourselves to give the kick and bass room to breathe but we’re going to let smart:EQ3 take care of that in a later step.
The bass before smart:EQ3:
And after:
Step 6: Piano EQ
We have a bright piano loop, ‘ph_120_piano_loop_timer_Fmin.wav’, from the Splice pack, Piano House. Let’s see how smart:EQ3 handles it. We choose the Piano profile, click learn, and look at the results. It’s frankly a little dark for our taste, with quite a big hump in the lows and a dip in the highs. By pulling down on the green line and reducing the amount of Impact, we can arrive at a result that fits our song better. Hey, we can’t expect AI to get it right every time.
The difference between the before and after here is very subtle indeed, so much so that you may be wondering why bother at all? Good question. Remember that we’re going to group all of these channels together at the end and let the smart:engine make tonal balances for us. It needs to have the EQ engaged to do this.
Before AI EQ:
And after with our adjustments:

Step 7: Vocals EQ
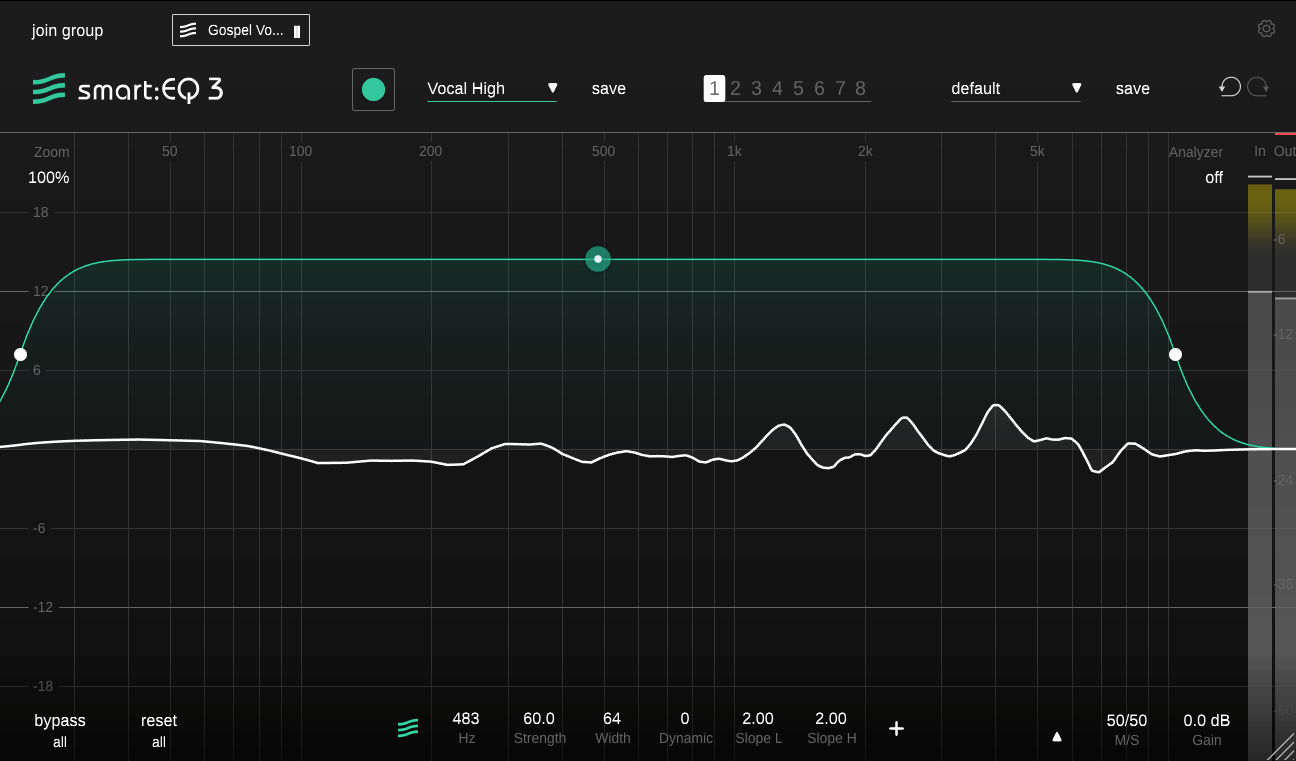
The next step in EQing is the gospel vocal sample ‘SOUNDDOCTRINE_reflections_melodic_loop_12_vocal_female_solo_gospel_rnb_60_bpm_Fmin.wav’, which came from Splice’s Reflections pack.
We add smart:EQ3 to the channel, choose the Vocal High profile and let it do its thing. It gives us some boosts in the upper mids at around 1200Hz, 2500Hz and 4000Hz, and tames the highs a touch, which were a little crispy in the original recording.
Vocals before EQ:
And after:
Step 8: Grouping
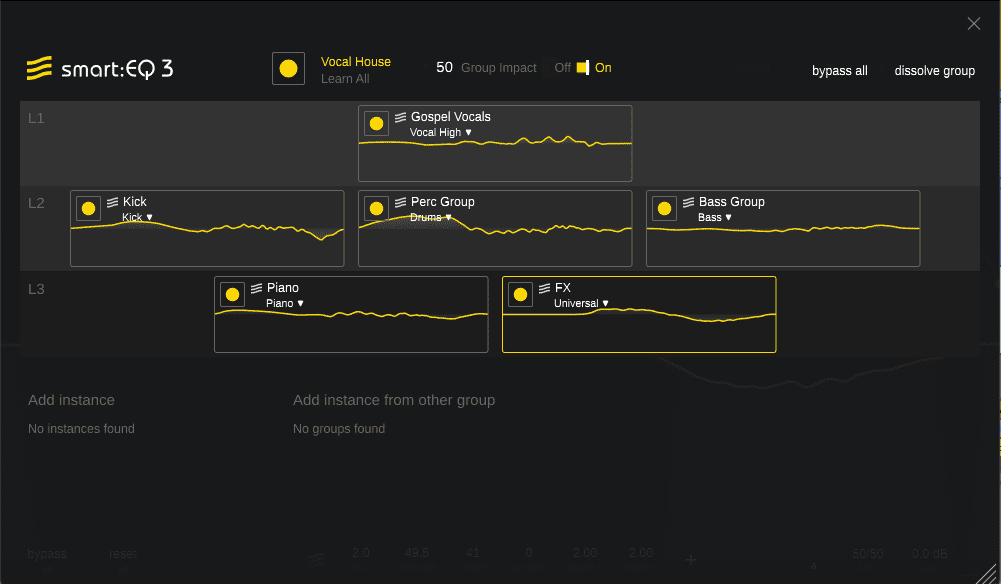
Finally, let’s group all the instances of smart:EQ3 together so it can create a balanced mix for us. On the vocal EQ (any of the instances in the project will work), we click on the Join Group tag in the upper left corner. We give our group the name ‘House’ and then click Create New Group.
On this new screen, we can see a hierarchy of three levels, labelled L1, L2, and L3. L1 gets the most spectral tonal focus in the mix, with L2 being supporting and L3 background. At the lower left, we can see all the other channels of smart:EQ3. We drag these into their appropriate tiers, with vocals at the top, drums and bass next, and piano at the bottom. As before, we hit the Learn button and let the plugin balance our mix. The end result is a solid mix with tighter lows and warmer mids than before.
Here is the mix with the group function in bypass:
And with group AI engaged:

Here’s the final track with reverb and delay sends all on:
This content is supported by Sonible. If you want to read more about content funding on Attack Magazine and how we can continue to provide content to you for free, visit our content funding page for a breakdown of our editorial policy
Tutorials is sponsored by
Roland Cloud is your creative hub for Roland hardware and software. Access legendary recreations of Roland Classics, find new sounds for your favorite products, and download updates and companion apps to make music fast and easy.