
This channel is sponsored by
 Roland Cloud is your creative hub for Roland hardware and software. Access legendary recreations of Roland Classics, find new sounds for your favorite products, and download updates and companion apps to make music fast and easy. Visit Roland Cloud
We use Baby Audio’s Super VHS to add a faded lo-fi vibe to a house track.
There’s no denying that modern in-the-box music production has made things much more convenient. However, some might say that we’ve lost something sonically in the move to digital. Hardware mixing desks, recording to tape, semi-working effects and instruments – these all added grit and imperfection and helped give music character.
The good news is this is all available digitally in the form of lo-fi plugins like Baby Audio’s Super VHS. This multi-effect processor features a number of different parameters to help turn a pristine and clean signal into something resembling a VHS tape that’s been left on the rear seat of a 1977 Buick Skylark parked in the hot sun. Today, we’re using Super VHS to help us vibe-up a house track.
We’ll go from this:
To this:
Quick Overview Of Super VHS
Super VHS by Baby Audio is a multi-effect plugin made to add grit and warble. The name should give it away, really. Think Boards Of Canada-style wobbly synths and bit-reduced old beats.
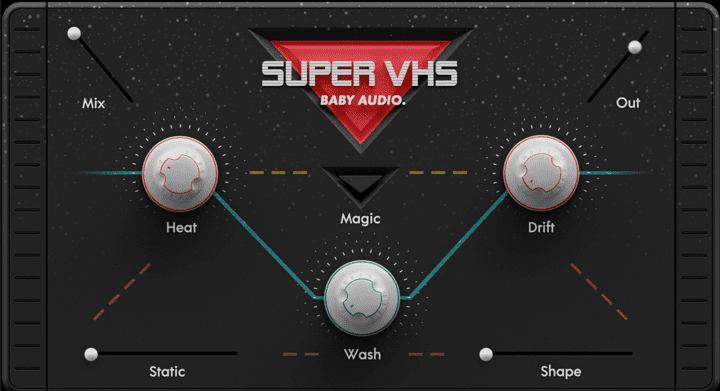
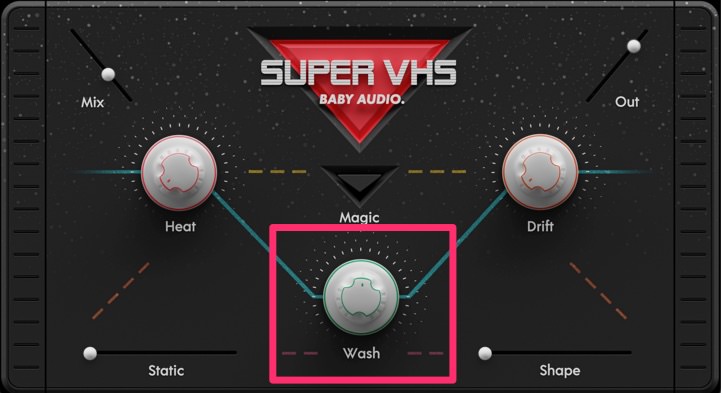
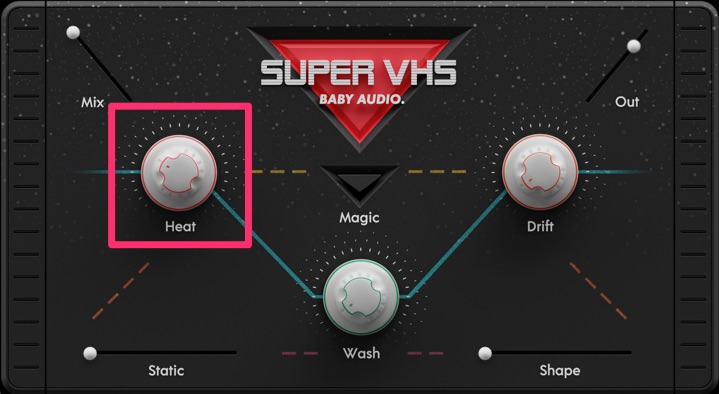
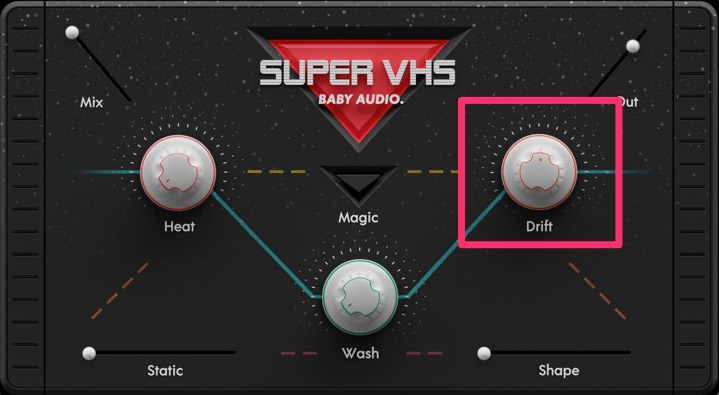
There are eight controls on the VHS tape-shaped plugin. Each adds a different flavour of lo-fi. Starting in the middle, there are three knobs. The first is Heat, which adds saturation. Dial in a little for a boost of warmth or a lot for distortion. To the right is Drift. This knob introduces tape-like wow and flutter, or pitch warbles. Use this to give any sound a nostalgic, dream-like feeling. Finally, at the bottom is Wash, a dark reverb with spring reverb-like overtones.
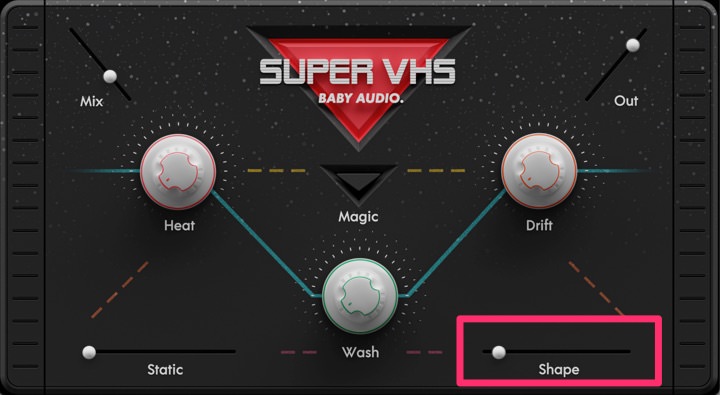
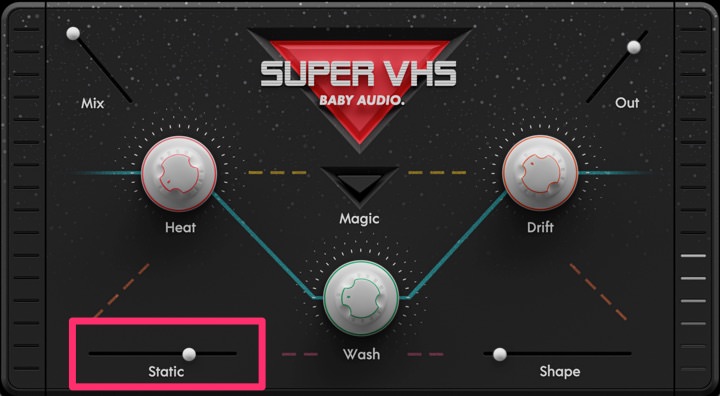
Let’s look at the slider controls next. On the bottom left is Static, which introduces a crackly hum like you’d find on an old television set. To the right is Shape, which reduces the sample rate. At the top left is Mix for blending between wet and dry. And at the top right is Out for adjusting output amount.
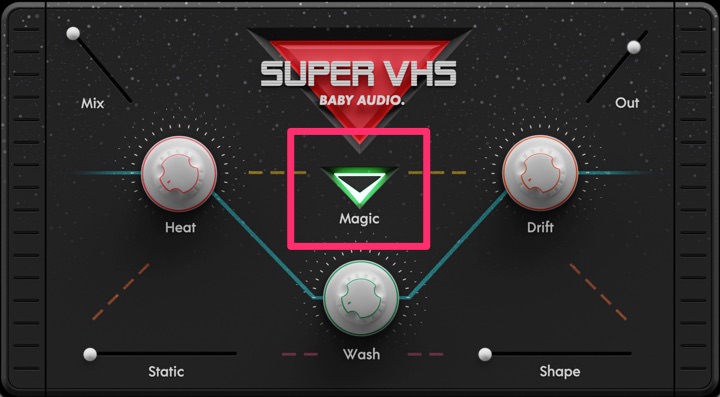
There’s one more function. Right, dead-centre is a button labelled Magic – click that to introduce a lo-fi chorus.
Today, we’ll use each parameter individually to give some old-school mojo to a house track featuring samples from Splice’s Deep House Soul pack.
Step One: Shape
We have a kick (the sample ‘dhs_kick_one_shot_synthetic_low_donot.wav’) and a TR-505 snare from Ableton Live’s stock sample collection. They’ve both been processed with u-he Presswerk, EQ’d, and the snare degraded with Inphonik’s PCM2612. To this, we added a topper sample, ‘dhs_123_drum_loop_vinnifrost_hat.wav’, tightened up with Native Instruments’ Transient Master.
We’d like to give our hat loop some more character so we add Super VHS to the channel. We’re going to use Shape to reduce the sample rate and give it some crunch. It’s a pretty bold effect and we don’t want to destroy the hats, just give them some character, so we choose the first setting (the sliders are stepped rather than continuous). We also bring down the mix amount to favour the dry signal. This rounds off the highs as well as some of the transients, making it a bit softer as well as ‘older’.
Here is the hat loop before Super VHS:
And after:
Step 2: Wash
We’re using an edited Clip from Ableton Live of a Roland CR-78 to bring a ‘Heart Of Glass’ drum machine groove to our production. It could use some reverb though as it’s pretty dry.
We place Super VHS on the MIDI channel. This time, we use Wash to dial in some dark and musty reverb. We bring the dial up to 50%. We don’t want to completely drown the percussion though so we bring the Mix amount down to around 30%. That’s given it a nice, dark feel.
The CR-78 before reverb:
And after:
Step 3: Heat
We’re liking where our drums are going but they could be a little more punchy. Instead of putting a compressor on the drum bus, let’s use Super VHS to beef them up and also help them sit together.
We group all our drum sounds – kick, snare, hi-hat loop and CR-78 MIDI track – into a bus. We place Super VHS on this and bring our attention to the Heat knob. This adds saturation, which can help to bring all the tracks together. We bring up the amount to around 10 o’clock. This feels perfect – any more and things start to distort, any less and the effect is a bit too subtle for what we’re looking for.
The drums before saturation:
And after:
Step 4: Drift
Next, let’s see what Super VHS does with musical elements. We have a dusty chord sample that we like. It’s called ‘dhg_chord_mono_A#.wav’ and it comes from the Splice pack, 90s Deep House and Garage. We’ve created a chord progression with it and processed it with u-he Presswerk and EQ Eight to really bring out the crust and dust. It’s a bit static though. Super VHS can fix that.
This time, after adding Super VHS to the track, we reach for the Drift knob. This introduces tape-style pitch wobbles and makes it sound as if it’s playing off a reel-to-reel with a failing motor. We find that this effect is best used in moderation – too much and it will dominate the whole track. We want it to be a little woozy, not sound like a boat in rough seas. Accordingly, we raise the dial to 50% and then stop. That’s given it some pitch drift and made it a bit more interesting.
The chords before:
And with the Drift effect:
Step 5: Magic
For our last musical element, a glassy synth loop called ‘dhs_123_synth_loop_ivory_Bmin.wav’, we want to widen it a bit and give it some movement. Super VHS’s Juno-style Magic chorus can help with this.
We place Super VHS on the channel and hit the Magic button. This adds a dark chorus that helps widen the sound. As this is more of a supporting sound to the chords (above), we want to push it back in the mix even more, so we dial in a little of Super VHS’s Wash reverb. And finally, because we love the effect so much, we give it a touch of Drift.
The dry synth loop:
And with Super VHS chorus, reverb and pitch drift:
Step 6: Static
Finally, let’s use the Static setting to create a noisy soundbed to help improve the overall lo-fi vibe.
We create an empty audio track and insert an instance of Super VHS on it. When we turn up the Static slider, we can hear a crackling noise loop. This noise loop is also affected by the plugin’s parameters, so we add some Wash reverb, Drift pitch wobble, and Shape sample rate reduction to colour it to taste.
It’s a bit full in frequency, so we drop in Live’s EQ Eight next and filter out the lows and highs, leaving just the region between 1k and 12k. That’s better but it’s a bit boring just buzzing away like that. Let’s use sidechain compression to make it more rhythmic. We use Live’s Glue Compressor sidechained to the kick to make it pump gently in time to the beat. Finally, we lower the volume on the channel so it’s just barely perceptible. The idea is that you don’t really hear it but you notice it when it’s muted.
Here is the Static loop processed on its own:
And in the context of the track so far (remember, the idea is to be subtle):

Lastly, here’s the finished loop with bassline sample ‘dhs_123_bass_synth_loop_fatfnk_Dmin.wav’ and some light master bus saturation and compression.
This content is supported by Baby Audio. If you want to read more about content funding on Attack Magazine and how we can continue to provide content to you for free, visit our content funding page for a breakdown of our editorial policy.
Tutorials is sponsored by
Roland Cloud is your creative hub for Roland hardware and software. Access legendary recreations of Roland Classics, find new sounds for your favorite products, and download updates and companion apps to make music fast and easy.