
This channel is sponsored by
 Roland Cloud is your creative hub for Roland hardware and software. Access legendary recreations of Roland Classics, find new sounds for your favorite products, and download updates and companion apps to make music fast and easy. Visit Roland Cloud
In this new instalment of our mixing series, we mix a deep house-style beat using Waves plug-ins in Ableton Live.
Mixing is a new series in which we mix tracks of various genres using stems provided to us by readers. If you’re interested in submitting a beat, we are looking for 8-16 bars of 24-bit bounces with the loudness level at no more than -15rms. We will not accept stems that already sound like a finished and mixed track. If you have included any samples, please let us know what they are.
You can send your submission to editor@attackmagazine.com and make sure to also include a short artist bio, a few photos of you in your studio, and a SoundCloud link. Note that by sending in your music, you consent to allow Attack to electronically distribute your music and stems in the form of non-commercial downloads for the purposes of the article.
This installment’s stems have been provided by Hong Kong-based producer Milam, who produces dreamy Deep House & Techno inspired by East Asian elements such as Buddhism and anime. He started off as a classical pianist then gradually moved into producing electronic music, performing all over the world in places such as UK, India, the US and Hong Kong. His aim is to spread the gospel of house and techno throughout Hong Kong, China and beyond. You can follow Milam on SoundCloud.


Here’s the unmixed beat we were provided:
And here’s our final mix:
Step 1 – Preparation
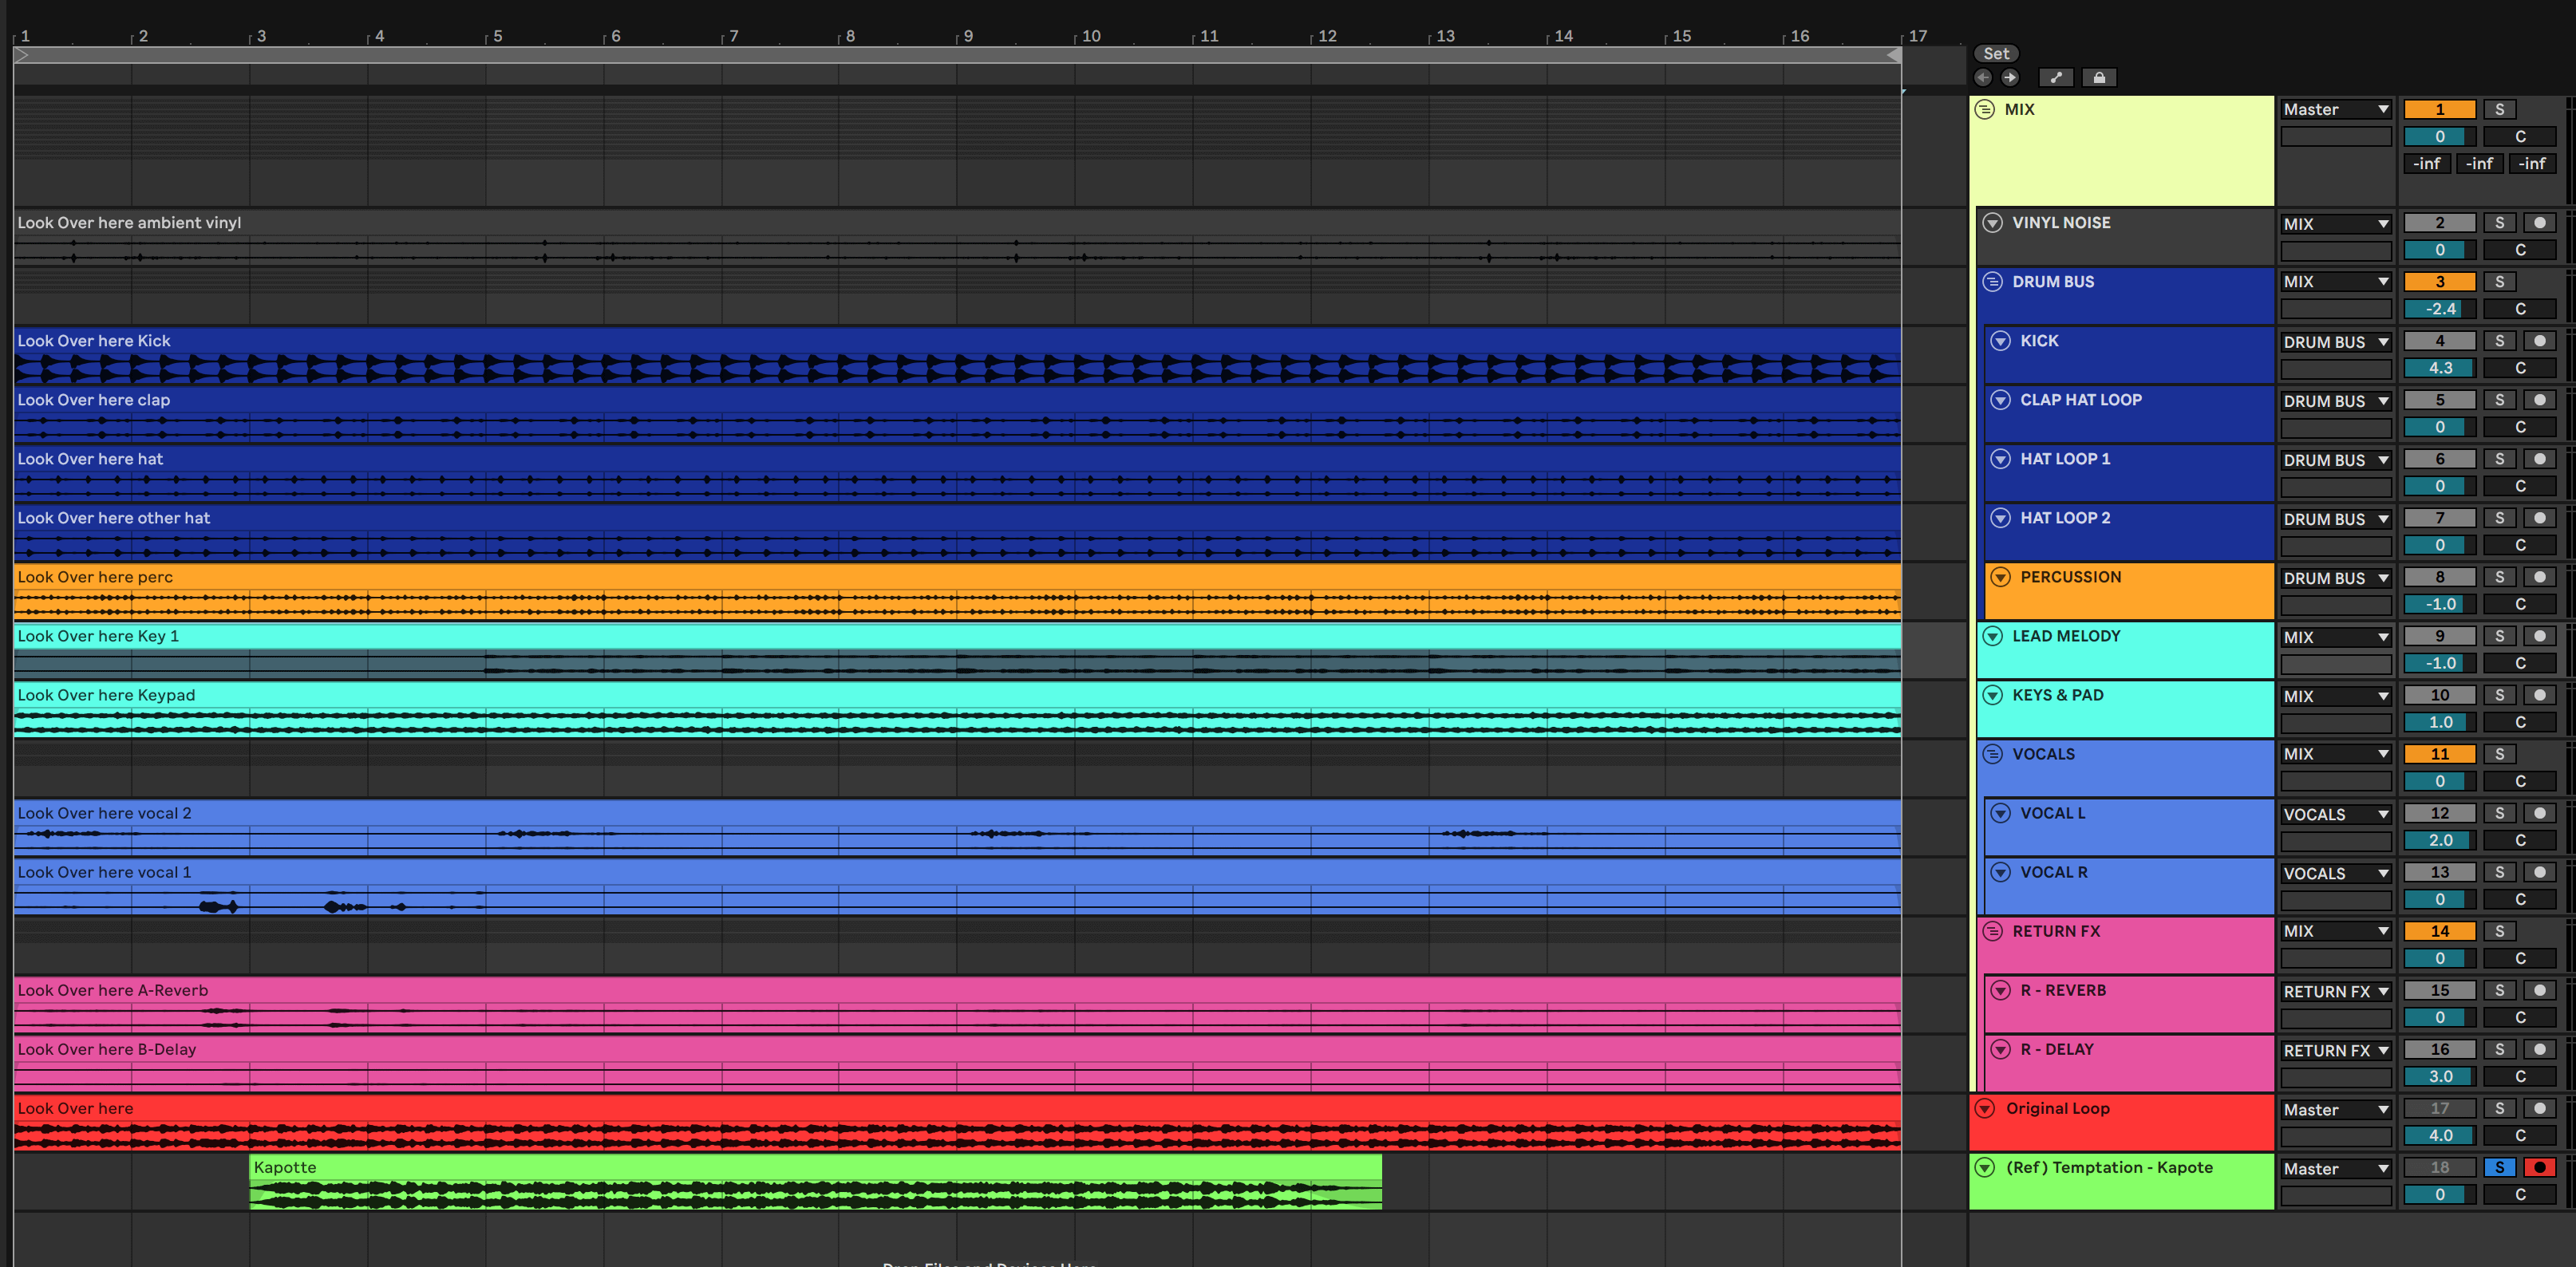
We’ve been provided with twelve stems for this beat. Here are shortened versions of each individual stem:
- Drums: Kick, Hat & Clap Loop, Two Hat Loops, Percussion Loop
- Harmonic Elements: Lead Synth, Tremolo Keys
- Vocal Samples: Two hard panned spoken word samples, which we’ve combined:
- Return Effects: Milam bounced his return Reverb and Delay effects separately but they’re combined below:
- Vinyl Crackle Ambience
It’s always good to colour code your tracks and group similar elements into sub-groups to make it easier to find your way around and apply group processing. We grouped all of the drum elements, including the percussion stem, while also grouping the two return effects stems.
At the very bottom, we placed the original full bounce provided so we can go back and forth between the producer’s version and our mix. This is crucial as it can prevent you from getting too carried away while mixing!
Finally, we’ve loaded up a snippet of Kapote’s ‘Temptation,’ because it has a similar driving beat with a minimal number of elements. Mixing without a reference can be like going down an endless tunnel so always be sure to have one or two similar tracks in your project!
Step 2 – The Low End
You may have noticed that there is no bass stem! As a result, we’re going to need to get as much low end as possible from the kick and the keys stem that features some low rumble.
First, load up Voxengo’s free SPAN plug-in to find the kick’s root frequency. This will show us exactly where we need to boost to get some more knock and weight from the kick. All you need to do is hold your mouse over the highest point in the kick’s graph and SPAN will show which frequency and note is the root. In the below image, you can see that it’s around 44-45 Hz.
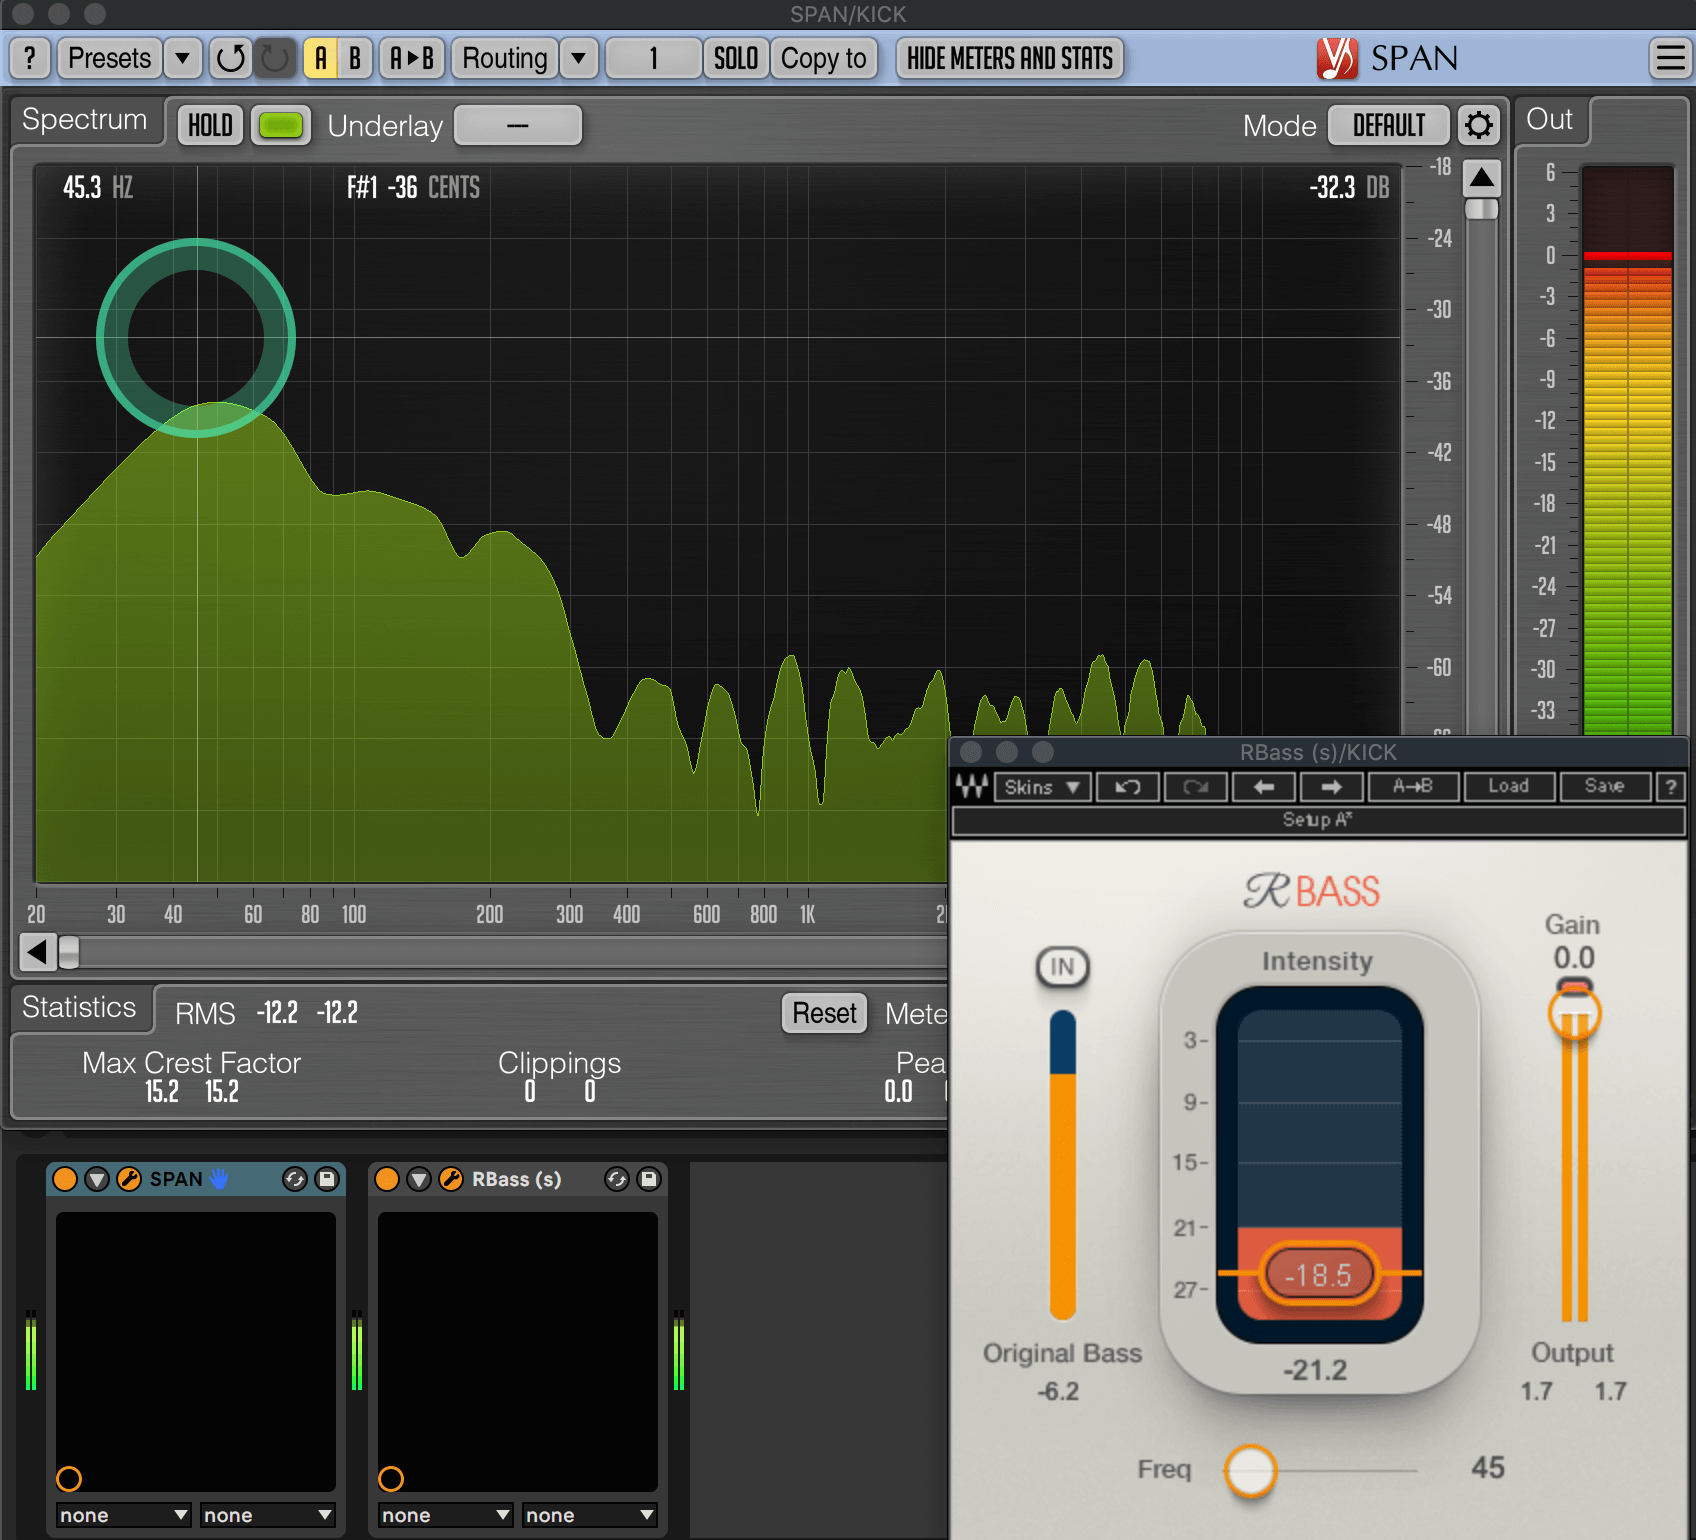
Load up Waves RBass or any other low frequency enhancer on hand and make a slight boost in this specific area. Here’s the dry kick without RBass and then with the plug-in activated.
You will need headphones or speakers to really hear the difference but the effect can also be felt in the highs as well. This immediately brings our kick closer to the kick in our reference track.
For the keys, we’re going to use multi-band processing. If you haven’t already, be sure to pick up ELPHNT’s SPLTTR audio device for Ableton, as it immediately splits any channel into three chains of lows, mids and highs. Load up SPLTTR on the keys channel and set the Mid/Lo to around 137 Hz. This means that the ‘Lo’ chain of SPLTTR will occupy anything under 137 Hz.
Insert an instance of Waves’ Submarine (or any other sub generator plug-in like Waves LoAir) on the Lo chain and its default setting will be more than enough to add a good layer of subs. You can always lower the Mix knob if it’s excessive. Place a compressor after Submarine and sidechain it to the kick. This will provide that classic pumping effect and make sure the kick doesn’t have to fight with the bass to cut through the mix.
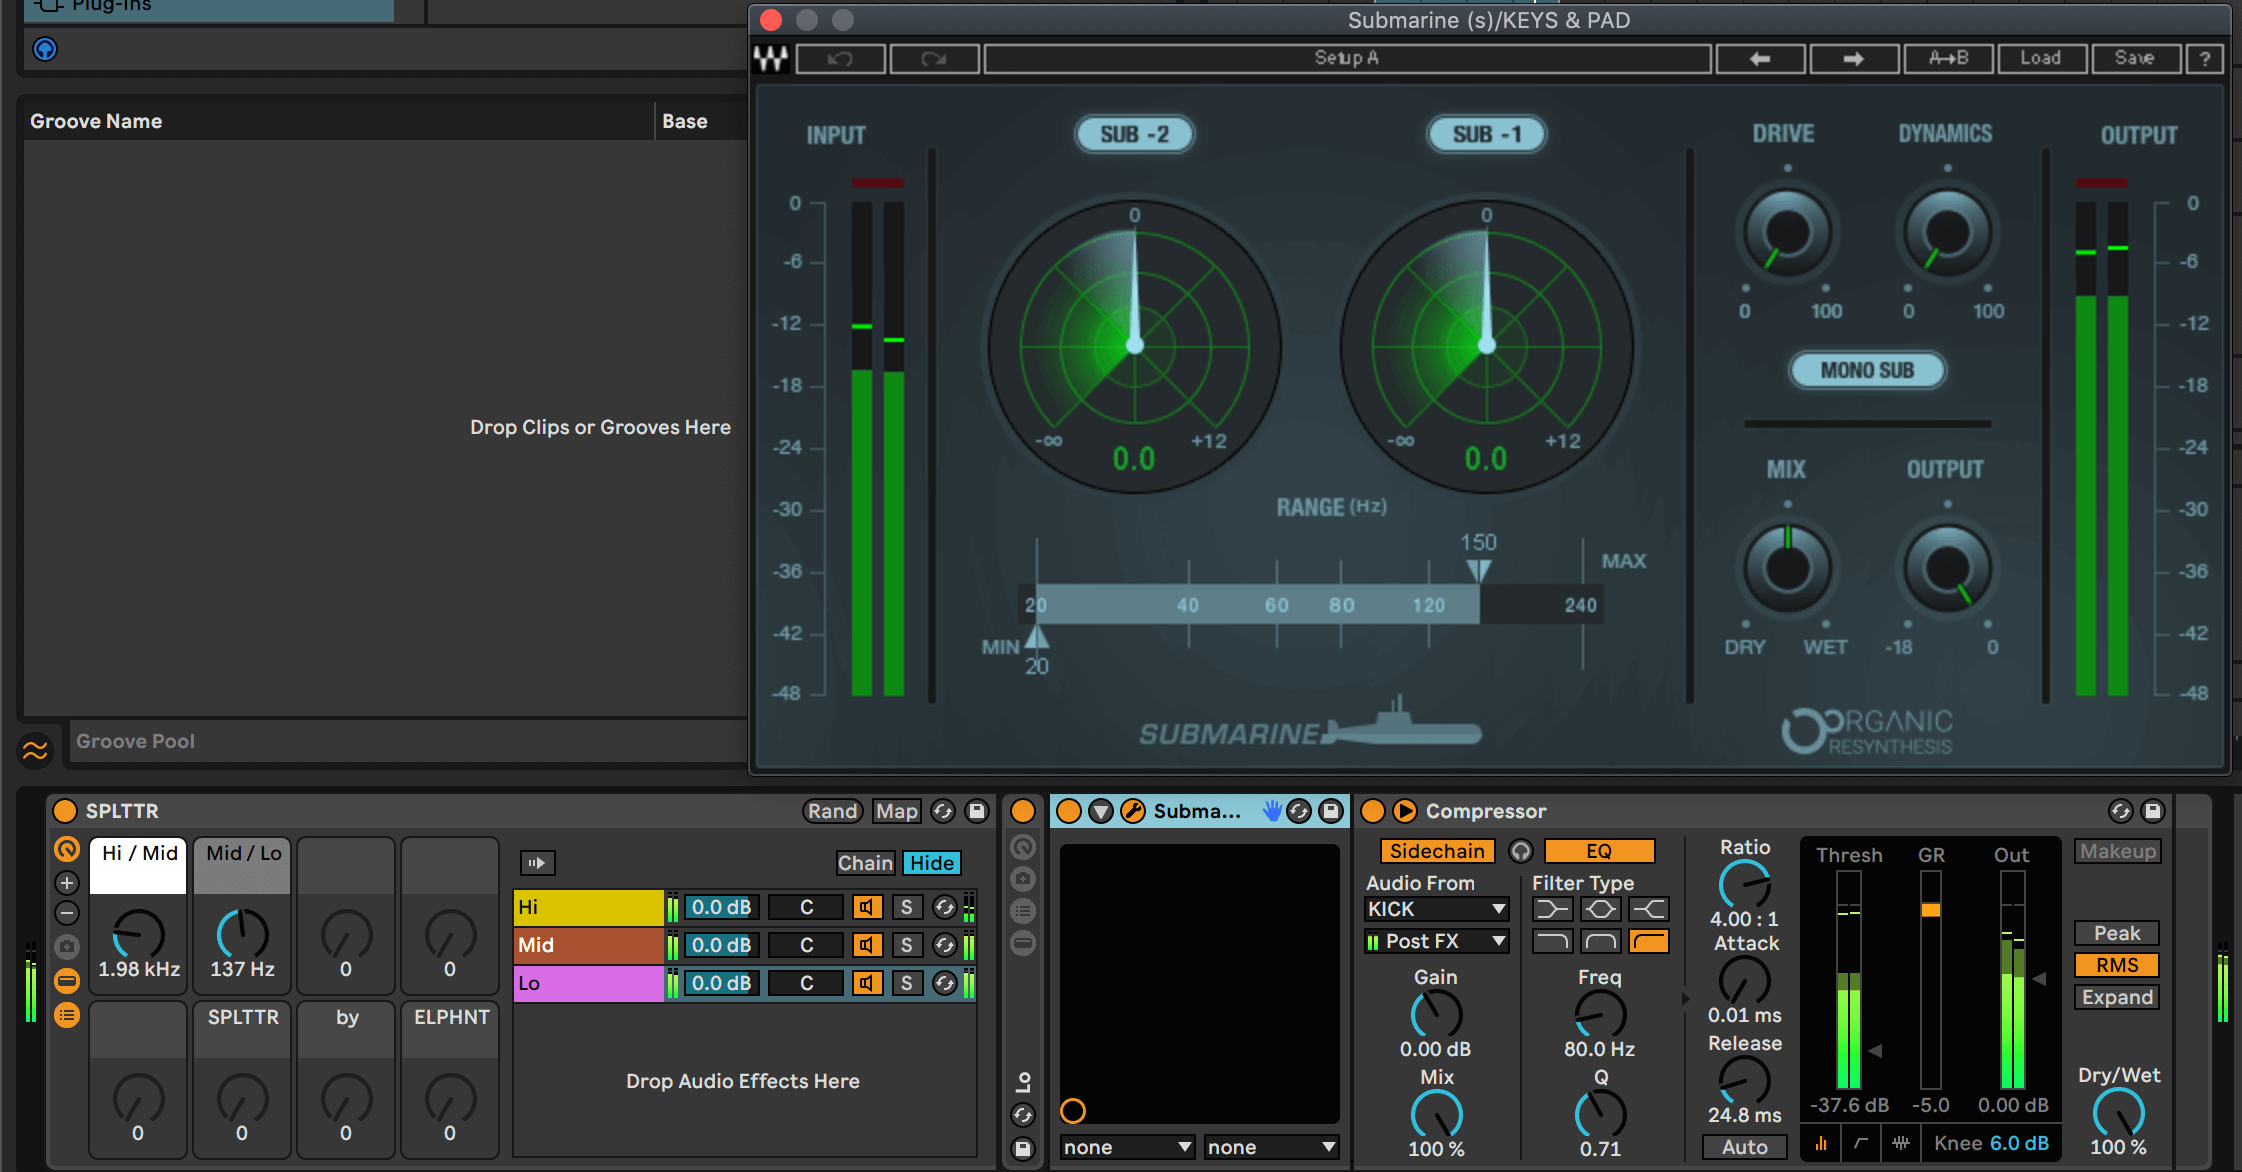
We also placed an instance of MetaFlanger on the Hi chain to give the keys some stereo width. You can do this with any phaser, flanger or chorus plug-in to taste.

Here’s how the keys sound before and after the multi-band processing
The low end sub rumble makes this stem a great replacement for a classic bass part.
Here’s our progress so far, with the kick, keys and vinyl crackle stems playing:
Step 3 – Drum Processing
We’ll start work on the rest of the drums with the clap loop. Here’s how it sounds in solo:
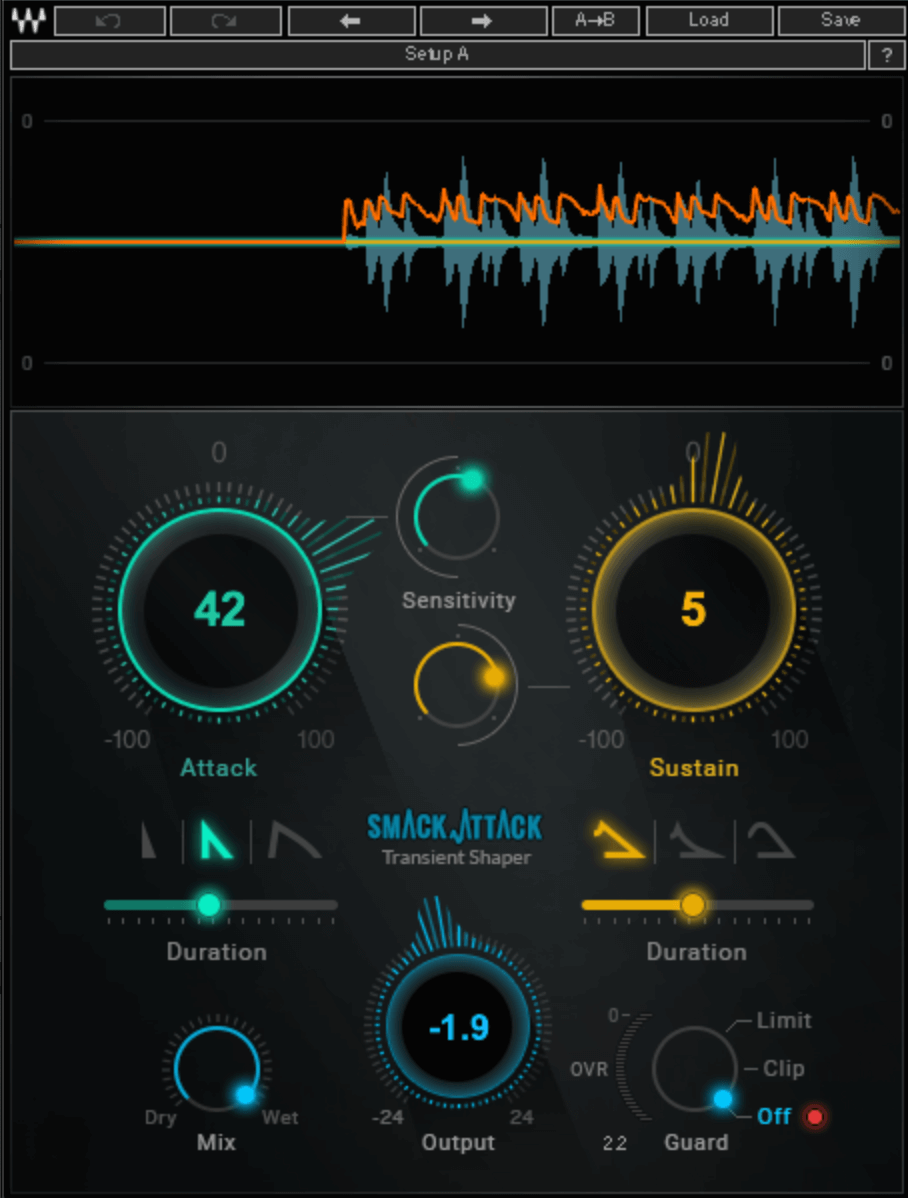
When comparing our clap to that of the reference, it’s not coming through as punchy and we’re not really feeling its hit. A quick solution is a transient shaping plug-in so insert any one you have on the clap – we used Waves’ Smack Attack – and increased the attack by a good 30-40%.
You can also increase the sustain slightly to give the sound more weight. A large increase of the attack parameter will make the part louder so be sure to compensate by lowering the output volume.
Here’s how the clap sounds with Smack Attack activated:
The other individual drum stem we’re going to process is the percussion:
The loop already sounds great but giving it some stereo width will help it pop out. You can achieve this with any chorus or widening plug-in but be sure to keep the dry/wet low so the effect is felt instead of heard.
We reached for Waves’ Doubler plug-in that combines the original signal with slightly delayed and re-pitched versions. The AccGTRWide preset is definitely a favorite for a quick widening effect:
Here’s how the drums sound so far:
With all of the drum parts grouped, we can process the whole group as one. The goal is to add some brightness and presence as well as some more punch via parallel compression.
Waves’ Aphex Vintage Aural Exciter plug-in is great for this so load it up, select the Cowbell preset (you heard correctly!) and adjust the AX Mix knob to taste – we left it between 4 and 5. Too much of this effect and the highs will get very harsh! An alternative to this plug-in could be quality EQ’s or frequency enhancers that are good for adding shine to high frequencies.
For the parallel compression, insert an audio effect rack and create an additional chain. Now that we have two chains, we’ve doubled the signal and can process the chains separately. Keep one dry and insert a compressor on the other. We used Waves’ OneKnob Pressure that is perfect for achieving an over-compressed sound.
Remember, the idea with parallel compression is to combine the dry dynamic version of a sound with a super-compressed and squashed version. Increase the OneKnob all the way up to nine (this is the equivalent of lowering the threshold to a very low value on a traditional compressor) and decrease the compressed chain’s volume to around -15 db.
Step 4 – Lead Elements
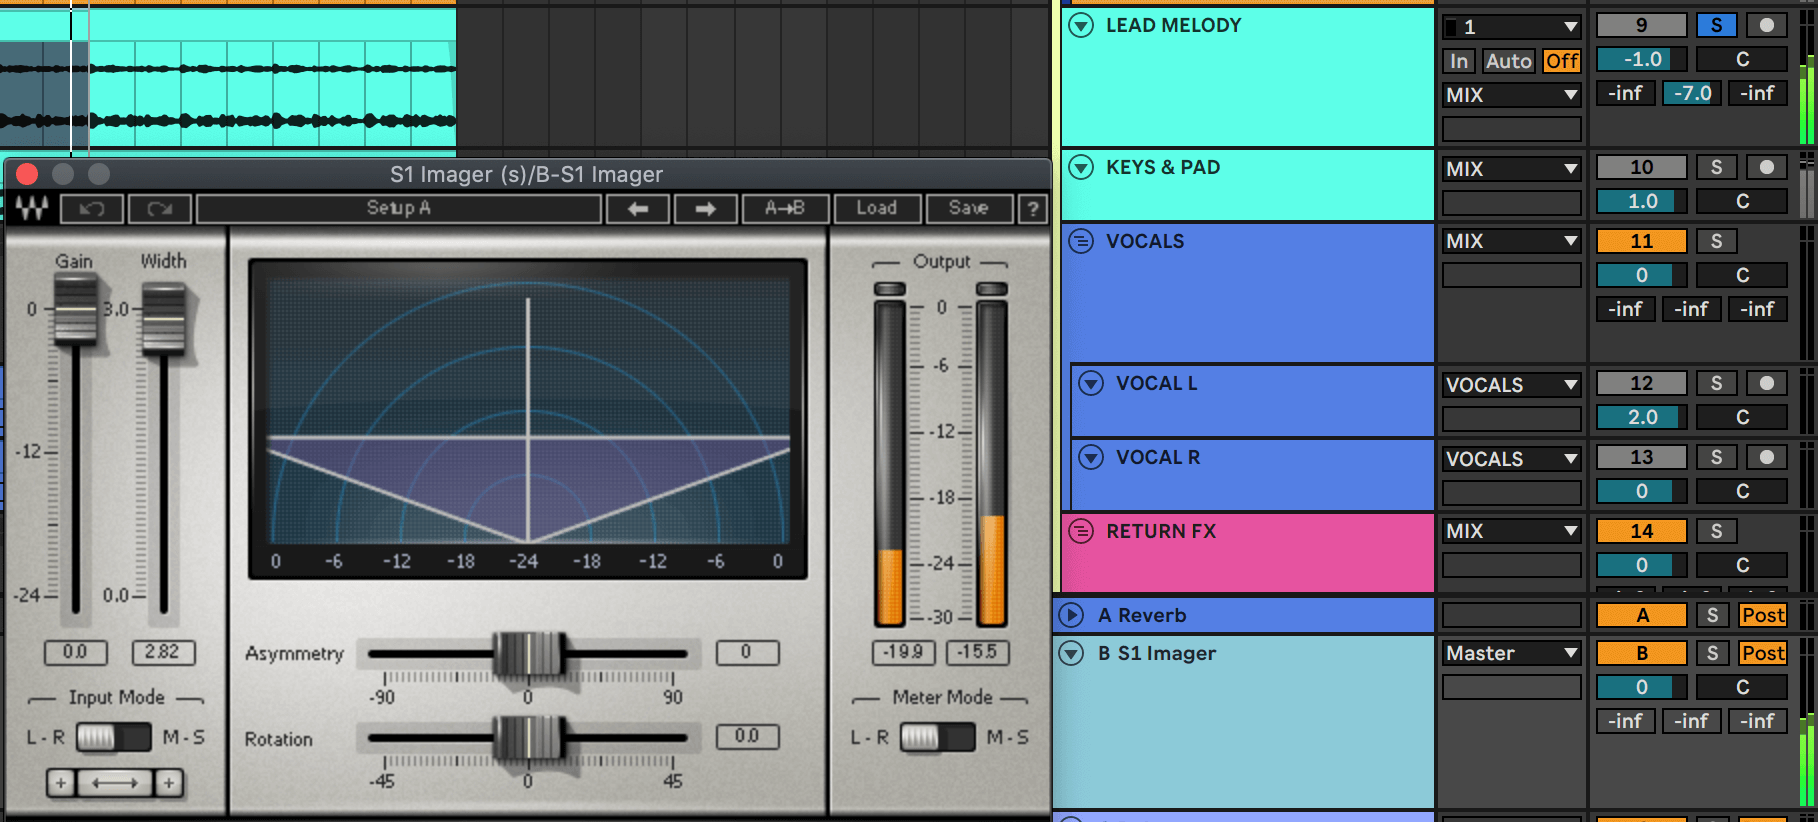
Now that we have the drums down we can take a look at the lead elements, which are the dreamy synth melody and the vocals. Because this is deep house it is really important for the synth and pad sounds to have a wide presence. A quick trick to achieve this is using a return channel with a stereo widening plug-in on it.
Here’s the melody as received:
Create a return channel and insert Waves’ S1 Imager or any other widening plug-in you have and increase the width to its max setting. The next step is sending around -7 db from the synth to this return channel and the effect is immediately felt.
For the vocals, the main vocal stems are already hard panned and quite audible so we can focus on the return effects to ensure we’re hearing the cool delay effects.
On the return delay stem, insert Waves’ RVox, which is a one-knob-style compressor perfect for adding presence and brightness to any kind of vocals. Here’s the delay before and after Rvox:

The next step is some basic mastering but here’s our progress so far:
Step 5 – Saturation and Compression
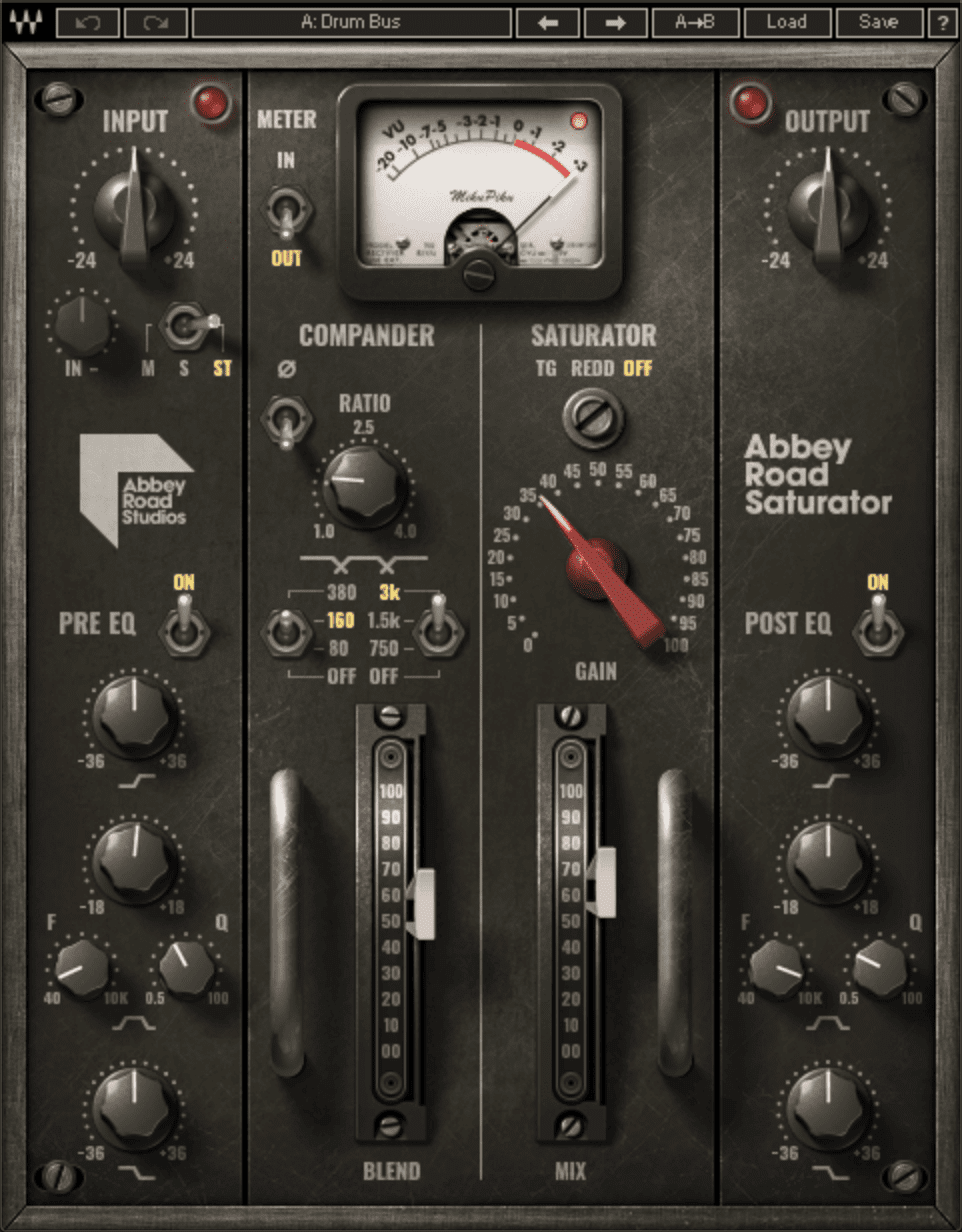
Saturation is a great way to start processing the whole mix as it can add a common character to all parts. We used Abbey Road Saturator’s Drum Bus preset and slightly tweaked the Blend, Mix and Ratio knobs. The Ratio controls the balance between high frequency and low frequency enhancement so leaving it too high can sound too bright and digital.
The last step is some compression and the LinMB multiband compressor can do a great job of adding cohesion and balance across the spectrum. Many producers claim that the Multi-Electro Mastering preset of this plug-in is their secret weapon before handing over the mix to a mastering engineer.
We also used this preset and all that’s then required is to lower the Master Threshold for the compression to kick in across all of the bands. You can then slightly adjust the individual thresholds to taste. For example, we increased the Low and LowMid thresholds too reduce the compression there, as the high frequencies started to take over too much with the plug-in active. Be sure to use the trim fader to compensate for the reduction in gain.
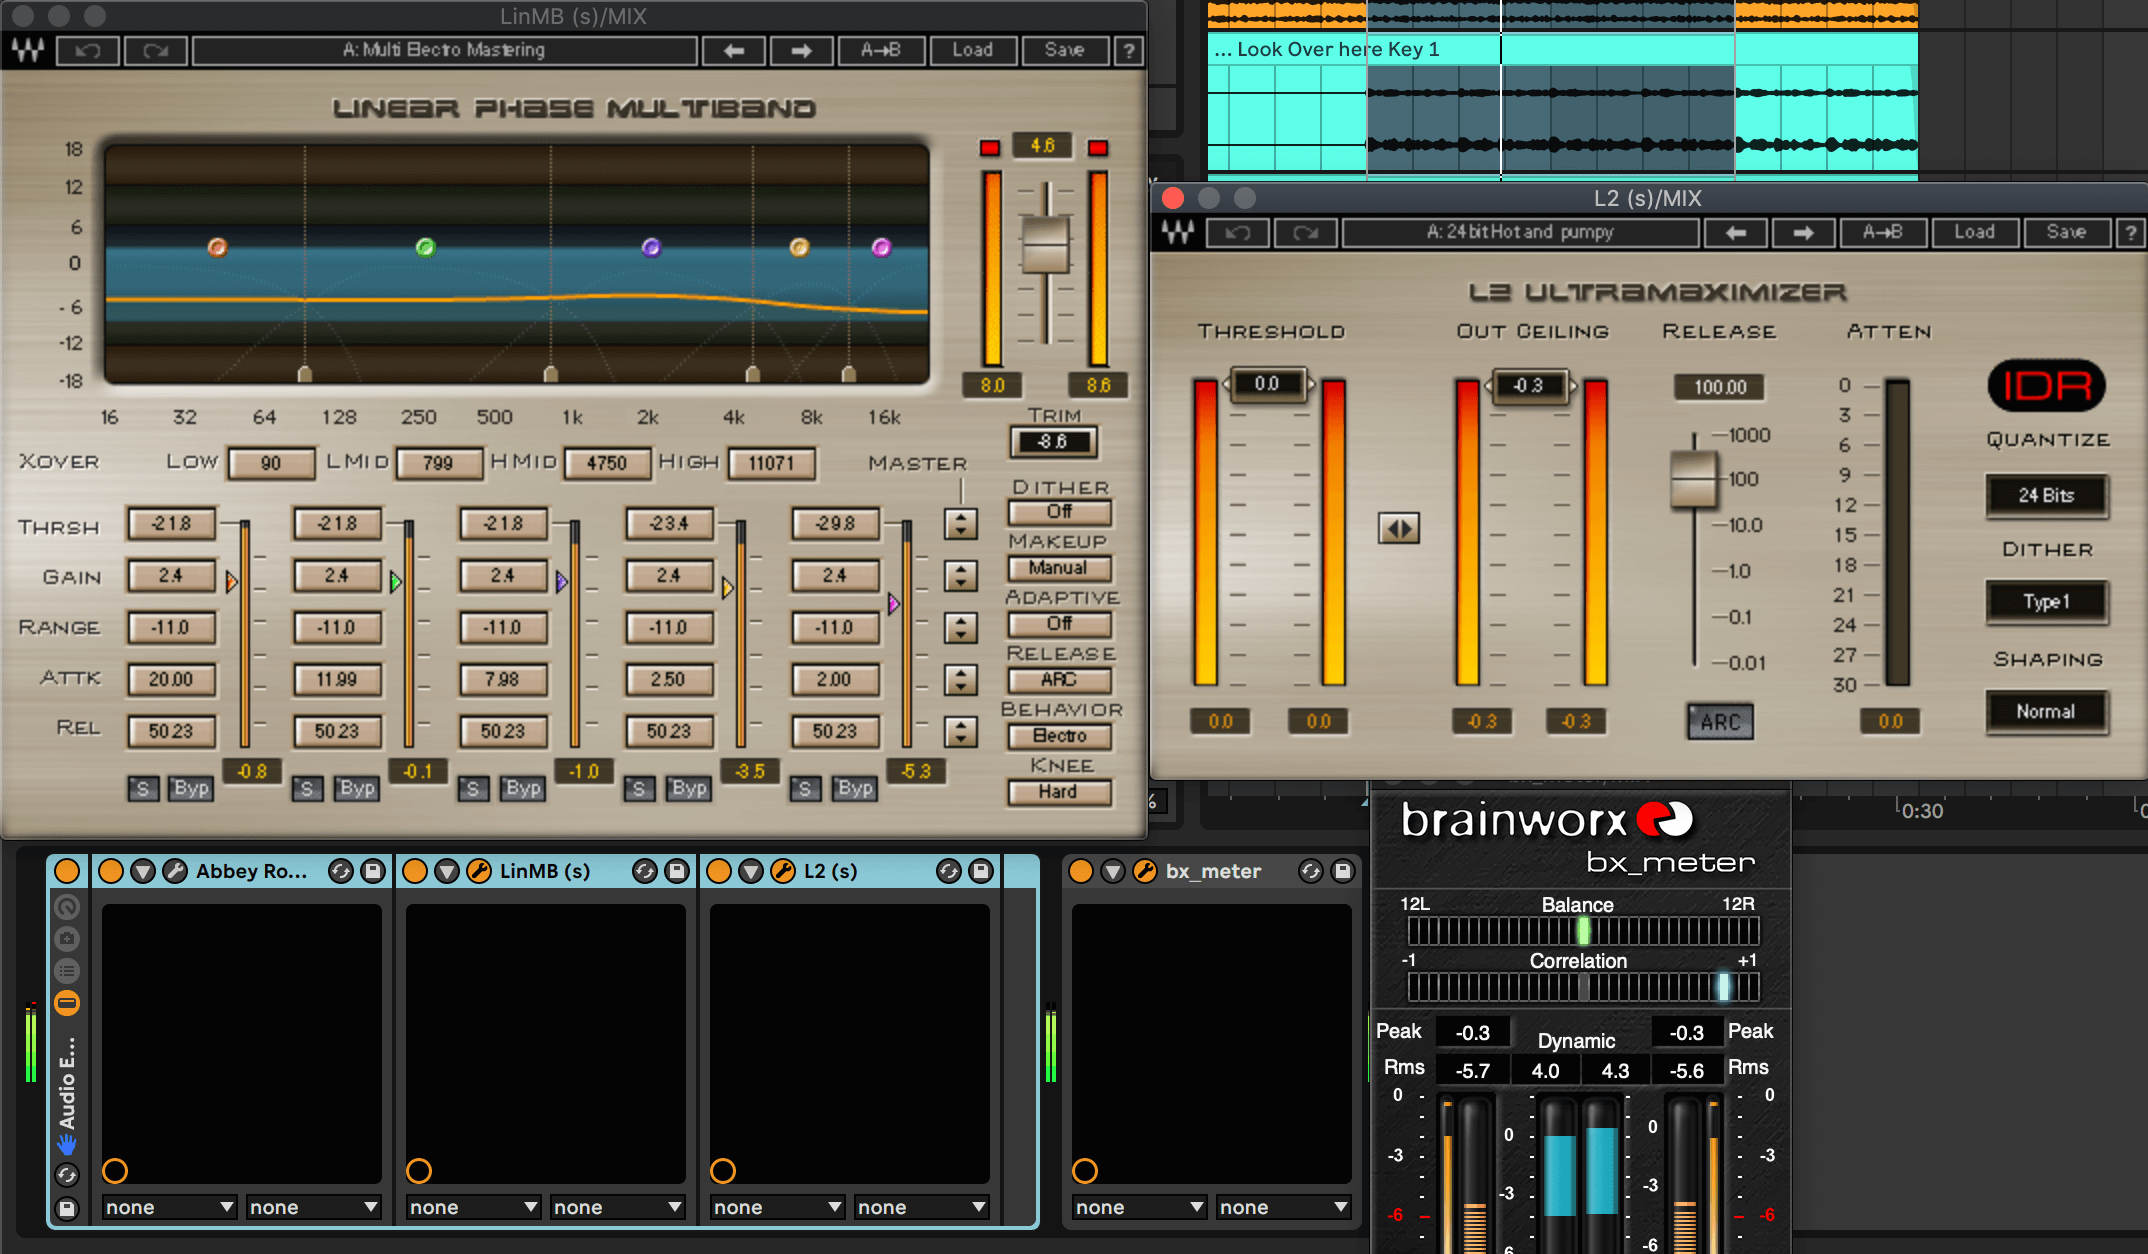
Insert any limiter to prevent clipping by setting the Out Ceiling to -0.3 and use a meter to make sure your RMS levels are no more than -6 to -5. Any more loudness will surely reduce overall dynamics. If you’re going to send your track out for mastering, keeping RMS levels at -10 to -15 is a better idea!
Here’s our final mix:
If you want to get involved in this series, please send us an email.
Tutorials is sponsored by
Roland Cloud is your creative hub for Roland hardware and software. Access legendary recreations of Roland Classics, find new sounds for your favorite products, and download updates and companion apps to make music fast and easy.