
In this tutorial, we’ll go through the main types of compressors and show you when to use them. We’ll also run the same audio file through all of them to give you an idea of just how much each compressor type differs.
Originally made for leveling out voices for radio broadcast, today compressors are employed for everything from taming peaks to adding colour to nuking as an effect. Even if you’re a compressor master (see our interview the with Ambivalent) and know how to properly use attack, release, and threshold settings, this often isn’t enough. It’s also important to know what kind of compressor to use and when.
Note that this tutorial assumes you are broadly familiar with how to use a compressor. If you find yourself scratching your head, please take a look at this tutorial and then come back.
The compression in some of our examples are rather subtle so we recommend listening carefully on headphones. Click on any image to see a larger version.
VCA Compressors
VCA compressors are what you want when you need transparency. They’re fast and punchy on rhythmic material so they’ll smooth out peaks without squashing everything in sight. Given their love of drums, most buss compressors are based around VCA technology. They also have a large number of controls, meaning they’re versatile. Don’t hit them too hard though, as they’re known to distort when pushed, and thorough plugin emulations will retain this characteristic.
Famous VCA compressors include the SSL Buss Compressor and the API 2500.
Let’s see how VCA compressors can shape a sound.
Drums
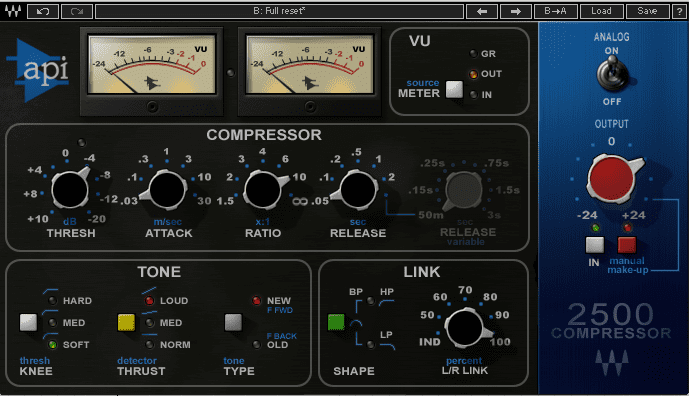
We import our sample into our DAW. The drum programming is fine but the overall mix sounds a little lifeless. We load up Waves’ API2500, an emulation of the famous VCA-style compressor, and get to work.
First, we make sure the compressor is in full reset (init) mode, set the meter to monitor output levels, and flip the Analog switch for analogue emulation. We crank the threshold clockwise to about -4. We need a fast attack to avoid clicks, so we turn it down to .03 seconds to tighten up our transients. We also want a fast release so we avoid squashing the mix too much, so we set it to 0.5, the fastest setting, and slam the ratio all the way to 10:1.
VCA comps can be complicated, so let’s take a look at some of the other functions here. Knee controls how quickly the compressor transitions into gain reduction, and the API2500 has three settings. Let’s go with Soft based on how it sounds. We set the detector thrust setting to Hard—this inserts a high pass filter at the detection input, cutting 15dB at 20Hz and boosting 15dB at 20kHz to avoid low-frequency pumping, which is perfect for drums. We leave the feedback setting on feed-forward for more precise compression control. Lastly, we put the output into manual and adjust to taste.
Our drums sound more full and alive now.
Full Mix
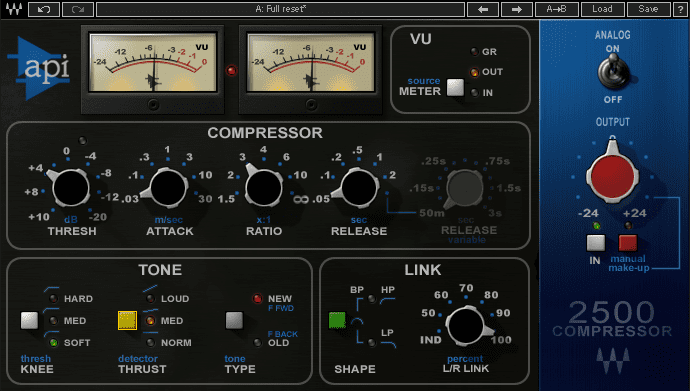
Let’s see what a VCA compressor can do on a full mix. We set the threshold to +4, leave attack and release the same for transparency, and dial the ratio to 3. Leaving the knee soft, we choose the Medium thrust detector setting, and put the output into auto makeup.
Our mix is a little more punchy and lively thanks to the VCA circuit.
FET Compressors
Field effect transistor (or FET) compressors use transistors to emulate tube-style compression behaviour. Tubes are known for colouring the sound and FET compressors are the same. If you want transparency, go for a VCA. If you want aggression and excitement, reach for a FET. They’re also super fast, meaning they’ll clamp down on transients hard. This makes them great for drums, vocals, guitars, or anything that needs a little oomph. They’re also great for parallel compression for when you want to balance aggression with dynamics.
The most famous FET compressor is the Urei 1176. Chances are you’ve heard it a million times on famous records but not realized it.
Let’s see what FET compression can do for us.
Vocals
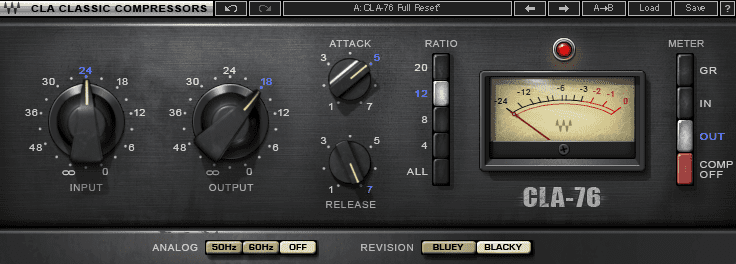
We’re going to demonstrate how to use a FET compressor on vocals. We load up Waves’ CLA-76, the company’s emulation of the Urei 1176. We can see that it’s a lot less complicated than a VCA. There are two versions available but let’s use the famous black version.
We start in full reset. The Analog buttons control whether the plugin hums at 50Hz (UK mains) or 60Hz (US mains). We leave it off. FET compressors are known for their aggressiveness so we tread carefully, setting our attack to 5 and checking for onset clicks. There are none, so we move on. We set our release to the fastest setting, 1. Note that attack and release settings on the CAL-76 are in reverse order, with 1 being the slowest and 7 the fastest. Lastly, we set the ratio to 12. While it’s tempting to hit that All button, which emulates the hardware trick of pushing all the buttons in for a nuke effect, we restrain ourselves as it’s not appropriate for the task at hand.
Lastly, we set our input amount to 24. The amount of compression in a FET circuit is dependent on the input amount, so be careful. We leave our output where it is.
Our new vocal is full and rich, with a consistent character.
Full Mix
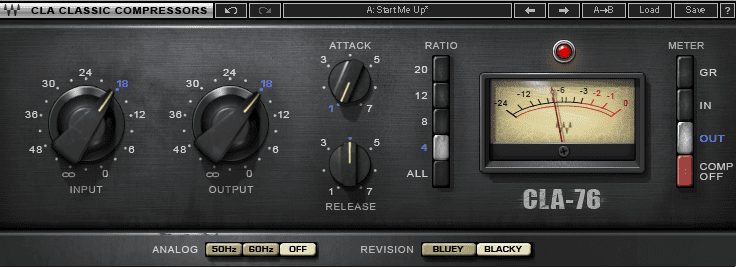
Turning back to our full mix, we adjust by ear with a slow attack of 1 (remember, FETs are known for being quick, so this “slow” is still a relatively speedy 1 millisecond) and release of 3, with a conservative ratio setting of 4:1. We adjust the input and output levels to 18.
We can really hear how the beat kicks now with the FET engaged.
Optical Compressors
Sometimes referred to as opto compressors, optical compressors convert the audio detection signal in the compressor into light and apply compression in relation to how it hits a light-sensitive resistor. The time it takes for this to happen means optical compressors are not what you’d call fast. But it is smooth and transparent, making it excellent for certain applications. It also imparts a buttery warmth, making it a great choice for adding sheen and mojo to a signal. It sounds especially nice on vocals, guitars, and bass.
The most famous optical compressor is the Teletronix LA-2A Leveling Amplifier, which paired an amplifier with its compression circuit.
Let’s put an optical compressor through its paces.
Bass
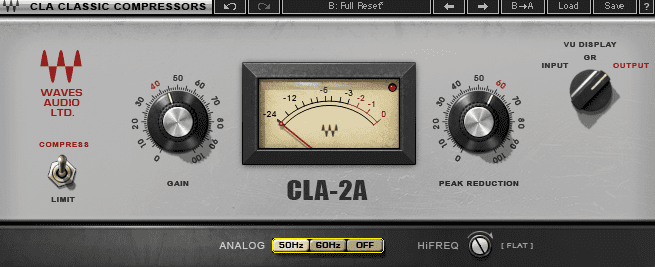
We’re going to use Waves’ LA-2A modelling plugin, the CLA-2A, for this. CLA-2A has two kinds of compression, regular (3:1) and limiting (100:1). We leave it on the compressor setting. We use the peak reduction knob to control the amount of compression. About 60 sounds good on our bass. We don’t want to overdo it. We use the Gain knob to set the output volume, being careful to avoid distortion.
We can use the VU meter to toggle between input, output and gain reduction. Everything looks good. We decide to use this compressor in analogue mode, so we engage the 50Hz button to add subtle colour to our signal. The Hi Freq dial is an internal side-chain for reducing compression on bass but we don’t need this so we leave it alone.
The optical compressor has added warmth, presence, and bass to our signal.
Full Mix
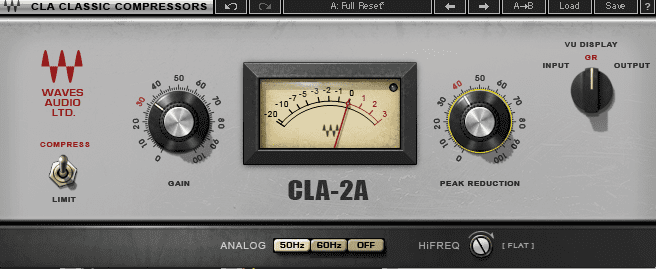
For our full mix, we leave it in compression mode and turn the Gain down to 30 and the Peak Reduction down to 40. We’re not trying to slam our mix, just give it a little polish.
The effect is subtle but there’s a warmth now that was lacking before.
Variable Mu Compressors
The oldest type of compressor available, variable mu compressors use tube technology to imprint a certain sonic characteristic onto any signal pushed through it. As the name implies, the amount of compression is variable depending on how hard you push a signal into it. It’s great for adding warmth, depth, and colour, and evening out an overall mix on the master buss. It’s also wonderful for mastering and limiting.
The most famous variable mu compressor is the Fairchild 670, with its development stretching back to the 1950s.
Let’s see what a variable mu compressor can do to some soulful keys.
Keys
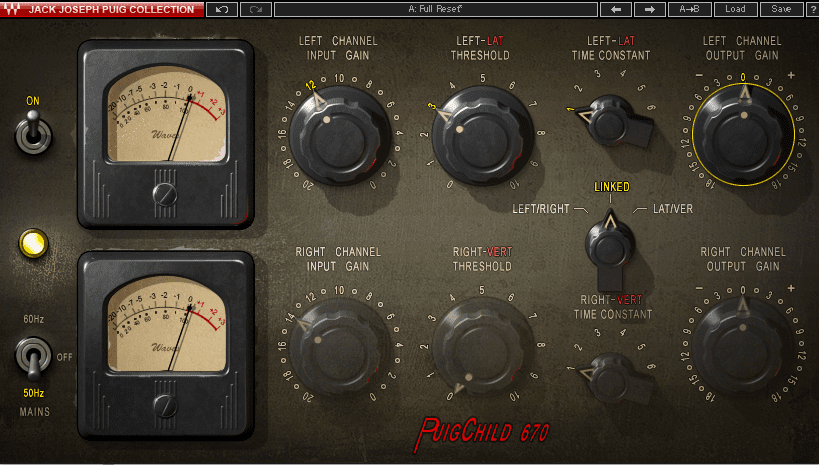
We load in our keys sample and strap a Waves PuigChild 670 (an emulation of the Fairchild 670) across it. We set it to full reset to initialize it and then check that the stereo mode is linked, which it is. This way we only need to worry about the settings on the left channel, as they will be mirrored on the right (displayed across the bottom half of the plugin). We set our input gain to around 12. Threshold controls the amount of compression—we set it to around 3 for subtlety and colour. Attack and release settings are fixed in the Time Constant dial, with settings getting longer as you go clockwise. We choose setting 1 for a fast attack of 0.2 ms and release of 0.3 seconds. This focuses on the transients in the playing and leaves the sustain portion of the notes relatively untouched.
Lastly, we adjust our output gain and engage the mains toggle switch to give it that extra analogue flavour.
Our keys now sound smooth and even.
Full Mix
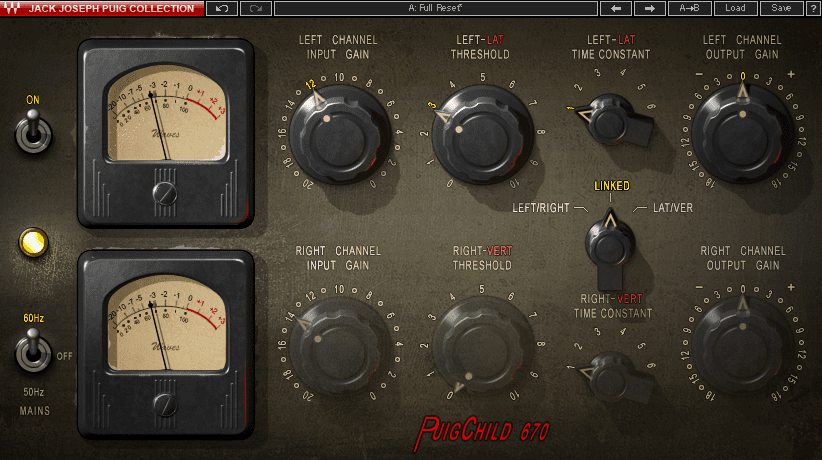
We use broadly the same adjustments on our full mix as we don’t want to overcook it.
Hybrid Compressors
Up until now we’ve focused on analogue emulations but there are plenty of compressors that freely combine circuit types, available in both hardware and software versions. This can make them extremely versatile, allowing you to select the right compression type (or types) for the job. Many also have features not possible on slavish hardware emulations.
Synth Line
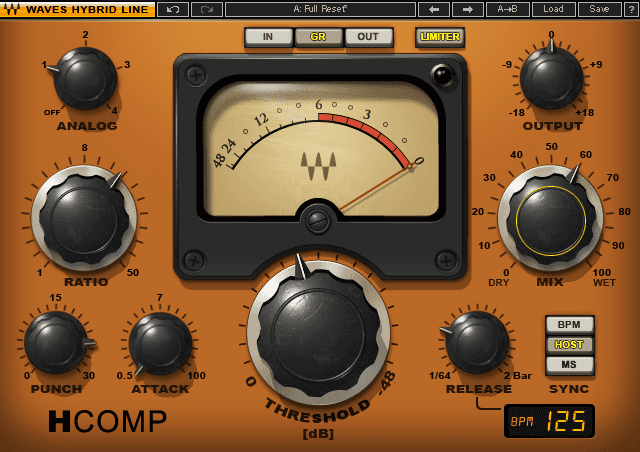
We’re going to use Waves’ H-Comp hybrid compressor on a synth line sample. H-Comp combines transformer, tube, and transistor behaviour into one effect. Let’s see how we can use it to our advantage.
As our synth line is pretty tight, let’s use this to enhance the transients. We initialize it and we’re instantly given some compression, with threshold controlling the point at which compression is applied and ratio setting how much. We increase the ratio to about 14 and turn the Threshold knob until we hear the compressor start to bite. About -21 sounds good. We set the attack as fast as it will go, 0.5 seconds, and lock the release to host tempo. The compressor is now working with our track BPM. You can’t do that with old hardware.
Let’s use more of H-Comp’s unique, software only functions. We turn up the Punch knob, which lets transients through. A setting of 25 sounds good. There’s also an Analog dial, which imparts the colour of different kinds of circuitry. We try them all in turn and settle on 1 for this sound. Lastly, we turn down the mix to about 60 to let some of the unaffected signal through. This is a quick way to get some parallel compression going.
The transients poke through a little more now and there’s an added hue of colour.
Full Mix
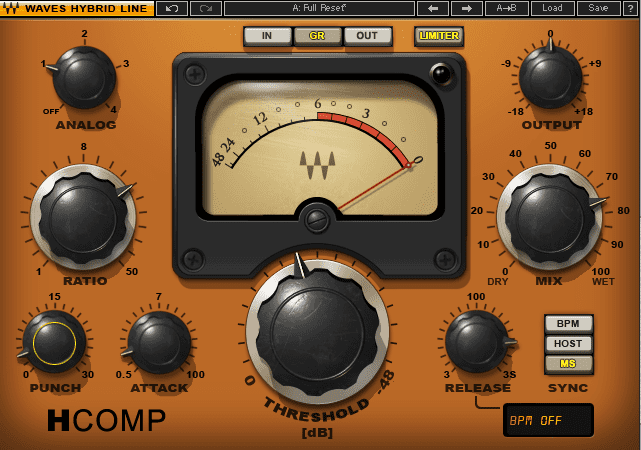
For our full mix, we can use H-Comp for mastering. We use a relatively fast attack of 0.92 and long release of 871 ms with a threshold of -21 and a ratio of 17. We let transients through with a Punch setting of 3.2. We set Analog to 1 again and stop the mix knob at 75.
With the help of the hybrid compressor, our mix is punchy and full with plenty of energy.
Many of the example samples in this piece came from Attack Magazine’s book, The Secrets Of Dance Music Production.