u-he are makers of award-winning software synthesisers and effects including Diva, Repro-1, Zebra2, Hive, Bazille, Presswerk and Satin.
Visit U-he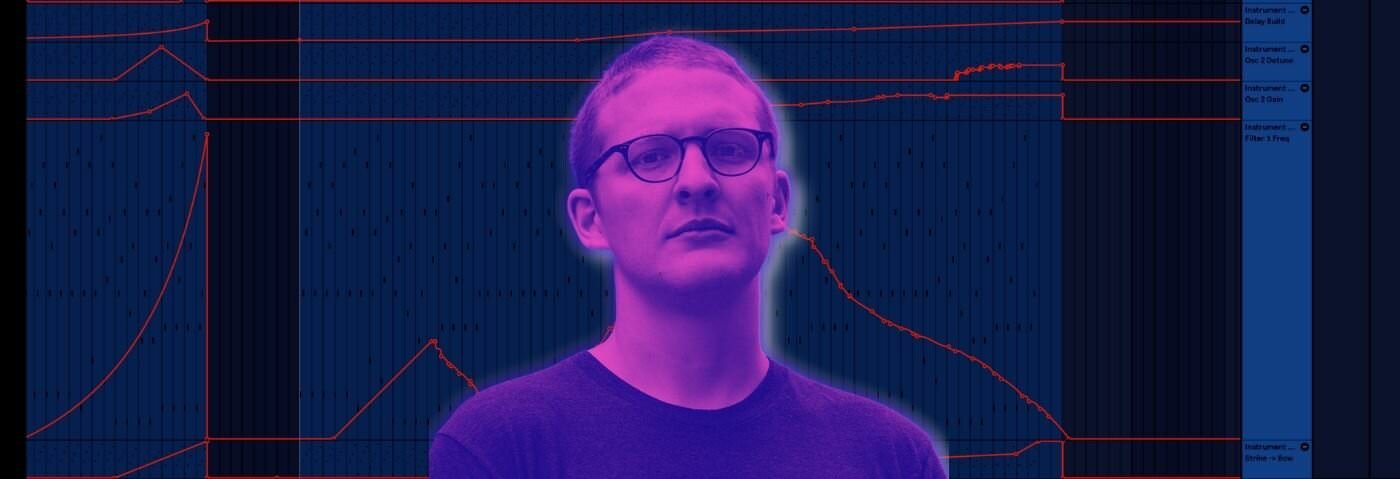
Technique » Synth Secrets »
Morphing Arpeggios Like ‘Argente’ by Floating Points
This channel is sponsored by

In this Synth Secrets, we’re going to use Ableton Wavetable to show you how to create morphing arpeggios. We’ve used Floating Points’ ‘Argente’ as inspiration.
We’re going to create a synth patch that serves those big, sprawling arpeggios that morph over time. We’re going to fill the whole audio spectrum from low to high, from narrow to wide. One of the most fun things to do with a synth.
To follow along, set your BPM to 175, because I’d like to use this as part of a drum and bass track.
Download the free Ableton session
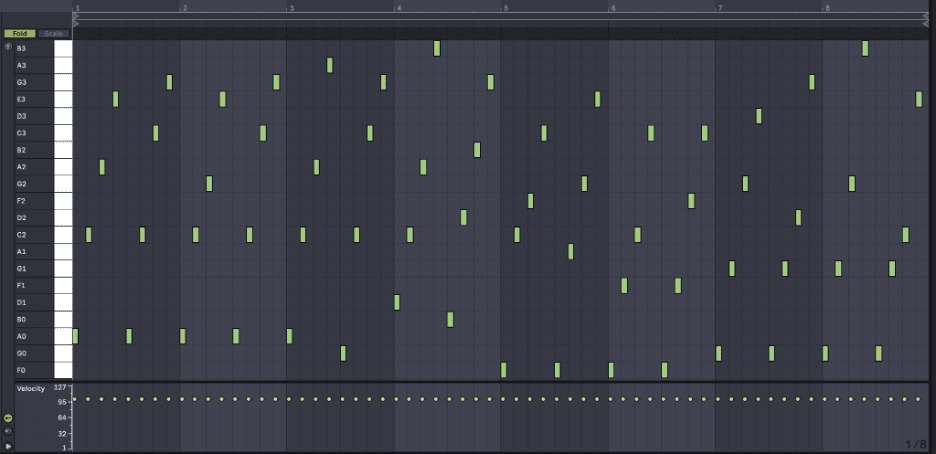
Note the MIDI part — the arrangement is critical to the sound that we’re going for — we’re covering about three octaves of territory, the lowest octave being the first. Our MIDI part starts on A1, which is at 60 Hz, and sweeps all the way up to A3 which sits squarely at 440 Hz, with strong harmonics reaching all the way up the frequency spectrum when the filter is wide open.
Starting with such a wide note palette allows us to move up and down the frequency spectrum simply by manipulating the frequency cutoff knob to dramatic result. Here’s the MIDI we’ll be working with.
Click any image to enlarge:
In all the demo audio we’ll be listening to a nine bar loop, but this type of arpeggio sound will often take up 32 or 64 bars of an arrangement… or even more, slowly morphing over time.
Floating Points’ ‘Argente’ a beautiful piece of music that prominently features an arpeggiated synth morphing so slowly it’s almost imperceptible at times, over the course of almost five minutes.
Here’s what we are creating today:
Want to watch instead? Go for it but follow us on YouTube!
Let’s get to it!
Step 1
First let’s add an instance of Wavetable.
Keeping in the “basic shapes” category, select the sawtooth wave. Now let’s move over to the amplitude envelope on the right and bring the sustain down to nothing and the release down to about 200 ms since we want kind of a pluck or a percussive strike sound. I know that to make this part really interesting I’ll need to change a variety of characteristics of the sound over time so I’ll create an instrument rack containing this instance of Wavetable by selecting it and hitting command+G (or going to Edit->Group) so I can create some macros.
If you’re not using Wavetable, you can still use an instrument rack in Ableton to morph multiple parameters of any Ableton instrument or VST at once, and if you’re not even using Ableton, your synth likely has a few Macro controls you can use the same way we’re using the instrument rack.
Also pump up the output gain of this synth from -9.0 dB to 0.0 dB so we have plenty of output and, as a result, plenty of flexibility during the arranging and mixing process. It’s no fun to have patch that’s just too quiet even when you’ve got your faders slammed to max!

Step 2
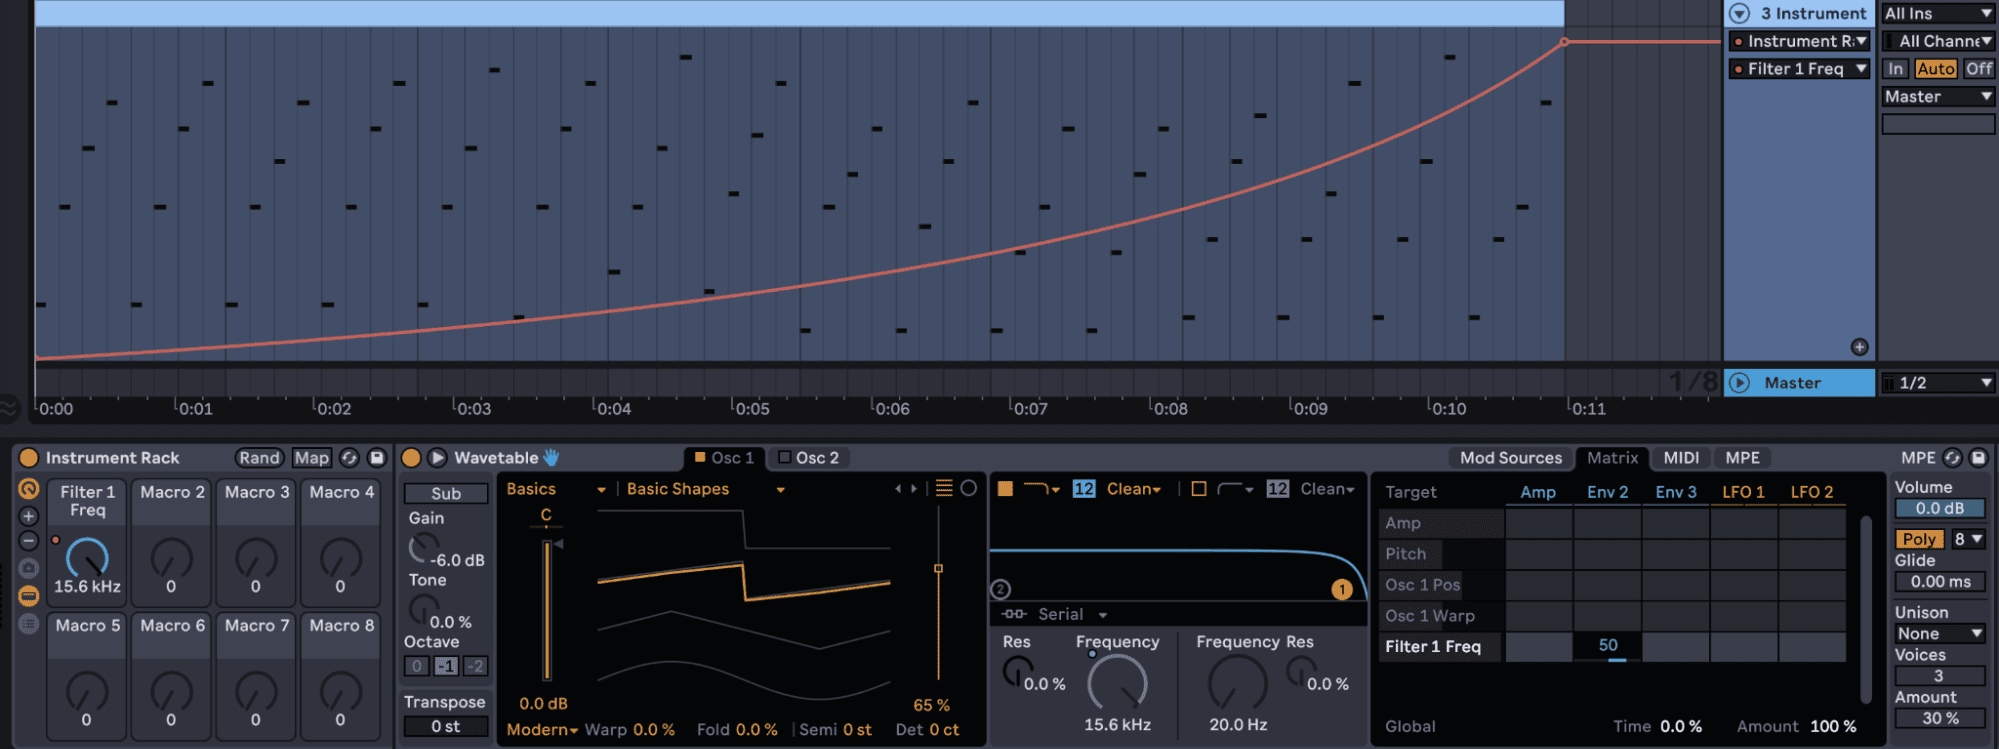
I like making sounds that are fun to play and very approachable, and probably the cheapest and easiest way to get your kicks on a synth is futzing around with the filter cutoff (there’s a reason that the cutoff frequency knob is the biggest one in Wavetable’s interface), so I’m going to make this patch sound good no matter where you position that knob.
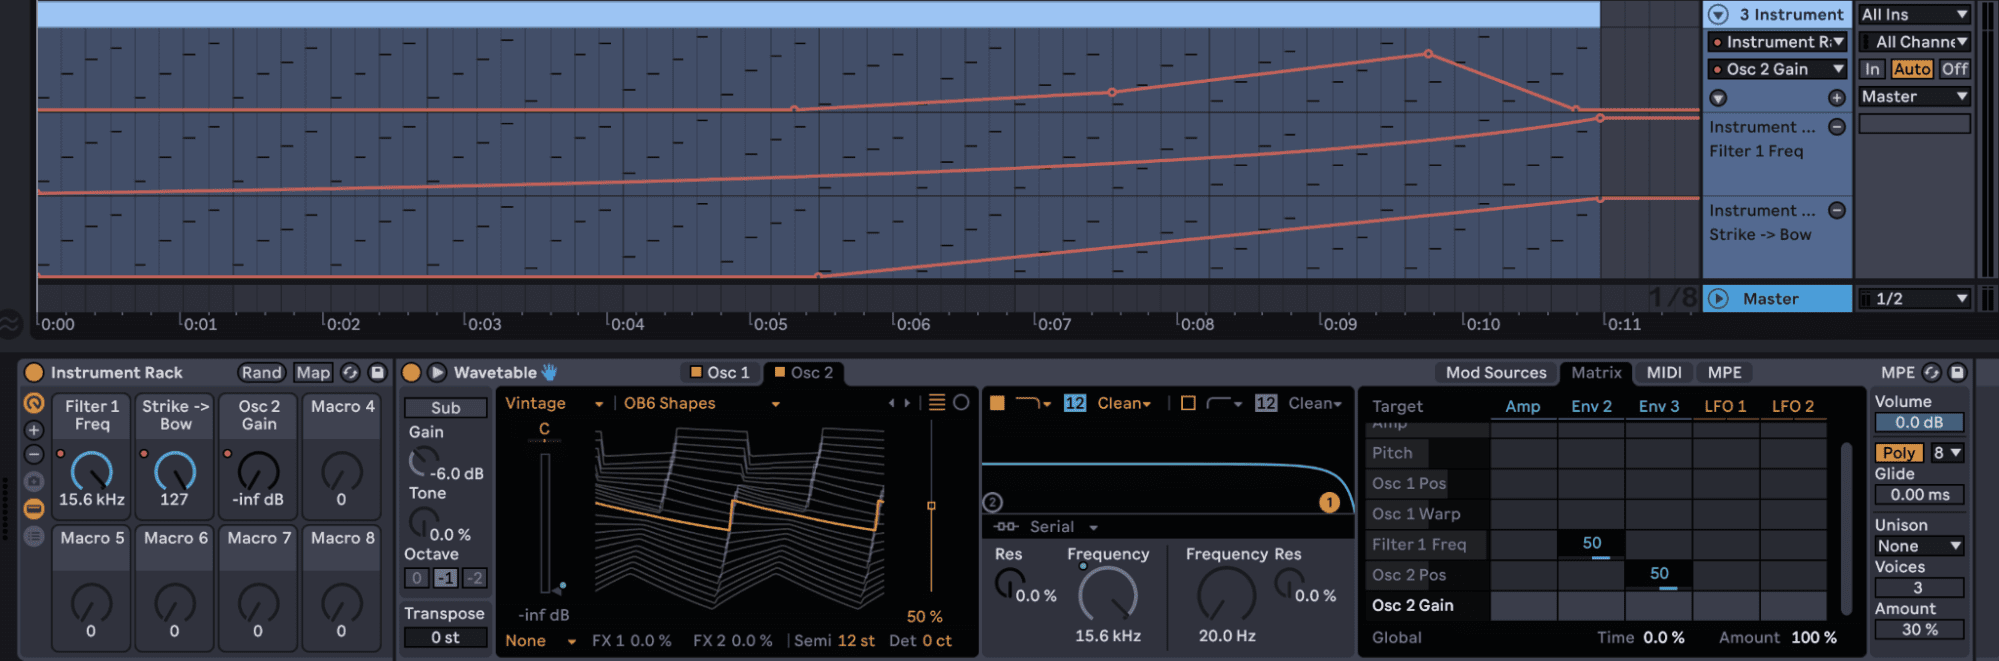
First things first, I’m going to turn the cutoff to zero and hit play. If you do the same, you’ll hear that it’s not a particularly useful sound in its current state. Open the mod matrix and enter a value of 50 at the intersection between “Filter 1 Freq” and “Env 2.” Now we’re getting somewhere.
Now let’s start doing something with these macros. Click on the button at the top left of the instrument rack interface to show the macro controls. Then click “map” on the very top of the instrument rack interface, click on the filter 1 cutoff knob, then click on “map” underneath the first macro knob. This should open an inspector pane on the left hand side that allows me to set minimum and maximum limits for the knob. Click on the green “map” button again to exit map mode and play around with your newly programmed macro knob. On my project I’ll automate knob 1 to open up the filter over time.
Step 3
Macros are great because they give you a way to really mess around with your sound over time and try a lot of different combinations of settings but without the risk of forgetting which parameters you were messing around with and ruining your patch irreparably. Plus, having parameters that are very satisfying to change mapped to knobs just makes the instrument more playable and dynamic.
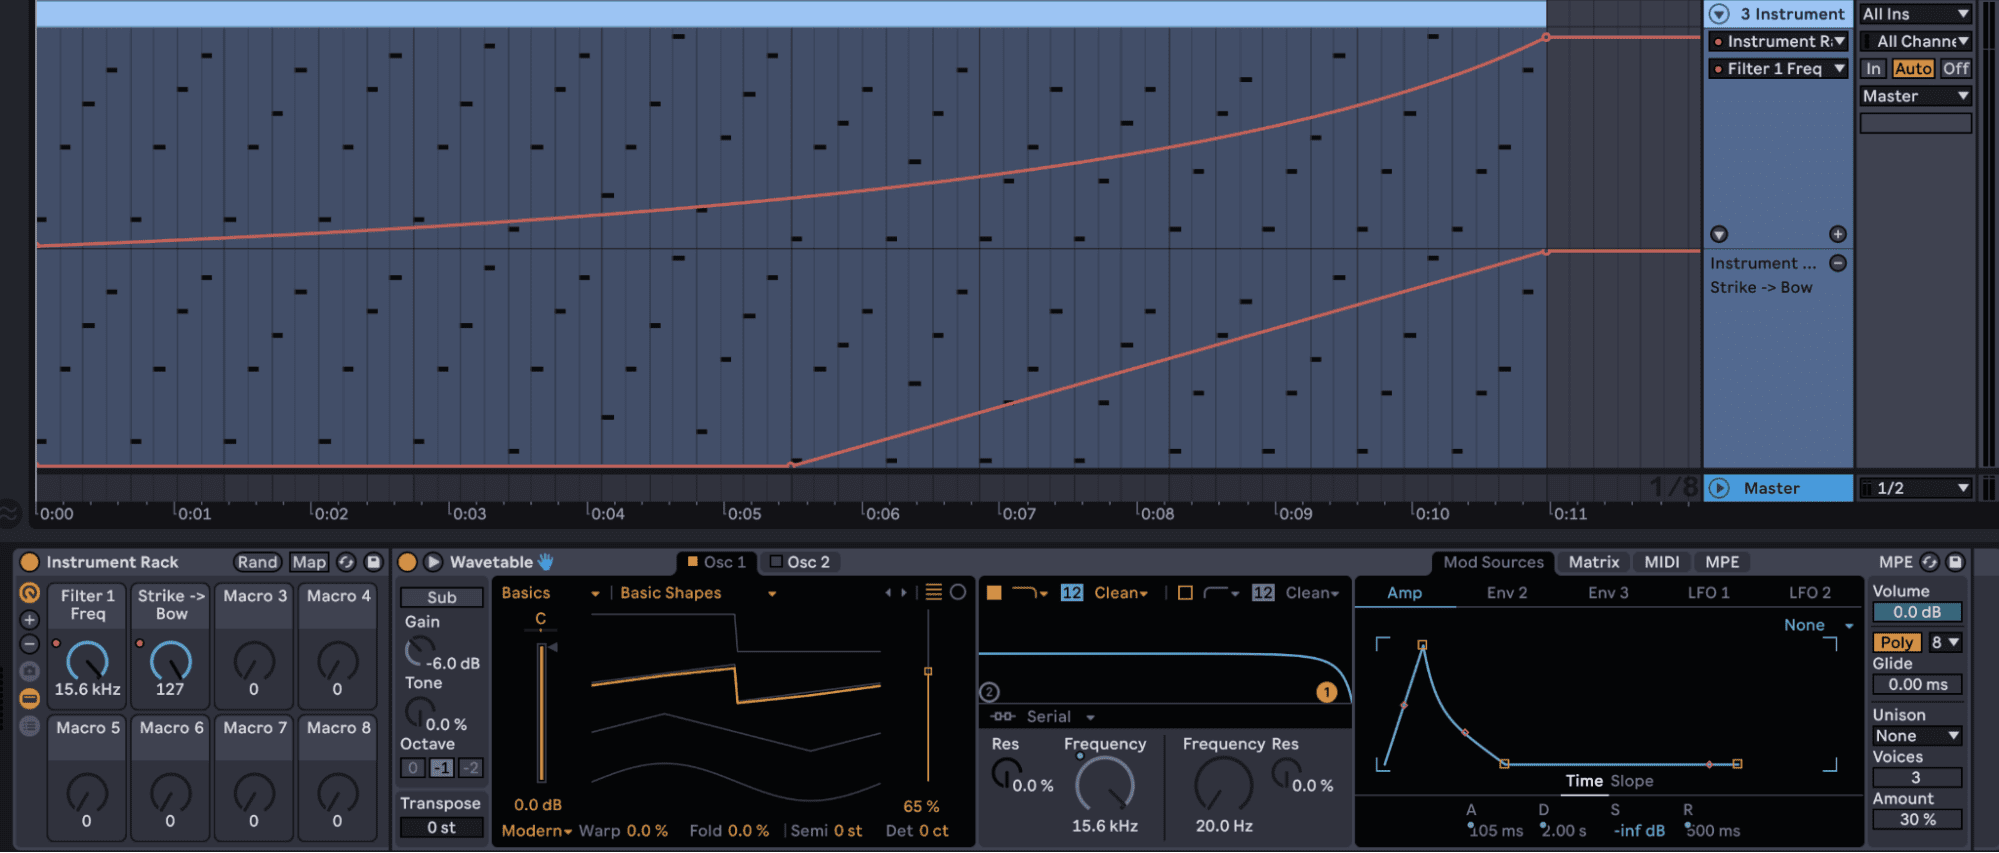
So now that we’ve mapped our first macro, let’s repeat the process but this time we’ll do something a bit more complex so we can morph from a percussive strike into something a bit more like a bowed string.
Map the amplitude envelope decay (labeled “D” on the bottom of the Amp envelope pane) to knob 2, setting the minimum to 200 ms and the max to 2 seconds. Now, also map the amp envelope’s attack to that same knob, and in the macro mappings menu on the left keep the minimum at 0 ms and set max to 105 ms. Finally, map the release to that same knob, set the minimum to 200 ms and the max to 500 ms. Select knob two and hit Command+R to rename it, and call it “Strike -> Bow.” I’ll automate my rack to morph from strike to bow as the filter opens up.
Step 4
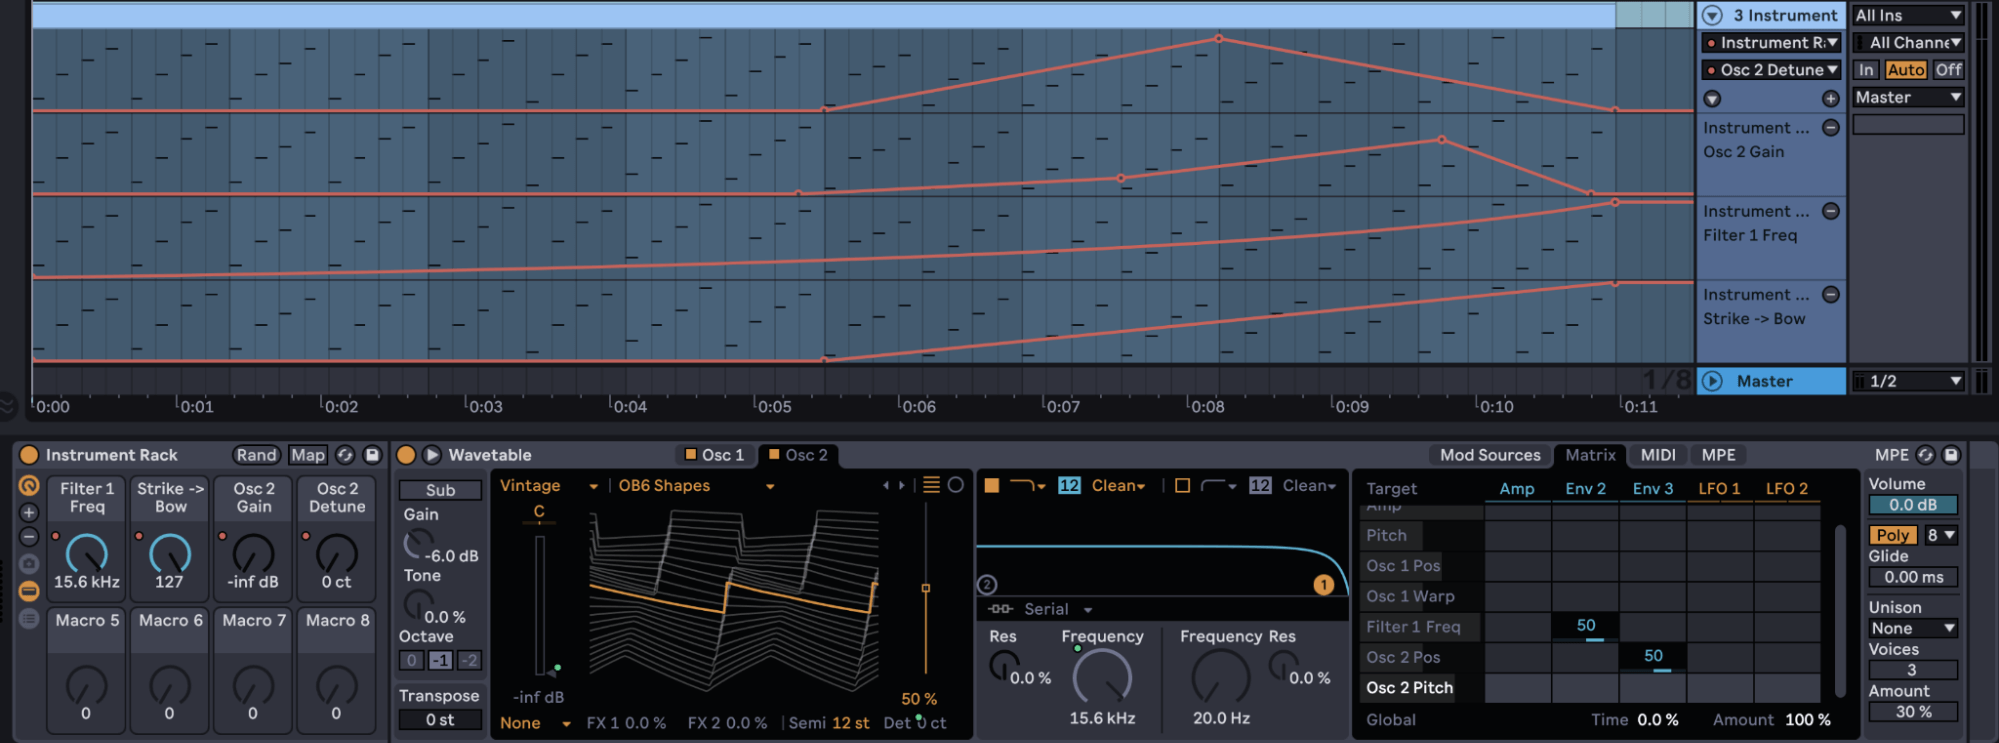
I feel like I’m going to want a higher octave layer that adds complexity and sparkle as the filter opens. Activate oscillator 2, select the “OB6 Shapes” wavetable in the “Vintage” category, pitch it up 12 semitones, then fiddle with the wavetable position until you’re in an area you like the sound of. I like a wavetable position value of about 50% on this one. Now click on the “Matrix” in the modulation section to open the mod matrix. Now click on the intersection of Env 3 and Osc 2 Pos and enter a value of 50, then click on the blue text “Env 3” to open that envelope’s edit window. Turn Sustain to zero and Decay to about 2 seconds. That gives just a little tonal change at the front edge of each note to keep it interesting.
Now I don’t want to have Oscillator 2 active the whole time. Bringing out that “sparkle” layer is something you can do over time to keep an arrangement moving. I’ll map Oscillator 2’s gain to our third macro knob and automate to come in and out so you can hear what that does.
Step 5
I feel like modulating the tuning of Oscillator 2 would be a fun trick. Coming in and out of tune would allow the patch to go from feeling wide and pulsating to crisp and hyper-focused. I’ll map Oscillator 2’s “det” or detune value to Macro Knob 4 and automate that so we can get a taste of its effect.
One thing I love about arpeggios like this is that there’s no right or wrong answer. You could bring a distortion effect in and out. You could add noise. You could bring in an LFO that modulates the pan position of some or all of the sound or bring FM into the mix or all of this or none of it. The options are infinite.
Step 6
Now that we have the basics down let’s have some fun with space. I’m going to use Surreal Machines’ ‘Modnetic‘ for its fantastic reverb and unique delay section, but you could get fairly similar results using Ableton’s Hybrid Reverb and Echo audio effects. Both are great for dub!
For starters, I’m going to put an instance of Modnetic on the track and choose the “Reverb Concert” preset. If you push play right now you’ll hear how much that adds to our patch already. To keep it from getting too cloudy I’ll change the hall type from “Concert” to “Small”. I’ve also pulled the mix down to about 40%.
I would love some delay on tap too. To do so I’ll activate the Echo section, change from timed delay to beat synced delay by clicking on the button that reads “ms”. It changes to “beats” and leave the timing at 2/16. Pull the bass down 5 dB and bring “noise” up 30% to add some mojo.

If you are following along and you didn’t place your reverb/delay in the instrument rack along with the instance of Wavetable, drag it into the rack. That way we can automate effects parameters from macro knobs, too. Unfold Modnetic so you can see all its addressable parameters by clicking on the triangle/arrow button between the effect’s power switch and the show/hide plugin button.
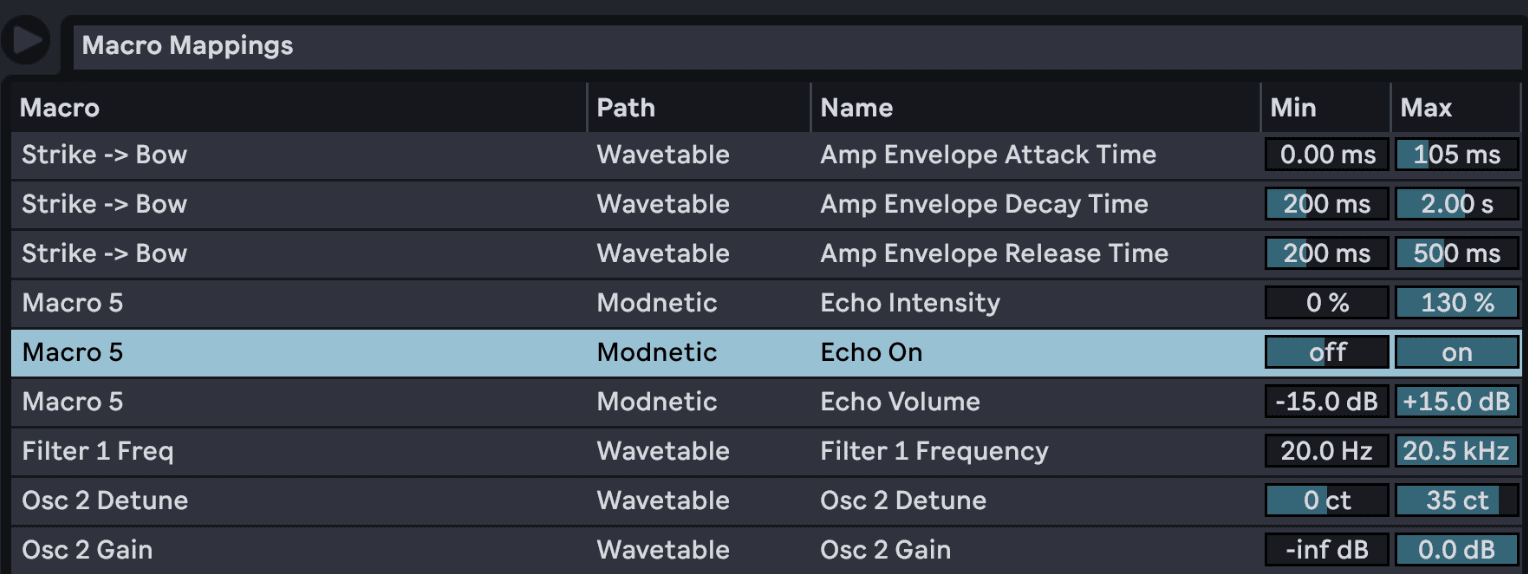
Now map three parameters in Modnetic to macro knob 5 — echo intensity (known to most of us as “feedback”), echo volume, and echo on. If you change the minimum value of “echo on” in the macro mappings to just below 50 percent, this knob will actually completely bypass the echo when turned all the way to the left, then increase the echo’s influence as you spin the knob.
Listen to it build over time as the knob is turned:
Step 7
Let’s max out Modnetic a little more and get a bit weird. Just because. One awesome capability Modnetic has under the hood is the ability to reverse the direction of the virtual tape that’s providing the echoes, allowing for a somewhat psychedelic reverse echo sound.
I want to program a macro knob that’s designed to be turned either all the way to the left (doing nothing), or slammed all the way to the right, where it provides a dramatic and unexpected reversal of the audio.
Map Modnetic’s “Echo Direction” and “Mix Dry/Wet” to macro knob 6. Set the dry/wet minimum value to 40%. Keep the minimum for tape direction at 0 and turn the maximum to just over 50% so that the tape only flips direction when the knob gets all the way to the right. Also map “Reverb On” in Modnetic to knob 6 and set the minimum value to about 90 percent and the max to 0. Sounds weird maybe but the intent here is to turn the reverb engine off completely when the tape reverses direction, keeping the effect totally dry and as in-your-face as possible.
Just to keep things intuitive, I’ve renamed knob 5 “Delay Build” and knob 6 “Reverse the Tape,” and my macro mappings look a bit like this:

Step 8
I think this rack has enough “toys” for now. I could arpeggios through this for minutes, turn knobs, and have a blast.
The last step in my mind is to polish the overall sound a bit, and my cheap-and-easy trick for this is to load Ableton’s Multiband Dynamics audio effect and the “multiband compression” preset at the end of the chain, then an Ableton Limiter with the “upper ceiling” preset after that.
With a sound like this that I just want to be huge, the multiband compressor really pulls out some sparkle and thud, and also pulls some more of the distant reverb tails up into the mix making them more dramatic. I put the limiter on the end just to avoid any gain staging and clipping issues.
So here’s the final sound over the course of 8 bars:
And here’s it in context — a drum and bass build and drop, using a bit of processing and a couple of chopped up loops from Splice:
Make this one your own with your favorite effects and arrangement.
Follow Attack Magazine
Synth Secrets is sponsored by
u-he are makers of award-winning software synthesisers and effects including Diva, Repro-1, Zebra2, Hive, Bazille, Presswerk and Satin.
Download the demos and try them for yourself at www.u-he.com