u-he are makers of award-winning software synthesisers and effects including Diva, Repro-1, Zebra2, Hive, Bazille, Presswerk and Satin.
Visit U-he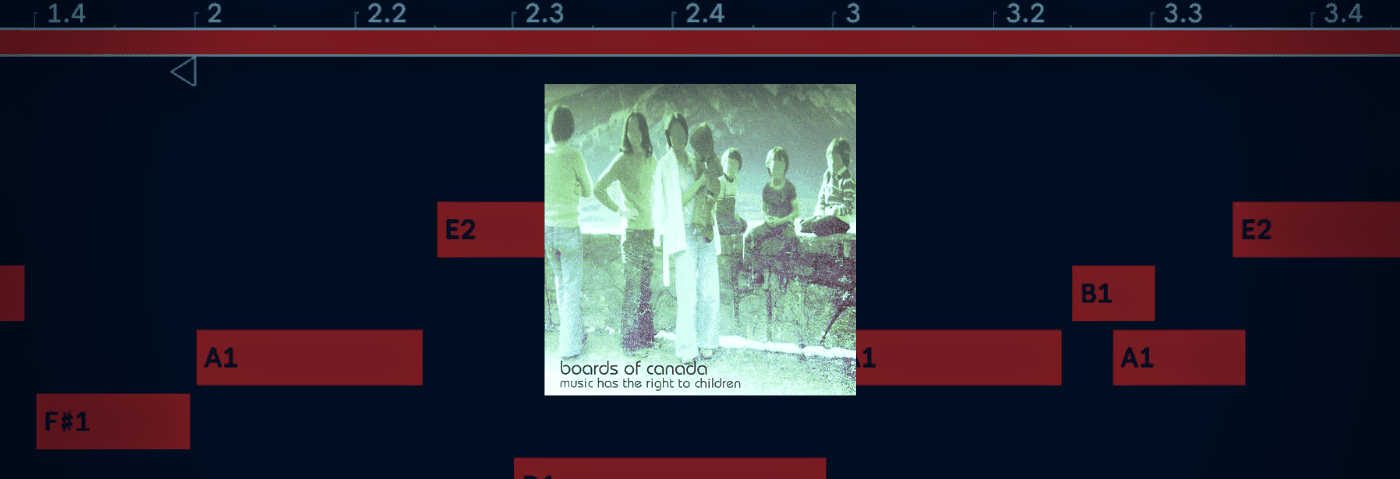
Technique » Synth Secrets »
Recreating The ‘Roygbiv’ Bassline From Boards of Canada
This channel is sponsored by

In this Synth Secrets, we’ll build a thick, dusty bass lifted from an undisputed classic, Boards of Canada’s ‘Roygbiv’.
The Scottish duo, Boards of Canada, has cultivated a sound that might best be described as the auditory counterpart of a polaroid picture of a childhood memory you never had, and you can hear echoes of their style in many artists, perhaps most clearly in the work of Tycho.
For any Boards of Canada fans, the sound below we’re about to build will immediately activate our memory banks.
The Internet At Large seems to agree that BoC crafted this bassline on a Roland SH-101, which is perfectly likely but we’ll simply use Wavetable, Ableton’s lovely jack of all trades synth which is included in Live Suite. If you’re a Wavetable user you can follow along exactly — if you’re not a Wavetable user, you can still follow along since every trick we’re plying is available in any basic synthesizer, albeit you’ll find the switches and knobs in slightly different spots.
It’s also no secret, that aged hardware effects units and somewhat garbage tape machines are a crucial part of Boards of Canada’s sound, and in order to add an additional thick layer of that evocative dust we’ll use Surreal Machines’ Modnetic, a convincingly organic tape delay, modulation, and reverb plugin. We will also use some other audio effects that come included in Ableton Live Suite to get the final touches down.
Here’s a screenshot of the MIDI we’re using for this exercise — get that into your piano roll, set the tempo to 80, and we can get started. Note that some notes overlap and some don’t. That’s critical to get the right vibe on a bassline like this. More on that later.
Click on any image to enlarge it.

Want to watch instead? Make sure to follow us on YouTube also.
Step 1
Pull up an instance of Wavetable and start by getting it right on oscillator 1. Wavetable features tidy and intuitive collections of wavetables for our use. By default, the “Basics” wavetable category is selected in the oscillator section and the “Basic Shapes” table is selected. Select the “Vintage” category and the “Miniwaves” table (presumably lifted from a Korg Minilogue… I’m kidding), then move the wavetable position to about 40% so we’re playing the sawtooth wave.. We’ll reduce the oscillator gain to -2.5 dB.
Go to the oscillator effect section at the bottom of the oscillator’s edit pane. Leave the type set to “modern” and set “warp” to 20, effectively narrowing the width of the waveform, then change “Det” or detune to 3 ct. Once we activate the sub-oscillator, this subtle detune will cause the two oscillators to interact, giving the subtlest pulsing feeling.
Then for the requisite amount of thickness, activate the sub-oscillator at the far left of Wavetable, crank the gain, and set the tone around 65%
Next we get the voicing right; on the far right switch from the default “Poly” voicing to “Mono” with a click, and set the glide to 20-30 ms.
So far the patch comes to an end too abruptly anytime there’s a break between notes and there’s a transient edge that’s too short. We want this sound more fluid and gentle, so dial in the amplitude envelope by clicking on “Amp” under the “Mod Sources” tab, lengthen the decay to nine seconds,, drop the sustain volume a few dB so there’s a gentle fadeout on the longest notes, and increase the release time to something like three seconds or so.
Foundation complete.

Step 2
It’s time to add dust. Instead of depending on effects plugins to get us the wow and flutter of a bad tape deck , we can program a lot of that into the synth patch itself. We do this by modulating the pitch with an LFO. Careful, this is touchy. More than a sprinkle of this effect on your synth can make it sound rather funky in a bad way.
Click on the “Matrix” tab in the modulation section, type “1” at the intersection of LFO 1 and Pitch, then click on the words “LFO 1” to quickly bring up its edit interface. Set the rate somewhere between .75 and 1 Hz, then set the amount to between 15% and 20%. Finally, click the little “R” button in the top right of the LFO’s interface in order to stop the LFO from resetting every time we trigger a new note. That’s just not how tape sounds. You can hear the kind-of-subtle effect giving the patch some new life:

Step 3
There’s still way too much high-frequency information in this patch. It doesn’t sound even a little soothing, so let’s drop the (default low-pass) filter cutoff to about 1.6 KHz, boost the resonance to about 25%, and switch the filter from a 12 dB/octave cutoff to 24 dB/octave, and switch from “clean” to “OSR” in the filter type dropdown. OSR just sounds a bit more vibey.
Let’s also introduce a touch of filter modulation using Envelope 2. First open the mod matrix. You probably don’t see “Filter 1 Freq” listed on the left hand side of the matrix, but if you click on the filter frequency knob in synth, it will appear at the bottom of the matrix. Now, enter “10” at the intersection of “Filter 1 Freq” and “Env 2” on the mod matrix. This is not much modulation but enough to add a bit more life to the patch.
Then click on Env 2 and set the release to about 2 seconds. Since some notes overlap and we’re using a monophonic voicing, Wavetable will not trigger the filter envelope if the new note overlaps the old one. That, plus the 20 ms of glide, give this patch the undulating sound it has.
Also to soften the edges a bit more without losing all the definition of the sound, select “classic” in the Unison menu on the bottom right, max out the voices at 8, and turn the “Amount” down to about 20 percent. At first the effect might sound like a bit much, but when we add ambience at the end of the process it tames the effect significantly.

Step 4
Time for more dust. An oft-overlooked component of many synth patches is a touch of noise. It’s important enough to the vibe that we’ll dedicate Wavetable’s second oscillator to noise. On most analog modeling synthesizers, a noise oscillator is a simple affair. You turn it on and it utters a pleasing “whhsshhh.” Not so with Wavetable.
Turn on Oscillator 2, open Oscillator 2’s edit pane, stay in the “basics” wavetable category and select the table entitled “white noise.” Hit play. Not what you would expect…
In trying to add pleasant noise to the signal (think tape hiss), we’ve instead added a cicada-like buzzing overtone. Not what we want. Noise is random in its nature, but playing back a single wave in a wavetable is not. The best way to get Wavetable’s “Noise” oscillator to really sound like noise is by using oscillator effects. You find those underneath the wavetable display, and “None” is selected by default. Switch that to “FM,” change the “Tune” to about 35% and the amount to 100%. Ahh, there it is. Turn the oscillator gain down to -10 dB.

Step 5
There’s still something missing in the filter section. In ‘Roygbiv’, it sounds almost like the noise tracks along with the pitch of the music somehow. It gets brighter on higher notes and darker on lower notes, almost singing along with the pitched sawtooth and sub oscillators. You can get this kind of effect by modulating the filter cutoff using MIDI note values. To do this, click on the “MIDI” tab in the modulation section, select the intersection of “Filter 1 Freq” and “Note,” and enter a value of 30. Now, the filter cutoff rises with higher notes and drops with lower notes. Hear the difference.

Step 6
Now add grit. Ableton’s Drum Buss is a favorite of mine for this purpose. Don’t let its name fool you — it belongs on synths, vocals, guitars and bass too. Add an instance of Drum Buss and just leave the parameters in their default positions. The subtle drive and high-frequency damping add a subtle something that serves the vintage vibe. You can toy with the dry/wet balance or add more drive if you like, but don’t go too far or you’ll lose that vibe. This should be a relatively subtle effect.

Step 7
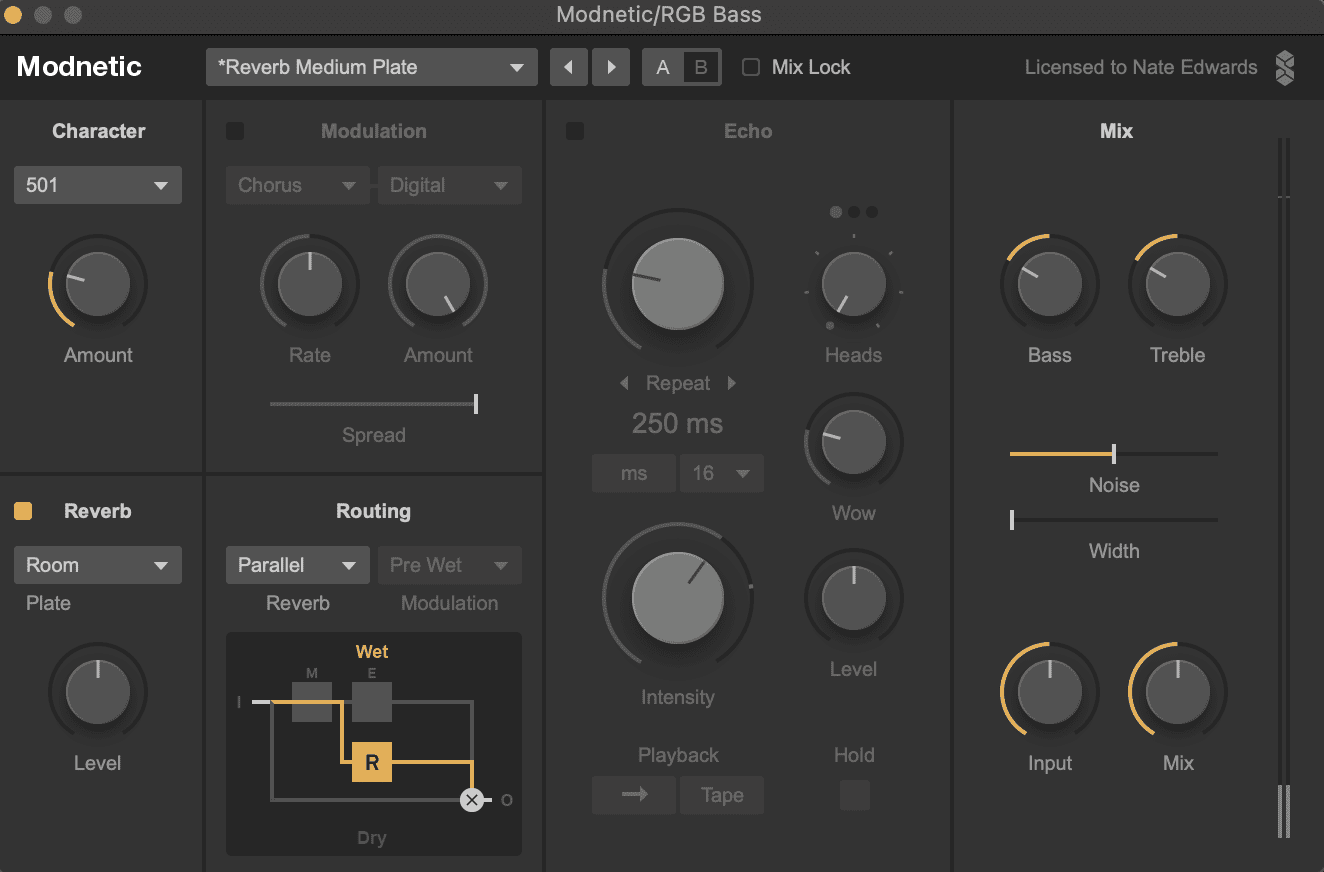
Almost there. Time for ambience, which is where Surreal Machines’ Modnetic comes into play.
Modnetic is all about color and vibe, which is perfect for this project. There’s a free demo at their website if you don’t own it, or feel free to use your own favorite “character” reverb. In Modnetic I’ll select the “Reverb Medium Plate” preset to start and I’ll change the plate type to “room. Moving to the “Mix” section of the plugin, I’ll turn both the bass and the treble down about 6 dB. I don’t want the reverb battling the bass synth itself. Then turn width to zero percent and noise to 50 percent to make this sound more vintage and lo-fi.
Step 8
Then lets’ move on to the modulation section of Modnetic. As one might expect of an effects unit called Modnetic, the modulation section is deeper than you’ll find in almost any other reverb or delay plugin and the vibe is strong. One can choose from chorus, flanger, and phaser effects, then select one of four versions of said effect, and the tones you can create are truly diverse, ranging from washed out vintage flanger sounds to crisp and wide digital chorus.
For this sound, I activated the mod section and then selected the digital chorus effect, turned the rate to about 25 percent and kept the amount 100%. Then I changed the routing from “parallel” to “pre,” putting the chorus in series, right before the reverb processor.

If you want to cop the same vibe with a different reverb, pay attention to the tails at the end of the sound sample and tweak your parameters until you get something similar. Most reverb units, including Ableton’s built-in reverb, include some amount of chorus or modulation you can introduce to the signal so you can get in the ballpark. There’s definitely something special about the Modnetic sound though.
Step 9
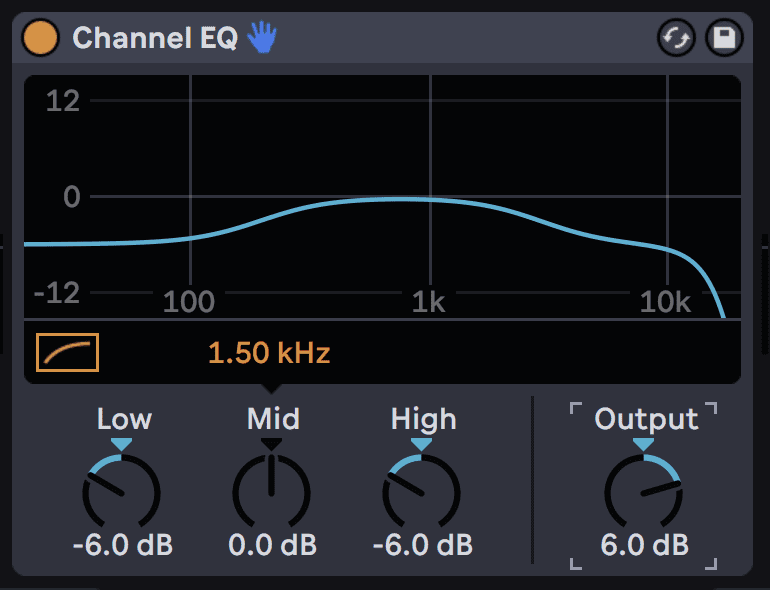
Time for final tone shaping. Drop a Channel EQ into the signal chain, pull the lows down about 6 dB, and pull the highs down about 6 dB, emphasizing the midrange and giving us the warm puffy familiar sound we want. Juice the output a bit, adding 6.0 dB of gain on the output knob in Channel EQ, which gives our signal a boost and allows us a bit more flexibility in the mix.
And there you have it — Wavetable doing a solid approximation of whichever vintage synth Boards of Canada used on this tune. Have fun and tweak further to make it your own.
We’ve added the famous lead synth and extended it to eight bars to hear the full context:

Synth Secrets is sponsored by
u-he are makers of award-winning software synthesisers and effects including Diva, Repro-1, Zebra2, Hive, Bazille, Presswerk and Satin.
Download the demos and try them for yourself at www.u-he.com