MiniFreak V is a new addition to Arturia’s V Collection X. We have the physical counterpart let’s load up it’s new sibling and try making a synthwave bassline inspired by Com Truise, Kavinsky et al.
In 2023, it feels like every day, there is something massive being announced. It’s been a whirlwind of gear releases, and Arturia has played its part. The Acid V made our “Best Gear 2023” roundup, and they have since followed it with V Collection X (10).
The new collection includes two entirely new instruments, two bottom-up rebuilds, four community-requested modern synths and composition sounds, and three exclusive preset expansion packs.
The new instruments included the MiniFreak V, Acid V, CP-70, Augmented Grand Piano, Augmented Brass and Augmented Woodwinds.
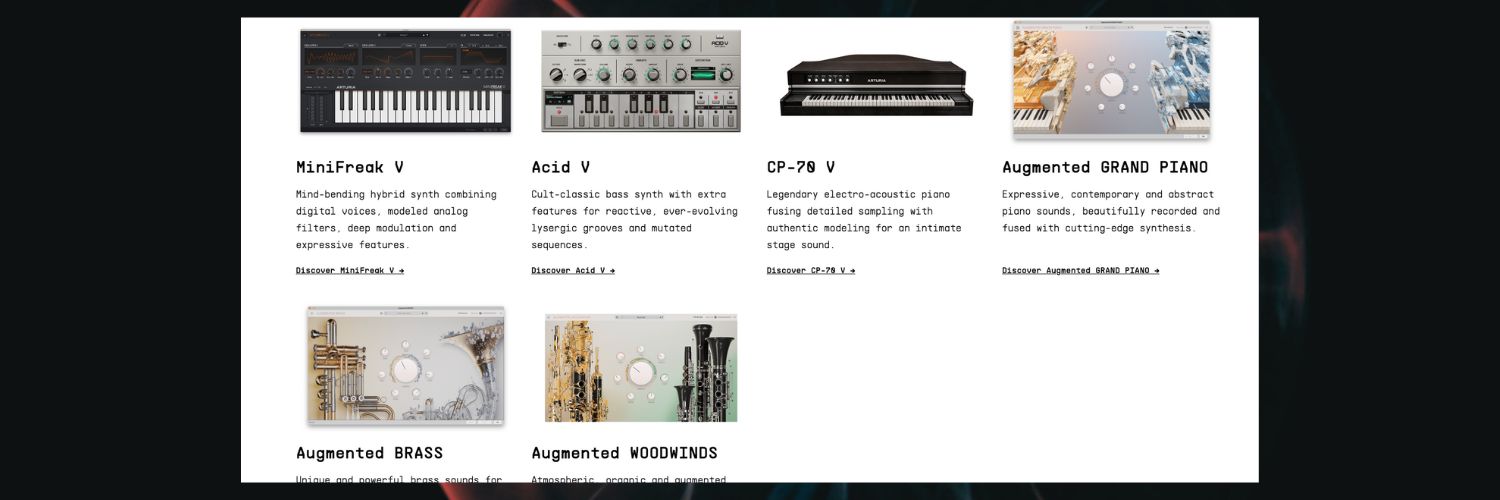
Rebuilt instruments include the Mini V 4 and the Wurli V 3.
Beyond that, as you’d expect from Arturia, there’s a host of extensive sound packs. The whole collection comes in at a reasonable £599. On the face of it, it’s punchy, but bear in mind the new instruments are in addition to the rest – 39 instruments in total. Some of these are regarded as some of the best emulations on the market. It’s going to last you a long time.
Making Synthwave with MiniFreak V
In this Synth Secrets, we’ll bow our cap to the greats of synthwave / darksynth / cyberpunk and Industrial Electro, namely Kavinsky, Com Truise and Klasey Jones.
Modelled on Arturia’s very own piece of hardware, the unique MiniFreak, MiniFreak V is a software emulation powerful enough to bring the physical to the virtual world.
Here’s what we’re making today:
Here it is in context:
The MIDI notes are below. The song is written in B Phrygian, which is E Minor but starts on the note B.
Remember to click any image to enlarge!
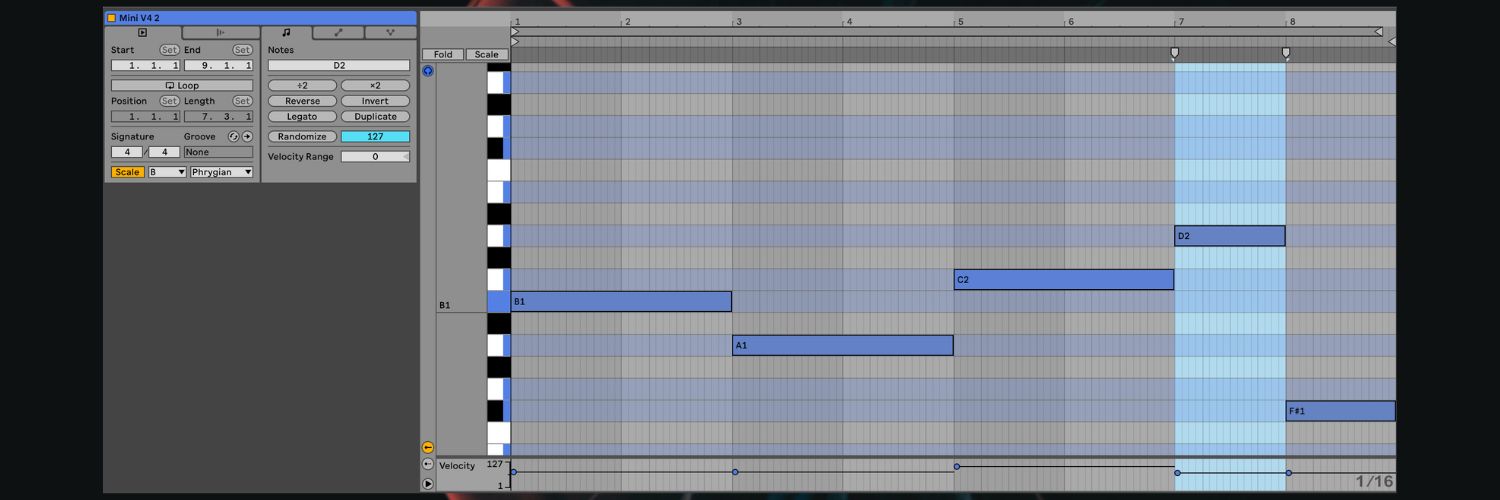
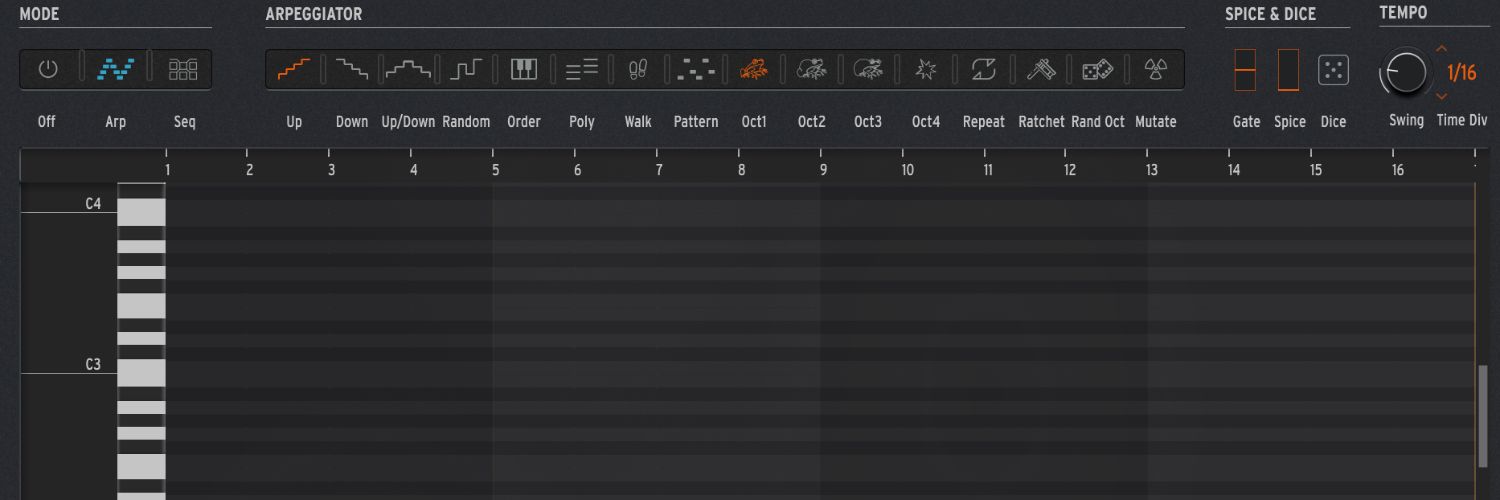
Step 1: Creating the arpeggio
Begin by selecting an initialised template found in the presets menu. Scroll down to Template and select Default. Choose a preferred tempo, this project’s BPM is set to a very comfortable synthwave 90bpm.
Next, open the Sequencer panel found at the top right of the synth and turn on the Arp. The gate will be set to 50, this can be adjusted at a later time.
Leave the rate at 1/16. Finally, adjust the feel of the rhythm to something more interesting by adding some Swing. Set this to 55%. This will create an added groove to the pulse for the listener.
Although there is a sequencer for the arpeggiator, this will not need to be used as the DAW has already been used to sequence.
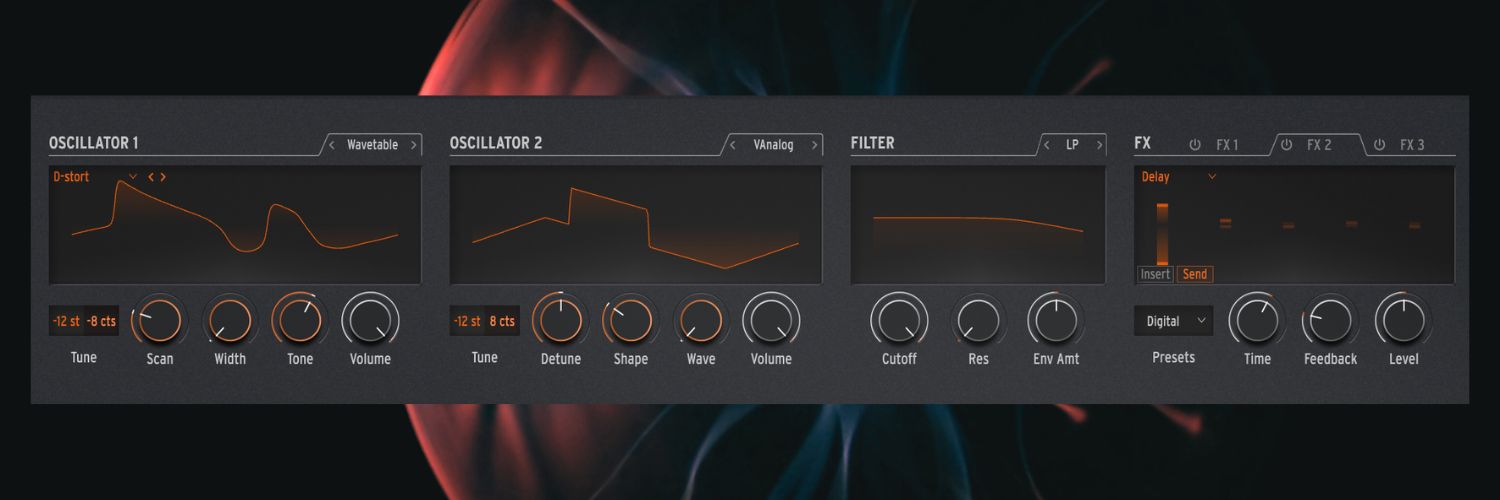
Step 2: Waveform Selection
Select Oscillator 1 and change the oscillator type to Wavetable.
From the different wavetables available, choose D-stort. Pitch down to -12 semitones. Set the Scan to approximately 24 and increase the Tone to 60. This will add extra drive and grit to the sound.
Move onto Oscillator 2, pitch down to -12 semitones, increase the volume and select VAnalog.
Adjust the Shape to 30, again to add additional grit. Finally, detune Oscillator 1 via the Fine Tune to -8 and Oscillator 2, also via its Fine Tune, to +8 to add some gentle width to the sound.
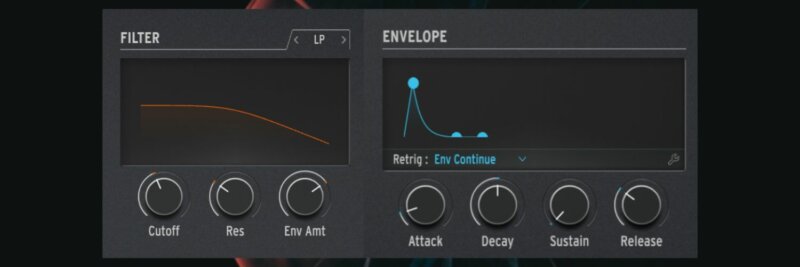
Step 3: Filtering and Envelope
This step will now start to round off the sound and decrease the noise and brashness heard so far.
Begin with lowering the Cutoff Frequency to 42 and the Virtual Analog filters Resonance to 30. Then increase the Env Amt to 40.
Press the Advanced option found at the top right of the synth, move over to the Envelope section and increase the Attack to 10, reduce the Sustain to 0 and the Release to 30. This will shape the sound of the filter removing the click from the initial sound, shorten the body and add a tail to what is heard.
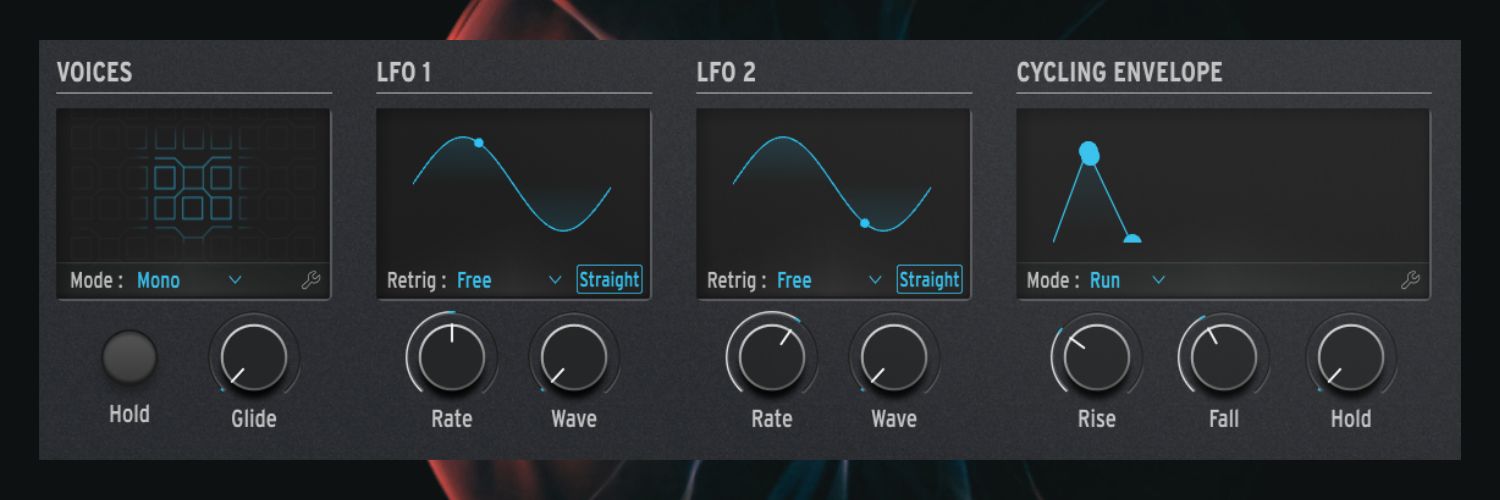
Step 4: Voices, LFOs and Cycling Envelopes
Set the voice to Mono. As this is a bassline, singular note playing is required as chords will cause unwanted clashing of frequencies. Just as adjusting the Swing via Arp gave the sound more movement, as will this next technique.
Set LFO 1’s Rate from Free to Straight, adjust the Rate dial to 1/2 and make sure Retrig is set to Free. Then move over the LFO2 and again, set the rate to Straight but adjust the Rate dial to 1/4.
Finally, move to the Cycling Envelope and change the mode to Run. Increase the Rise to 30 and the Fall to 40. The Cycling Envelope has three options, Envelope, Run and Loop.
The main difference between Run and Loop is that when set to Run, it will loop the envelope continuously but when it is set to Loop, it will reset each time a note is triggered.
As the arpeggiator is constantly triggering notes, Loop mode will make sure the parameter we set it to control will be continuously modulated, as an LFO would.
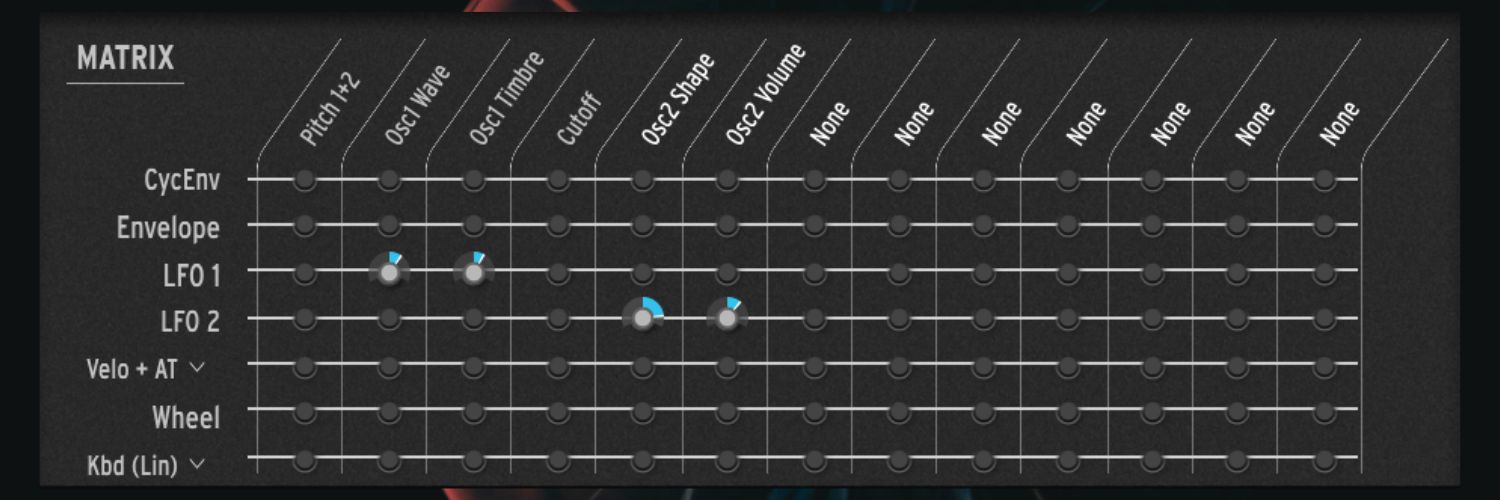
At first, these changes will make no difference in sound. To hear these, open the Macro/Matrix section, located just below.
Adjust the Osc1 Wave for LFO1 to approximately 30 and the Osc1 Timbre for LFO1 to approximately 25. Osc2 Timbre will not appear in the Matrix until it has been selected.
Hover back over to Oscillator 2’s Wave dial and when the mouse is over it, a + symbol will appear. Press this and it will now appear on the Matrix grid.
Do the same with the Volume, but now reduce the Volume dial to 85. Assign both these two parameters to LFO2 via the Matrix. The Cycling Envelope will be assigned once the FX has been set up in Step 5.
Step 5: Audio Effects
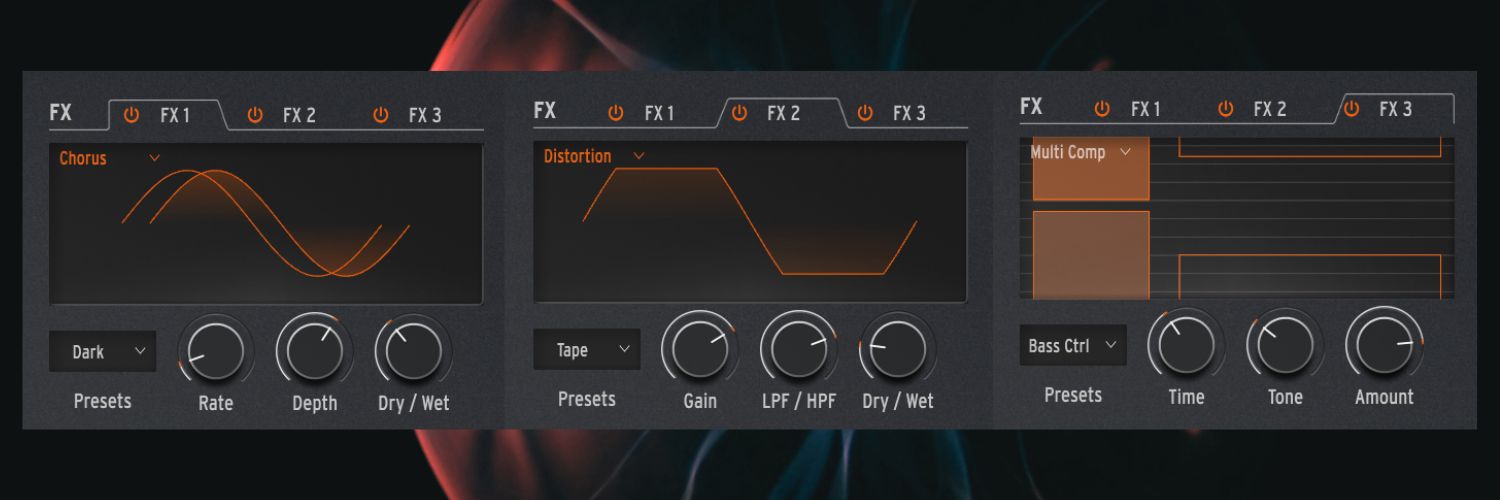
Post-processing audio is a great way to create a more unique sound but Arturia’s MiniFreak V comes with the ability to add up to three powerful audio effects. These run in sequential order, from left to right, so the order in which these effects are added is vital to achieving the desired sound.
Turn on FX1 and select Chorus. Turn the preset to Dark, increase the Rate to 10 and the Dry/Wet to 35. This will give an added stereo width to the sound.
Next Turn on FX2 and select Distortion. Select the Preset named Tape, decrease the gain to 70, move the LPF/HPF to 25 then finally reduce the Dry/Wet to 20. This effect will add grit to the patch.
Finally, turn on FX3 and choose Multi Comp. The aim here is to add extra weight to the body of the synth, so select the preset named Bass Ctrl. This will emphasise the low end. Bring the Tone down to 30 and turn up the Amount to 80.
Step 6: Back to the Matrix
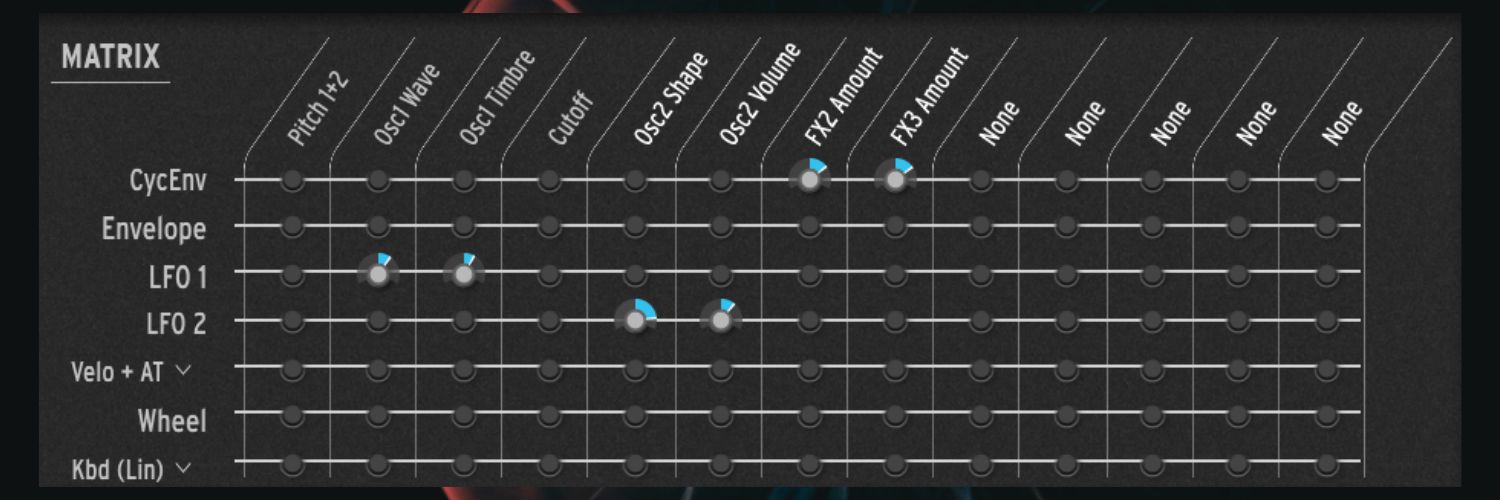
Now that the FX has been set up, the Cycling Envelope can now be used to modulate these parameters.
Select Advanced, choose FX2, press the + on the dial for the Dry/Wet and on the Matrix grid, locate the dial for CycEnv and FX2 Amount and turn to approximately 45.
Finally, move to FX3, press + on the dial for Amount and on the Matrix grid, locate the dial for CycEnv and FX3 Amount and again, turn to approximately 45.
Step 7: Setting up Macros
Macros are a great way to control a specific range accurately within one or multiple parameters with one separate dial.
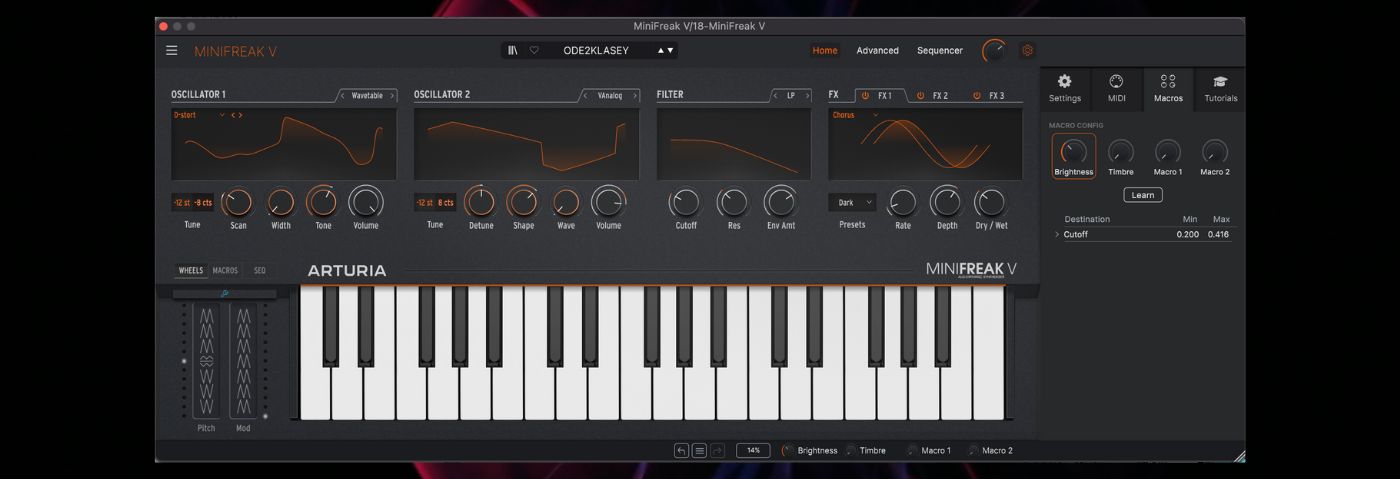
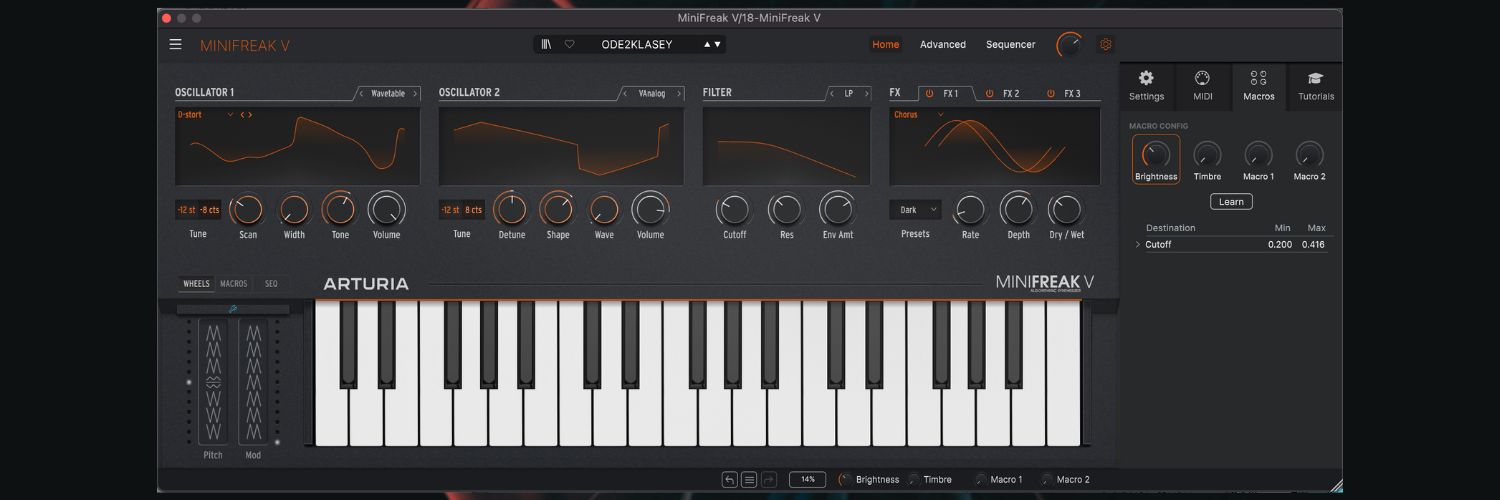
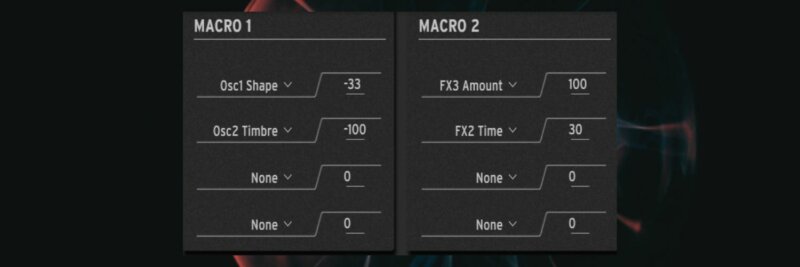
MiniFreak V has two sets of macros, two macro sliders and 4 macro dials. The first task will be to set up the two Macro faders.
Next to the Matrix is the Macro set-up section. Under Macro 1, click the first None. All the controllable parameters will now have white squares around them. Click Tone on Oscillator 1 and turn the 0 down to -33.
Then click on the None below, choose Shape and turn down from 0 to -100. Now turn up Macro 1 and listen to the difference
Now, turn to setting up Macro 2. Click None, choose FX3’s Amount and turn the Macro up to 100. Then click the None below, choose FX2’s Gain and turn the Macro up to 30. Once again, listen to the difference.
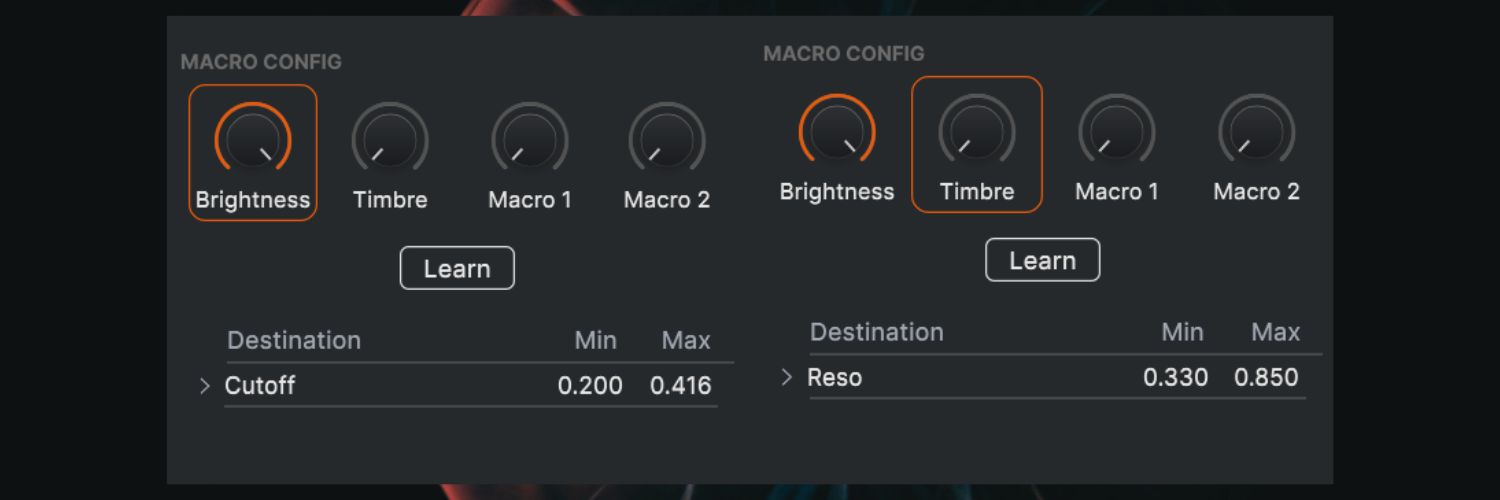
Lastly, begin the process of attenuating the Macro Dials. These can be edited by pressing the cog in the very top right corner of the synth.
Select the Macros tab, choose Brightness and move the Min value to 0.200. Then for the Timbr, move the Max value to 0.850. In this case, the Brightness is the filter Cut-off and the Timbre is its Resonance. These two dials can be controlled at the very bottom of the synth.
Step 8: Sidechain Compression and Automation
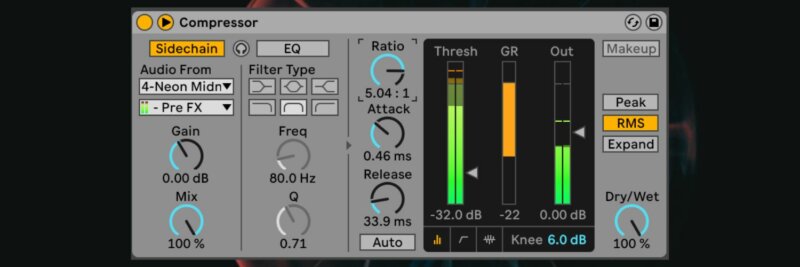
Sidechain compression is an industry-standard way of automatically ducking your bass to allow the kick space to breathe in the mix. Synthwave’s aesthetics often focus on heavily side-chained basses and sometimes apply this to other sounds in the track.
Add a compressor, select the side arrow, choose the drum kit and then the kick and lower the threshold so there is approximately 20dB of reduction. Adjust the Attack and Release to taste
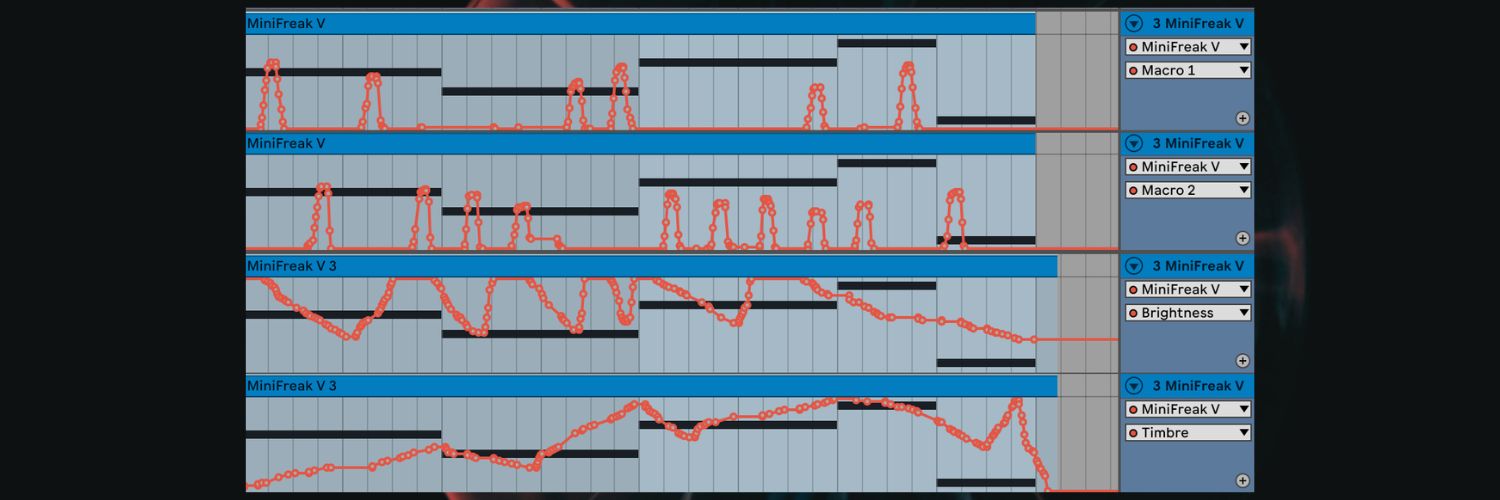
The final aspect is automation and well done for getting this far! Automation is another great way to add movement and excitement to the bassline.
Automation can be drawn in by hand or recorded live. In this instance, it was recorded live to give a more humanised feel. Map the two Macros to a pot on a physical controller and record in live (making sure MIDI Overdub and Automation Arm in the Transport area are selected).
If no MIDI controllers are available, simply use the mouse to record changes or draw in the automation.
Finally, map the Brightness and Timbre and again, record in the changes and we’re there.
And one more time here it is in context with drums, pads, lead and samples all from Ableton packs.
While you’re here, we read the full story from the developer of the MicroFreak.
Simon Mitchell is a music producer based in the UK. You can follow him on Spotify and Instagram under his production alias Eone.
Follow Attack Magazine
Attack Store

The Secrets of Dance Music Production
The world-leading book on dance music production. Comes with samples too.

The Producer’s Manual
Everything you need to take a mix, from initial recording to final master.

FinalFinal T-Shirt
A hilarious tribute to our never-ending battle with file naming chaos.

Secretos de la Producción de Música Dance
La guía definitiva para producir música electrónica de vanguardia.


Max For Live: Chance Engine
Add controlled yet random fluctuations to your most important parameters


Underground Resistance: The Final Frontier Poster
Anti corporate, political, powerful and progressive the power house of Jeff Mills, Robert Hood and "Mad" Mike Banks needs little introduction.
