u-he are makers of award-winning software synthesisers and effects including Diva, Repro-1, Zebra2, Hive, Bazille, Presswerk and Satin.
Visit U-he
Technique » Synth Secrets »
Use Ableton’s Wavetable to Create A Bassline Inspired By Kings Of The Rollers
This channel is sponsored by

In this Synth Secrets, we’ll build a growling, pulsating drum and bass bassline inspired by Kings of the Rollers’ ‘Somebody Else’.
It’s nothing fancy but you do need a couple of tricks up your sleeve to make it hit the way it’s supposed to, which is to say, like a ton of bricks. For this patch, we’ll actually be using two instances of a softsynth.
In this case, we’ll use Ableton’s Wavetable and we’ll use Live’s Instrument Rack device to put two synths on one MIDI track. This concept can also be applied to any software or hardware synth. All effects will be conjured by Ableton Live Suite’s built-in devices.
Before we get started, here’s a snippet of the bassline we’re creating today:
If that sounds good, then listen to the full track below:
Want to follow along? Download the full Ableton Live session below for free!
Step 1 – Initial setup
Set tempo to 175 BPM. Instantiate an instance of wavetable on a MIDI track in Ableton Live. Then, select the device and hit command+G (or right-click on the top of the device and select ‘Group’.) This nests the synth into a device called an Instrument Rack and you’ll notice a little handle now appears on the left of the device.
Click on the bottom button of this handle (the “Show/Hide Chain List” button) and you’ll see each “chain” of instruments and effects that exist on our MIDI track. Currently, we’ve just got the one chain, populated with one Wavetable synth. Using command+R, rename the chain “Clean Sub.” We’ll first create a solid foundational sub-bass, then move on to the dirty part.
Now, let’s create an 8 bar MIDI loop and draw in an 8 bar long note at c0. In Wavetable, move the wavetable position to someplace between triangle and sawtooth to give yourself some harmonic content to work with. Then move to the filter section. At the top of the filter section, click on the blue button that reads “12” to change the filter roll-off from 12-pole to a more aggressive 24-pole, set the filter resonance to 40% and the cutoff to 100 Hz, and set the synth’s volume to -5 dB.
Under the “Mod Sources” tab, select the “Amp” envelope and set sustain to 0.0 dB so our bass is just a constant wall of sound whenever triggered. Select the “MIDI” tab in the mod matrix, and change “PB” from the default of 2 to 12, which gives the pitch bend parameter a 12 semitone (one octave) range plenty to work with when using pitch bend to move the sound up and down the scale. Finally, click the voicing button (that by default says “Poly”) and switch it to “Mono.”
A look at our progress so far:

Step 2 – Pitch Bending
Rather than playing notes in a conventional way, I like to use pitch bend automation in rolling D&B basslines. You can give it a bit more of a languid, living, breathing sound that way.
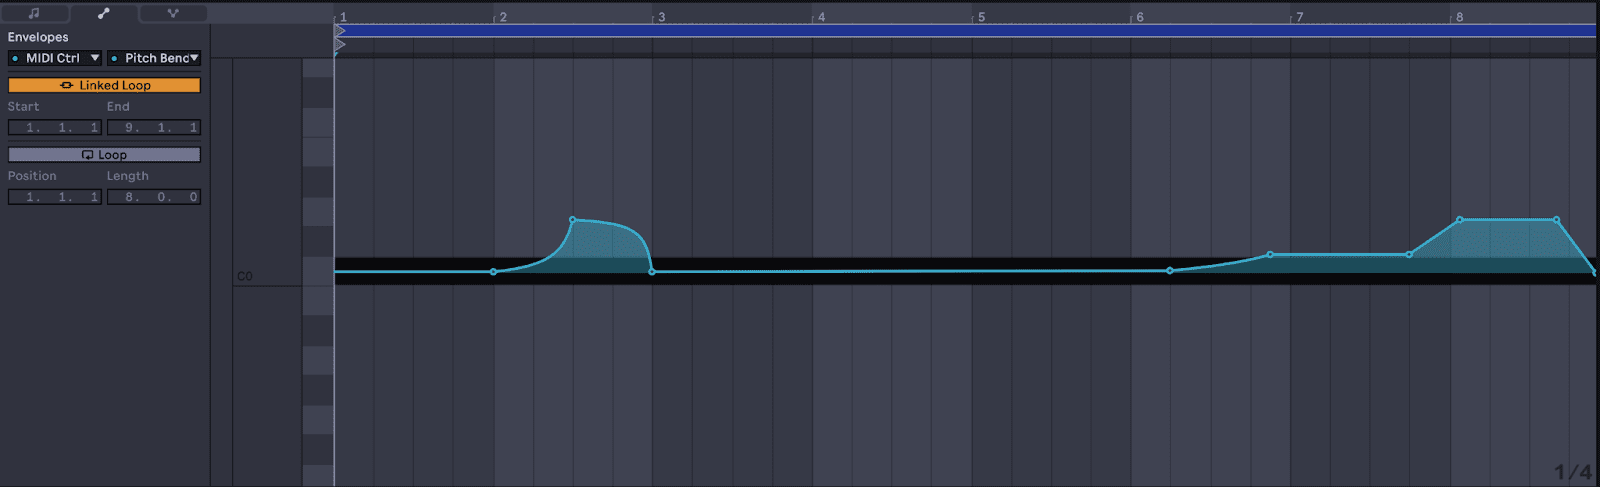
Copy the following pitch bend automation. The little spike early on is like a mini bass drop to make things interesting, and the automation ramps at the end get the bassline to play a couple more notes. Note the pitch bend values of “680” to go up a semitone to Db, and “2050” to go up another 2 semitones to Eb.
If you’re ever having difficulties trying to get your automation to hit an exact value when using Live, remember that you can right-click on any breakpoint and select “Edit Value” to type in the exact desired number. This works as long as you’re using Live 11.0 or later.
Hit play and you’ll hear this simple rolling bassline:
N.B: We recommend following along with headphones or studio monitors. As ever, click any image to see a larger version.
Now that we’ve got our sub-bass dialled in, it’s time to make the dirty layer.
Step 3 – Another Chain
Go back to device view and select the “Clean Sub” chain. Hit command+D to duplicate it (or right-click and select duplicate). That will give you a new identical chain with an identical instance of Wavetable enclosed inside. Rename the new chain “Dirty Bass.”
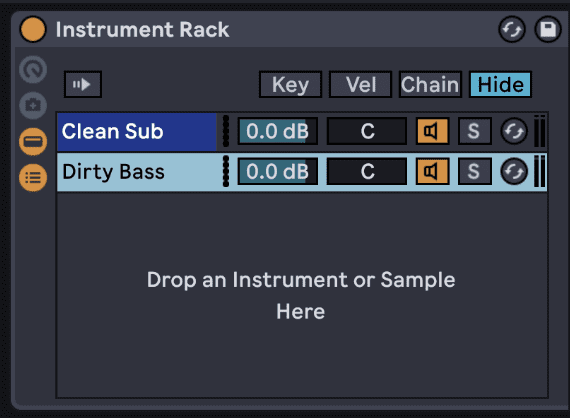
If you’re new to racks, what Ableton’s Instrument Rack does is allows you to put a number of virtual instruments on one MIDI track, and it mixes the audio output from each instrument (and effects you put on the individual chains) into one audio channel. It also allows you to change the relative volume and pan of each chain in the rack using the controls on the left-hand side.
Clicking on “Dirty Bass” will pull up the instance of Wavetable that lives on that chain. Do that, then change the wavetable category from “Basics” to “Collection”, choose the wavetable “Squash”, and move the wavetable position all the way to the top. If you’re using another wavetable synth like Serum or Massive X, a similarly complex waveform with a somewhat nasal tone will do.
Activate “Oscillator 2” as well, and in the “Basic Shapes” wavetable, move the position up to the square wave. Now move over to the filter section, change it from the “Clean” filter to “OSR” and change it from 24-pole to 12-pole with the toggle button, turn the drive up to 8.25, the resonance down to 20%, and the cutoff frequency to 400 Hz.
Now move over to the mod matrix, and enter a value of 30 at the intersection of Filter 1 Freq and LFO. Hit play – you’ll hear the filter open and close, and it gets quite bright when the filter is wide open. I want to take the edge off the sound a bit and add some complexity.
First I’ll go to the Mod Sources tab, select LFO 1, and turn the amount down to 70. I also find that adding a hint of unison – just 2 voices in “Noise” mode with the “Amount” set to about 10% does the trick. Finally, change the volume of the synth to -19. We’ll be adding some layers of saturation and distortion that will bring back that volume and then some.
Now we’re making some progress:

Step 4: Timing the LFO
I know a lot of people are content with simply syncing an LFO like this up to a note value and entering notes onto the MIDI piano roll, but for a control freak who wants everything to sit exactly right, that just won’t do it. What we’ll do instead is use automation to change the timing of the LFO and make the pulsating bass sit perfectly in the rhythmic pocket with our drums.
Disclaimer: this takes time. Getting everything to sit just right takes a bit of trial and error. But I believe that the reward is worth it – a slightly off-grid, organic, rolling bass that adds depth and interest to the mix.
In the envelopes view of your MIDI clip, select “Instruments | Dirty bass | Wavetable” from the first dropdown menu and select “LFO 1 Rate” on the second. Hopefully, you’ve got a basic drum and bass drum groove going that you can play on loop while you dial this in. What’s the point of a bassline if it isn’t built around the drums?
In my automation, I started with values that hovered between about 0.1 and 0.4 Hz, then ramped up to about 4.5 Hz in the last half of the sixth bar and settled in at about 2 Hz for the last two bars. The trick here is to gently modify the automation until it sounds right and you have no funny clicks or pops when the loop ends and restarts. You’ll know you have it right when you hear it.
It should sound something like this:

Step 5: Stereo fieldwork
It’s important to note that since we have two different synthesizer “chains” going on here, we have three different places we can put effects: in the “clean sub” chain, in the “dirty bass” chain, or after the Instrument Rack itself (which affects both chains). If you’re used to using racks in Ableton Live, this makes perfect sense to you, but if this is a new concept and you’re a bit confused, you’re not alone. Maybe we can clear it up a bit.
I’ve selected the “Dirty Bass” chain in my instrument rack. Notice that after the interface of Wavetable there’s a small “handle”.

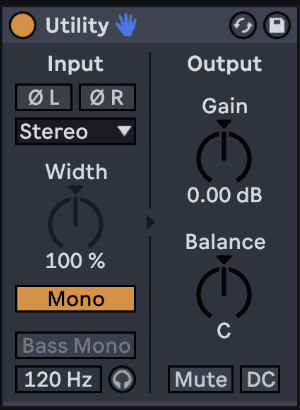
You can add effects between Wavetable and the “handle” if you want to only affect the one chain (in this case I’ll only add a “Utility” audio effect to the Dirty Bass chain:

Or after the handle, if you want it to affect the audio of the entire Instrument Rack, thereby affecting the audio of all the chains after they’ve been combined.

For this patch, we’re going to start by only affecting the “dirty bass” chain. Let’s place a “utility” audio effect on the chain for starters. I like what the unison effect brought to the sound, but it’s a little too wide in the stereo field for my liking on this particular sound. Turn the width down to 0%, or simply hit the “mono” button to collapse this patch to the centre of the stereo field.
Have a listen:
This is useful if the track you’re working on will have other elements that ought to take up a lot of stereo width; vocals with reverb and delay, thick pads, atmospheric synths. If you want to apply this patch to a more sparse track that features the bass as the main element then, by all means, keep it wide.
Step 6: Isolating frequencies
Next, we add an EQ Three to the Dirty Bass chain. Set the FreqLow to 150 and disable the low and high bands entirely. This DJ Killswitch-style EQ is quite handy for pulling out big chunks of the frequency spectrum with minimal fuss. We do this to avoid the LFO-modulated “Dirty Bass” from colliding much with the solid “Clean Sub” tone, and to take the harsher frequencies out of the top, leaving room for vocals, leads, etc.

Can you hear the difference?:
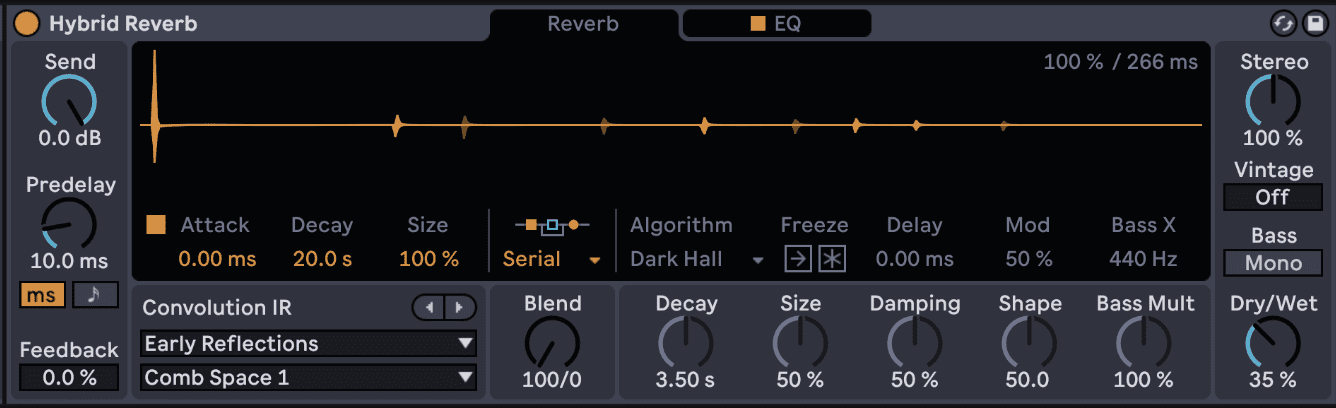
Step 7: Adding space
Now we add a Hybrid Reverb. It’s useful adding it to the Dirty Bass chain alone and not affecting the Clean Sub, because it allows us to add ambience while keeping the sub-bass tight. Move to the Convolution IR section, stay in the Early Reflections category, and select Comb Space 1 for a good basement-y ambience. Move right to the Blend knob and move it all the way to the left, setting it to 100/0.
This allows us to only hear the tight ambient reverb from the convolution section of Hybrid Reverb and none of the more washy impulse-based reverb that Hybrid Reverb can offer. Change Dry/Wet to 35% and we’re done with this chain.
With Hybrid Reverb:
Now let’s move on to shaping the two chains together.
Step 8: Adding grit
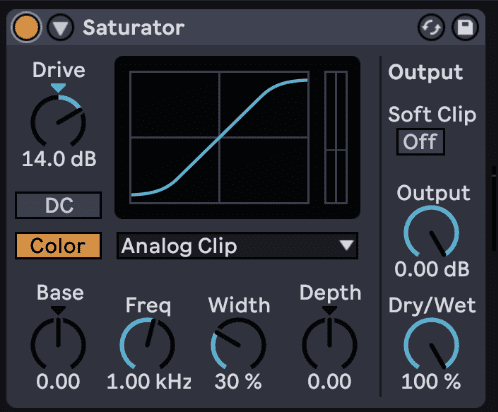
This calls for dirt. Now we’ll start placing our audio effects after the right “handle” of the Instrument Rack, which allows us to affect both the “Dirty Bass” and the “Clean Sub” gates with the same devices.
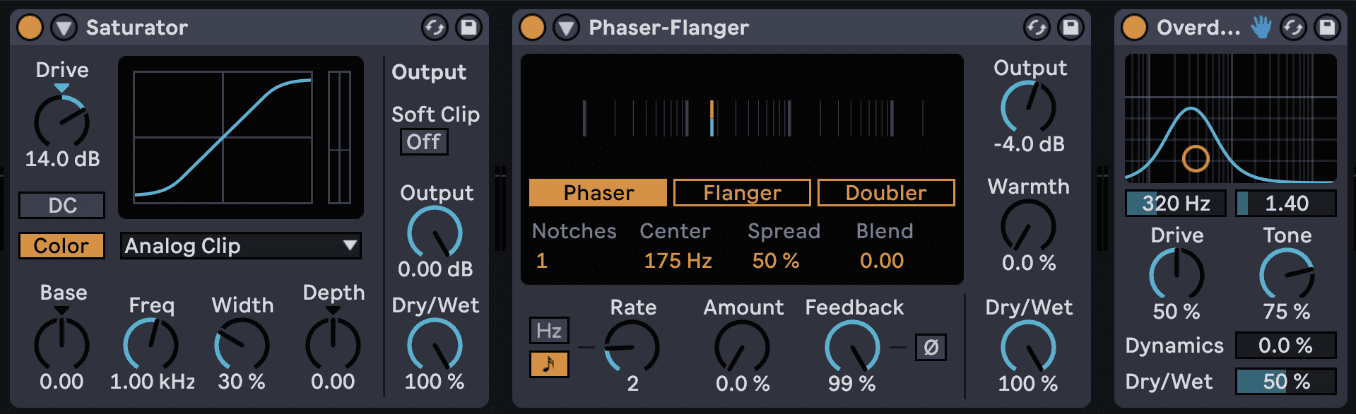
First, we’ll add a saturator device and set the drive to 14 dB and leave the other parameters unchanged.
Now that’s a tasty-sounding bit of grit to my ear:
But… we need more dirt. Let’s add something you might not expect in this chain – the Phaser-Flanger device. A phaser creates moving resonant peaks in the frequency spectrum. I like using Ableton’s Phaser-Flanger as a way for adding static resonant peaks that are incredibly focused, giving sounds new life.
Add a Phaser-Flanger, set “Notches” to 1, “Center” to 175 Hz, “Amount” to 0, and “Feedback” to 99%. Now we’ve added a tight resonant peak at 175 Hz that we’ll use to push another distortion module.
Add an Overdrive device. Set the centre frequency (the first slider) to 320 Hz, and the bandwidth (the second slider) to 1.4. Keep “Drive” at 50% and boost “Tone” to 75%. Finally, pull “Dynamics” down to zero to give a tight compressed sound, and set Dry/Wet at about 50.
Here’s a look at those three modules in series.
Have a listen to what we have so far:
Step 9 – One Last Good Smash
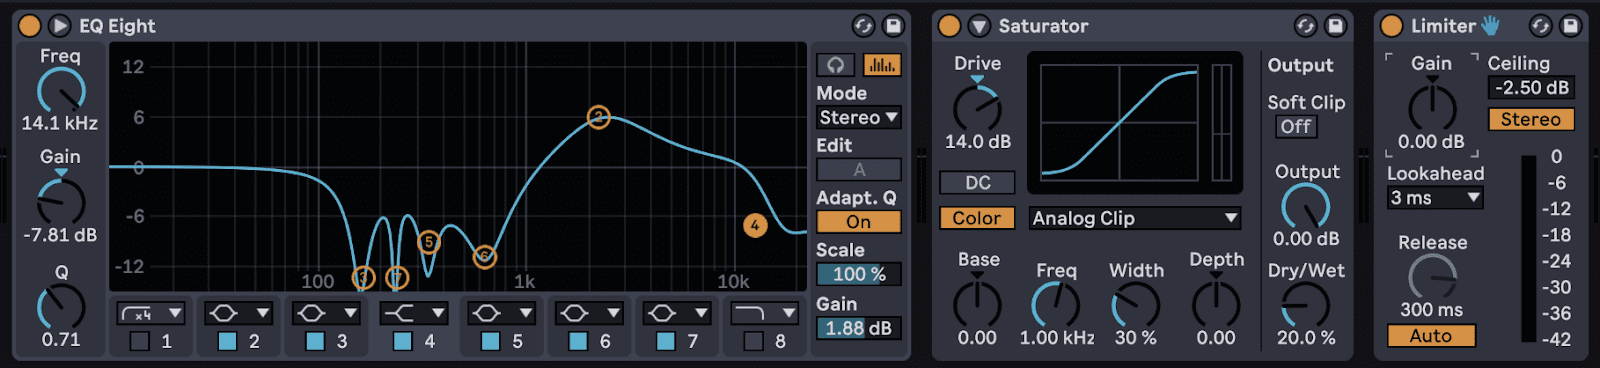
The last thing we’ll add to this sound is a pretty drastic EQ to pull out some funky harmonics and give a bit of an intentional comb-filtered sound, a small boost in the mids, and tame the very high frequencies, followed by one more Saturator with “Drive” set to 14.0 dB and “Dry/Wet” set to about 20%, and a limiter with an output ceiling set around 2.5 dB to keep the thing from going off the rails and clipping.
And that leaves us with something that should work nicely in the mix. Have fun and try your own tweaks.
Here’s a listen to the finished product soloed:
And in the context of a track:
Now, get out there and get dirty!
While You’re Here…
If you like this Synth Secret you might enjoy our book The Secrets of Dance Music Production. It is available from the Attack store!
FOLLOW ATTACK MAGAZINE
Synth Secrets is sponsored by
u-he are makers of award-winning software synthesisers and effects including Diva, Repro-1, Zebra2, Hive, Bazille, Presswerk and Satin.
Download the demos and try them for yourself at www.u-he.com