
Take advantage of all that hardware synths have to offer by using one as an external effects processor. We show you how with IK Multimedia UNO Synth Pro and Ableton Live.
If you have hardware synthesizers, you’re likely getting a lot of musical use out of them. But are you taking advantage of everything they have to offer? Quite a few modern synths not only have excellent effects built-in but they have audio in ports. This means they can be used with other gear or even audio from your DAW. And, once captured into audio, they can be further processed and creatively mangled.
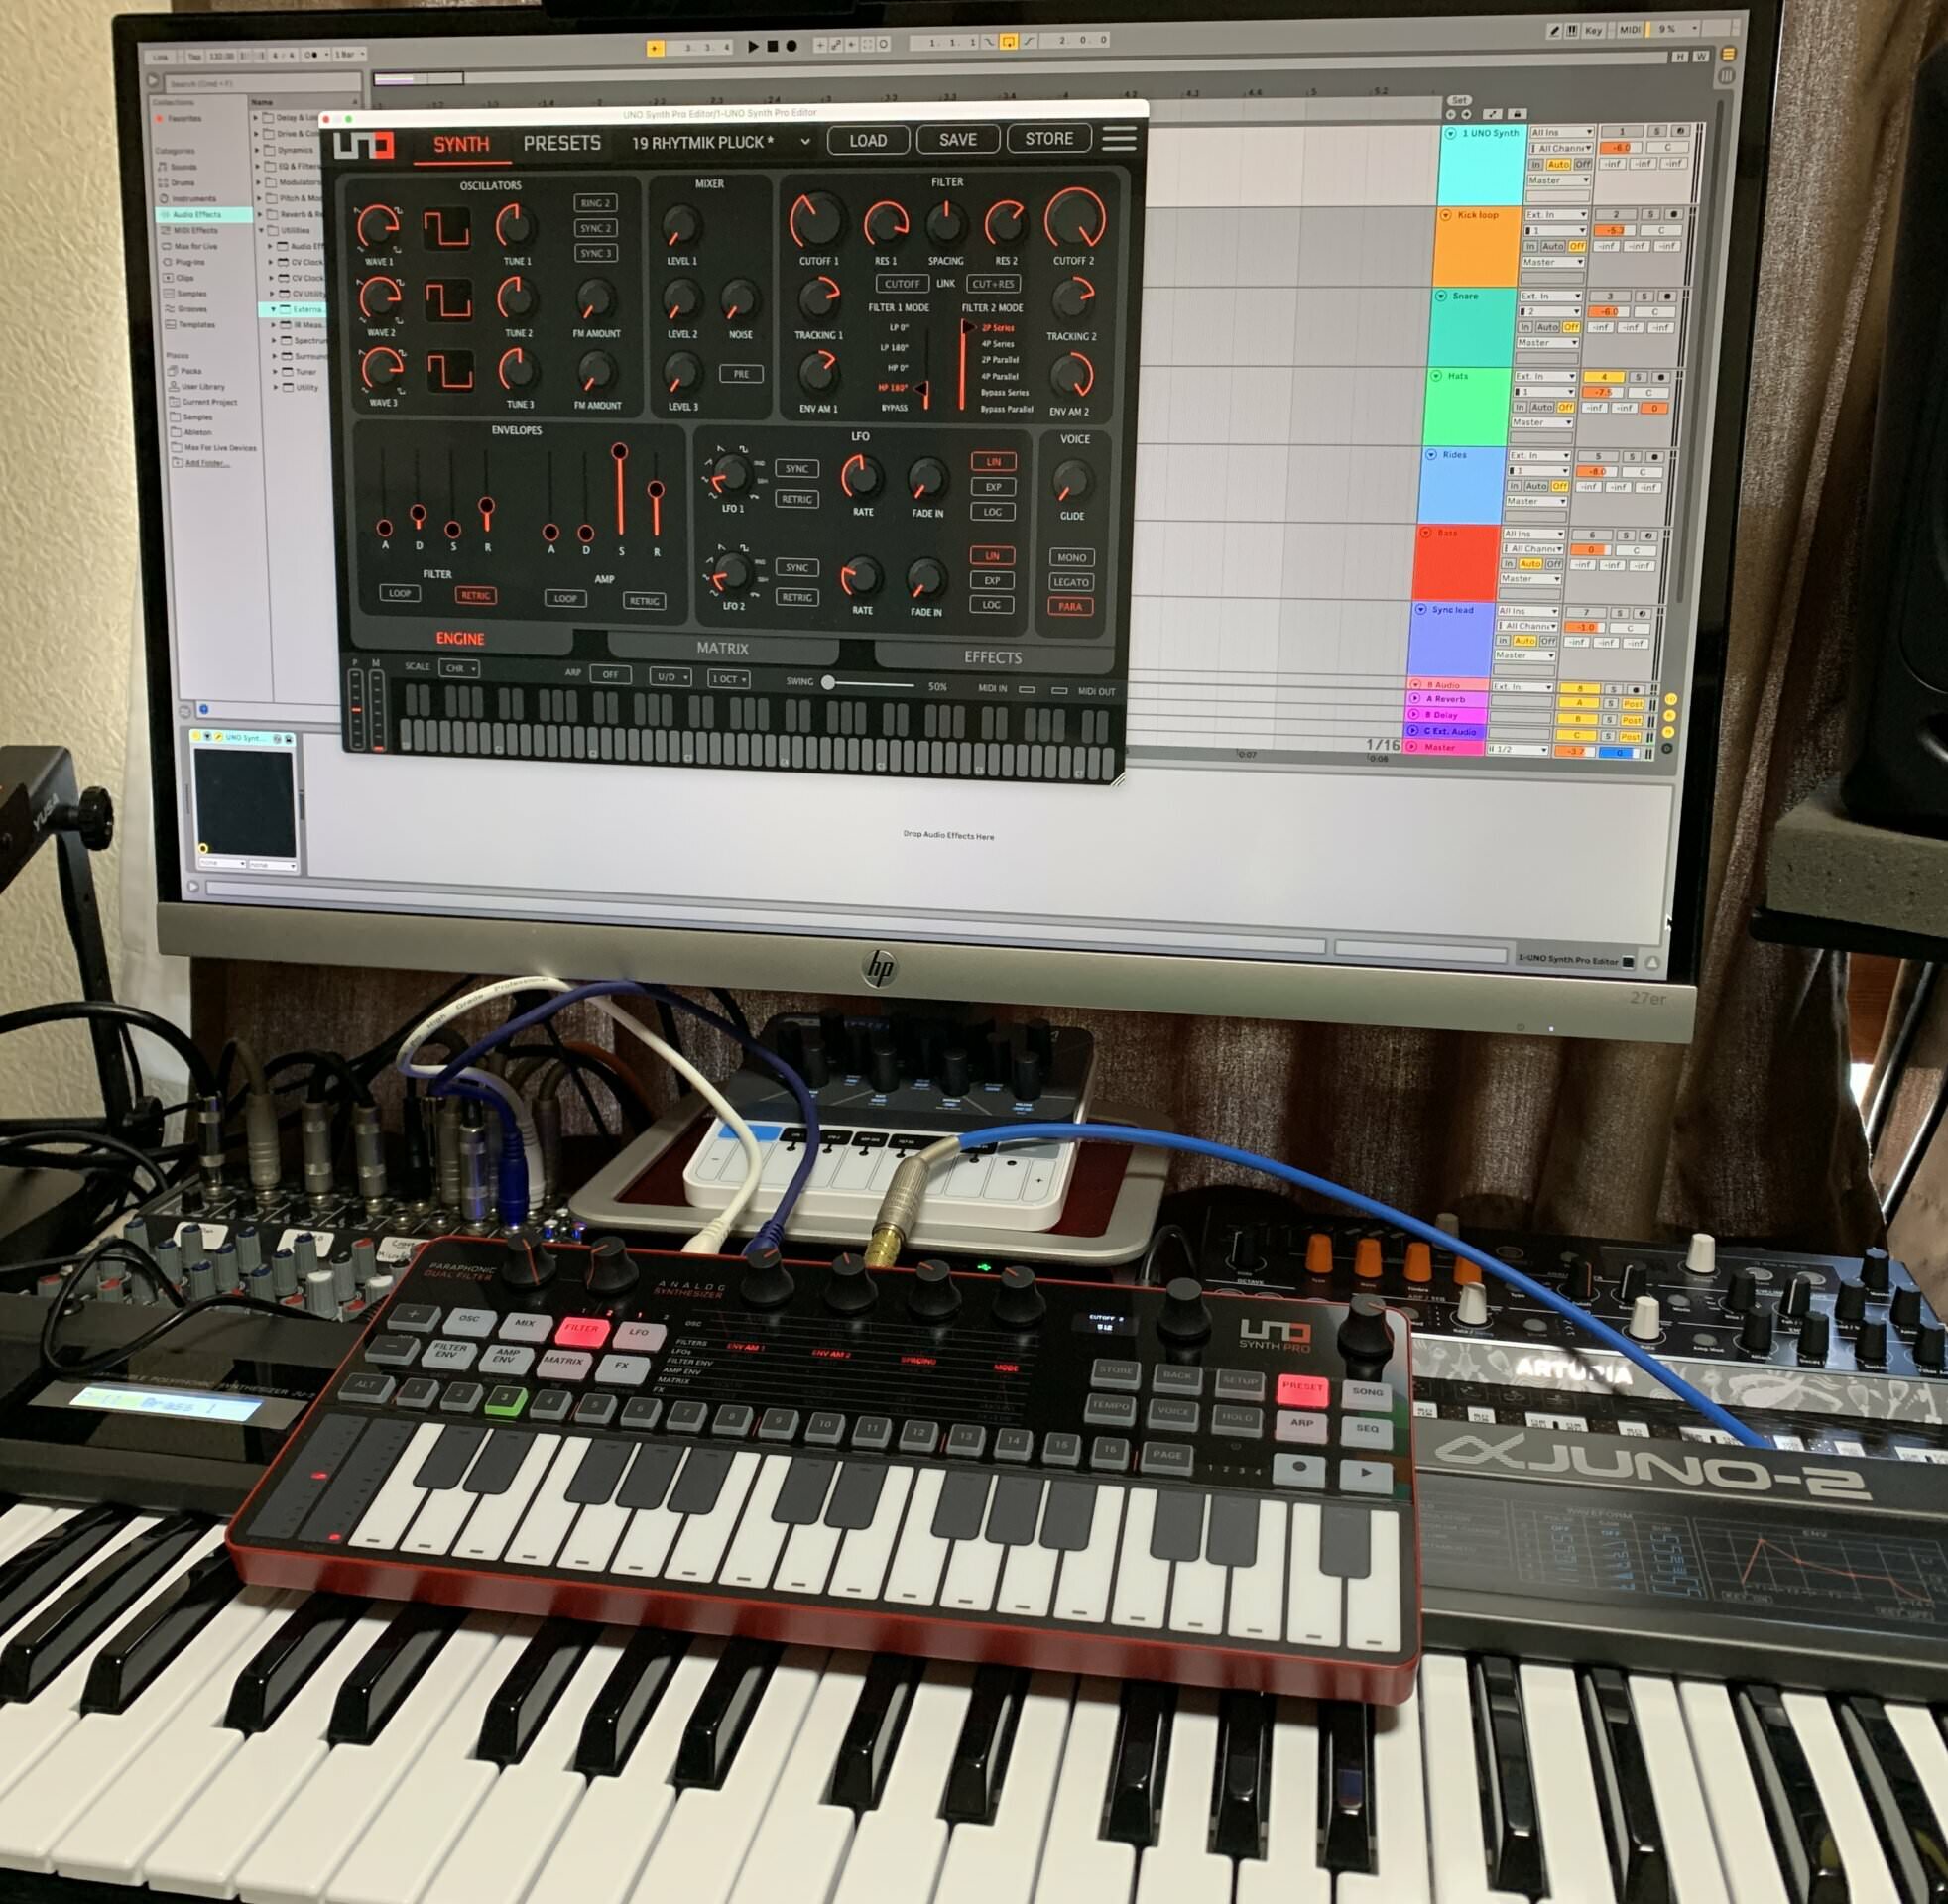
In this tutorial, we’ll explore how to use a hardware synth to process audio from a DAW. We’ll be using an IK Multimedia UNO Synth Pro Desktop and Ableton Live. While the specifics will only apply to these two, the concepts, in general, should work for any DAW and any synth that accepts external audio signals.
We’ll go from this promising but dry techno track:
To this:
A Quick Overview Of IK Multimedia UNO Synth Pro
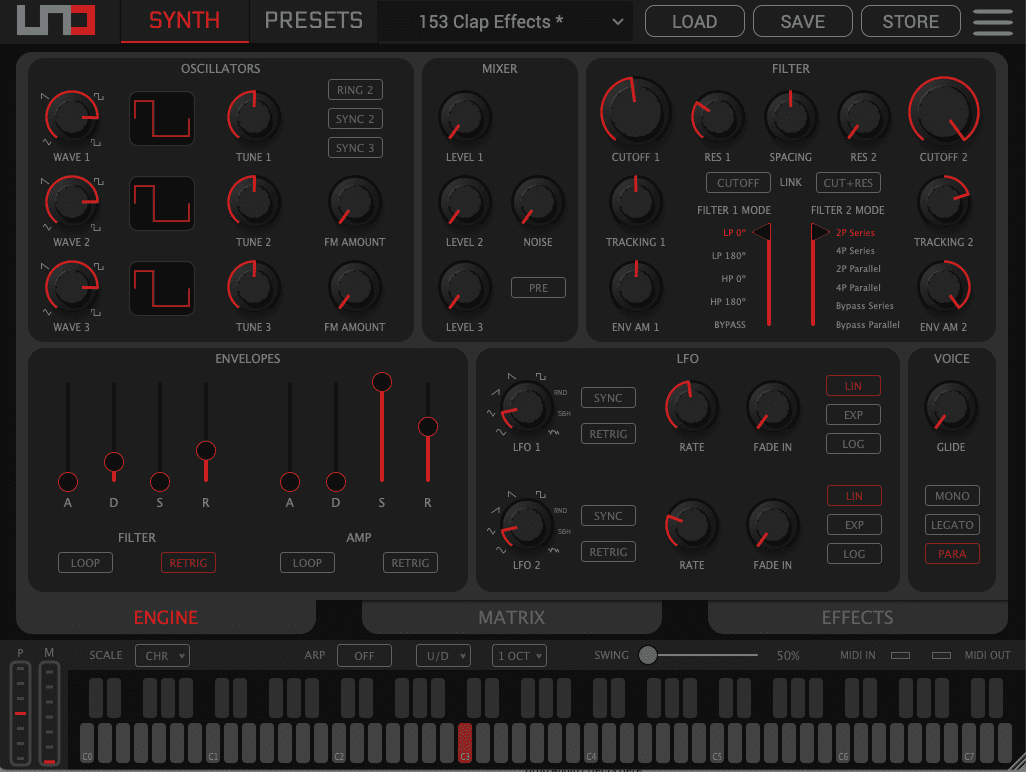
UNO Synth Pro is a three-oscillator analogue synthesizer with two filters, a modulation matrix, sequencer and arpeggiator, and – most importantly for this article – an effects section. The synthesizer, which comes in two models, full size and desktop, is too complex to cover everything here so if you’re new to the UNO Synth Pro, read our review before continuing.
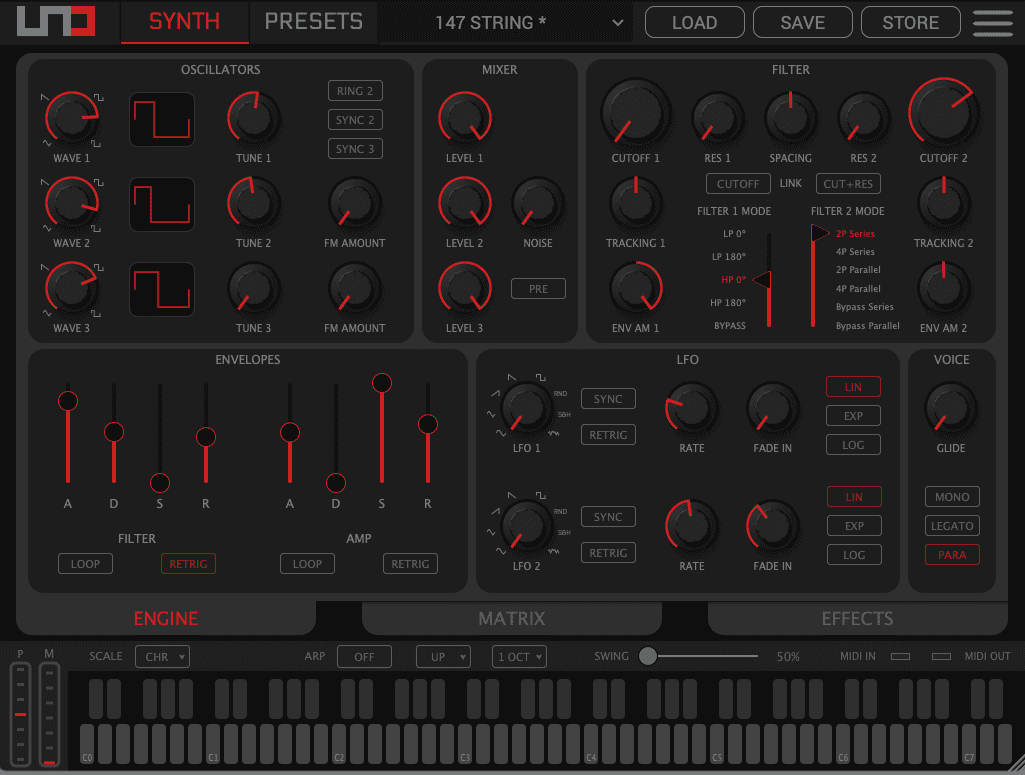
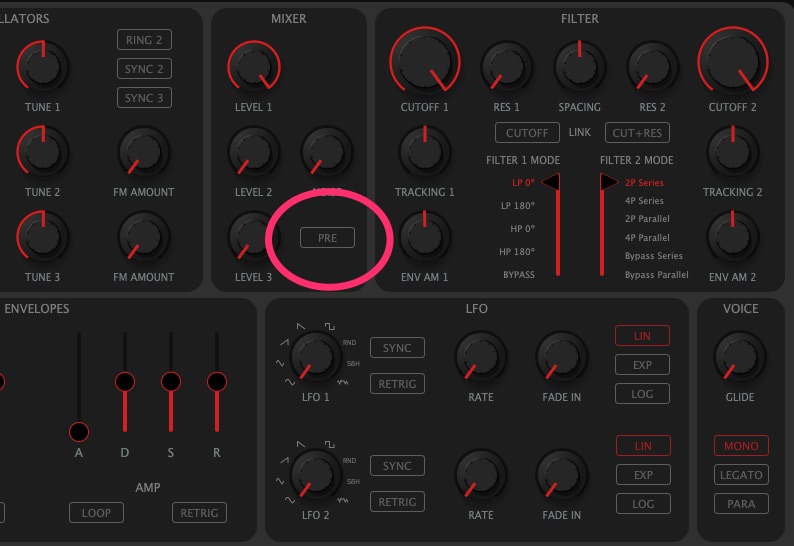
When using the UNO Synth Pro as an effects unit, there are two sections to address: the filters and effects. The UNO Synth Pro has two filters that can be run in series or parallel. Filter 1 has lowpass and highpass modes and both can be set to 180 degrees out of phase. Filter 2 is a lowpass filter with 2- and 4-pole options. They each have cutoff and resonance as well as separate tracking and envelope amount settings.
hardware synths as effects processors
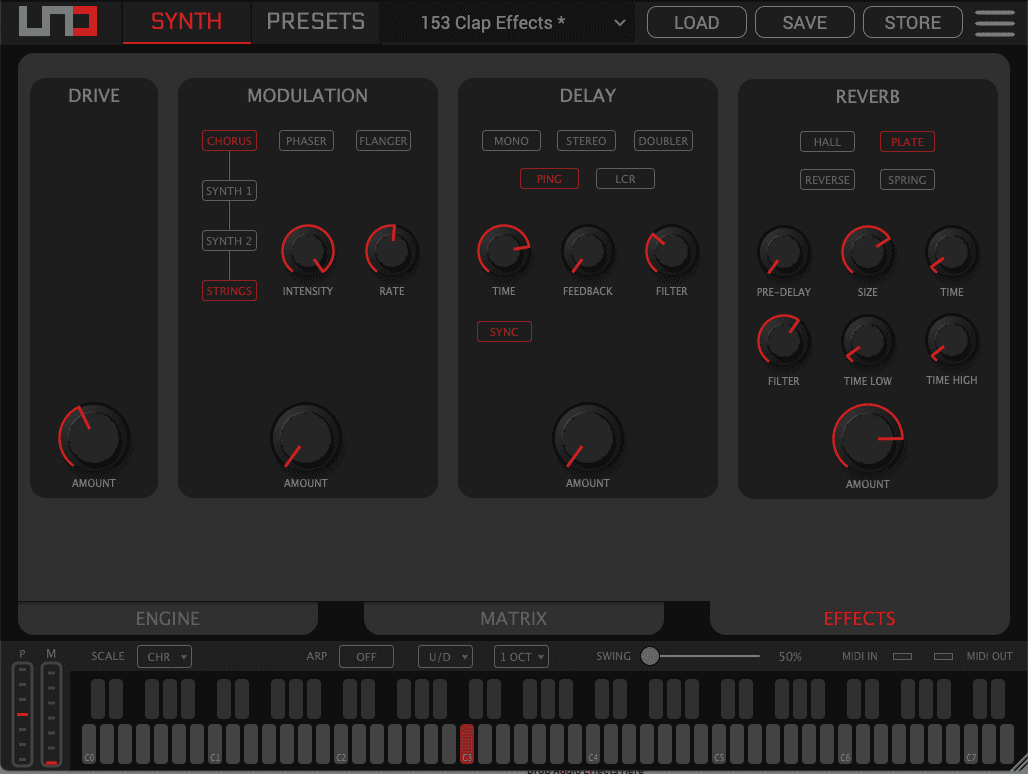
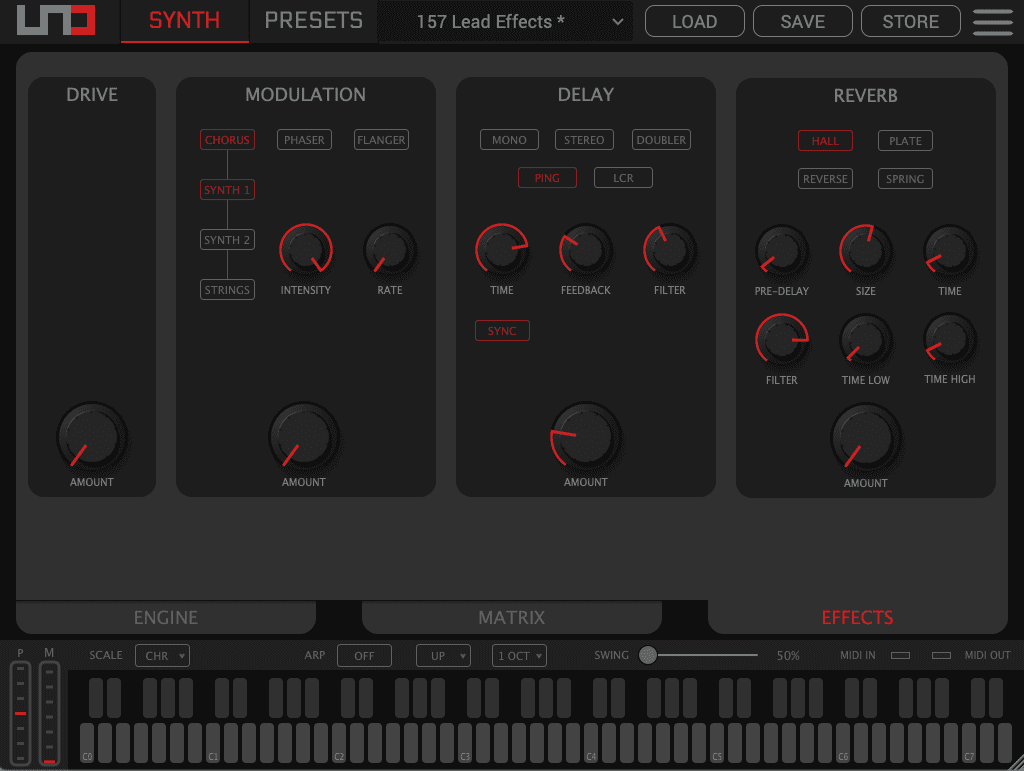
In terms of the effects, there are four: analogue drive and three digital effect types. Drive is simple enough to use, with a single amount of control. Next is Modulation, which includes chorus, phaser and flanger. There’s a delay with five settings, ranging from mono to various stereo configurations. Lastly, there’s a reverb with four types: hall, plate, reverse and spring.
We’ll be using the recently released editor for display and programming purposes. The editor can function as a standalone program or as a plugin in your DAW, which is how we’re using it. Click on any image to see a larger version.
Making Connections
There are a number of ways to connect an external effects unit to Ableton Live. This is the method that yielded the best results for us.
Let’s set up the wiring first. Route a single audio cable out from your audio interface to the Audio In jack on the back of the UNO Synth Pro. Next, connect stereo cables out from the synth and connect them to inputs on your audio interface. UNO Synth Pro will only accept a mono signal in but needs a stereo out, as the effects are stereo.
Next, create a new send track in Live. Add Ableton Live’s stock External Audio Effect plugin to this. The External Audio Effect plugin allows you to route audio out to a piece of hardware and then back in. Under the Audio To dropdown, choose the appropriate output on your audio interface going to the UNO Synth Pro. Likewise, in the Audio From section, select the inputs on your audio interface that the UNO Synth Pro is connected to. Choose the source track that you want to apply effects to and increase the send amount from there to 100%.
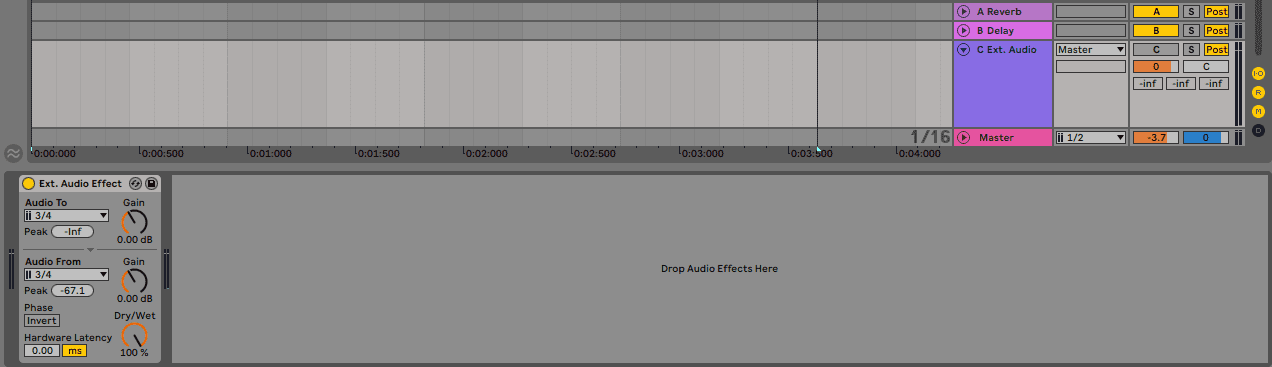
We need a way to capture the audio stream from the External Audio Effect plugin. Create a new audio track and set the input to be the same as the input on the External Audio Effect plugin. Arm the track to record and set Monitor to In. Then you can either blend the two together for parallel processing or delete the original. Create a new audio track like this for every new sound you want to record.
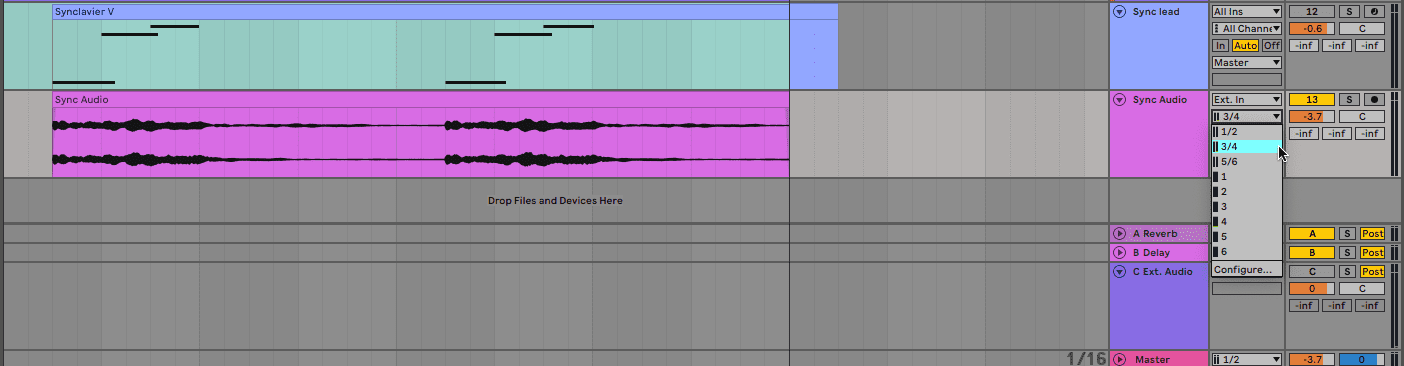
To be able to hear any external audio coming from the UNO Synth Pro, you need to press a key to open the envelope. Create a MIDI track, add the editor plugin to it, and draw in a note that lasts for the length of two bars. Be sure and turn down any oscillators so you only hear external audio. Also, make sure the Pre button is selected in the Mixer section. This routes the external signal through the filters and effects. (Changing it to Post will pass the audio through unaffected.)
Finally, make sure that Reduced Latency When Monitoring is checked in Live’s Options menu. (If you still have latency issues, check this article.)
Now when you press play on the DAW transport, you should hear track audio piped through the synth’s effects.
Step 1: Clap
For the first sound, the clap, ‘FL_TEX_Clap_One_Shot_04.wav’, from the Splice pack, Techno Expedition, we want to use a combination of effects to make it dark and moody, with a long reverb.
First, in the filter section, we reduce cutoff to about 50% and increase the resonance a little. This darkens up the clap and gives it some bite.
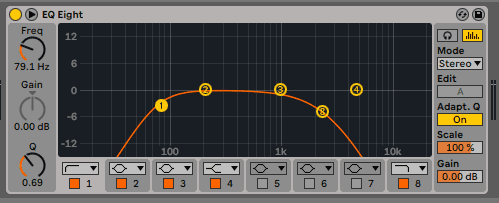
UNO Synth Pro has a fantastic analogue drive section and it’s just what we need for this sound. In the Effects section, we crank up the drive almost to 50%. Next, we dial in a heaping helping of plate reverb to really give it some atmosphere. We can use the filter in the reverb section to make it even darker. Finally, we use Live’s EQ Eight to take out some of the lows as well as any remaining errant highs.
Here is the original clap:
And now with filter, drive, and reverb from UNO Synth Pro:
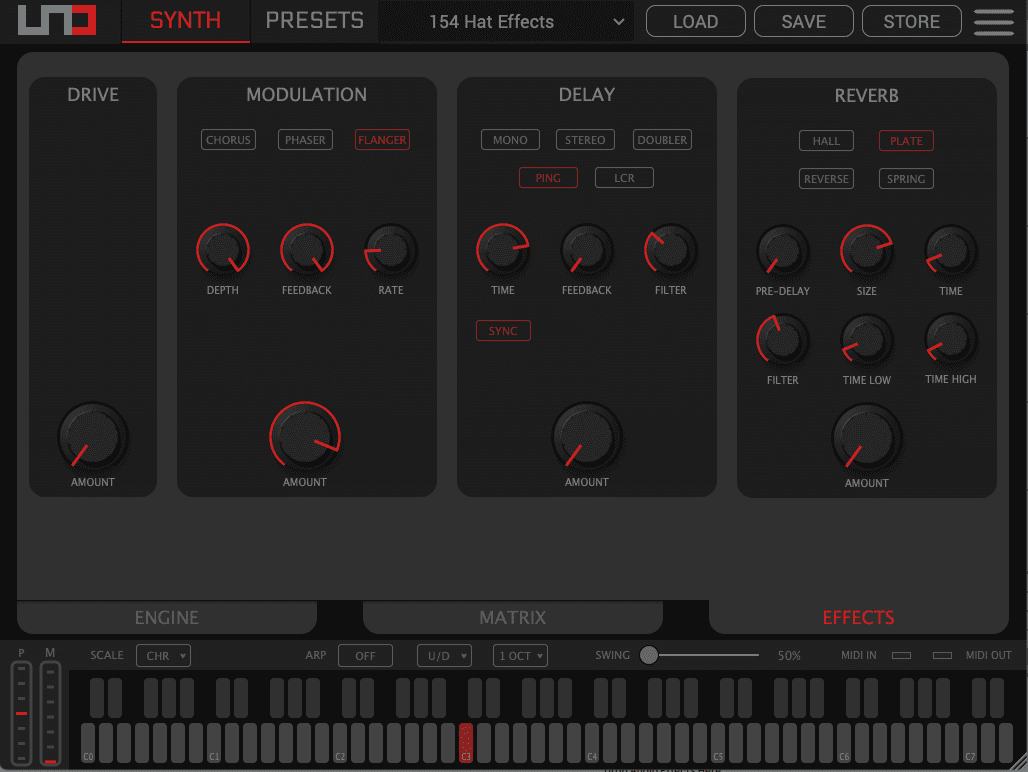
Step 2: Hats
We have a hi-hat loop, ‘FL_TEX_Loop_20_Hat_132.wav’, from the same Splice pack. It’s a great loop but we’d like it to have a little more motion. Flange should work nicely.
We’re not using the filters this time so we make sure they’re both wide open. On the Effects page, we choose Flanger in the Modulation section. We want something metallic and strong, so we go with full depth and feedback settings with a rate set to around 24, or one-fourth of the way up. We also increase the Amount knob almost to 100%.
We like the effect but we also like the original loop, so we choose to use them both in the track, blending the affected loop under the original one.
The original loop:
Just the flange:
And both together:
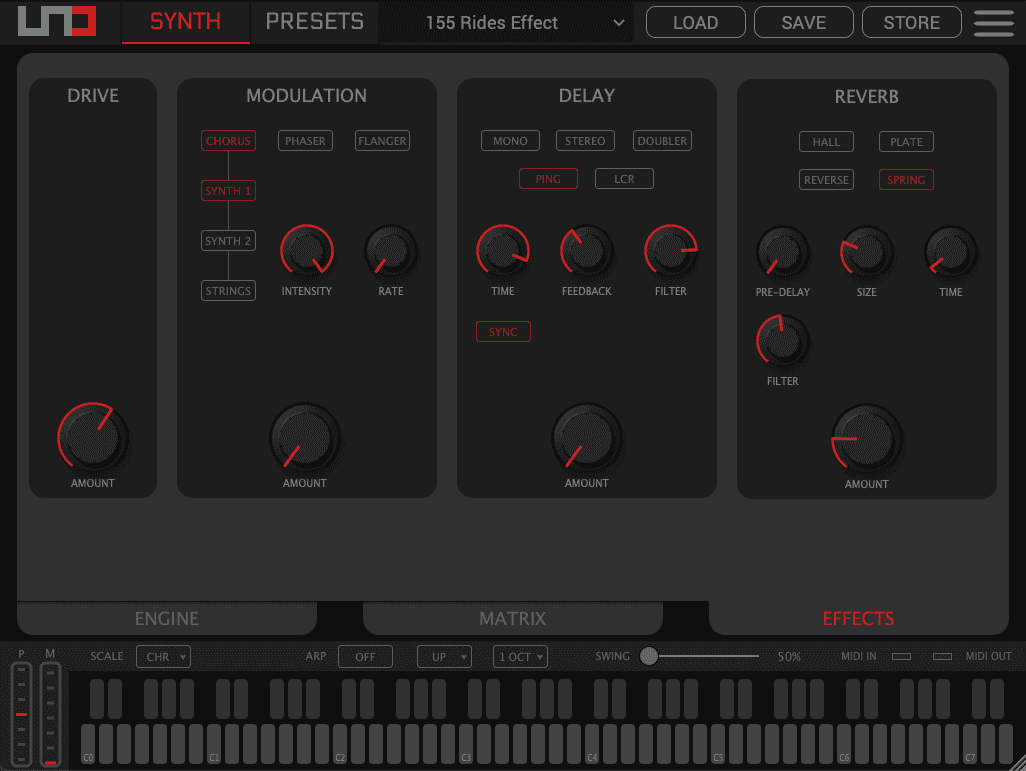
Step 3: Rides
Next, we have a pumping ride loop, ‘FL_TEX_Drum_Loop_Ride_14_132.wav’, from the same Splice pack. Like with the clap we’d like to make it a little darker but we also want to preserve – and even exaggerate – the pumping. Let’s use drive, spring reverb, and cutoff motion to achieve this.
First, let’s use automation to modulate the Cutoff knob in Filter 1. We draw in a series of ramps so the cutoff opens rhythmically. We also dial in a little resonance for Filter 1. It’s still a bit bright so we bring down the cutoff in Filter 2 (set to 4P Series) and add a little more resonance because who doesn’t like resonance?
In the Effects section, we crank up the drive and add some metallic spring reverb, setting size and amount to taste. We also lower the reverb filter to make it extra dark.
The original rides:
And after processing:


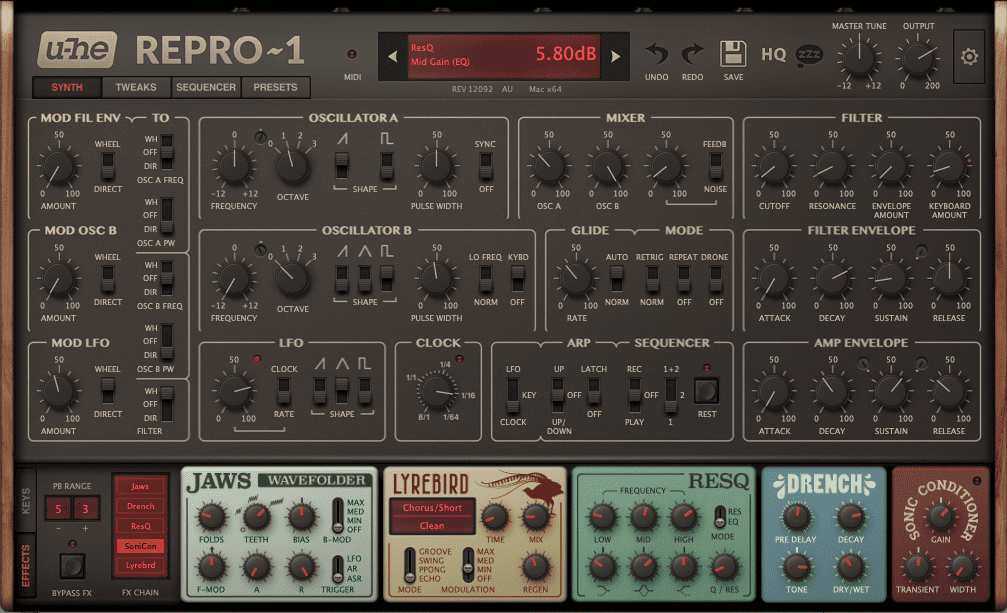
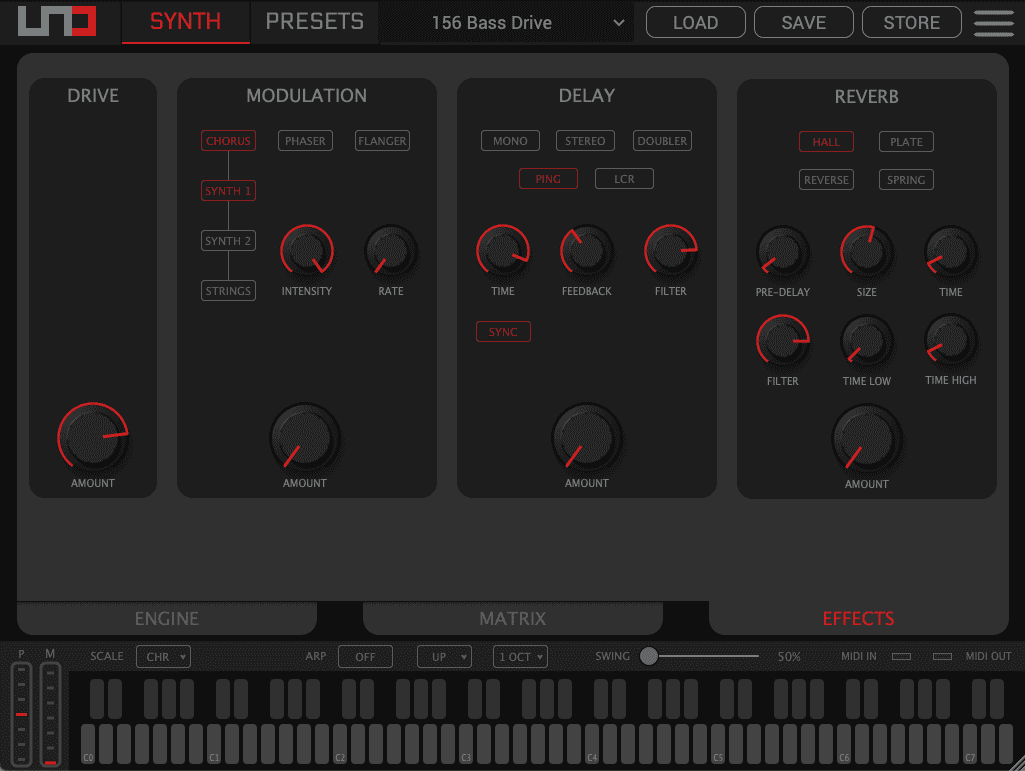
Step 4: Bass
We start with a bassline that we’ve made using u-he’s Repro-1. It’s nice and subby but we’d like to add some drive to it. We run it through UNO Synth Pro, lower the filter cutoff just a bit, and then really crank that analogue drive.
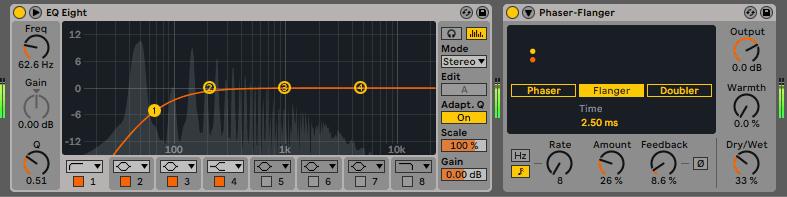
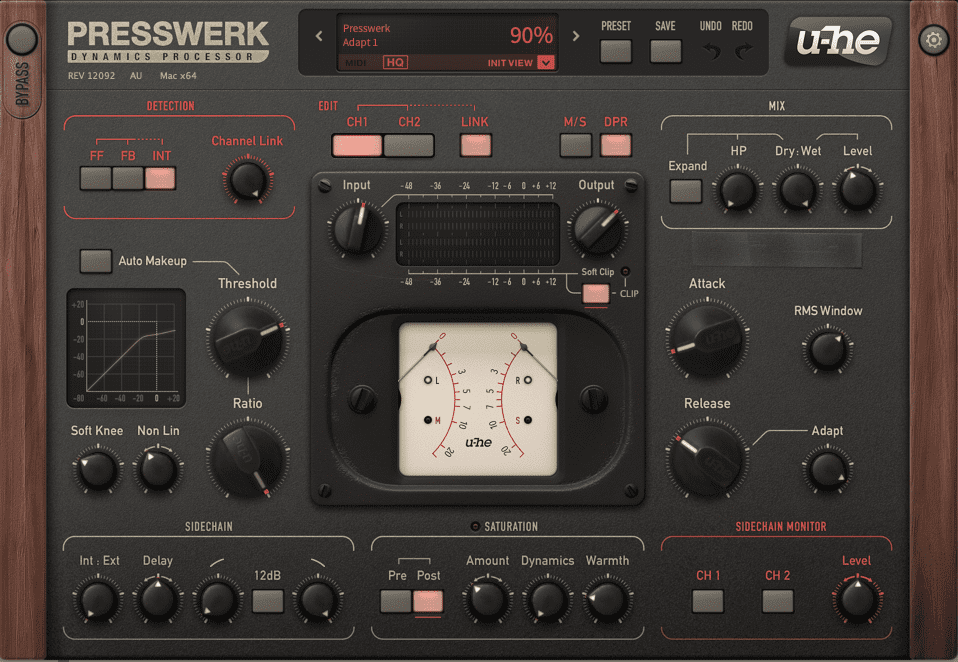
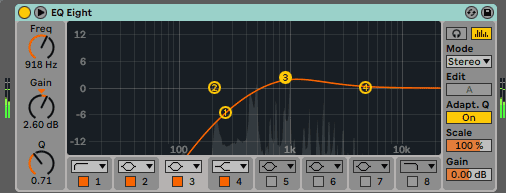
Next, we want to blend both sounds together. First, we use Live’s EQ Eight to cut the lows below 200Hz from the driven bass channel so they don’t overlap. We also add Live’s Phaser-Flanger – set to Flanger – to the channel to give it a little motion. We group the two tracks together and Place a copy of u-he’s Presswerk compressor on it sidechained to the kick.
The original bassline:
Processed with analogue drive, EQ and flanger:
And the two basslines together in a group:

Step 5: Synth Lead
For the final element, a synth lead made with Arturia’s Synclavier V, we want to add some delay. We send it to the UNO Synth Pro and use a ping-pong delay, with the time set to dotted eighth notes. We keep the Feedback amount low and restrained, as we don’t need it to get out of control. Again, we lower the filter for a darker sound.
The original lead sound:
And with delay:

Here are all the elements together with a Splice kick sample, ‘FL_TEX_Drum_Loop_11_Kick_132.wav’. A little saturation and compression on the main bus sweeten the deal.