
Latency can turn your hardware heaven into a confusing and frustrating hell – especially with Ableton Live. We look at some strategies to get your MIDI and audio all synced up.
“Any signal in a computer-based environment is going to have a certain amount of latency.” So says Ableton on their website. In other words, latency is a fact of DAW life so get any idea of achieving zero latency out of your head right now. There’s latency involved even when you keep everything inside the DAW. Once you bring in outside systems like external MIDI and audio, things can get even trickier.
In this Hardware Focus, we’ll be tackling a topic many readers have been asking about – how to reduce latency in your studio setup. Specifically, optimal settings and solid strategies to reduce latency when working with MIDI and audio. We’ll be focusing on Ableton Live, as it seems to be particularly confusing, but many of these practices will apply to other DAWs even if the actual methods are different.
What Is Latency?
Also called lag, latency is “the time it takes for (a) signal to enter the computer, then travel through the software and back out through your speakers or headphones,” according to Ableton. Plugins all have differing amounts of latency that they add to a signal. Some are very small, while others, like limiters, add quite a bit. Limiter lookahead, for example, isn’t accomplished by magically seeing into the future. The DAW delays all your tracks by the amount of time it takes to perform this function, ensuring everything stays in time. For the end-user, we don’t experience any lag at all as the DAW adjusts everything for us. However, once you start bringing outside audio and MIDI into this environment is where things get tricky.
It takes time for audio to be changed into digital for use in the computer, and then back into audio for playback on speakers and headphones. Additionally, different pieces of equipment introduce varying amounts of lag. Hardware – particularly old hardware – is not very precise at all. While this inconsistency is part of its charm, it can also be a major headache.
So what can we do?
Optimal Settings
We can start by making sure our audio settings are optimal. Open the Preferences in Live and click on the Audio tab. Under the Sample Rate section, choose the highest In/Out Sample Rate that your system can handle.
Next, look at Latency. Lower Buffer Sizes will result in less latency. However, too low and you’ll get horrendous clicks and audio dropouts, as your computer won’t be able to process the audio quickly enough. Ideally, you’d like something around 10ms of Input Latency or less. Try a setting and play some MIDI notes into an instrument plugin. If you hear any glitches, go up to the next setting.
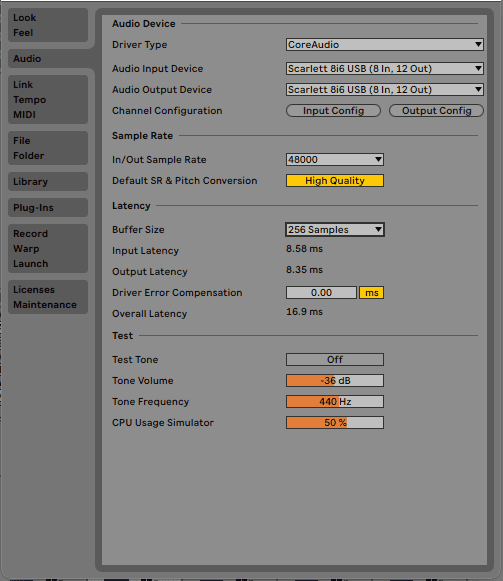
How about Driver Error Compensation? If you are getting incorrect readings from your class-compliant audio interface, you can use this setting to offset this. However, if you have an interface with its own drivers, it’s not necessary to adjust this. See Ableton’s site for more on this.
Something to keep in mind is that hardware such as synths and drum machines have their own latency. Messing with Driver Error Compensation won’t fix this. In fact, it could make things worse. We’ll look at how to compensate for external hardware latency next.
Additionally, Windows users should make sure they are using an ASIO audio driver.
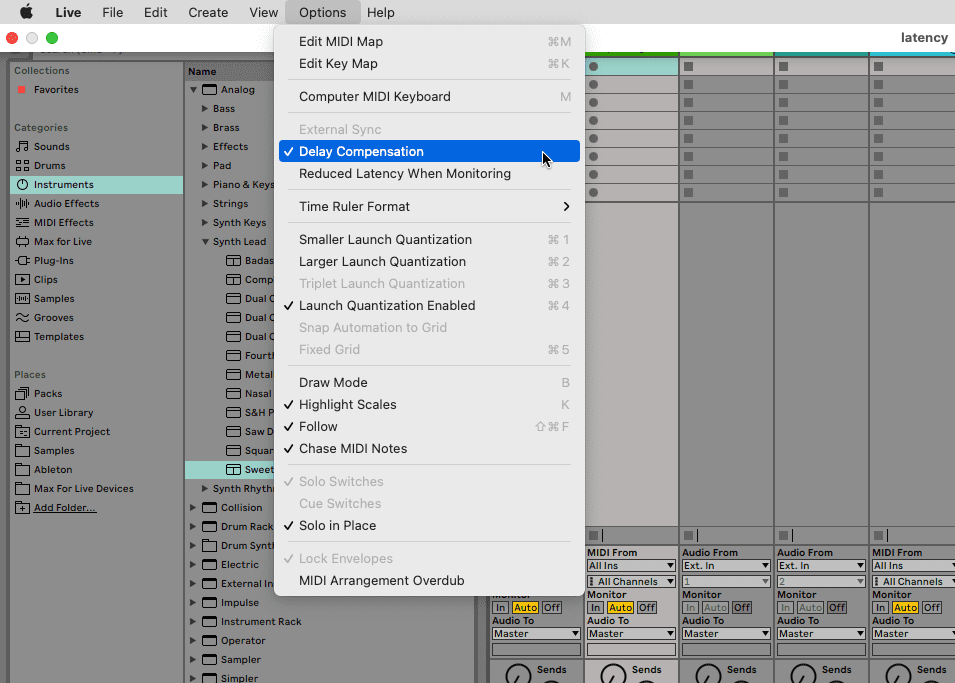
Lastly, make sure that the option Delay Compensation in the Options menu is ticked. This will tell Live to match the internal latency across all tracks so that you do not experience any lag at all.
MIDI And Audio Latency
Now that we have things optimized for latency as best we can, let’s get some hardware involved and try recording some MIDI and then audio. First, we’ll use a Behringer Crave controlled by MIDI over USB. The audio goes out to a mixer, into a patchbay, and then into a first-generation Focusrite Scarlett 8i6 on inputs 1 and 2. Note that latency can be present in both MIDI and audio, and whether your connections are DIN cables, audio cables, or USB.
We’re going to use the External Instrument device for this. While there are a number of different ways to work with MIDI and audio in Ableton, this is the most convenient. This is because the External Instrument device adjusts for any latency in the system and compensates for it. Because of this, you can be sure that what you’re monitoring is going to be in sync with the sounds coming out of your DAW. (Compare this to monitoring on an audio channel recording from an external source. In this situation, it may sound fine but things will be recorded out of sync. We’ll get into this in a future article.)
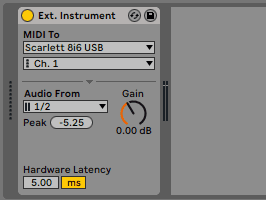
In the example below, we’ve added an External Instrument device to a MIDI channel. We’ve selected CRAVE as the MIDI destination (remember, it’s USB so this will show up in the list of MIDI devices). We’ve also selected the appropriate MIDI and input channels. We can now play our external hardware instrument via MIDI.

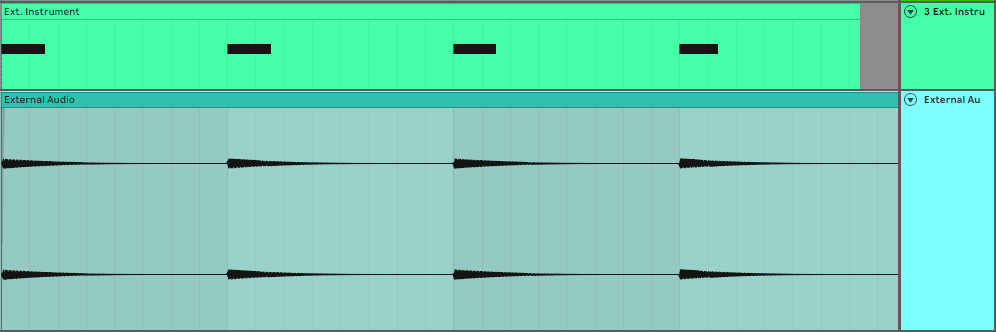
It sounds pretty good but there could be some lag present. Remember, Live is compensating for latency in the system (DAW and audio interface) but not the hardware device. Let’s see how tight it is. We dial in a short, percussive sound and record four quarter notes via MIDI. Our playing is a little sloppy so we tighten it up with quantization. We want it to be tight, as we’re going to record audio next and compare it to the MIDI to check the latency.
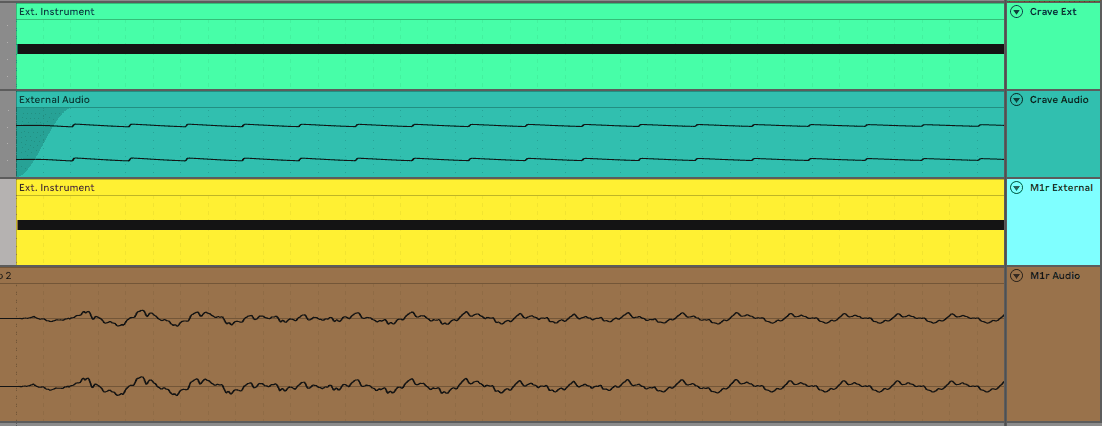
Next, we create a new audio channel to record the Crave. We set the input to the External Instrument device, arm the channel to record, and press play. Now we can zoom in on the recorded audio and compare it to the quantized MIDI. The Crave’s MIDI is remarkably tight.
Let’s try it again with a different, older device. This time we’re going to use a Korg M1r, the rackmount version of the famous ‘80s synth. We use the same MIDI notes to trigger a similarly plucky sound and record in the audio. This time, there is marked latency compared to the Crave. Bummer. We definitely want to fix this. We could go in and manually fix it but this is not ideal. Instead, let’s adjust for the latency of the external device.
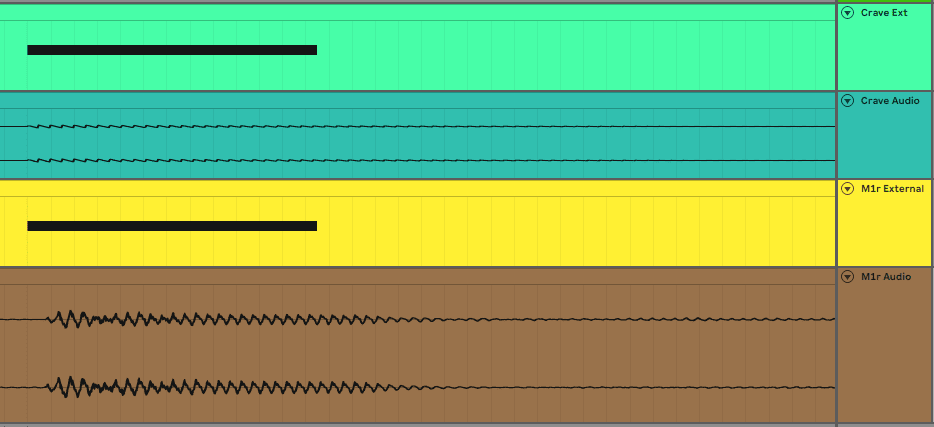
First, we need to know how long the latency is. In Options, turn off Snap To Grid. Next, highlight the space between where the MIDI note starts and where the recorded audio starts. The first one is about 6ms. The second is 6ms. However, the third and fourth notes are 5ms off. Remember we said hardware wasn’t consistent? Let’s say it’s about 5ms and start with that.

Next, we go back to our External Instrument device. At the bottom, there’s a setting for Hardware Latency. This is to offset the latency of our external device. We set ours to 5ms.
We then re-record the audio and check. Hey, look at that. Right on the money.
As every piece of hardware is different, it’s a good idea to save that External Instrument device as a preset so you can recall it anytime you use that instrument.
What if you’re recording instruments with no MIDI, such as guitars or pre-MIDI keyboards? We’ll look at that next time, as well as adjusting the timing on drum machines and external sequencers.