Hardware is fun, but how can we get it to play nicely with our DAW? In this Hardware Focus, we look at getting started with integrating hardware into your computer-based setup.
For the novice producer, navigating a DAW alone can be tricky enough. There’s plenty to think about already before bringing outside hardware into the equation. And yet there’s no denying the seduction of gear: the allure of a drum machine or the siren’s call of a sexy desktop synth. There’s also the promise of new sounds and even a new workflow to change things up.
First things first though. How can we successfully integrate outboard gear into our DAW environment? The good news is it’s not that hard at all. The bad news is once the hardware floodgates are open, it’s terribly difficult to stop the deluge of purchases and prevent GAS (gear acquisition syndrome). There’s a reason they frame it as a sickness.
This article is geared towards the novice adding their first bit of hardware kit to a computer-based setup. We’re assuming you already have a computer, monitors, and an audio interface and are relatively comfortable with using them. We’ll be looking at connecting two types of gear here, modern and vintage. For that, you’ll need some USB cables (specifics depend on the hardware unit in question) for the modern, and at least one five-pin DIN MIDI cable and some audio cables for the vintage.
We’re using Ableton Live for this piece but the concepts are universal and should apply to any DAW. Please see your DAW’s manual for specifics. As always, click on any image to see a larger version.
Let’s get connected.
Type 1 USB MIDI
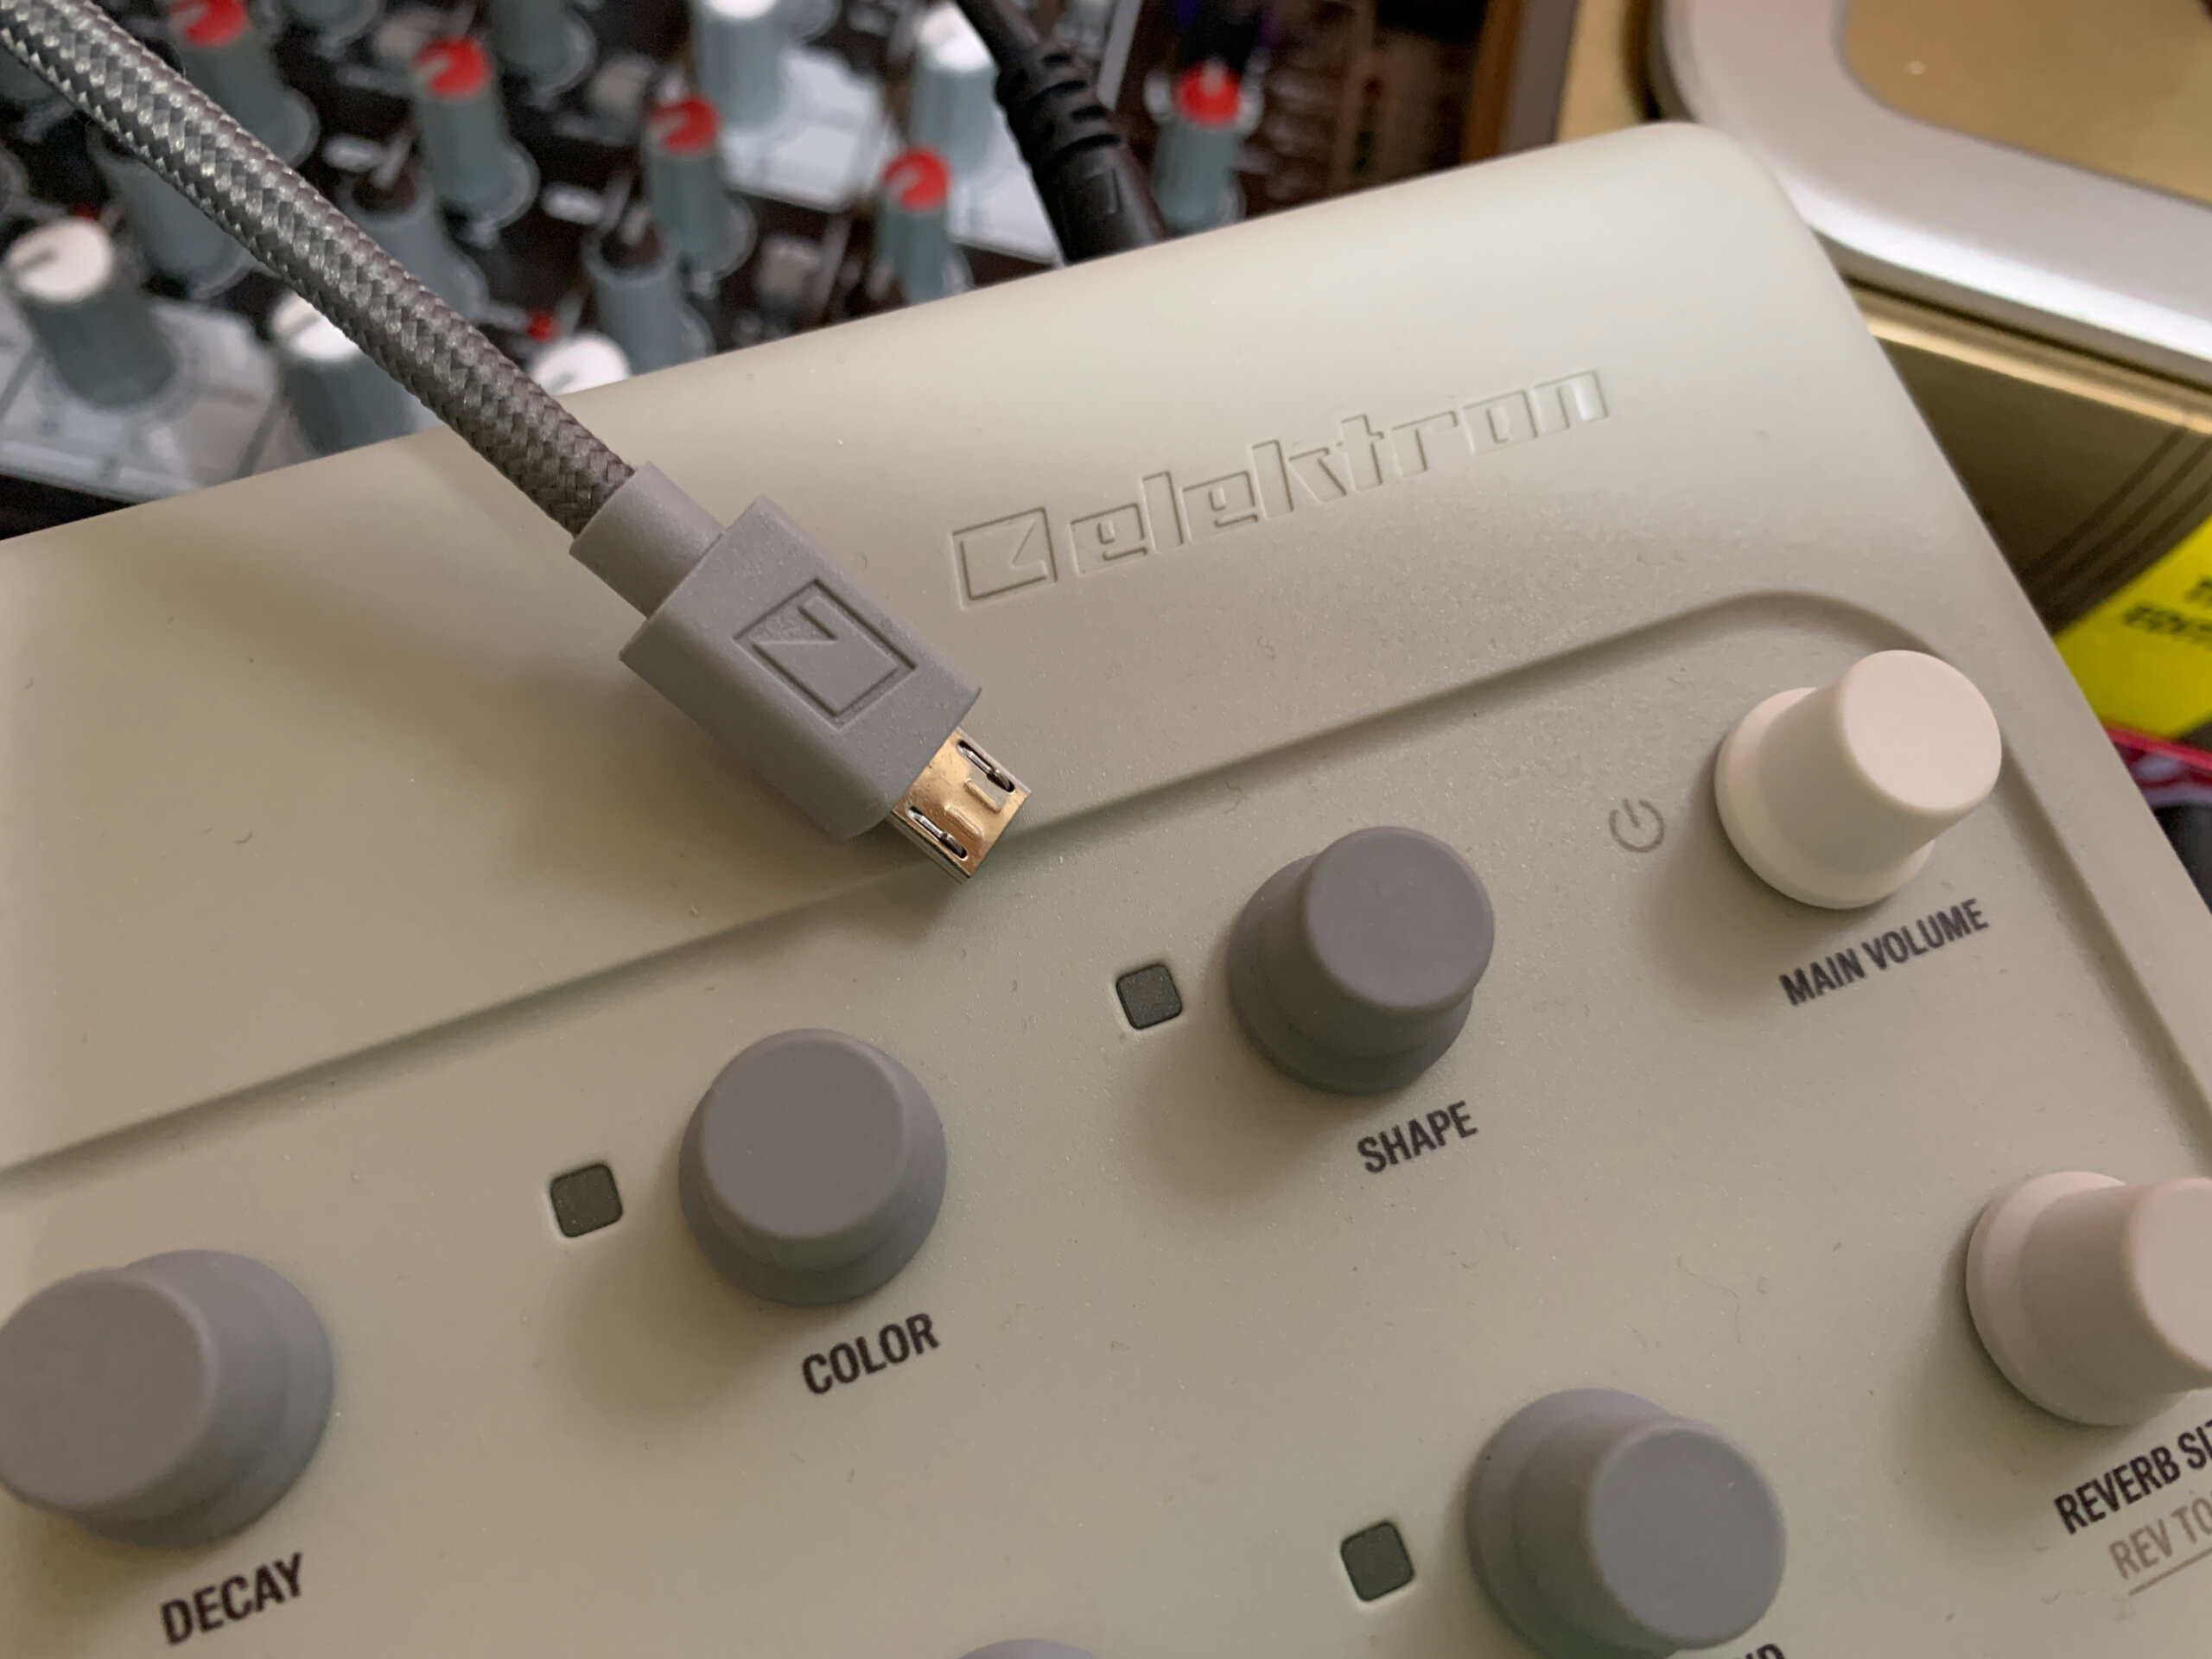
USB MIDI is increasingly common in modern synths, drum machines and grooveboxes, and provides a convenient way to send MIDI information to and from a device. Hooking it up is as easy as connecting the device to your computer or hub. Many instruments include their own USB cable but some do not. If no cable is included with your device, make sure you check the type, as there are plenty of different kinds of USB connectors now.
We’ll be using Elektron’s Model:Cycles to demonstrate this. It includes its own braided (and branded!) micro USB-2 cable. We connect it from the device to our computer via a hub.
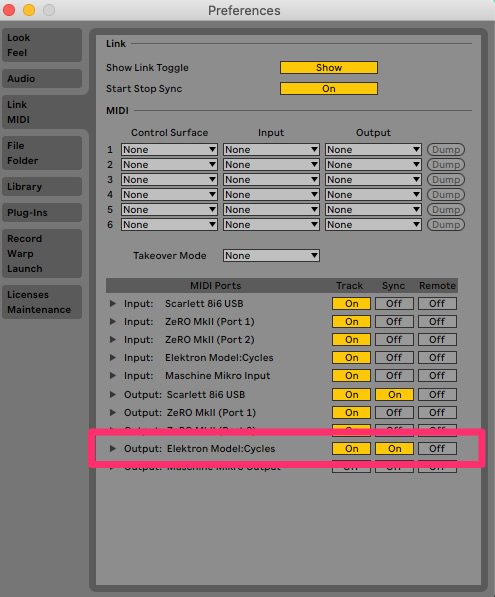
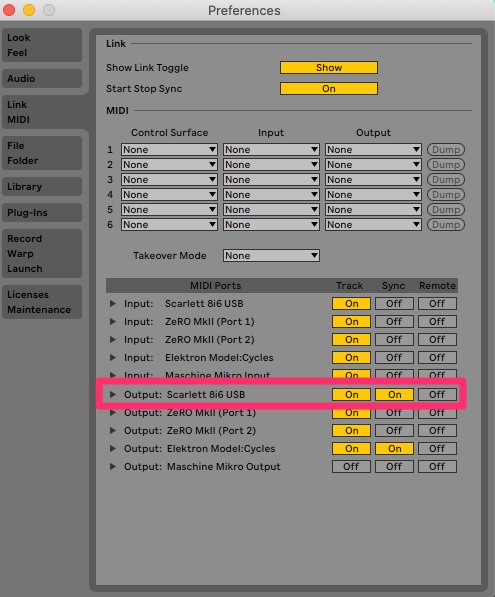
First, start Ableton Live and open the Preferences. Make sure that the USB MIDI device appears in the list. Turn on Track in the output section of the device to play notes. If you want to trigger a drum machine or sequencer to play along with your DAW, engage Sync as well.
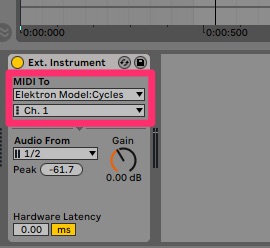
Next, create a MIDI channel. Choose the External Instrument plugin from Live’s list of internal instruments and drag it to the MIDI channel. Now we can choose what external instrument we want to play. We choose Elektron Model:Cycles from the dropdown menu in the MIDI To section. We set the MIDI channel to 1, which gives us control over the first channel chromatically. Now we can play Model:Cycles from any keyboard controller and record note information just like a plugin.
As we haven’t set the audio channel yet, you may want to confirm that notes are being triggered correctly by hooking some headphones directly to the unit.
Type 2 USB Audio
Less common than USB MIDI is USB audio. This is unfortunate, as it makes routing from external devices extremely convenient. If you only have the one piece of gear, it also alleviates needing to buy an audio mixer. It does have its drawbacks though. Some users complain of noise in the signal. While the Model:Cycles has class-compliant audio, some devices may require you to download drivers first.
As our USB cable is already connected from the first part, we can skip connectivity and go straight to setting things up in the DAW.
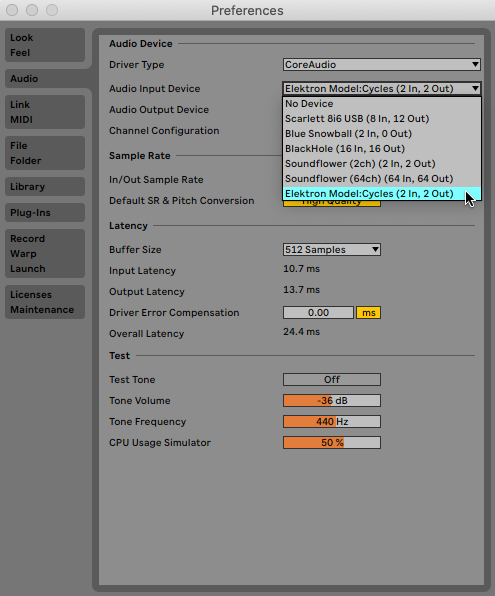
First, make sure audio is set up correctly. Open Preferences again. Under the Audio Input device section, choose your device. Now audio will route into Live from the device via USB.
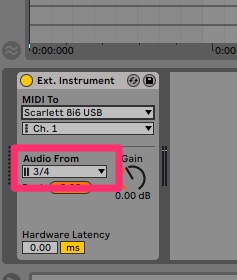
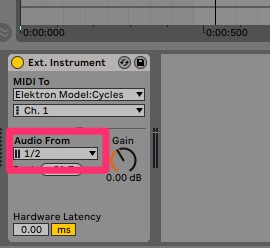
Let’s turn our attention back to the External Instrument plugin. Below the MIDI section is the Audio From area. Choose the channels you want to route into Live. We’ve chosen the Model:Cycle’s stereo output pair, 1/2. When you play notes on your controller you should hear the instrument.
Next, let’s configure an audio track to receive this. Create a new audio track (if you haven’t already). Choose External Instrument from the Input dropdown. Now you can record the external instrument and treat it just like any other audio. Note that you may need to adjust the latency on the External Instrument plugin if it doesn’t sync up perfectly.

Type 3 DIN MIDI
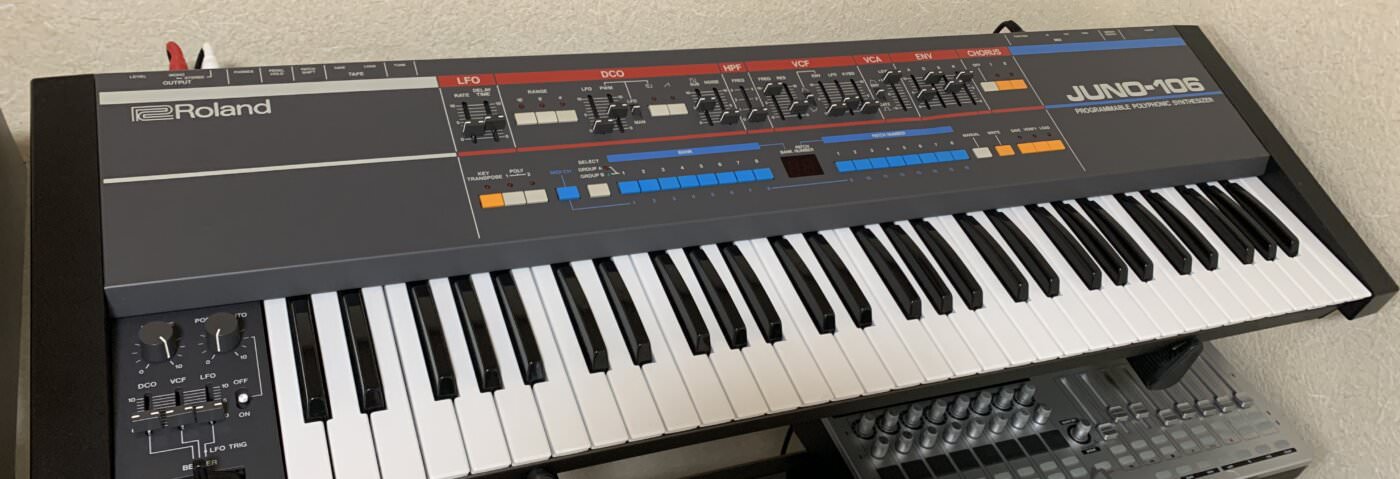
Next, let’s move on to hooking up some vintage gear, a Roland Juno-106. This synthesizer is a classic from Roland’s golden age of analogue polys. It would be a shame to leave it to languish on the stand and never get used in a track. Let’s see how we can successfully integrate it with a modern DAW setup. Note that this applies equally to any DIN-port equipped gear with MIDI. It doesn’t have to be vintage.
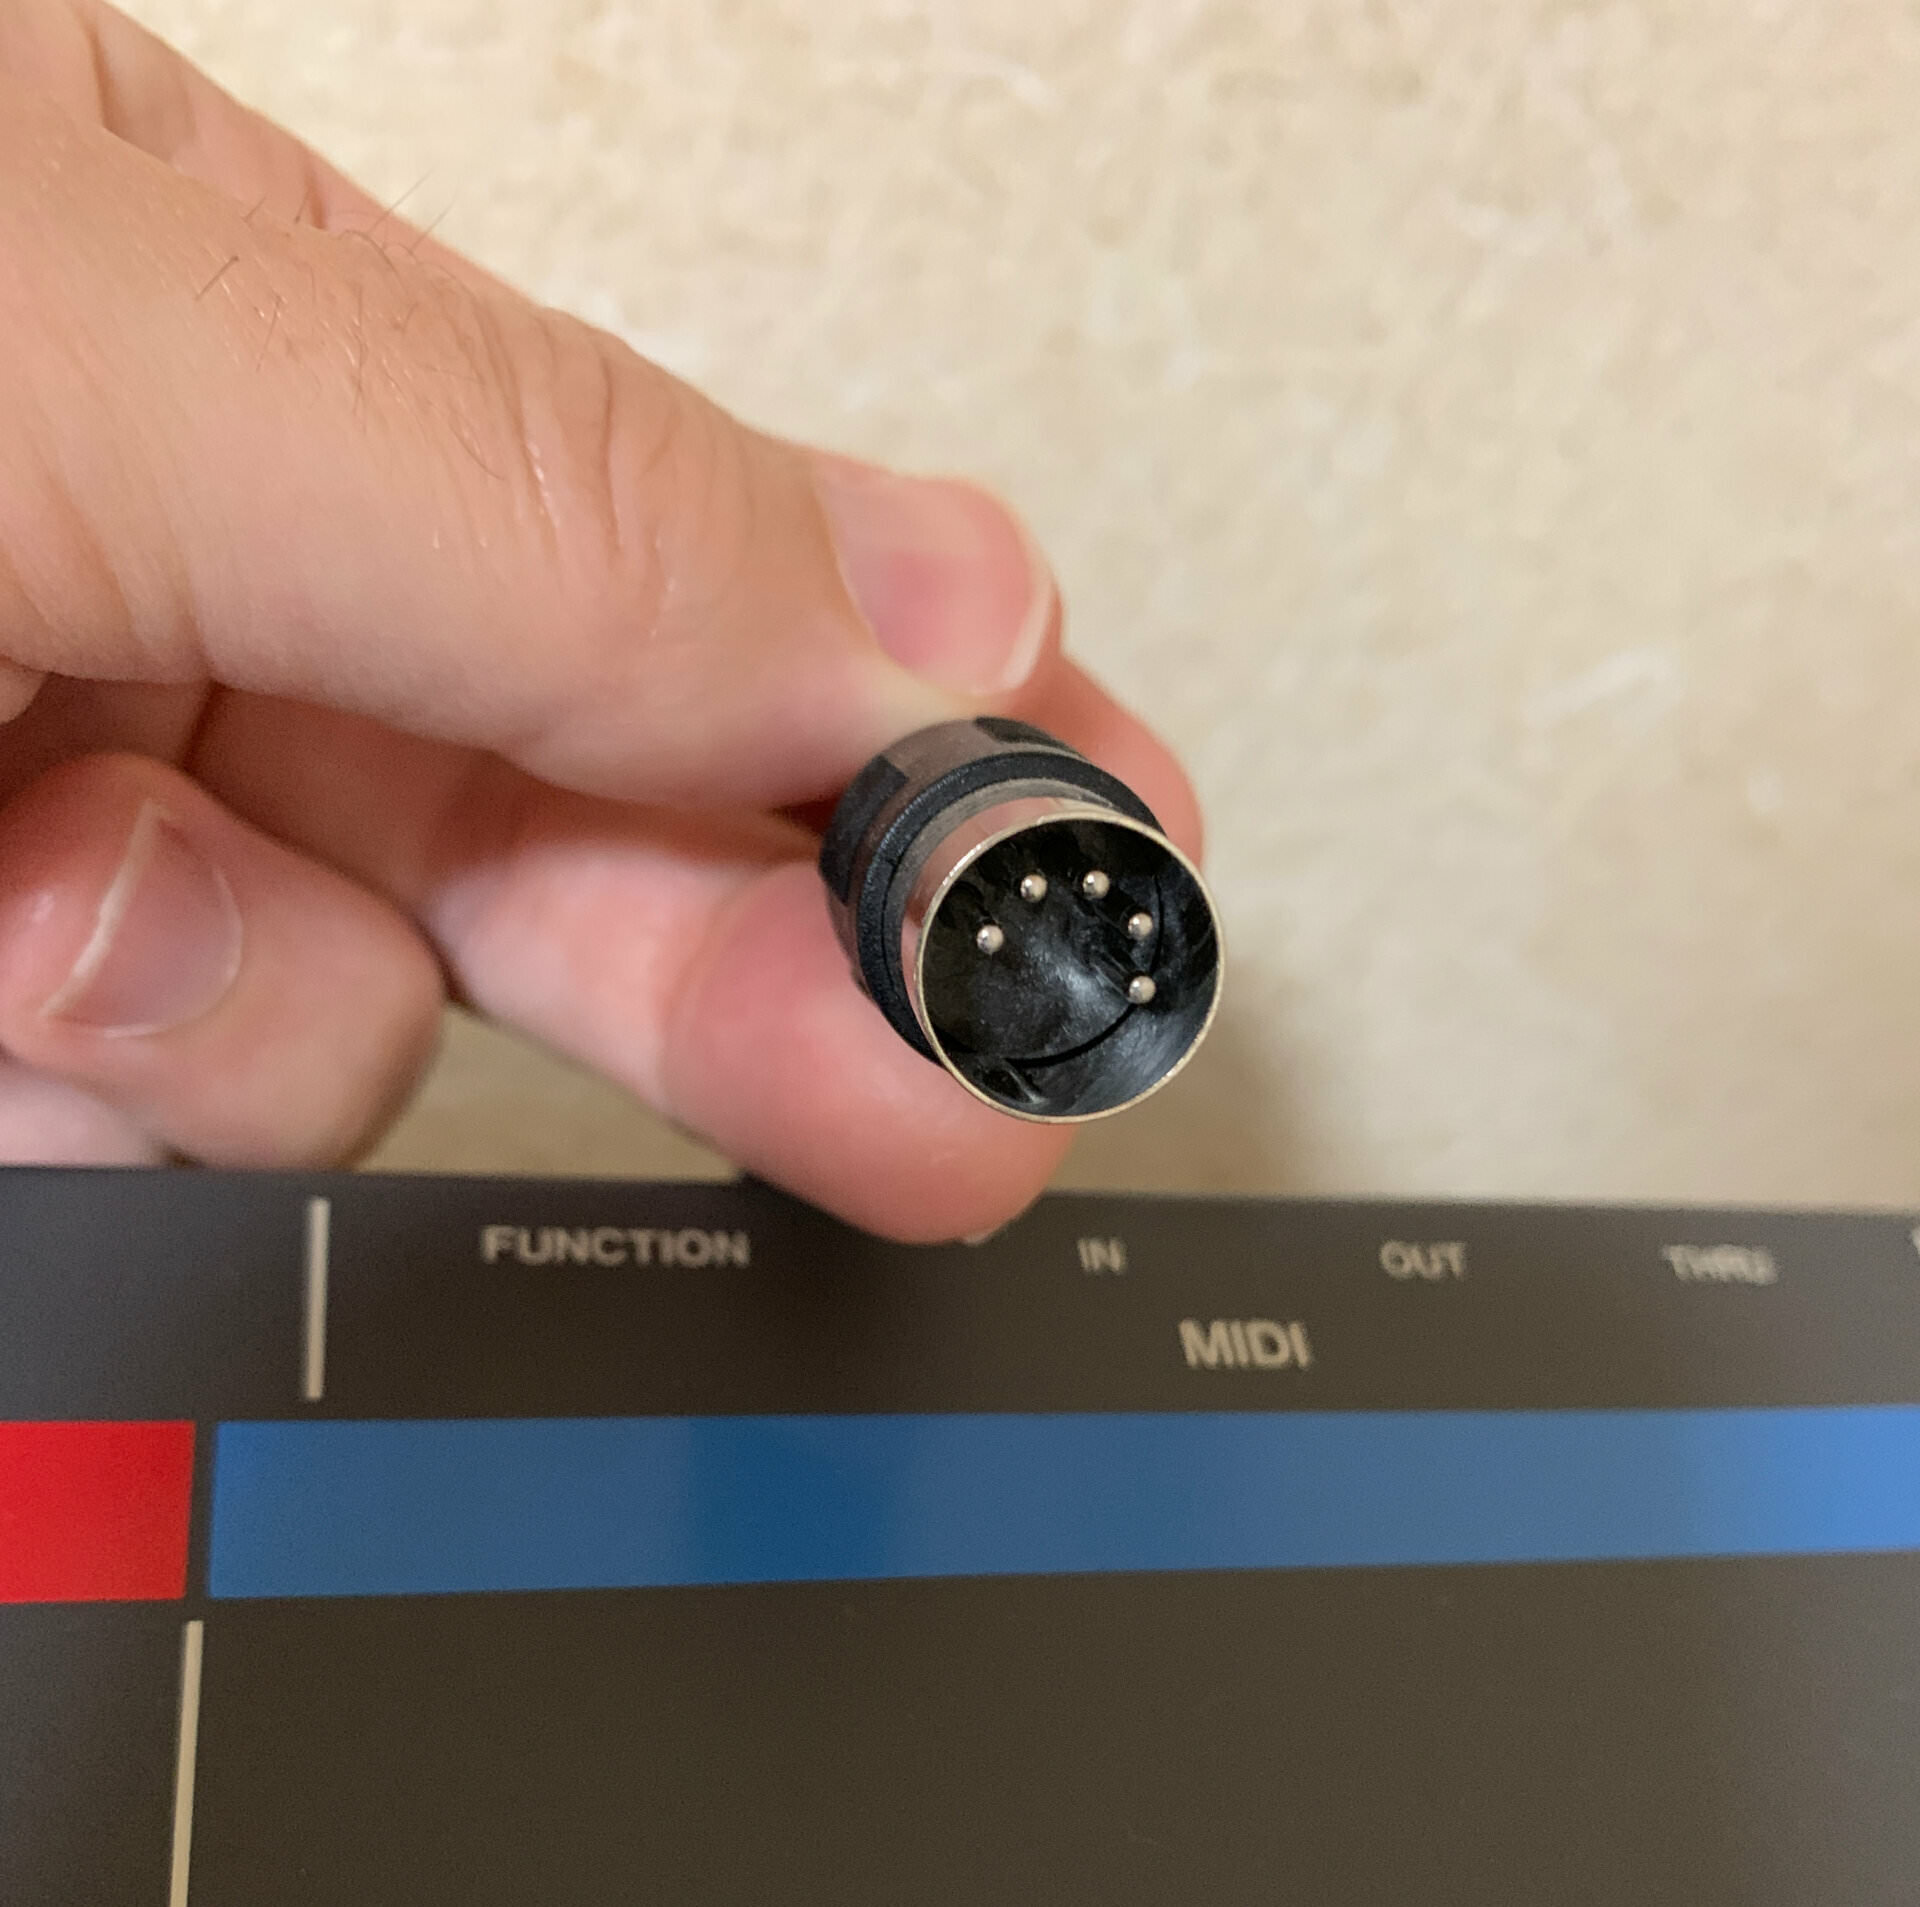
To be able to control a non-USB MIDI device we’ll need at least one MIDI cable and a MIDI interface connected to your computer. Your audio interface may already have MIDI ports. Connect the MIDI out port on the computer end to the MIDI in on the device.
First, open Live’s Preferences and set up the MIDI so that the output Track box next to your audio or MIDI interface is highlighted. You may also want to click Sync if you plan to trigger any sequences.
Create a new MIDI track in your DAW and load an instance of External Instrument. Set the MIDI To dropdown to your interface and select the appropriate MIDI channel. Make sure that the same channel is set on your instrument. You can monitor with headphones plugged into the device to make sure it’s receiving MIDI note information.
You can also use the device to control your DAW. Add another MIDI cable, this time running from the MIDI out of your device to the MIDI in of the interface. Open Preferences and tick the Track box next to the interface in the Input area. If your device has a nice keybed, an added bonus of this is you don’t need a separate MIDI keyboard anymore. For example, in our personal studio, we use a Roland Alpha Juno-2 as our master controller.
If you decide to add more MIDI devices in the future, you’ll need a more robust MIDI interface. You’ll also need to keep track of what MIDI channel each device is using. To paraphrase Biggie, more MIDI, more problems.

Type 4 Audio
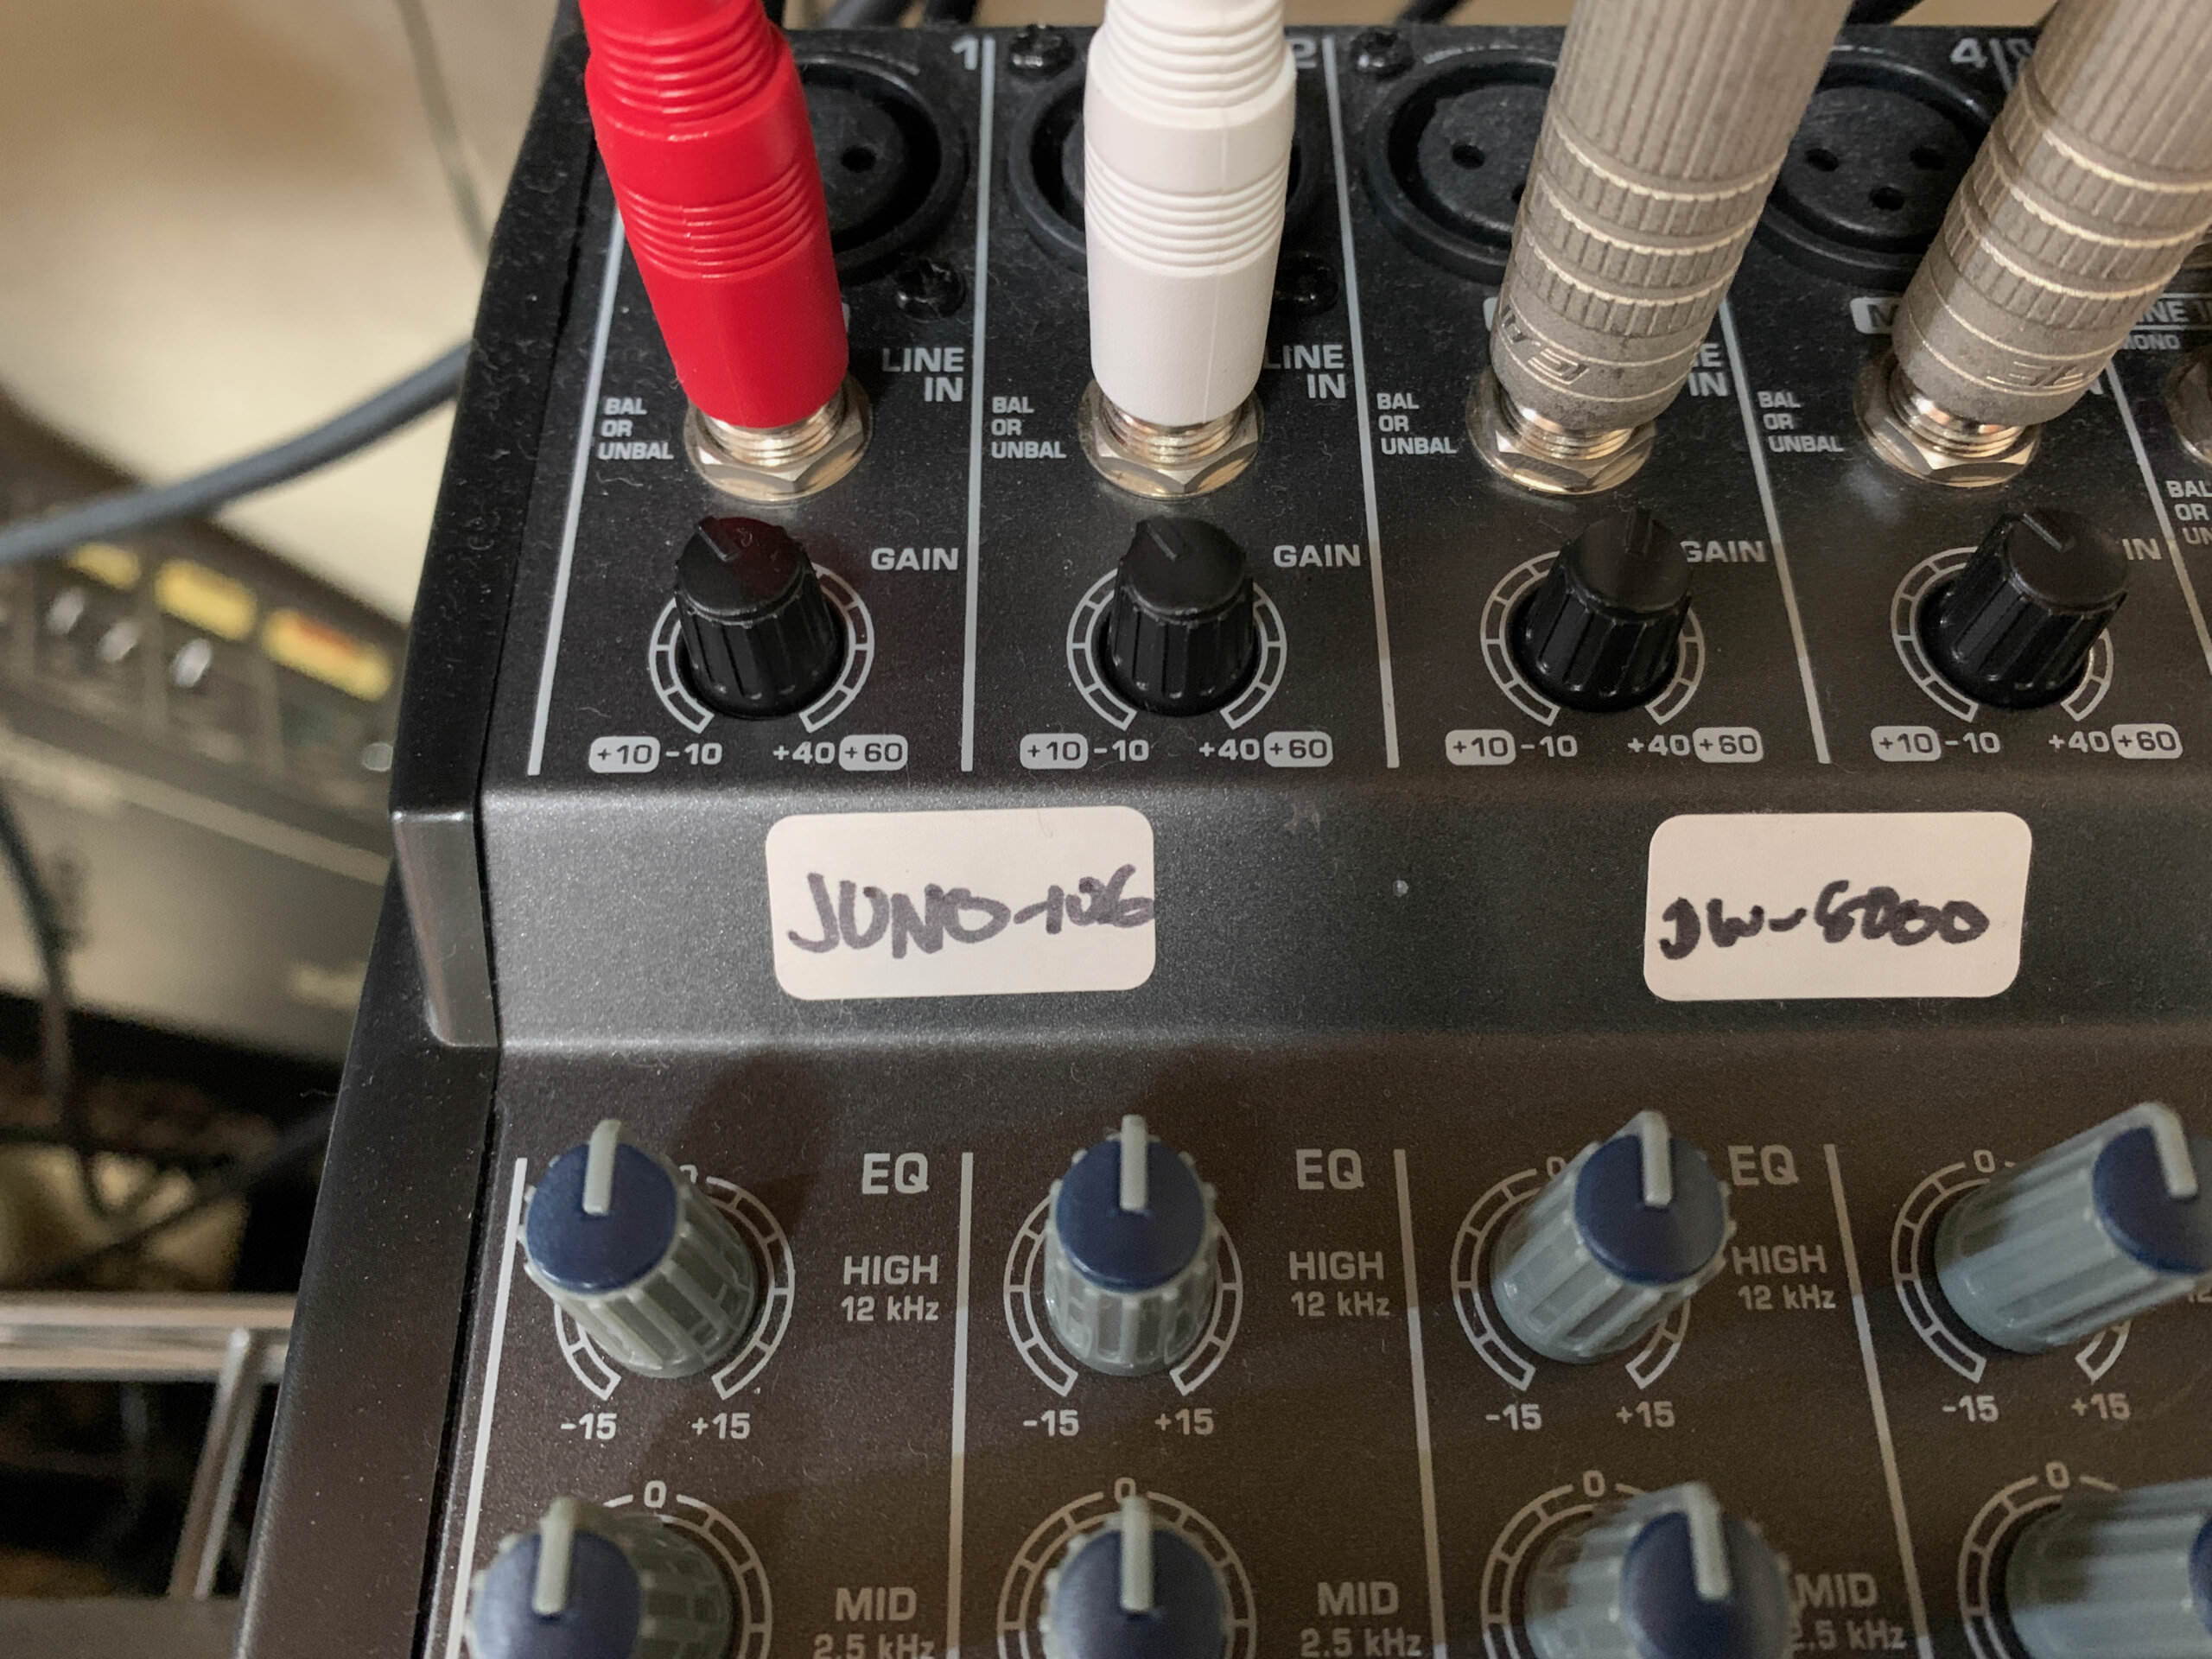
Lastly, let’s get the audio from our vintage device routed into our DAW so we can record its output. For a mono device, run a single audio cable from the audio out on the device to audio in on your audio interface or mixer. If your device has stereo outs, you’ll need two, one for the left channel and one for the right. As the 106 has a stereo chorus, we need two cables. We connect these to a mixer, which is then run to our audio interface, a first-generation Focusrite 816.
Open the Preferences pane in Live and make sure the Audio Input device is set to your audio interface.
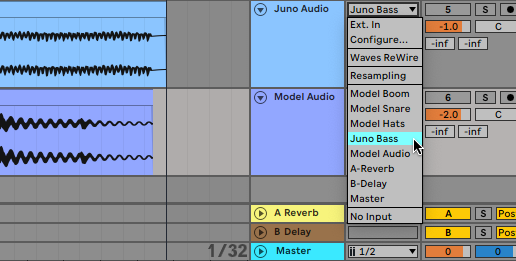
Next, create a new audio track and configure it so the input comes from the External Instrument plugin. Arm the track and press record. Audio will play via MIDI sent to the external synthesizer. Once your audio is captured, you can treat it just like any other audio.