This channel is sponsored by
 Roland Cloud is your creative hub for Roland hardware and software. Access legendary recreations of Roland Classics, find new sounds for your favorite products, and download updates and companion apps to make music fast and easy. Visit Roland Cloud
In this tutorial, we take you through how to improve your home masters with the help of Eventide’s Elevate.
Mastering is the process of taking the final mix and treating it in a number of ways to prepare it for release and distribution. It’s actually very common for mastering engineers to disagree over what is and should be the process. However, despite this, if you have the money to spend then your best bet is to pay a professional. Their expertise and equipment will pick up on the tiniest flaws and ensure your track sounds fantastic in every setting. The reality though is that for many of us the budget is not free-flowing and we have to find our own solutions. It’s good news therefore that Eventide have teamed up with New Fangled Audio to create a simple, yet powerful tool that will reduce your engineering times with highly effective results.
In this tutorial, we’re going to run through how to master using Eventide’s Elevate. If you wish to follow each step, then you can request a demo copy here. Here is the 16 bar loop of the unmastered track that we’re going to work on:
UNDERSTANDING THE GRAPH
When you launch Elevate, it shows the window below:

Eventide Elevate Default Window
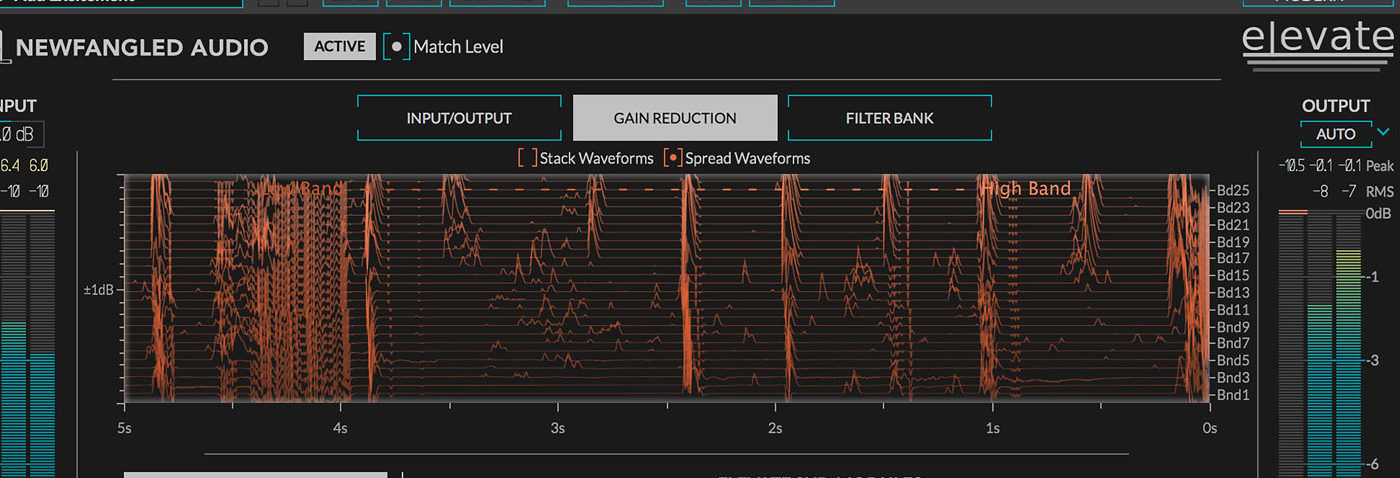
Press play and the orange graph will display the occurring gain reduction as shown below. The Gain Reduction tab is selected, by default, in grey. The small spikes that we see in the horizontal orange lines indicate the volume reduction per frequency band.

Gain Reduction Graph
Select the Filter Bank tab in the Main Parameters and you’ll see the frequency bands are grouped across the spectrum. They are 0-102Hz, 218- 315Hz, 503-678Hz and so on. The frequency range is divided into 26 bands by default. You can see the boxes indicating the frequency group bands at the top of the graph in the below image.

Frequency Bands
There is the option to reduce the number of bands by selecting Auditory Filter Bank and choosing any number you prefer from 1 band to 26 bands. If you’re new to mastering, we recommend you work with fewer frequency bands as having less choice can help with grapsing the process. However, for the purpose of this tutorial, we will work with the default setting of 26 bands.
MULTIBAND COMPRESSION
Select the next Sub-Module labelled Limiter/ EQ.

Limiter/EQ showing the Graphic EQ and Solo function
Once selected, we see the Graphic EQ in its default flat position. Before we apply any Limiter Gain, we will tweak the EQ to taste.
Go through the spectrum and listen to each band individually by using the solo button [S] located running along the foot of the plugin. We have chosen to listen to these three bands below:
Band 1: 102Hz
Band 2: 2.4kHz
Band 3: 9.8kHz
After listening back to these, we’ve decided to boost the low, mid and high mid frequencies by the amounts indicated in the below image.

Boosted low, mid and high mid frequencies
We felt that in these areas, the track was lacking in energy and that the EQ has helped address this.
Here is the result:
LIMITER
In the next step, we remain within the Limiter/EQ Sub-Module but turn our attention to the Limiter Gain and Adaptive Gain. In the image below we’ve applied 11dB of Limiter Gain. You should hear the track increase in volume as you increase the gain. Now, take a look at the Gain Reduction in the top right-hand corner. The red meter displays the gain reduction of -4.0dB. This means that the Limiter is reducing the loudest parts of the track by 4.0dB.

Limiter showing Gain Reduction
This is how it now sounds:
ADAPTIVE GAIN
As the Limiter increases the gain reduction, small red bars moving downwards begin to appear on the Graphic EQ. These bars indicate that there is limiting being applied to each individual band as opposed to the whole track. This is known as Adaptive Gain. Although this may sound complex its actually a very simple way of applying multiband compression.

Adaptive Gain
When a limiter is strapped across a whole mix then it will react to the loudest element or frequency. In electronic/dance music, the loudest parts tend to be the kick and bass, (the low end), and therefore the whole track ducks in volume when the kick and bass play. However, with the Adaptive Gain cranked to 10db, we allow each individual band limiter to fluctuate by up to 4db as that is the Gain Reduction from the Limiter. So, in our case, the kick is being limited slightly more than the other frequencies but in doing so that isn’t affecting the other bands. This helps with the overall balance. With applied Adaptive Gain it sounds like this:
TRANSIENT EMPHASIS
Head next to the Sub-Module Transient. This section of the Elevate plugin allows us to control whether a transient becomes punchier or smoother per band. Essentially we can make the track more or less dynamic by tweaking the attack. Below are two examples of the Transient Emphasis fader at 0% and 100%

Transient Emphasis at 0%
This is how it sounds with the Transient Emphasis at 0%:

Transient Emphasis at 100%
This is how it sounds with the Transient Emphasis at 100%:
After listening to both, neither of these options will work for our track. The purpose of trying both 0% and 100% is because it’s good practice to A/B test and it helps familiarise yourself with all the available options. We therefore decide to set the Track Emphasis fader to 75%. This is sounding good except the dub techno synth is too punchy now. To address that, we use the Track Emphasis Per Band and reduce the punch from 1.3kHz to 2.8kHz which further helps the overall balance.

Track Emphasis 75% with reduced mid range frequencies.
This is how it now sounds with the track emphasis at 75% and with the Transient Emphasis Per Band reducing the punch.
The track is shaping up nicely. The next step is to look at the Adaptive Transient found sitting alongside the Transient Emphasis. The Adaptive Transient moderates the multiband operation. Below are examples of the Adaptive Transient at 0% and 100%: At 0%
At 100%
We chose to settle at 40%. As ever, use the tools to taste. Different types of genres/mixes require different settings. At 40%
CLIPPER
The final Sub-Module is Clipper which comes at the end of the chain and allows up to 12dB of Drive to be added using a single fader. The Clipper allows you to clip transients and the Drive parameter allows you to increase the Limiter output into the Clipper to increase loudness and distortion. This is all managed with the gain curve and the Shape Parameter.

Clipper
We opted for 1dB of drive and 25% soft/hard clip. Any more than this created undesirable and obvious harmonic changes which did not suit the track. Here is the result:
CONCLUSION
So, finally, let’s see what the master sounds like in comparison to the mix. Here’s what we started with:
And after:
It’s quite obvious that the application of Elevate has increased overall volume, punchiness and clarity. This should make it sound better in as many different situations as possible. It’s a wise move to master in this way before contemplating paying a professional mastering engineer. Be careful not to take things too far. Remember to always A/B constantly, never rush, don’t work if your ears are tired, use a good pair of headphones for the final check and lastly remember that you can always go back and fix the mix.
If you enjoyed this Beat Dissected you might find our book ‘The Secrets of Dance Music Production’ a helpful resource for similar tutorials.
/**/
Tutorials is sponsored by
Roland Cloud is your creative hub for Roland hardware and software. Access legendary recreations of Roland Classics, find new sounds for your favorite products, and download updates and companion apps to make music fast and easy.