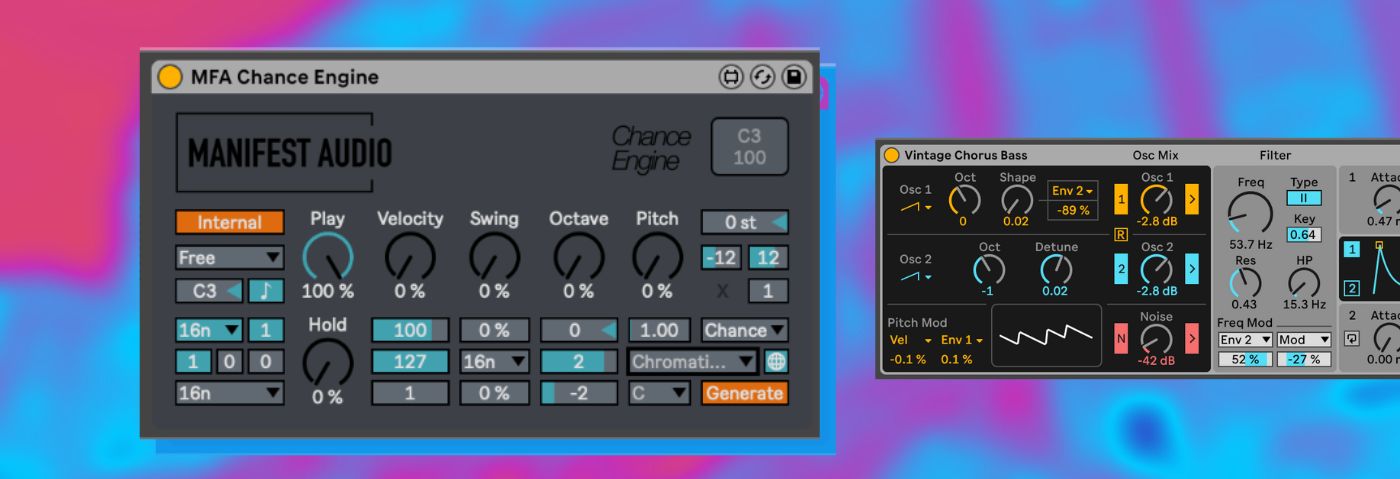
Chance Engine is a Max for Live device designed to add controlled yet random fluctuations to the most important parameters of incoming MIDI drums, melodies, and harmonies in real-time. In this tutorial, we’re going to use it to make an Italo-style bassline.
One of the most popular devices in the Attack Max for Live Store is Chance Engine by Manifest Audio. It adjusts the probability (chance) of various parameters on incoming notes. This might be the octave, pitch, sustain, velocity, or swing for example.
It’s important to remember it’s not a synth. It’s a MIDI effect that will alter your MIDI output. The real fun is the power under the hood for ‘chance results’. The clue is in the name.
In this tutorial we will use it to build a Italo disco style bass line. We will use different probabilities to affect the pitch, the randomization intervals, sustain, and swing. We’ll also leave to chance which notes are processed through the device.
The real secret of Chance Engine is to get a grip with the controls one at a time to avoid getting lost in a haze of randomness! If you’re starting out, hopefully each step below will give you a grounding of ‘what does what’ and once mastered you can really control the machine for tailored results.
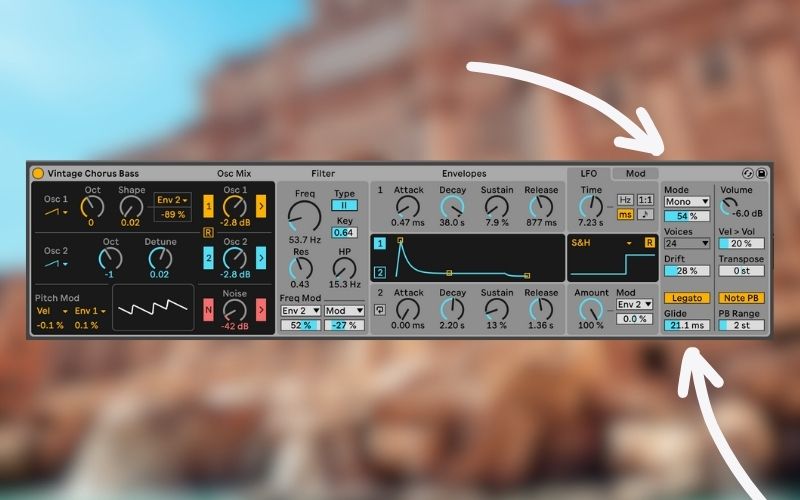
In this tutorial, we’ll use Drift as our synth to receive MIDI from Chance Engine. You can use any synth in Live, or indeed any third-party synth, such as Diva.
As ever, click any image to enlarge.
Step 1
First, set your BPM to 115.
Next, create an empty MIDI channel. First, add Chance Engine and then Drift after it in the chain. Chance Engine is a MIDI effect. It can’t be used on an audio channel and must be placed before instruments on a MIDI channel.
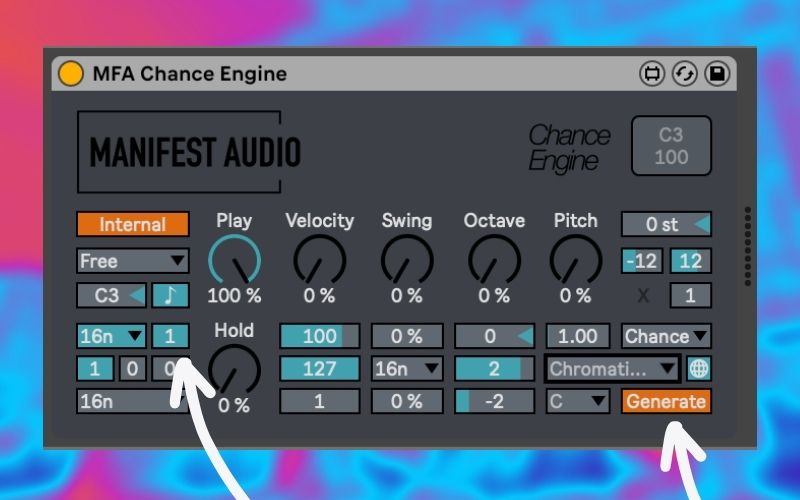
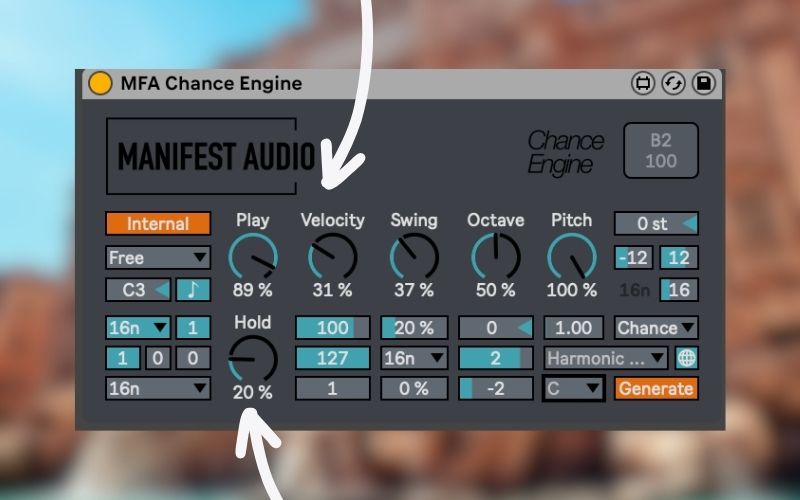
First up, switch to Generate mode. The default mode for Chance Engine is Default Process mode, which transforms incoming MIDI input according to the controls above. When you switch to Generate mode it opens new parameters and produces MIDI output on its own.
With Generate mode in place, choose your Pulse Rate. For our needs, we will stick to the default sixteenth notes (16n) which is a typical disco bassline rhythm. At this point, experiment with the Pulse Multiplier to produce more exciting rhythms. For a classic Italo style, we will keep the Multiplier at 1 but feel free to amend it to taste.
Step 2
With our rhythm in place, let’s get to work on the melody.
Start by choosing a scale and key directly on the device, or with the included Global Hub utility to control the scale for multiple Chance Engines simultaneously (and save the scale with your set).
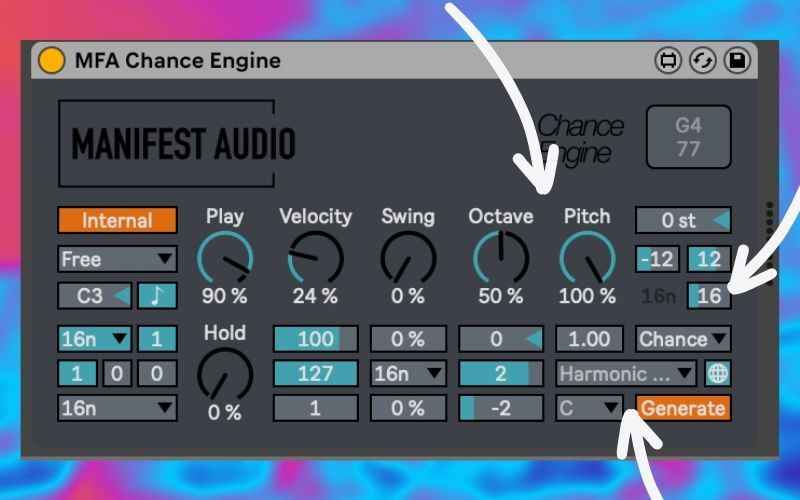
Where it says “Chromati…” on the far right of the device, click there and you’re presented with all the scale options. There’s plenty to choose from, but we like Harmonic Minor.
Now we want to randomize the pitch of each note. Head to the Pitch knob and dial it all the way to 100%. Pitch determines the probability that note pitches will be randomized within the mininum and maximum ranges to the right (-12 and 12).
Where things get very interesting is below the ranges is Random Interval. If you leave this on 1, every note will have a random pitch. If you set it to 16, each set of 16 notes will change pitch. For example:
Random Interval on 1
Random Interval on 16
For the style we’re after, we want to keep it on sixteenth notes as it gives our pattern a distinctive Italo disco-style bass line, selecting a new random note within the Harmonic Minor scale every bar.
Next, we want to look at what we can do with Octave. Note Octave on Chance Engine is always randomized with every single note and like Pitch, it sets the probability that a note’s octave will be randomized within the set parameters. It combines with the longer pitch randomization intervals to create some fun musical output. Let’s push Octave to 50%.
Top Tip
Try Tweaking longer Randomization Intervals with different Octave settings. Use them simultaneosly.
Next, reduce the Play chance to make the pattern output a bit less busy. Play at 100% means all notes are passed through Chance Engine. We’ve only brought it down a smidge to 90%.
The last step is a little Velocity randomization to help make things more dynamic. If you’ve not guessed, it determines the probability that velocities will be randomized within the ranges shown below. You can also set the Base Velocity underneath while in Generate mode – in our case it’s 100.
Top Tip
Automate Play chance: either draw in automation manually, record live, or even map it to an LFO Device
STEP 3
We’re nearly there.
Make sure your instrument is in monophonic mode with Legato Glide enabled. With that in place we can use the Hold parameter on Chance Engine to add glide to our pattern. The Hold feature determines how many notes will have sustain.
The trick here is to work between the Glide amount on your instrument and then the Hold amount on Chance Engine. We’ve gone for 150 ms of Glide on Drift and 20% of Hold, meaning roughly 20% of incoming notes will be sustained for glide. That works for us.
Now it’s time to add some Swing. For this sound we don’t want to over do it. To do so, set your Swing Strength directly beneath the Swing knob. We’ve set ours to 20%. Now directly above set the Swing Chance to – like Velocity, Octave, and Pitch – set the probability of notes having swing applied. We’ve gone for 37%, but if you want all your notes to have swing dial it up 100%.
Top Tips For Using Chance Engine
- When working with the Pulse Multiplier, be sure to keep Play on 100% so you can accurately assess the results before optionally reducing the chance notes will play after you’ve established your pulse.
- Work through the device one parameter at a time, keeping Play at 100% to clearly hear the results of other dials at their fullest.
- If you don’t want the pattern to play on the downbeat, use Offset in multiples of sixteenth notes, with 2 delaying the pattern start by one-eighth note.
- Use the Pulse Reset, measured in bars, to create a repeating rhythmic pulse pattern; at the default of 0 it will never reset.
- With the any of the chance knobs set to 0% you’re removing the element of chance that Chance Engine excels at; there are times you will want 0% on certain parameters, so maybe consider keeping the settings at 50% to preview the results and the power of selective randomization enabled by the device; the Play parameter is slightly different with 100% playing all notes all the time, and lower values proportionally reducing the probability notes will be played.
- Variety is the spice of life, so even with just subtle adjustments, Chance Engine can add compelling yet subtle variations to otherwise stale material.
- If you want to export the results of Chance Engine, route the channel to the input of a MIDI or audio track and record the results.
- And remember, when in doubt about any parameter in the device, just open Live’s Info View at the lower left of the GUI and hover over Chance Engine’s parameters for a clear description.
- If Info View stops working with any Max for Live device simply re-drag the device in and the issue should stop!
If you like this tutorial be sure to check out all our Max for Live devices in the Attack Store.
Got a tutorial suggestion? Drop a comment below or use the contact form.
