In this Synth Secrets tutorial, we will use Drift to make an Overmono, Modeselektor style bass.
These types of modulated basses seem to be everywhere these days. They’ve been cropping up in various places. They are not too hard to do either but lots of fun.
In this example, we will take the automation too far, but once you’re set-up, you can tweak it to your own taste.
We are using Drift, which is available in Ableton’s Lite Version, which you can trial for free for 90 days. You can of course, use any synth that has a similar set of controls to achieve something similar, so don’t be put off if you’re not a Live user.
That extends to the reverb and compressor which we use later in the chain, anything you have will do the trick as they are just shaping tools in this case and not tutorials about them as individual units.
So set your BPM to 137, an excellent dance music garage-y tempo, and let’s get to it.
Remember, click any image to enlarge.
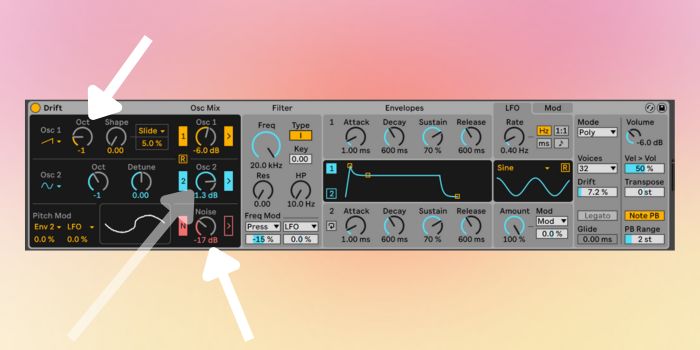
Step 1: Oscillators
Start by lowering Osc 1 down 1 octave. Keep the waveform as a sawtooth wave.
Next, keep Osc 2 but boost the volume to around 3 o’clock. Lastly, introduce some Noise by dialling it in underneath the Osc 2. Around 9 or 10 o’clock is fine.
On the Noise parameter, we’ve toggled out the filter control by clicking the pink arrow to the right of the Noise. It means that when we work with the filter, it won’t affect the noise settings.
Here’s how that looks:
Here’s how it sounds:
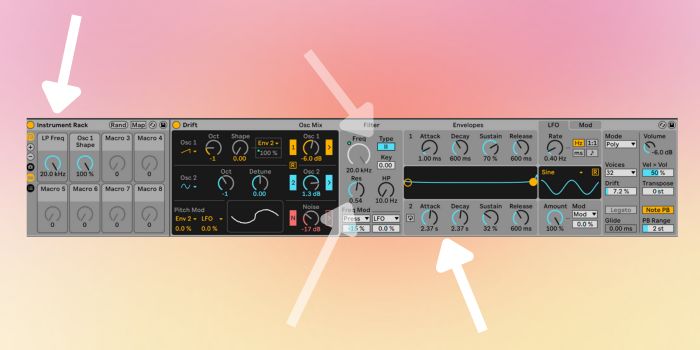
Step 2: Shaper Controls
Let’s shift our attention to the powerful Shape parameter. Shape morphs the shape of Oscillator 1—the shaping effect changes based on the selected waveform.
On its right, assign it to Env 2 and push the Shape Mod Amount amount to around 80%.
Now head to Env 2 and let’s dial in plenty of Attack and Decay somewhere both around midnight should be fine. Lastly, bring back the Sustain to around ten o’clock.
You should now be able to hear, but also watch in the visualizer, the waveform morphing. At this point, we’re not content with 80% on the Shape Mod Amount so let’s push it to 100%.
Now switch the Filter to the second shape Type II – it has the Cystomic MS2 Filter, which uses a Sallen Key design and soft clipping to limit resonance. That’s the ticket.
Now group Drift into an Instrument Rack by selecting in and hitting Command G on Mac and PC CNTRL G. Right-click the Freq and Shape Mod Amount and select them as Macros.
Here’s how that looks:
Here’s how it sounds:
Step 3: LFO Modulation
Let’s add more Sustain to keep the volume of the bass as high as possible.
Now click on the Mod tab and assign the Filter Cutoff to the LFO. Let’s change the amount to around 40% on an LP Frequency setting.
Now head to the LFO and experiment with the Rate and Amount. After that, head back to the Mod panel and assign the LFO Rate to Env 2 as well. Set the amount to 4% for now. We can mess with this later, so assign it to a Macro of its own so we can do so easily.
Now head back to your LFO, right click on Amount, and assign it to a Macro.
Here’s how it looks:

Here’s how it sounds:
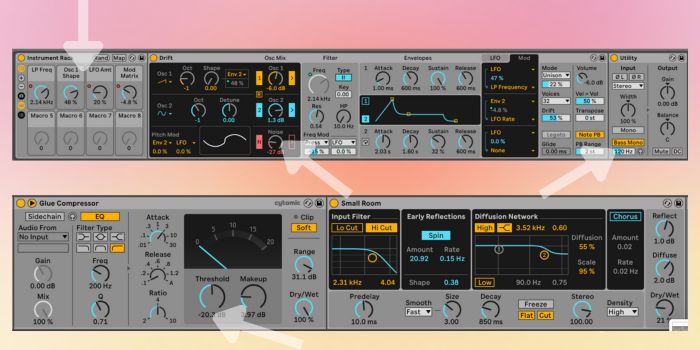
Step 4: Unison & Automation
In the last step, let’s use the Drift feature. Heck, it’s what it’s named after, after all!
Firstly, change the Mode to Unison as it works well with Drift. First, play around with the Unison Strength and The Drift Amount, which sets the variation per voice. It affects different aspects of the voices sound, such as the the pitch and filter cutoff.
Next, add a Utility device to your chain and select Bass Mono to ensure your bass sound remains in mono. With all this chorus and unison, we’re in danger of losing the bass down the center where we want it.
Next, add a compressor to your chain to keep the levels constant throughout. You can copy our settings in the pic.
Now add a reverb; any reverb will do it. We are using Small Room preset in Live’s Reverb device. Experiment with the Dry/Wet. You probably don’t want to go too far towards Wet, but don’t be afraid to add a good amount of reverb.
Worth noting, we also reduced the Noise slightly. We just like it, frankly a bit less. As ever, experiment to taste.
Here’s how the chain looks:
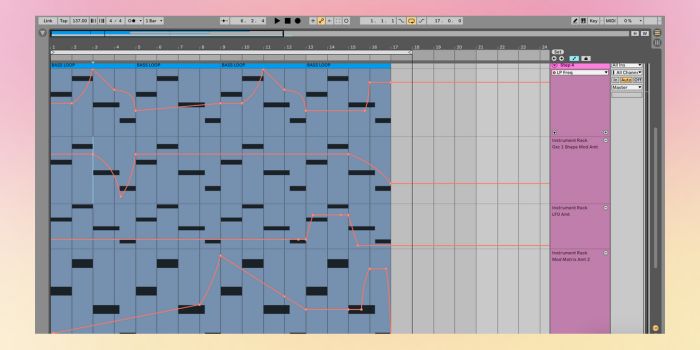
The last thing to do is record some automation using the Macros. You can see what we’ve done below:
Here’s our final sound:
We filtered the drums slightly and added some reverb. We’ve gone overboard on the automation for means of demoing only. Do as you please…!
If you like this Synth Secrets, be sure to check out another Drift Synth Secrets on making leads.
Find our more about Drift on Ableton’s site.
Follow Attack Magazine
Produce music?


Max For Live: Chance Engine
Add controlled yet random fluctuations to your most important parameters

Max For Live: Mouth Play
Unconventional vocal shaping with a brass model or FM oscillator source

Max For Live: NerualWaves
Synthesizer fuelled by a custom neural network, forging waves with precision

Max For Live: The Spellbook
LFO inspired by sacred geometry, weaving nature's fabric into your projects

Max For Live: Travelogue
A Max for Live MIDI device creating a unique sonic journey with joyful surprises


Max for Live: Plecto LFO
A lifelike, deterministic, non-linear LFO for Ableton Live, the Plecto LFO Max for Live device can be mapped to any instrument or effect in your set.