Room-style reverb can bring a sense of intimacy to a track. We use Denise’s Perfect Room to vibe up a chill downtempo song.
Of all the reverb types, room reverb is the best for creating a real sense of intimacy. (Check our Ultimate Reverb Guide for more on this.) Think about it. It’s how we hear things on a day-to-day basis. Sitting next to a guitarist or someone playing the piano is much more intimate than listening to someone play on the other side of a concert hall. Let’s use Perfect Room, a room reverb plugin from Denise, to create an intimate vibe in a downtempo track that favors electro-acoustic sounds rather than electronic ones.
Click any image to see a larger version.
We’ll go from this dry track:
To this intimate one with more space and body:
What Is Metallic Reverb?
Perfect Room is an interesting reverb in that it claims to create a ‘perfect space’ – that is, one without metallic ringing. What is metallic ringing? Most algorithmic reverbs use an array of short feedbacking delays and filters to simulate what we hear naturally as reverberation. These delays can ring at certain frequencies, causing resonances which can sound metallic. This is not necessarily a bad thing but it may not always be what you want.
Denise’s Perfect Room uses a proprietary algorithm that they call TXVerb technology, which doesn’t use delays to create the reverb tail. The result is a clean and natural reverb that sounds particularly good to us on acoustic and non-electronic sounds like percussion, upright bass and electric guitar. Typically when things are patented or proprietary there’s a sense they are special.
A Quick Overview Of Denise Perfect Room
Perfect Room is not especially complicated. Anyone who’s used a reverb before should feel at home with it. It does have a few extras that are usually not found on reverb plugins though.
The main controls are found in the bottom half of the plugin (the top half is occupied by a graphic display of the sound and how the reverb is reacting to it). Available parameters include input and output, mix amount, and low- and highpass filters for controlling what frequencies end up wet – handy when working with bass, for example. Below these are settings for Delay, which is the pre-delay to add a pause between the dry sound and the onset of the reverb, Tail, which sets length of the reverb tail, and width, for stereo spread.
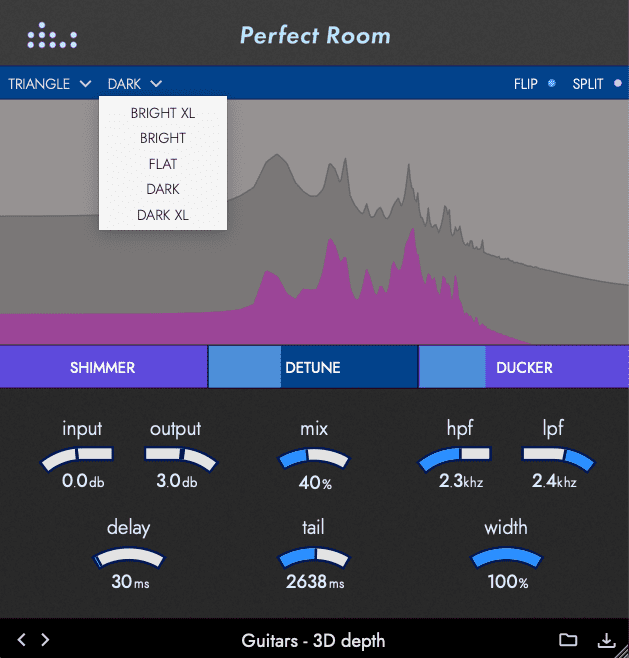
So far so good. Next, let’s look at some of Perfect Room’s more esoteric settings. Up at the top there are two dropdown menus. The first sets the decay shape, either NATURAL, TRIANGLE (for longer tails), and SQUARE, which results in a gated-like tail. Next is TYPE. Use this to choose how bright or dark you want your tails. At the top right are two on/off settings. The first is FLIP, which reverses the reverb, and SPLTI, for choosing mono or stereo reverbs.
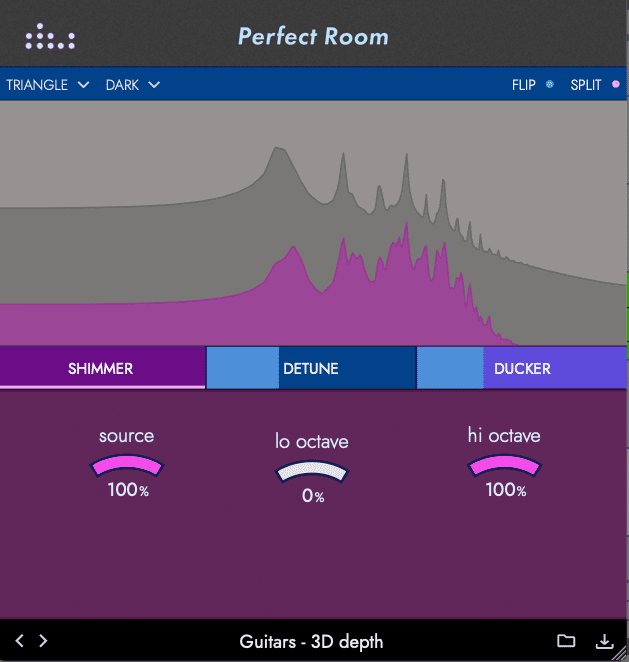
Finally, there are three sliders that allow for creative tonal shaping. SHIMMER adds harmonics both an octave above and blow, DETUNE brings in tape delay-like warbles and imperfections (unusual for a reverb!), and DUCKER lets you sidechain the reverb to the dry signal, pushing it out of the way to allow the original sound to stand out more. Click a slider to bring up additional controls below.
Step 1: Percussion
We start with a percussion loop, ‘Perc_Loop_85_13.wav’, from the Splice pack, Morning Chill. It’s got a nice, rolling groove but we’d like it to stand out from the other percussion a bit more. We can use Perfect Room to do this.
Here’s the dry loop:
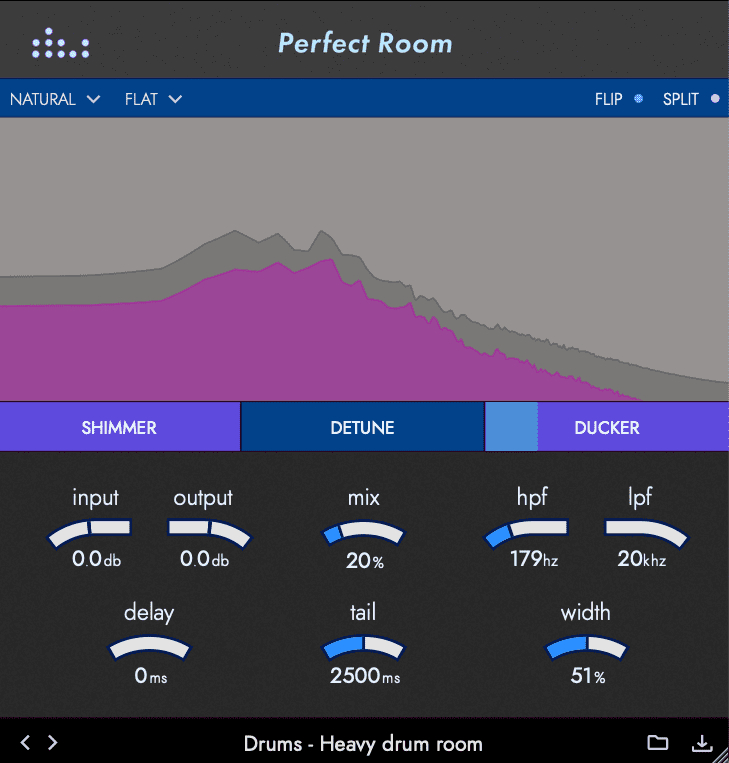
We start with the Heavy drum room preset but it’s a little dry for what we’re going for. We start by increasing the Mix amount to 20% so we can hear a little more of the ‘room’. Next, we turn off the lowpass filter, as we want to hear the reverb working on the percussion slaps as well as the body. We also bring up the highpass filter to around 180Hz to cut more of the lows. Width is currently set to 100%. We don’t need it to be so wide, as this is not a focal point of the mix, so we bring it down to around 50%. We like the other settings as they are.
Here’s the percussion sound so far:
It sounds good but when we audition it with the other percussion, it loses some of its punch. Let’s use the Ducker to address this. We use the Ducker slider to bring in the amount of sidechain compression against the reverb. A setting of 22% gives us a nice balance of effect and punch.
Here’s the finished percussion sound:
And in context of the full beat, with Splice samples ‘Kick_Loop_90_26.wav’, ‘Snare_Loop_90_23.wav’, and ‘MC_Hat__40_.wav’ from the same pack:
Step 2: Bass
Let’s move on to the bass next. We’re using a lovely Splice loop of an upright bass, ‘SC_UB_85_bass_upright_riff_thematic_stepping_progession_Am.wav’, from the pack, Upright Bass. You can hear a little bit of the room it was recorded in but we’d like to coat it a bit more in verb and give it some body.
Here it is in its original form:
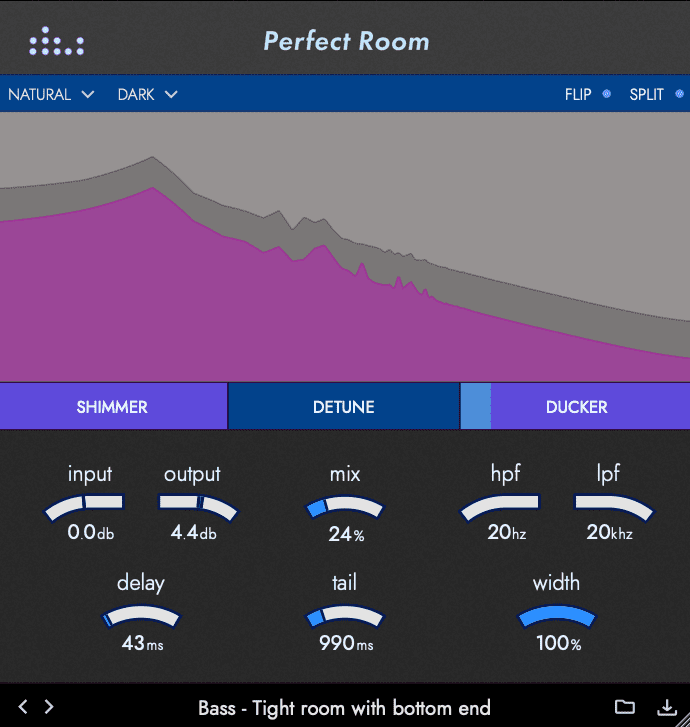
Again, we start with a preset, this time Tight room with bottom end. Our goal is to fill out the bass and give it some presence without making it boomy and swampy. We start by lowering the Mix amount to around 25%. We don’t need tons of reverb here, just a touch to give it some 3D space. We bring up the length of the tail a touch as well to 990ms.
Let’s tackle the Delay next. Pre-delay can help give the initial transient of a sound some room to breathe. As we’re dealing with a rhythmic sound here, we want to make sure that the pre-delay amount matches the cadence. We tweak the settings until we arrive at 43ms. We also use a touch of the the Ducker – around 15% – to help the transients stand out.
Here it is so far:
For the last bit of adjusting, let’s use the Type setting to change the color of the reverb tail. It defaults to Natural, which is fine, but we want something a tad darker. The Dark setting, unsurprisingly, suits our needs. The difference is subtle but it works better in the context of the mix, which is the whole point.
Upright bass with dark tails:
Step 3: Keys
For the next step, we’re going to use Perfect Room a little more creatively. We’re liking this electric piano loop, ‘Piano_Loops_PianoNoir_3_Amin7_70.wav’, from the Splice pack, Piano Noir, but we want to push it back in the mix to make room for the coming guitar, which will form the melodic backbone of the track. Let’s see what we can do.
Here’s the dry piano loop:
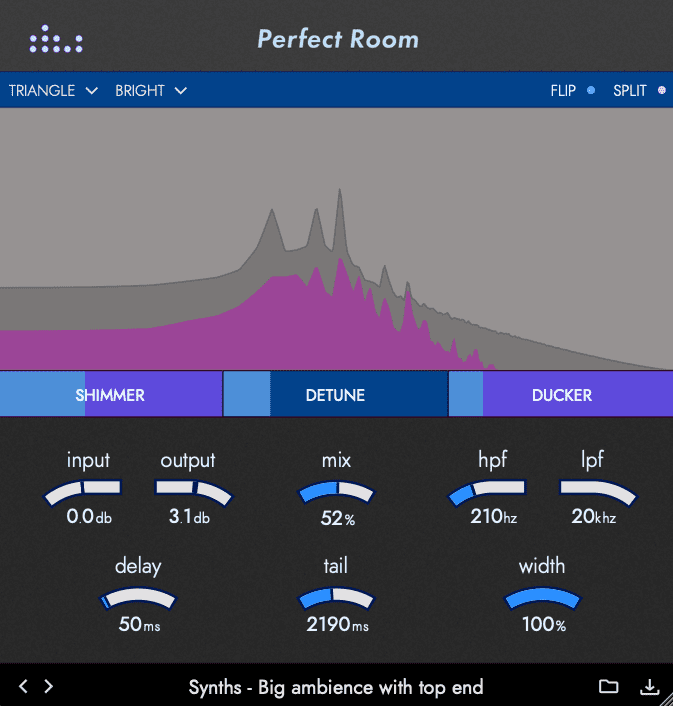
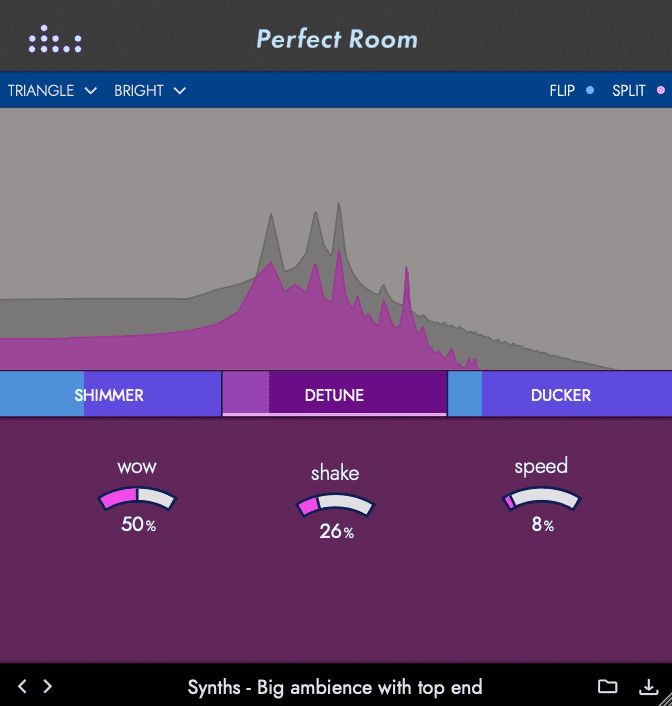
The preset Synths – Big ambience with top end gets us started. We bring the Mix amount down to about halfway but really increase the Tail amount to a luxurious 2190ms. We change the tail shape to Triangle for an unusually long-feeling decay and switch the Type to Bright to match the feel of the sound.
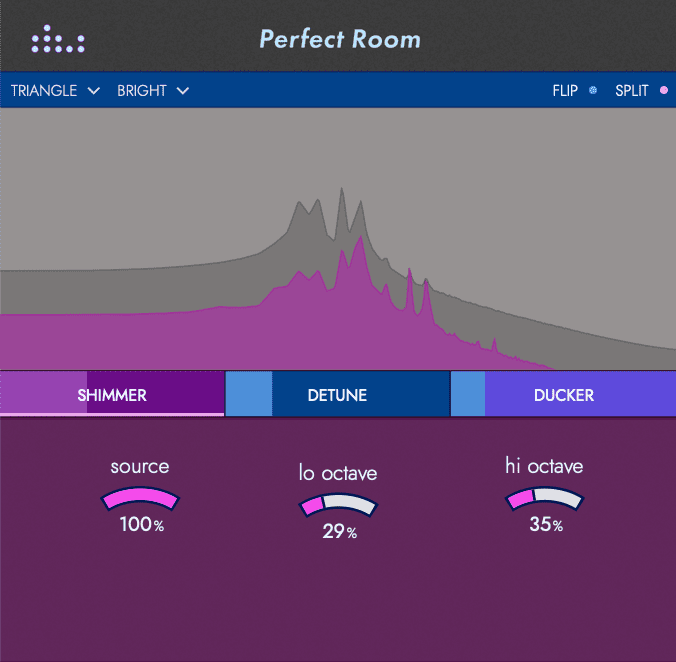
Next, let’s use those creative effects to their advantage. There’s too much Shimmer happening so we lower the amount. We also go into the deeper settings and bring the octave harmonics down a bit. Next, we bring up the Detune and make adjustments to the Shake and Speed parameters, lowering them to make the effect a little more subtle. Finally, we have the Ducker help the transients poke through a little.
We have now softened and spread out the keys in a creative way:
Step 4: Guitar
Our final element, ‘SC_ES_126_guitar_lead_thoughts_Amin.wav’, from the Splice pack, Electric Soul – Guitar Loops and Riffs by Treehouz Vol 3, is pretty dirty and already has a number of effects on it.
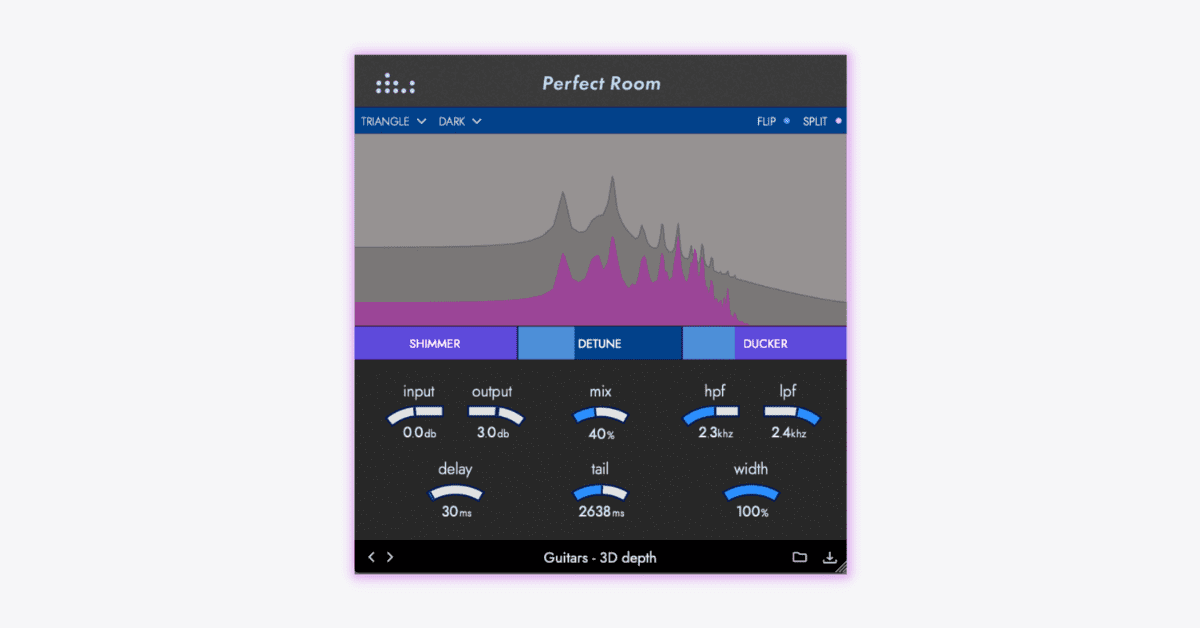
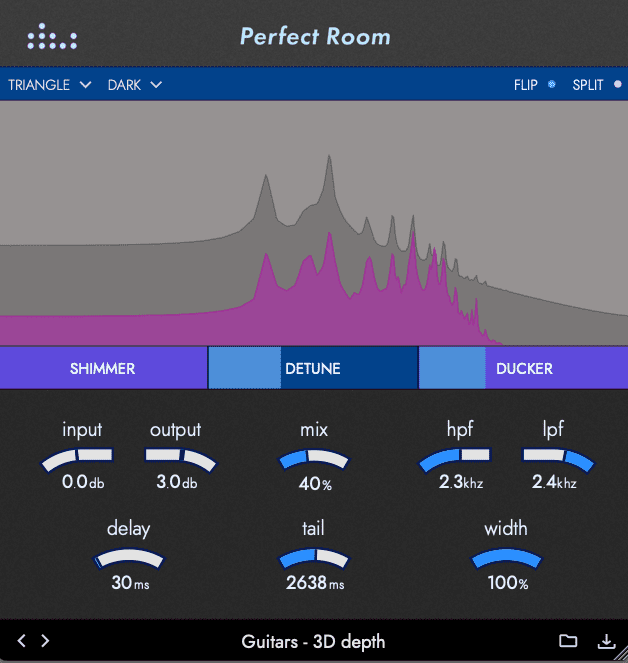
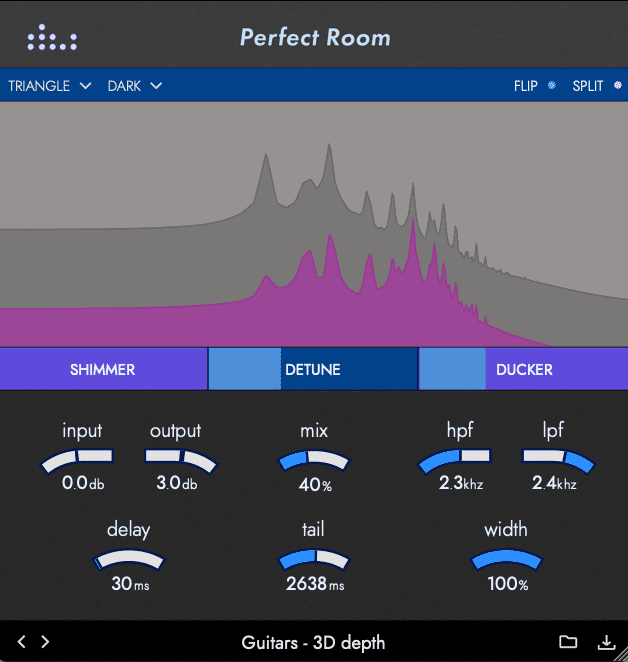
Let’s use Perfect Room to further process it by emulating a tape delay effect. We start with preset Guitars – 3D depth and immediately lengthen the reverb tail to 2638ms for a full sound. We also bring up the highpass filter to 2.3kHz and bring down the lowpass to 2.4kHz to catch just a small part of the mids for a tape-like feel. Finally, we change the tail style to Triangle and the Type to Dark for a spooky tape vibe.
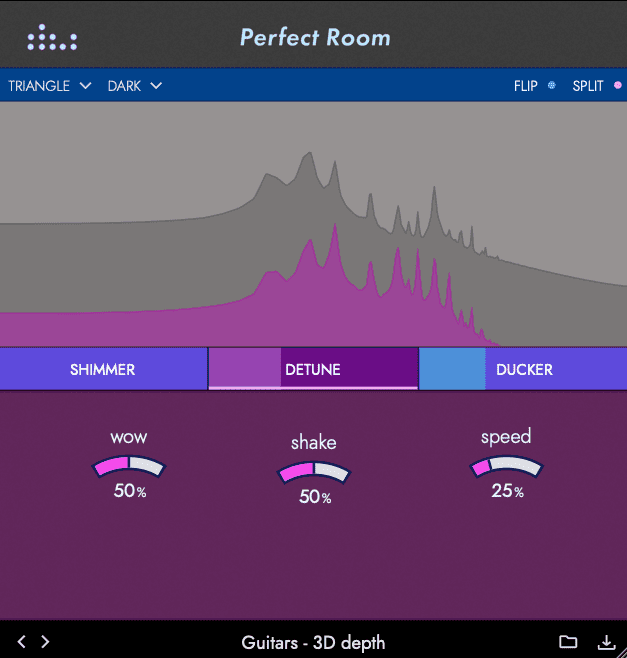
Tape delays are characteristically unstable owing to the imperfections of their motors. By adjusting the settings in the Detune section we can recreate this. We bring up the amount of Detune and lower the Speed to 25% for a languid feel. Lastly, we bring in the Ducker for some transient clarity.
The guitar with tape-style processing:
When we bring everything together, we get a mix that is a bit more intimate and full:
*Attack Magazine is supported by its audience. When you purchase through links on our site, we may earn an affiliate commission. Learn more.
FOLLOW ATTACK MAGAZINE
Read this next: “I Removed My Music From Spotify”- Why Artists Are Stepping Away