
In this synth secrets, we use pitch automation and the analog-emulating qualities of Ableton’s newest synth to craft a bouncy synth stab patch.
There’s just something about gliding pitch that works perfectly for chord stabs. It makes them sound full of character, intricate, and simply cool.
Ableton’s newest synth Drift has a handy Detune control in its second oscillator, which is ideal for some pitch automation. It sounds even better when layered with the first oscillator that houses the stellar Shape control.

We’ve looked at Drift in previous tutorials to make modulating basslines and synth leads. Fortunately, its oscillators and effects make it easy to craft some great polyphonic patches as well!
Drift is essentially a subtractive synthesizer that has two oscillators, a noise generator, one filter, an LFO, along with various modulation and effects options. Among these options are the Drift and Shape parameters, which even by themselves introduce analog flavor and unique textures.
The synth has a minimal design, but it sounds extremely powerful and has the perfect workflow for quick and effective sound design.
You can try Drift for free by downloading the Live Suite 11 for a 90 day free trial.
Here’s the sound we’ll be building in solo:
And here it is in the context of a track:
Step 1: The MIDI Chords
The MIDI information we’re going to feed into Drift is crucial because we need both short stabs and sustained chords. The sustained sections are where we’ll be able to program in the pitch automation.
When programming these kinds of parts always try to place as many hits as you can on 16th-notes that aren’t already occupied by the kick and the snare in the groove. This creates syncopation and adds natural swing.
In our MIDI example we do just that, especially making sure that the sustained notes play on syncopated notes.
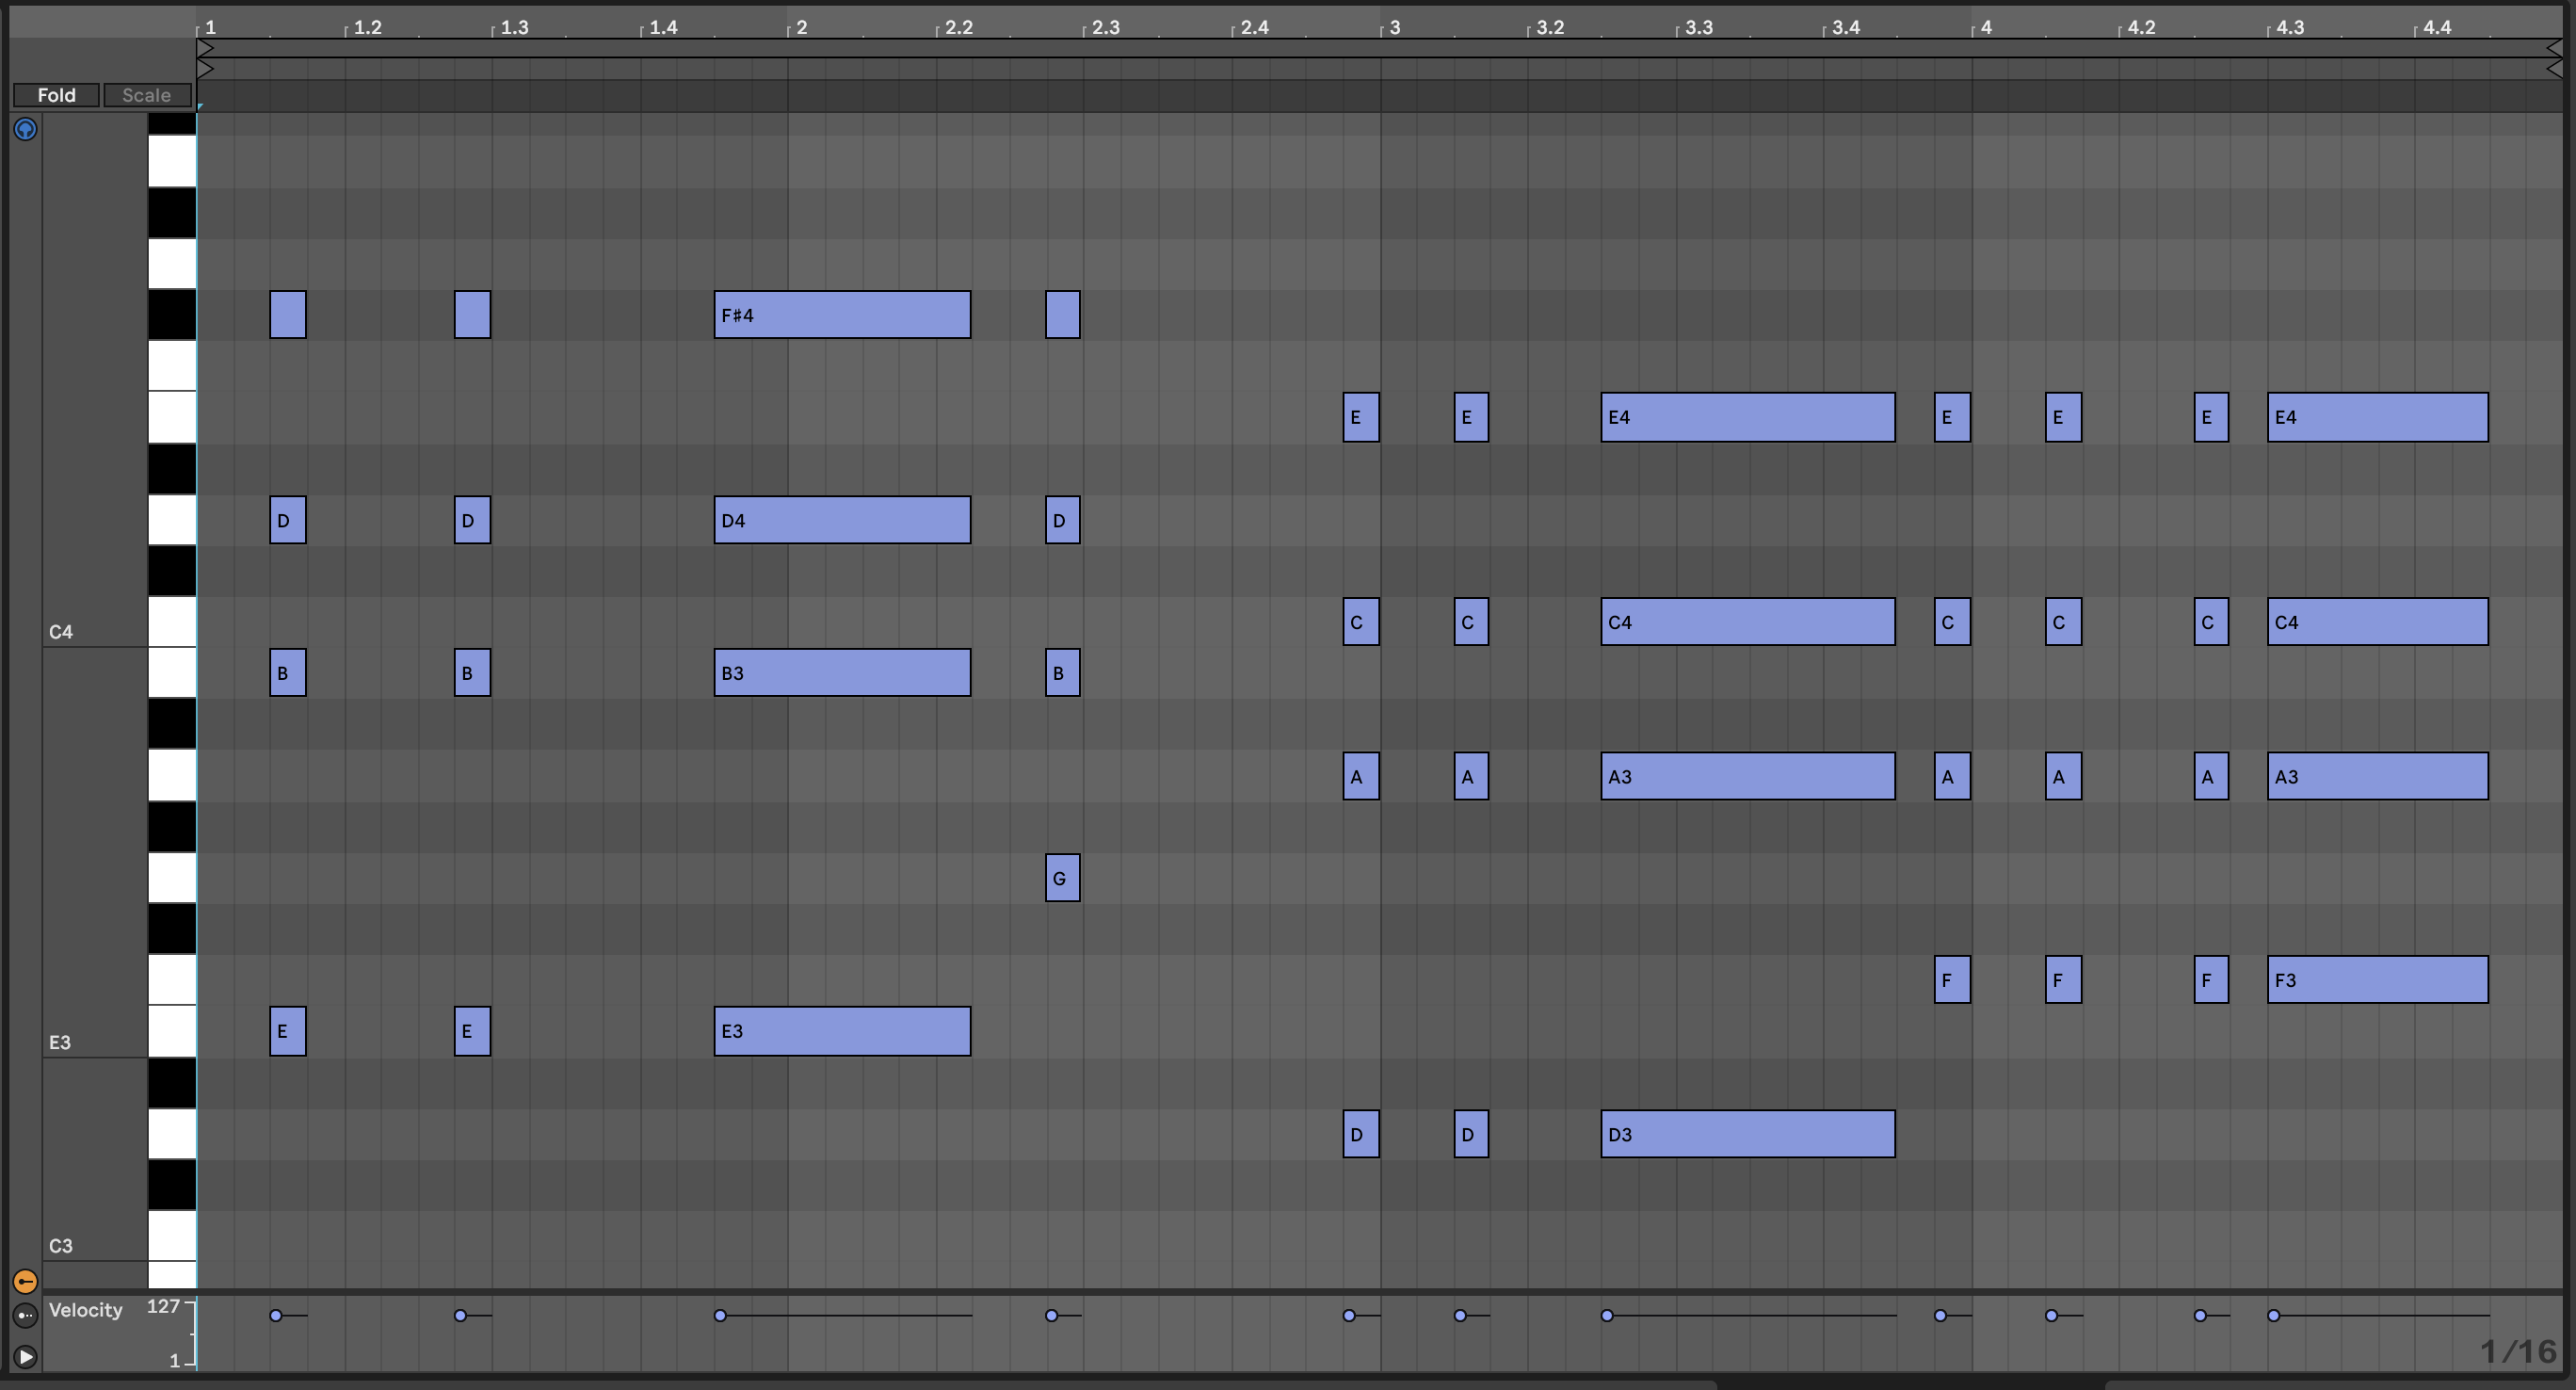
Music theory isn’t the focus of this tutorial, but for those who are curious the chord progression goes:
E minor 7 (add 9), G Major 7, D minor 7 (add 9), F Major 7.
Create an empty MIDI Channel and load up Drift!
Here’s how the chords sound with Drift’s default sound:
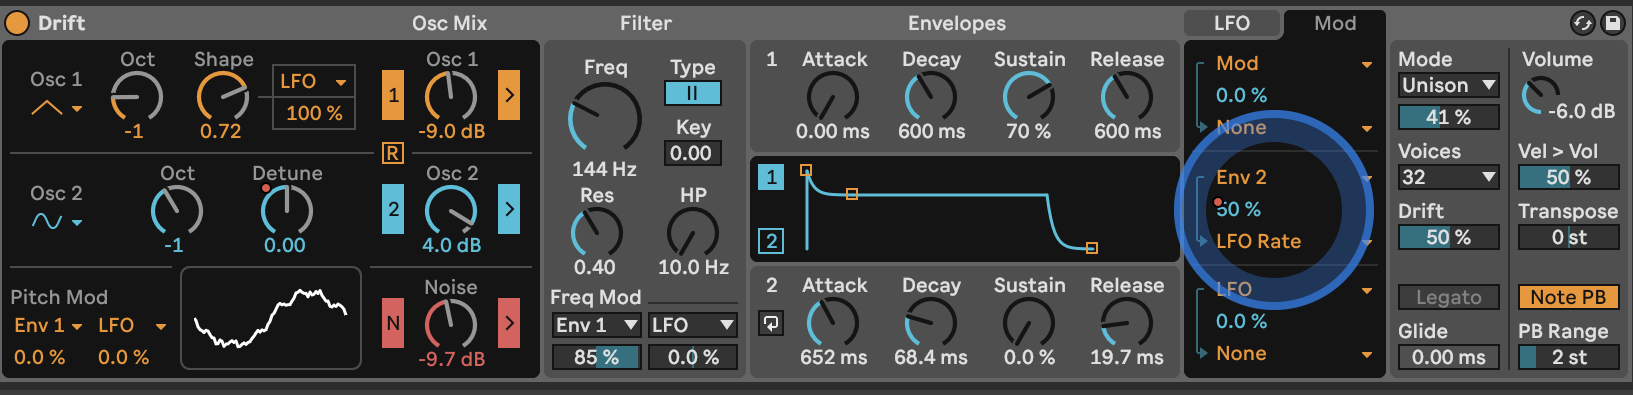
Step 2: Filter and Oscillator Settings
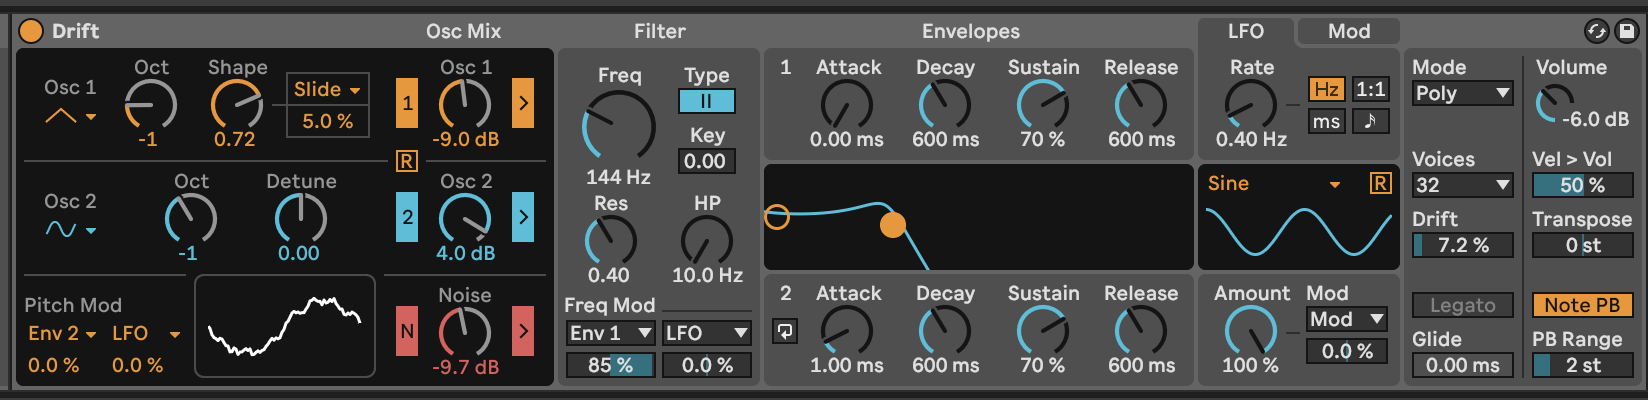
The first thing to do is set up an opening filter envelope. In the Filter module set the Type to the steeper II, lower the Freq to 144 Hz and set the Res to 0.40. In the Freq Mod section below set the control to Env 1 at a vaule of 85%. Under the Envelopes section lower the Attack of Envelope 1 to 0 ms. This will make the filter open immediately.
Set Osc 1 to a triangle wave and set the Oct to -1. Increase the Shape to 0.72 and lower the Osc 1 Mix to -9 dB.
Leave Osc 2 set to a Sine wave Increase the Osc 2 Mix to 4 dB.
Increase the Noise Osc Mix to -9.7 dB. The subtle noise will add a little bit more oomph to each stab.
Here’s how this sounds:
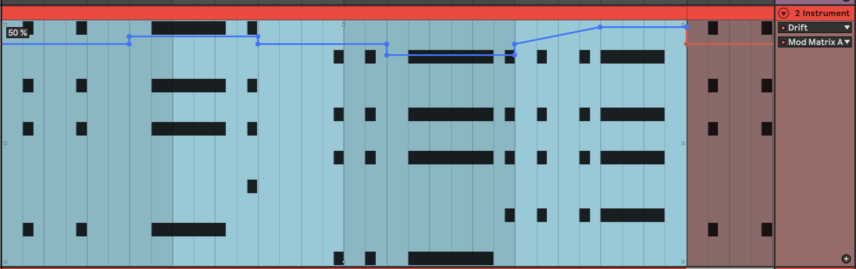
Step 3: Pitch Automation
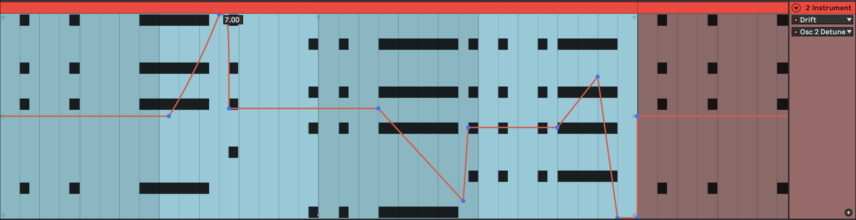
Now for the fun part! We’re going to use the Detune knob in oscillator 2 to create sliding pitch movements.
Right click Detune and select Show Automation to be able to automate the parameter. The values of this knob range from -7 to +7 and work in semitones. This means that a value of 7.00 means an increase in pitch of seven semitones.
When programming in pitch automation, you’ll want to work in semitones increases and decreases that will usually work with most notes. Among these are values of plus/minus 3, 4, 5 or 7 semitones. Small values like 0.5 will create slight bends, which will work fine as long as they are programmed to be fast.
With this in mind program an upward bend of +7 for the first sustained chord. For the second sustained chord, use a bend of -4. For the last one, make it more interesting by starting with an upward bend of +0.5 and then in the second half of it go down all the way to -7.
A key part of this technique is making sure the automation goes back to 0 after the slide movements (before the next chords hit).
You can use the picture below as reference.
Here’s how the stabs sound with the Detune automation:
Step 4: LFO Modulation
One of our favorite Drift features is being able to modulate the Shape control in Osc 1. This creates unique textures that would be difficult to replicate with other software synths.
Set the modulation source of the Shape to the LFO and increase the amount to 100%. In the LFO section, set the Rate to 1.56 Hz.
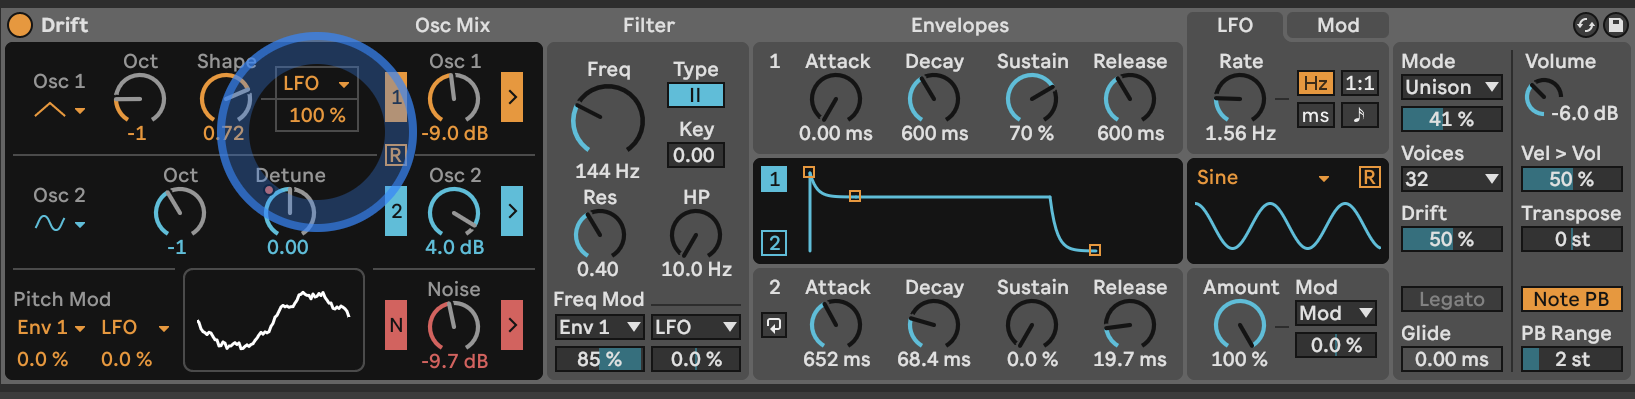
Mute Osc 2 for now, by clicking on the number 2 under Osc Mix. This will allow you to hear the Osc 1 Shape sounds clearly.
A classic LFO trick is to modulate the Rate. To do this, open up the Mod panel and map envelope Env 2 to control the LFO Rate. The amount value will determine how much Env 2 can increase the Rate.
Under the Envelopes section, set Envelope 2’s Attack to 652 ms, the Decay to 68.4 ms, the Sustain to 0.0% and the Release to 19.7 ms.
Back in the Mod Panel, right click the amount to be able to automate this. In our example, we’ve used different values at different times to add interest to the part.
Here’s how this sounds with Osc 2 still muted:
And here’s how it sounds with both oscillators active:
Step 5: Unison and Effects
We’re going to use some Unison chorus to add an even more vintage character to the stabs. To the right of the Mod Panel change the Mode from Poly to Unison. Set the amount to 41% and increase the Drift parameter to 50%. Drift introduces subtle pitch movements.
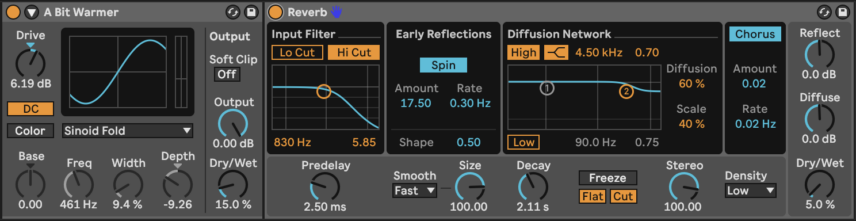
To beef up the sound, insert Ableton’s Saturator Audio Effect’s ‘A Bit Warmer’ preset and decrease the Dry/Wet to 15%. Finally, insert the Reverb Audio Effect, set the decay to 2.11s and the Dry/Wet to 5%. This will add a little bit of ambience.
Here’s our final sound in solo:
And in context with a beat and FM bassline:

Produce music?


Max For Live: Chance Engine
Add controlled yet random fluctuations to your most important parameters

Max For Live: Mouth Play
Unconventional vocal shaping with a brass model or FM oscillator source

Max For Live: NerualWaves
Synthesizer fuelled by a custom neural network, forging waves with precision

Max For Live: The Spellbook
LFO inspired by sacred geometry, weaving nature's fabric into your projects

Max For Live: Travelogue
A Max for Live MIDI device creating a unique sonic journey with joyful surprises


Max for Live: Plecto LFO
A lifelike, deterministic, non-linear LFO for Ableton Live, the Plecto LFO Max for Live device can be mapped to any instrument or effect in your set.