u-he are makers of award-winning software synthesisers and effects including Diva, Repro-1, Zebra2, Hive, Bazille, Presswerk and Satin.
Visit U-he
Technique » Synth Secrets »
Dub Techno Synth Chords
This channel is sponsored by

This Synth Secrets sees us synthesizing some dub techno chords. Tape echo at the ready.
As Basic Channel, Rhythm & Sound and Maurizio, the German production duo of Moritz von Oswald and Mark Ernestus invented dub techno, a stripped back version of the genre that takes inspiration from dub reggae. Tracks are long and spacious with often just a few elements repeating hypnotically. The duo’s Quadrant Dub 1’, ‘Phylyps Trak’, and ‘Q1.2’ are master classes in minimalism.
The Basic Channel guys are notoriously tight-lipped about the gear they used, but the general consensus has it that they employed a Sequential Circuits Prophet-5, among other pieces of kit. Accordingly, we’re going to use an analogue-modelling softsynth to craft our chords. Being influenced by dub, their sound is also as much about the processing as the synthesis. EQ, filters and of course delay play a huge part. What that in mind, this Synth Secrets is going to lean heavily on effects to achieve some dub techno-inspired synth chords.
We’re using Ableton Live but any DAW will work. As per usual, click on any image to see a larger version.
Here’s the sound we’re going for:
Step One
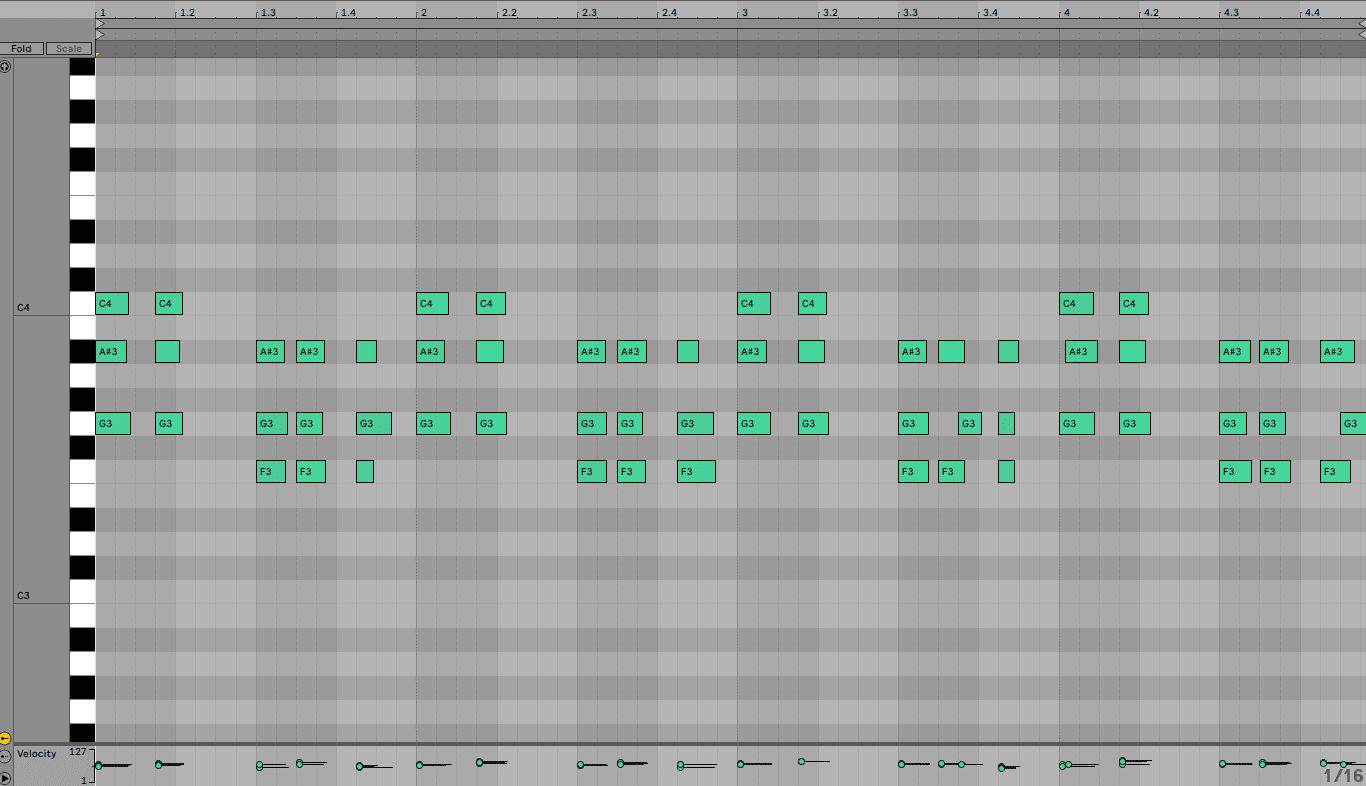
Create a new MIDI track and call up an analogue-style synth. We’re using U-he’s Diva but any synth with an adjustable noise circuit will work. Initialize the synth if it hasn’t been already. As Diva has a number of different modes, we went with the INIT Jupe-6 patch as it will get us the closest to the sound of a Prophet-5. Lastly, we program in some chords to get us started. Feel free to nudge some of the notes around as it will help to give it a looser feel.
Here’s our initialized patch with chords. There’s clearly a lot more work to do.

Step Two
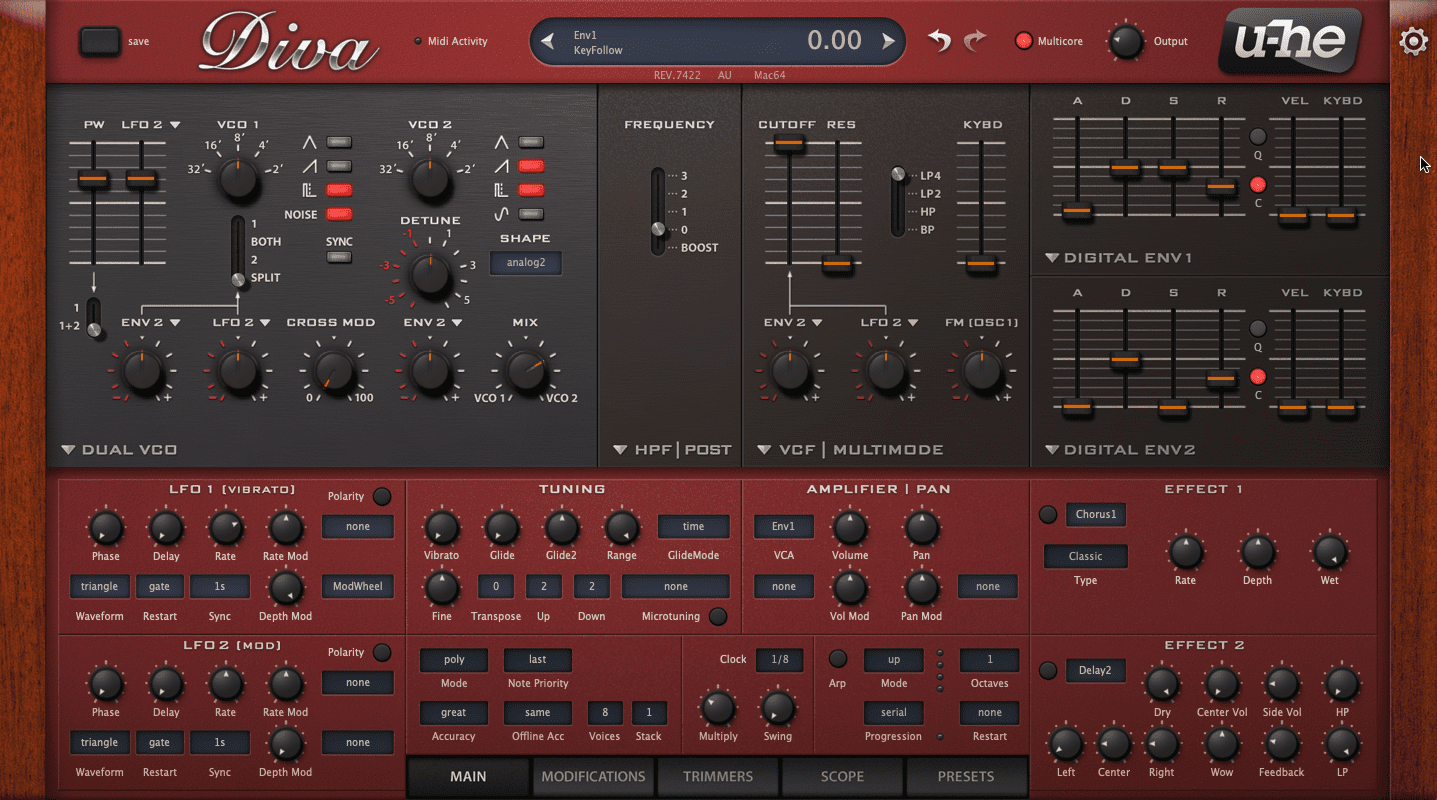
Let’s set up the oscillators. Click Noise on VCO 1 to engage the noise circuit. This will add a chuff to the notes and give the delays something to grab onto. For the body of the sound, click both sawtooth and square wave buttons on VCO 2.
Let’s use pulse width to thin out our square wave. Pull up on the PW slider until around 70. Flip the switch under the PW slider to 1+2 so the manual pulse width control affects oscillator two as well.
Finally, adjust the oscillator mix. We want to favour VCO 2 but still let some noise through. Turn the Mix dial clockwise and stop on 2 o’clock.
Our progress so far. It’s still miles away from dub techno though.
Step Three
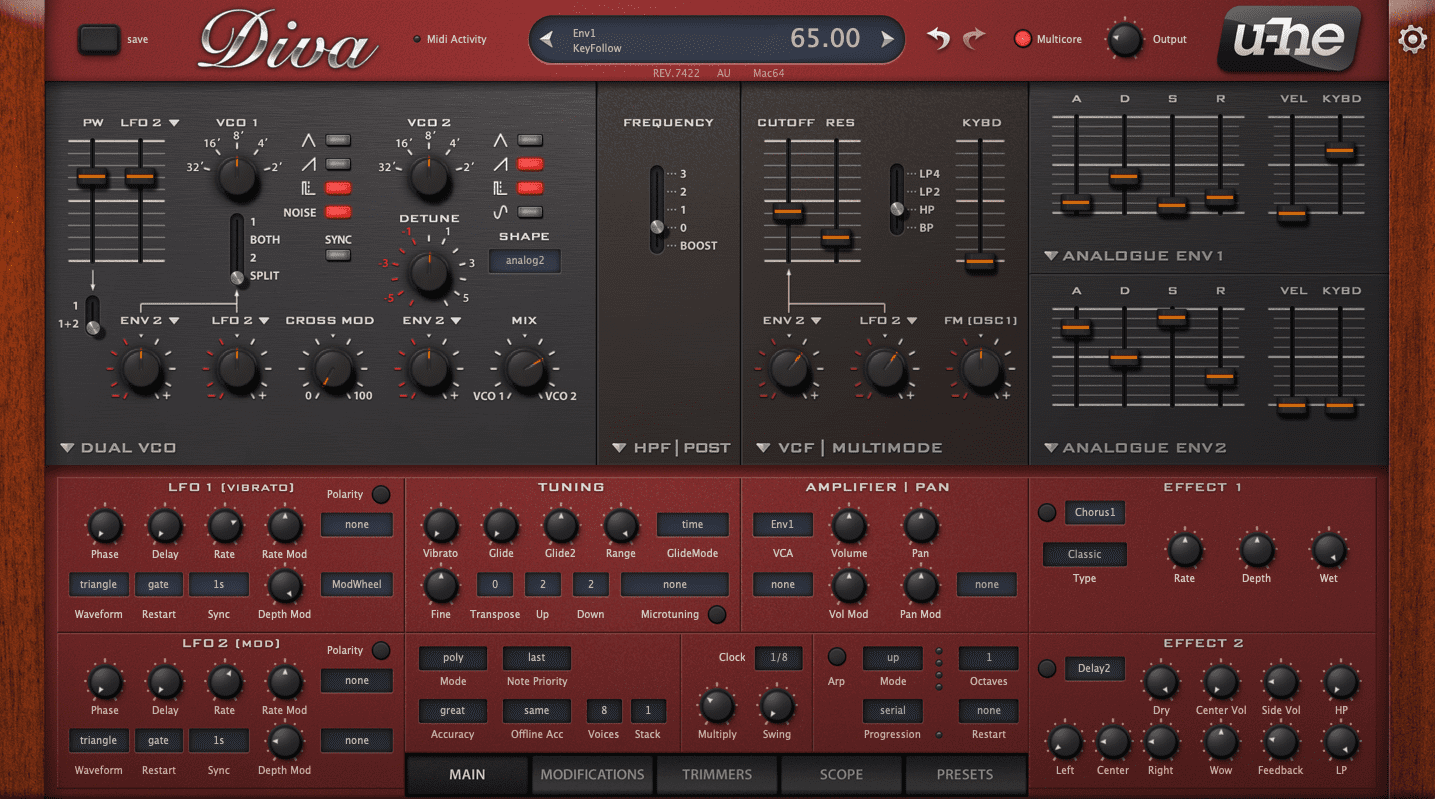
Let’s bring in the filter next. We won’t be using the lowpass filter but the highpass as we want a sound that is thin and airy, one that will float above the sub-bass. To that end, set the filter to HP, adjust the Cutoff to 80 or so and turn up the resonance to around 20.
Let’s add some movement to the filter. Turn the LFO 2 knob under the filter controls to 1 o’clock. Next, look to the lower left of Diva and find the LFO 2 (Mod) section. Bring up the rate to 1 o’clock and the Depth Mod to 9 o’clock. You should now hear the LFO modulating the cutoff.
It still sounds more ‘80s than dubby but we’re getting there.
Step Four
It’s time to call in the envelopes to give some shape to our chords. Switch both envelopes to analogue models for a more gentle envelope curve.
First, let’s tackle the amplitude with Analogue Env 1. Bring up the attack (labeled A) to 11 or so. This will give the sound a slight fade in. We want a short decay so ease that down to around 35. We don’t need much sustain at all. A setting of 8 will do the track. Next, bring the sustain down to 15. This may seem short but don’t worry, all of the echoes will fill it out. Finally, engage the Kybd slider (also known as keyboard follow) to have the notes played affect the filter. A setting of 65 sounds good.
Let’s take care of the filter envelope while we’re at it. Slide the attack right up to 80. This will give our filter envelope a slow onset – key to getting the sound right. Leave the delay where it is and bring the sustain up to 90. The release can stay where it is.
That’s the synthesis portion of the sound done. Whew!
Where we’re at:
Step Five
It’s finally time for effects. Let’s start with Diva’s onboard phaser and reverb. Set Effect 1 to Phaser 1 Stoned type for an Electro Harmonix Small Stone-like feeling. Make sure you turn it on as well. Set the rate to a little over 70, depth to 12 o’clock, and Wet to 1 o’clock. Finally, crank up the Feedback to 1 o’clock to add a resonant peak. Sounds good.
We could use some reverb as well so turn on Effect 2, choose Plate 2, and adjust the settings to taste. We don’t want too much though, so a low Wet setting is advisable.
With effects added:

Step Six
We’re finished with Diva but there’s more to be done so don’t take a break just yet.
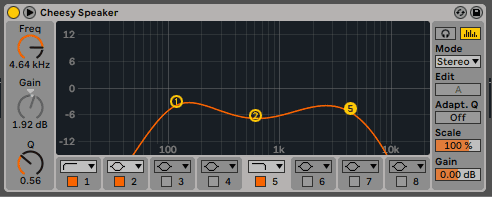
Synth chords in dub techno have a particularly hollow sound to them. We need to scoop out the mids on our chords. Throw an EQ Eight onto the MIDI channel and reduce the mids at 600Hz by around -7dB with a wide Q. High and low pass any errant frequencies as well. Anything above 4.5kHz and below 100hz should do nicely.
Now with EQ added:
Step Seven
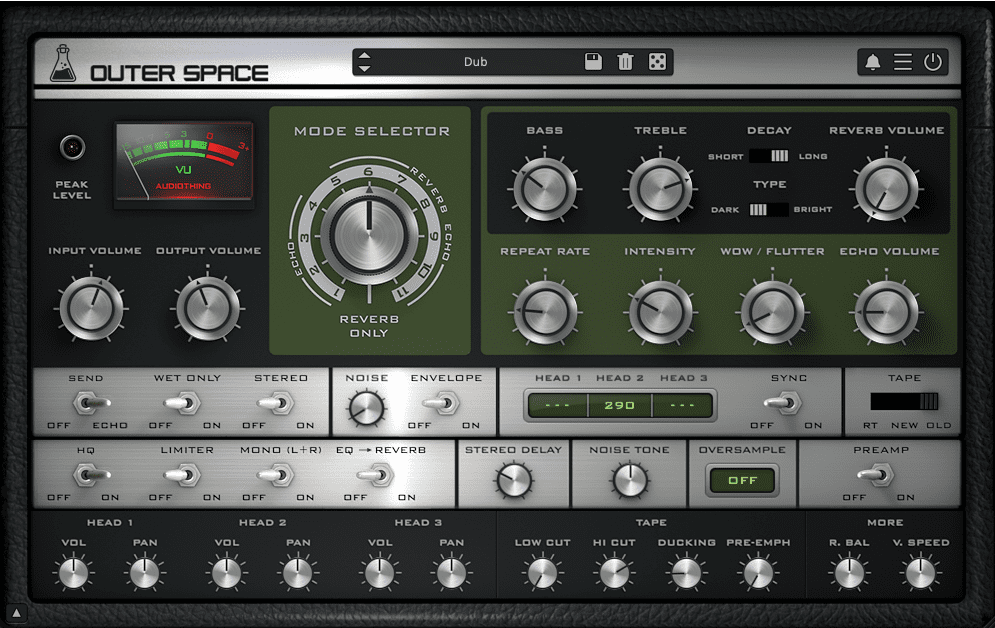
Let’s slap a delay on there next. (Get it? Slap? Ahem.) Any form of dub will undoubtedly involve a tape echo at some point. We’re using AudioThing’s Outer Space, an emulation of the Roland RE-201 Space Echo. We went with the Dub preset (unsurprisingly) but turned off the reverb, as we already have some on the signal courtesy of Diva. The extra rhythms provided by the tape repeats spice things up.
Get your dub on:
Step Eight
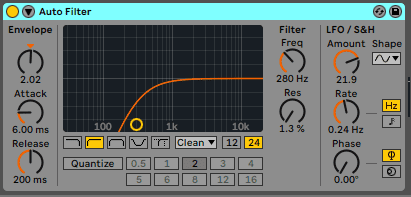
For our last step, let’s use the sends in Live to add even more delay. First, though, drop in Live’s stock Auto Filter. This is going to create some movement in the delay channel. Use a high pass shelf with a frequency of 280Hz and very low resonance. Set the LFO amount to 22 and rate to 0.25Hz. A little bit of Envelope sounds nice too.
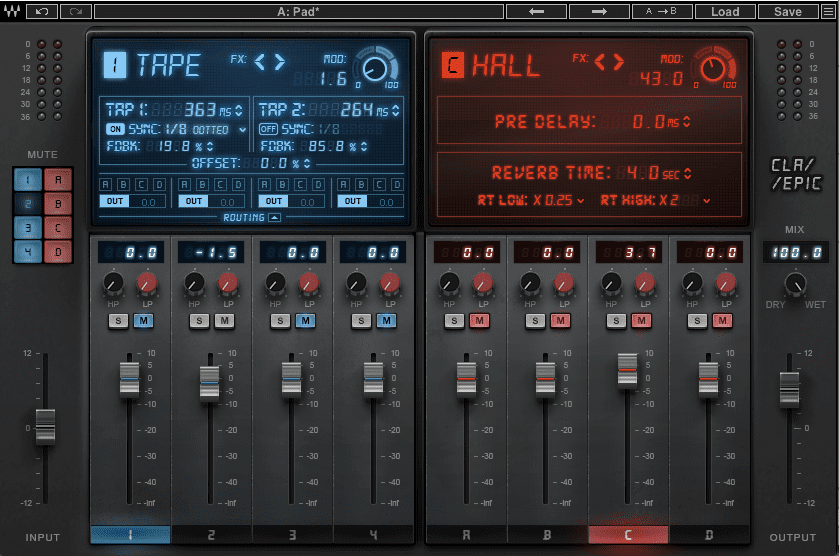
Lastly, let’s use Waves’ CLA Epic to create a dual-tap tape delay. We start with the Pad preset but mute all reverb channels as we just want the delay portion of the effect. Turn on Sync on Tap 1 and set it to 1/8 Dotted with a feedback of around 20%. Let’s let Tape 2 run free from the DAW’s tempo and use a setting of 264ms. Crank the feedback up to 85% or so. Make sure to turn the Wet/Dry knob all the way to Wet as we’re using this on a send track. Crank the send amount up to 100% on the Diva channel as we want very prominent delays.
With the delay and auto filter working together:
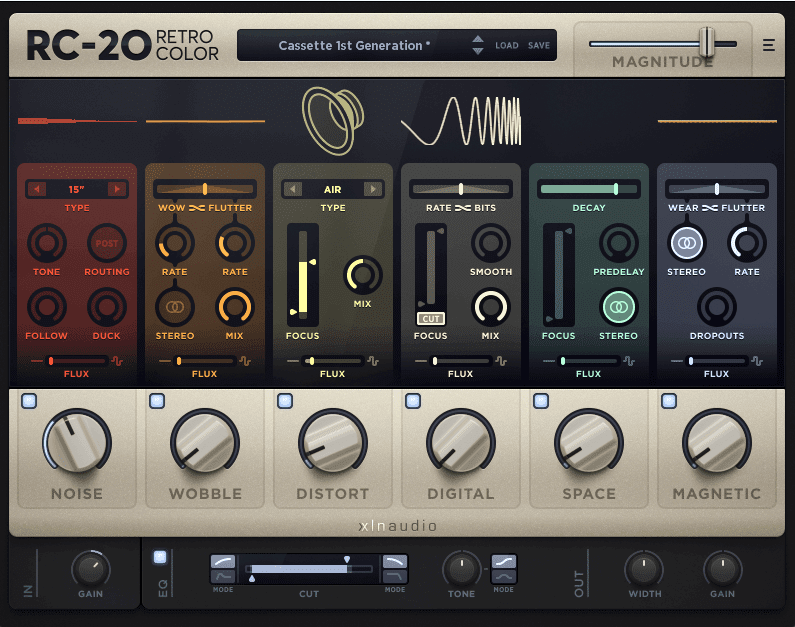
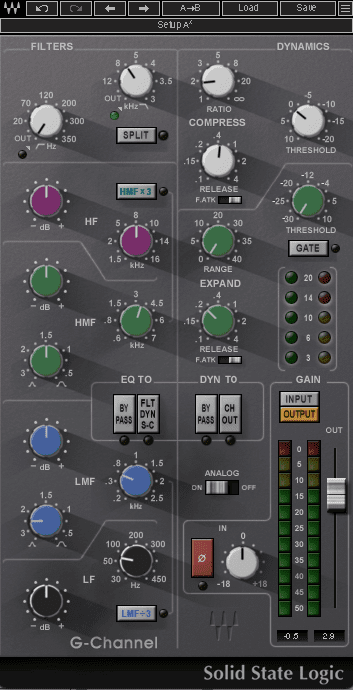
For added analogue authenticity, we used XLN Audio’s RC-20 Retro Color to add a heaping helping of tape hiss and Waves’ SSL G-Channel Strip to warm up the signal on the master bus.
Here is our sound in context with a muffled 909 kick and sub bass.
*Attack Magazine is supported by its audience. When you purchase through links on our site, we may earn an affiliate commission. Learn more.
Synth Secrets is sponsored by
u-he are makers of award-winning software synthesisers and effects including Diva, Repro-1, Zebra2, Hive, Bazille, Presswerk and Satin.
Download the demos and try them for yourself at www.u-he.com