
This channel is sponsored by
 Roland Cloud is your creative hub for Roland hardware and software. Access legendary recreations of Roland Classics, find new sounds for your favorite products, and download updates and companion apps to make music fast and easy. Visit Roland Cloud
This tutorial is a short excerpt from our new book, The Secrets of Dance Music Production, which is available to buy now from our online store.
We have more sounds at our disposal than ever before. Even if your studio extends no further than a laptop and a DAW you’re likely to have access to thousands of bundled drum sounds. If you have an extensive sample collection you can multiply that figure by ten.
With so many sounds, the law of averages says you should be able to find the perfect drum to fit most grooves/tracks. And even if a sound’s not 100% right some tweaks to its envelope setting or tuning is usually enough to help it fit the sonic bill.
But sometimes however many sounds you audition, none of them quite works. The kick drum has oomph but not crunch; the snare has whack without crack. Or maybe you’re a sample-eschewing sound designer who prefers every sound in their mix to be sculpted by hand.
In either case, there are two approaches to building original drum hits:
- by synthesising your own sounds
- by layering existing samples to make unique hybrids that fit the mix every time.
Here we focus on the art and craft of drum layering.
THINKING AS ONE
Many producers end up panicking over drum layering after their first few attempts end with muddy, ill-defined results. This is often because they like a drum sound so layer it onto existing drum/s and wonder why the beat doesn’t instantly sound better – two kick drums, they think, should by default be better than one.
That thinking is a shortcut to disaster. Layering must be approached with care, with an understanding of the dangers and with a clear idea of what each constituent sound is going to add to the composite final. Which is all to say, only layer when there is a good reason for doing so.
PHASE
The main hidden danger when layering drum sounds is phase cancellation, which occurs when the layered samples’ waveforms are out of phase with each other.
Two identical signals are completely out of phase (aka with negative polarity) when their waveforms directly mirror each other. If this occurs they cancel each other out, resulting in silence.
In the real world, when layering complex drum sounds, you are not going to end up with silence. But, especially if the opening transients of a waveform set off in opposite directions, frequencies in the composite layered sound can become quieter, giving a brittle, weak sound.
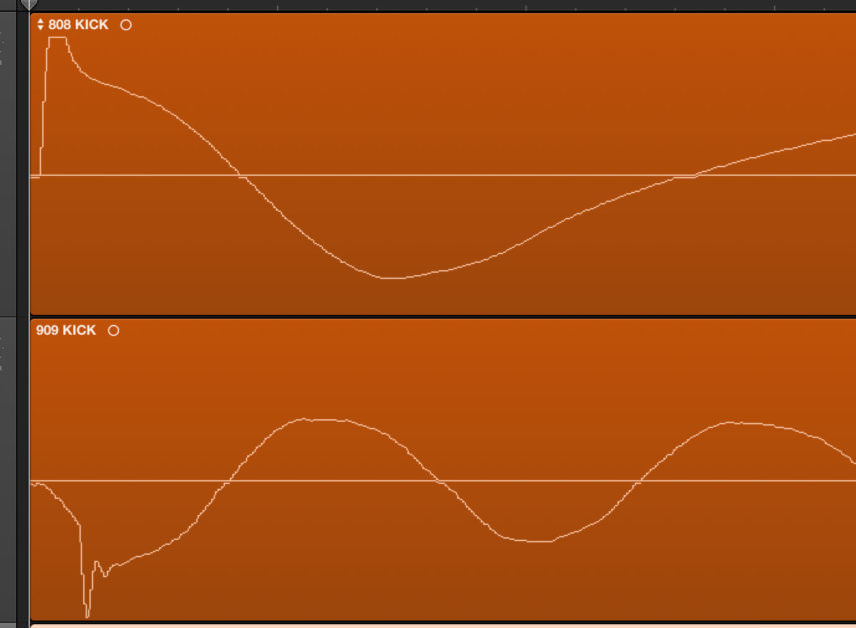
Two samples with negative phase – note the way the two waveforms set off in opposite directions.
While phase cancellation can affect any layered sound, it is most noticeable when layering kicks, where even a slight drop of energy in the opening transients can badly affect the low end.
One way of checking to see if samples risk cancellation is to zoom in on their waveforms, as in Fig 16 left. If they set off going in the same direction you are usually safe.
A simple shortcut if they don’t is to use a DAW’s polarity inversion button, often (erroneously) labelled as phase inversion.
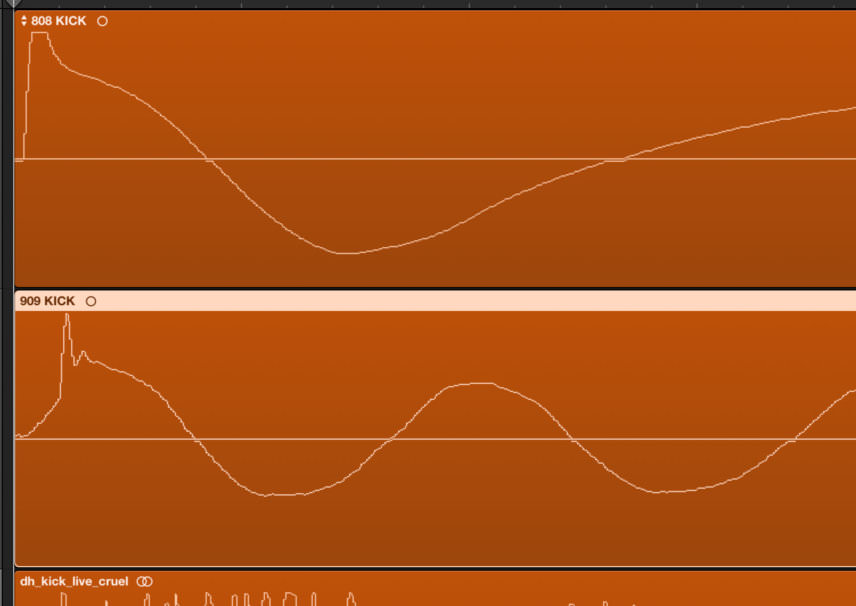
The same waveforms wih the second’s polarity flipped. They will now sound much fuller when triggered together.
There are many plugins that also allow you to do the job, like Sonalksis’ FreeG plugin.
Deciding whether the kicks work best with the polarity of one sample inverted is a simple case of trial and error: invert the polarity and if it sounds better stick with it.
It doesn’t particularly matter whether you invert the polarity of the first or second kick; the effect is pretty much identical. Bear in mind that inverting both has virtually the same effect as inverting neither.
EQ: TRIMMING THE FAT
The final area to focus on is the frequency range each constituent sample occupies. When mixing two or more sounds together there’s no point each one contributing the same frequencies to the composite. If too many frequencies overlap the end result will be muddy and ill-defined.
To avoid frequency doubling and masking, use EQ bracketing to carve away the unwanted frequencies in each sound, making space for them to sit together.
If you are layering a bass-heavy 808 kick drum (for low end) with a live bass drum (for mid-tone clout), for example, you might choose to roll away the higher frequencies of the 808 while cutting the lower frequencies of the live drum for the best of both worlds – a layered kick with a subby low-end and a weighty mid punch, but without congested crossover.
If you’re struggling to separate layers using EQ alone, try using different reverb treatments for each layer. Instead of straight hall or room settings, audition early reflection programs and short reverb and chamber IRs. Placing different layers in different spaces aids separation.
TIMING
When layering, the timing of the start of each sample is critical. Sometimes you’ll want the combined layered hit to be a single unified sound (in the case of a kick drum, for example). At other times you may want obviously staggered layers (in the example of a lazy disco clap/snare hybrid).
In both cases the trick to getting an effective layered sound is zooming in on the opening transients then shifting each layer in time either so they gel into a single sound or so that they hit at perceptively different times.
Note: altering sample start times directly impacts on the phase relation between the samples, so, again, flip either sample’s polarity to see what difference it makes.
One quick and easy way of ensuring opening transients don’t hit at the same time in each layer is to employ a transient designer or compressor to change the transient make-up of the opening portion. To shift a hard-edged live snare sample slightly back from the opening portion of a layered analogue snare, for example, simply lengthen its attack. A similar approach can be taken to rebalance the energy make-up of a layer’s sustain or release.
BUSSING
When you’re happy with a layered sound, route each composite sound to a single drum bus (‘kick drum group’ for example). Doing this not only allows you to EQ and/or compress the layered drum as if it were one sound – giving it a single gel of glue – it also makes it easier to balance its level against other drum sounds.
If you like the layered sound enough, bounce it out as a single hit and add it to your sample library.
KNOWING WHAT YOU WANT
With the theory out the way it’s worth making the most important point about drum layering last: layering is a lot easier when you have a clear intention in mind.
If you have a live kick drum sample you like but it doesn’t have the necessary low-end for the dancefloor, knowing that you need to layer it with an 808-style kick will help deliver results fast. Once you’ve made that call all you need to do is layer in an 808 bass drum, align the sample starts, retune, check phase, perform EQ tweaks (cutting lows from the live kick and highs from the 808) and you’ll have the sound you’re after.
Endless tweaking while layering wastes hours in the studio. A clear vision focusses attention on the task at hand.
Layered clap/snare combo – the old school way
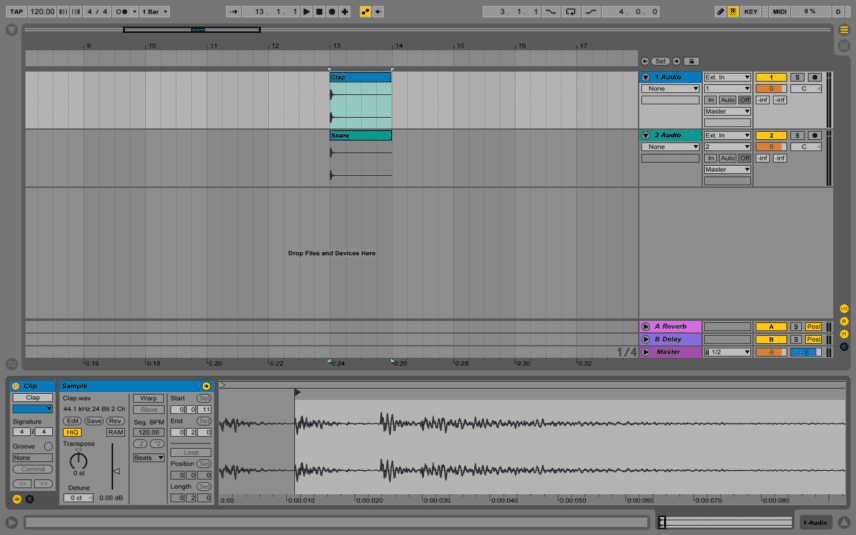
Step 1
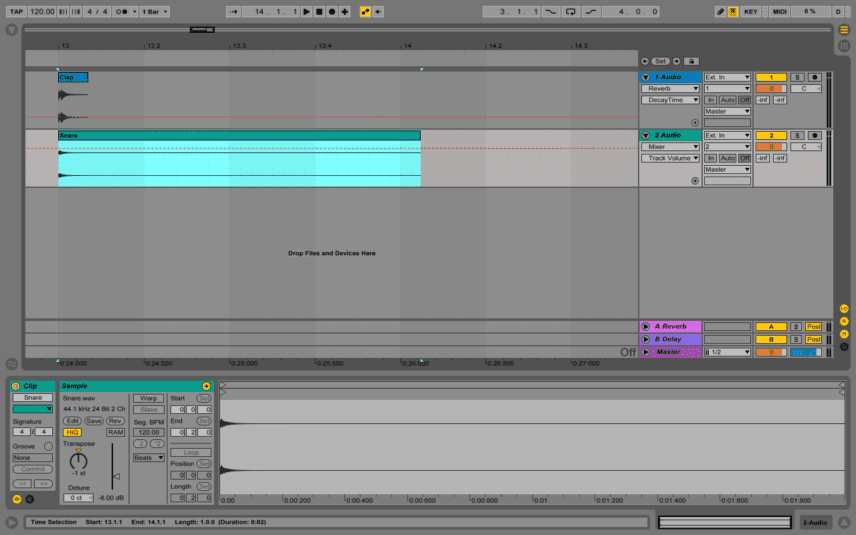
Stacking gives the combination of low-end percussive energy from the snare and spectrum-filling noise from the clap, creating a big, impactful sound that can really punch through a mix. Drag Clap.wav and Snare.wav onto separate audio tracks and make sure both audio clips are unwarped.
Step 2
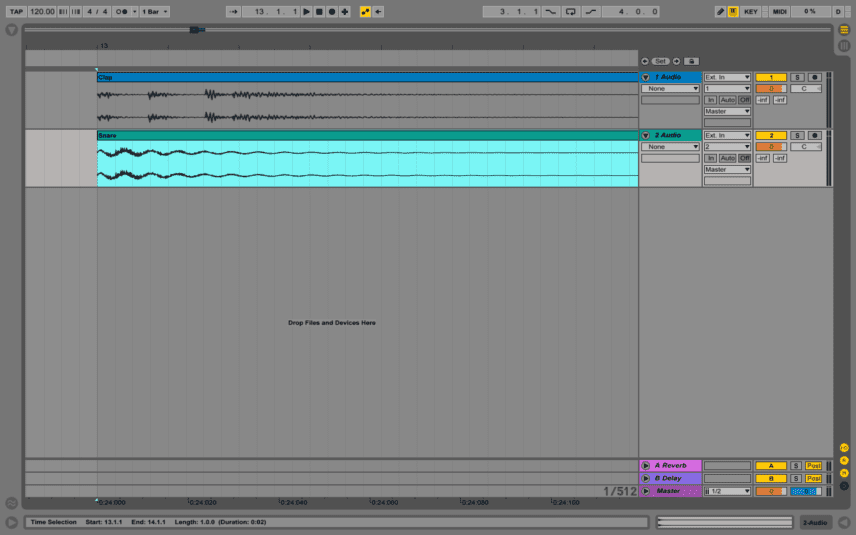
Zoom in to the start of the two clips. You’ll see the clap (on top) has multiple transients, only reaching its body as the snare has almost finished. This is fine if you’re after a loose, organic feel but it’s not right for tight, punchy sounds.
Step 3
The most elegant way to make the two sounds gel is to change the start point of the clap. Drag the clap clip’s Start Marker to the beginning of the second transient. This gives a good balance of impact and natural feel. (An alternative for a looser feel is to drag the clap’s start back in time.)
Step 4
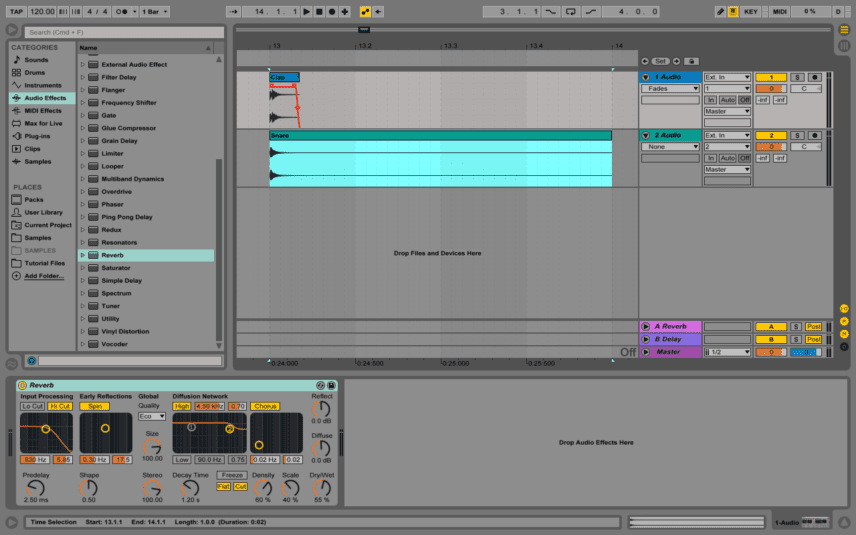
The clap has a long, mono reverb tail. Let’s replace this with a shorter stereo tail. Drag the clip’s end point to the left then set the track’s Device Chooser to Fades and add a quick fade out. Add Live’s Reverb from the Audio Effects folder to the clap track.
Step 5
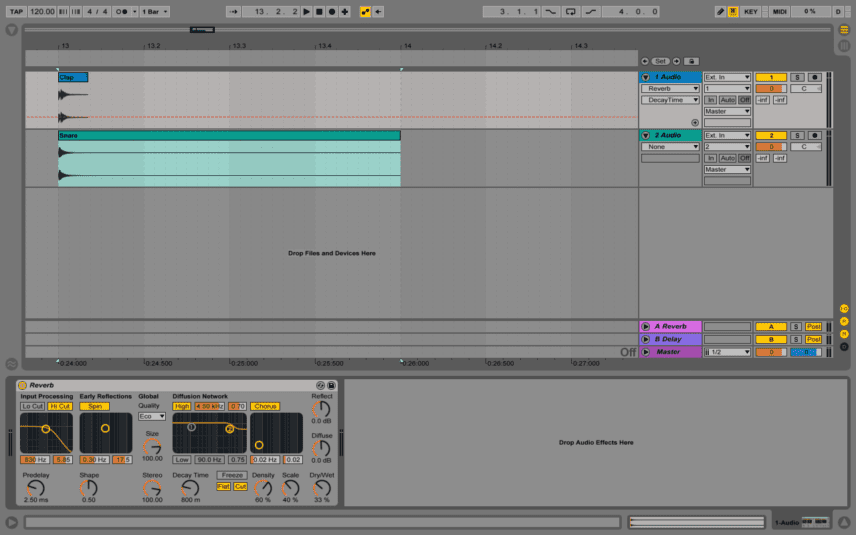
Reduce the Reverb’s Dry/Wet balance to 33% and turn Decay Time down to 800ms or so. The reverb on the clap adds stereo detail to the previously mono-only sound, making it appear bigger in the mix with negligible change in peak level.
Step 6
The clap is loud relative to the snare so reduce its Gain by -8dB. Another way to change the feel of the combined sound is to adjust the tuning of either element. Turn the clap clip’s Transpose down to -1 for a more natural, cohesive sound.
The Secrets of Dance Music Production is available to buy now from our online store.
/**/


The definitive guide to making cutting-edge electronic music.
Featuring 312 colour pages packed with technique, tips, illustrations and hands-on walkthroughs, The Secrets of Dance Music Production pulls together all you need to take a mix from concept to club-ready master, featuring a wealth of exclusive content from Attack’s award-winning team of writers, including:
Studio fundamentals: Synthesis and sampling; studio setup and monitor placement; EQ, ambience and compression all covered in detailed 101-style guides.
The golden rules of mixing: Learn how the pros get loud, defined and dynamic mixes stacked with interest and energy.
Essential techniques: Layering, frequency bracketing, lo-fi processing, bass splitting, vocal production, mastering… It’s all inside.
Up your writing chops: Compose inspired bass and toplines with kick-starter approaches to voicing, arpeggios, syncopation, killer chord progressions and more. Arrange loops into tracks with analysis of tried-andtested dancefloor structures.
Bigger beats: 50+ pages of rhythm making insight. Masterclasses in drum sound design, transient shaping, swing crafting and ghost placement plus 30+ beats broken down.
Learn from the masters… Pro tips from the world’s finest producers. Huxley, Redlight, Breach, Tricky, Justice, Sigur Rós, Todd Edwards, Kenny Gonzalez and more share their secrets.
Get that sound: From vintage arps to supersize FX; ripping Reese basslines to stacked EDM leads; ethereal soundscapes to deep house keys – dozens of sounds built from the ground up in media-rich walkthroughs.
Paperback, 312 pages. The Secrets of Dance Music Production comes with over 500 audio and project files.
Tutorials is sponsored by
Roland Cloud is your creative hub for Roland hardware and software. Access legendary recreations of Roland Classics, find new sounds for your favorite products, and download updates and companion apps to make music fast and easy.
07.24 PM
Thanks for sharing these. Between the low resolution and the mis-registered printing, these screenshots are nearly impossible to read in the physical book.
08.51 PM
Some fairly generic advice – most of it completely depends on the aesthetic the drums are for i.e. your own sound. I honestly don’t reckon it’s a good tack to encourage people to siphon their own voyage of discovering how to make good sounds into a coffee table book. Recipe for homogeny isn’t it?