
Have you ever wondered how to create a disco track? Learn how from this tutorial on producing disco music using Toontrack’s EZDrummer, EZKeys, EZbass, and EZmix.
If you’re going to produce old-school house music or create something with a French flair in the vein of vintage Stardust, Cassius, Daft Punk, and the other usual suspects, you’ll need a good disco sample.
But what if you don’t want to be connected to somebody else’s stuff? Or… what if you just want to produce disco music for disco musics sake? The answer – you make your own.
Today we’re going to dive into producing disco music using Toontrack’s software suites — EZDrummer, EZKeys, EZbass, and EZmix.
Here’s the disco loop we’ll build:
This is what you could do with your new homemade disco music using only a couple of minutes, some drum loops, some EQ, and a heap-full of side-chained compression. Vive La France..!
Let’s get cracking! As ever, click on any image to enlarge!
Step 1: Basic Drums
We’re going to start with the beat. We’ll set the tempo to 120 BPM. In most DAWs, that’s the default so you don’t have to do a thing.
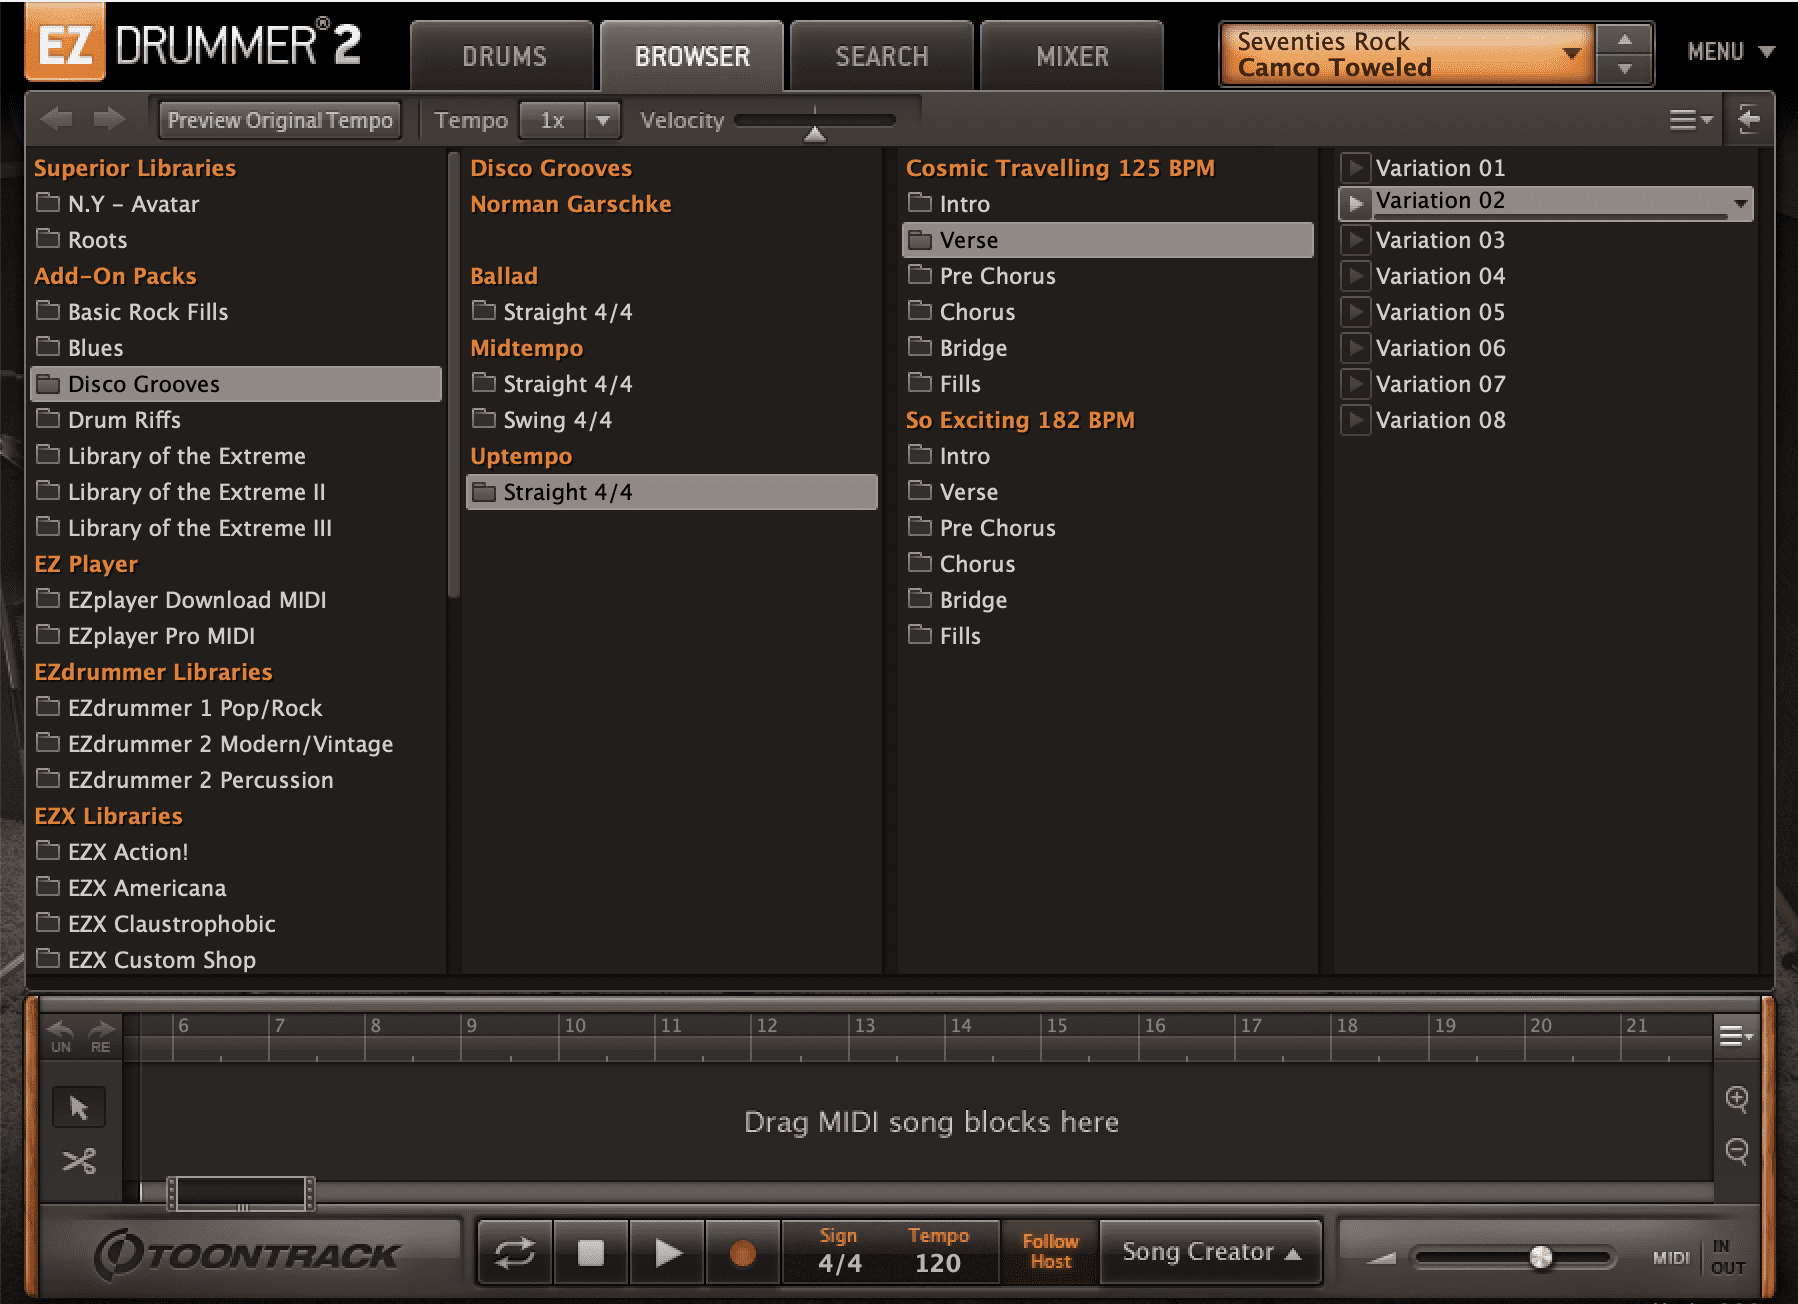
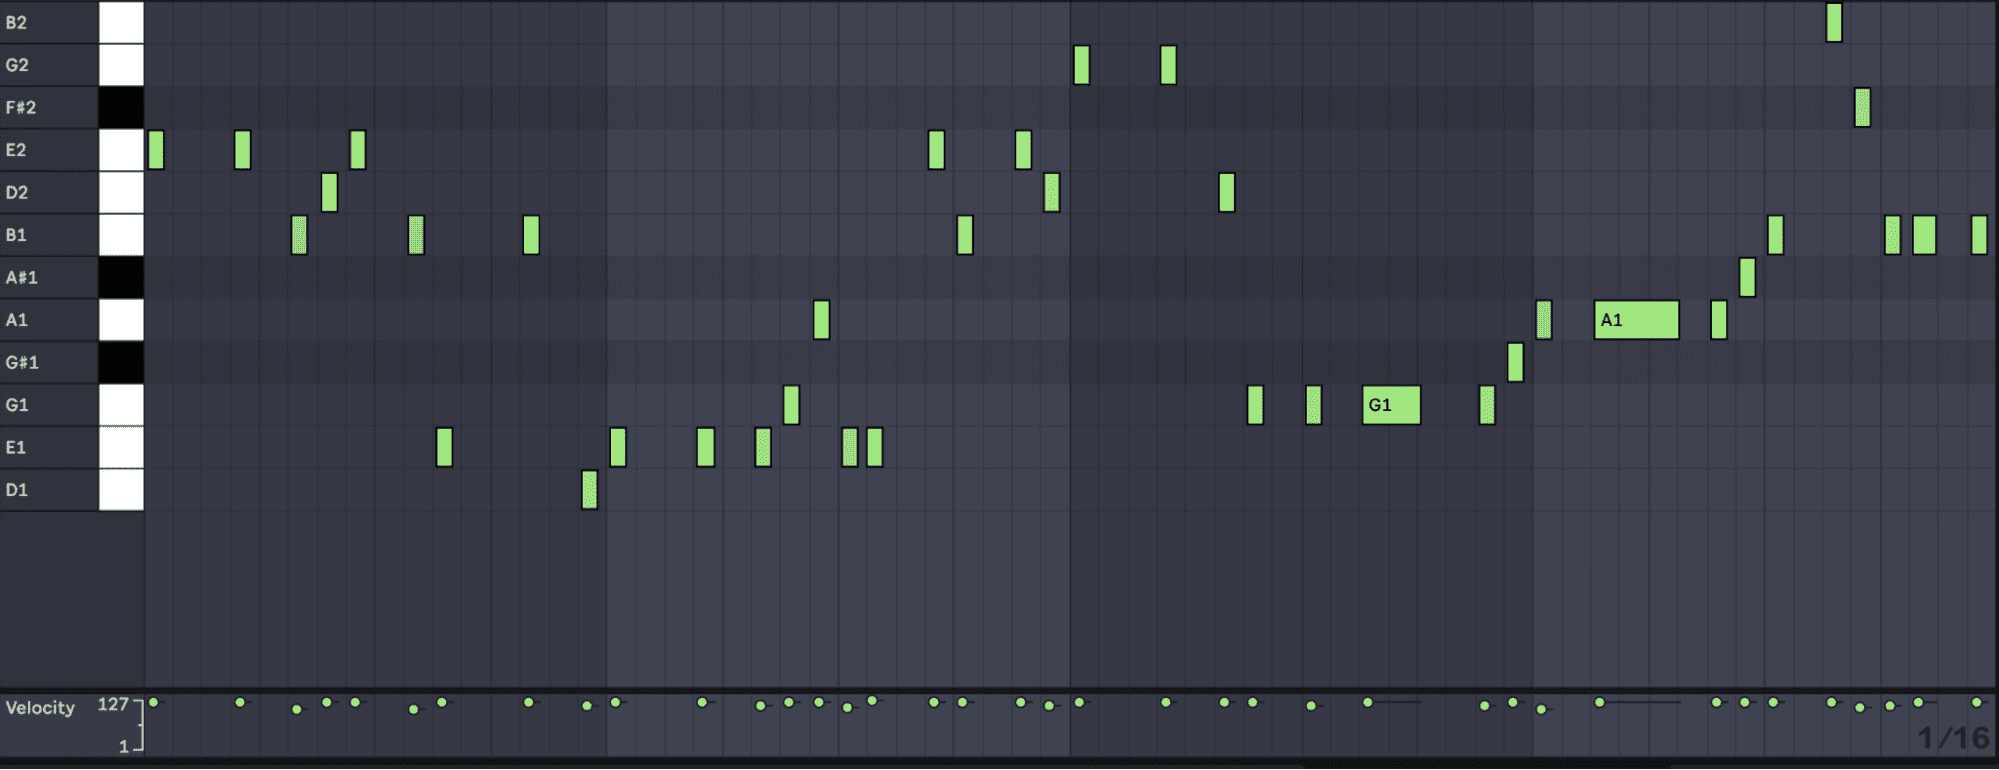
For the drums, I will be using EZDrummer. I’m using Toontrack’s Seventies Rock expansion for the sounds, specifically the “Camco Toweled” kit and some MIDI from the Disco Grooves MIDI pack. I found a loop I like, so I’ll drag that into an empty clip slot. Here’s what it sounds like for starters.
As you can hear, there’s a lot of life in that MIDI. EZDrummer’s includes loops that were recorded in the studio by great session drummers, so their MIDI files do not sound as stiff compared to if you programmed the data yourself.
Step 2: Break drums out to multichannel in Toontrack EZ Drummer 2
EZDrummer also allows you to break out individual mixer channels to their own stereo audio track in your DAW. This is critical if you want to shape your tone beyond the handful of macros that Toontrack provides.
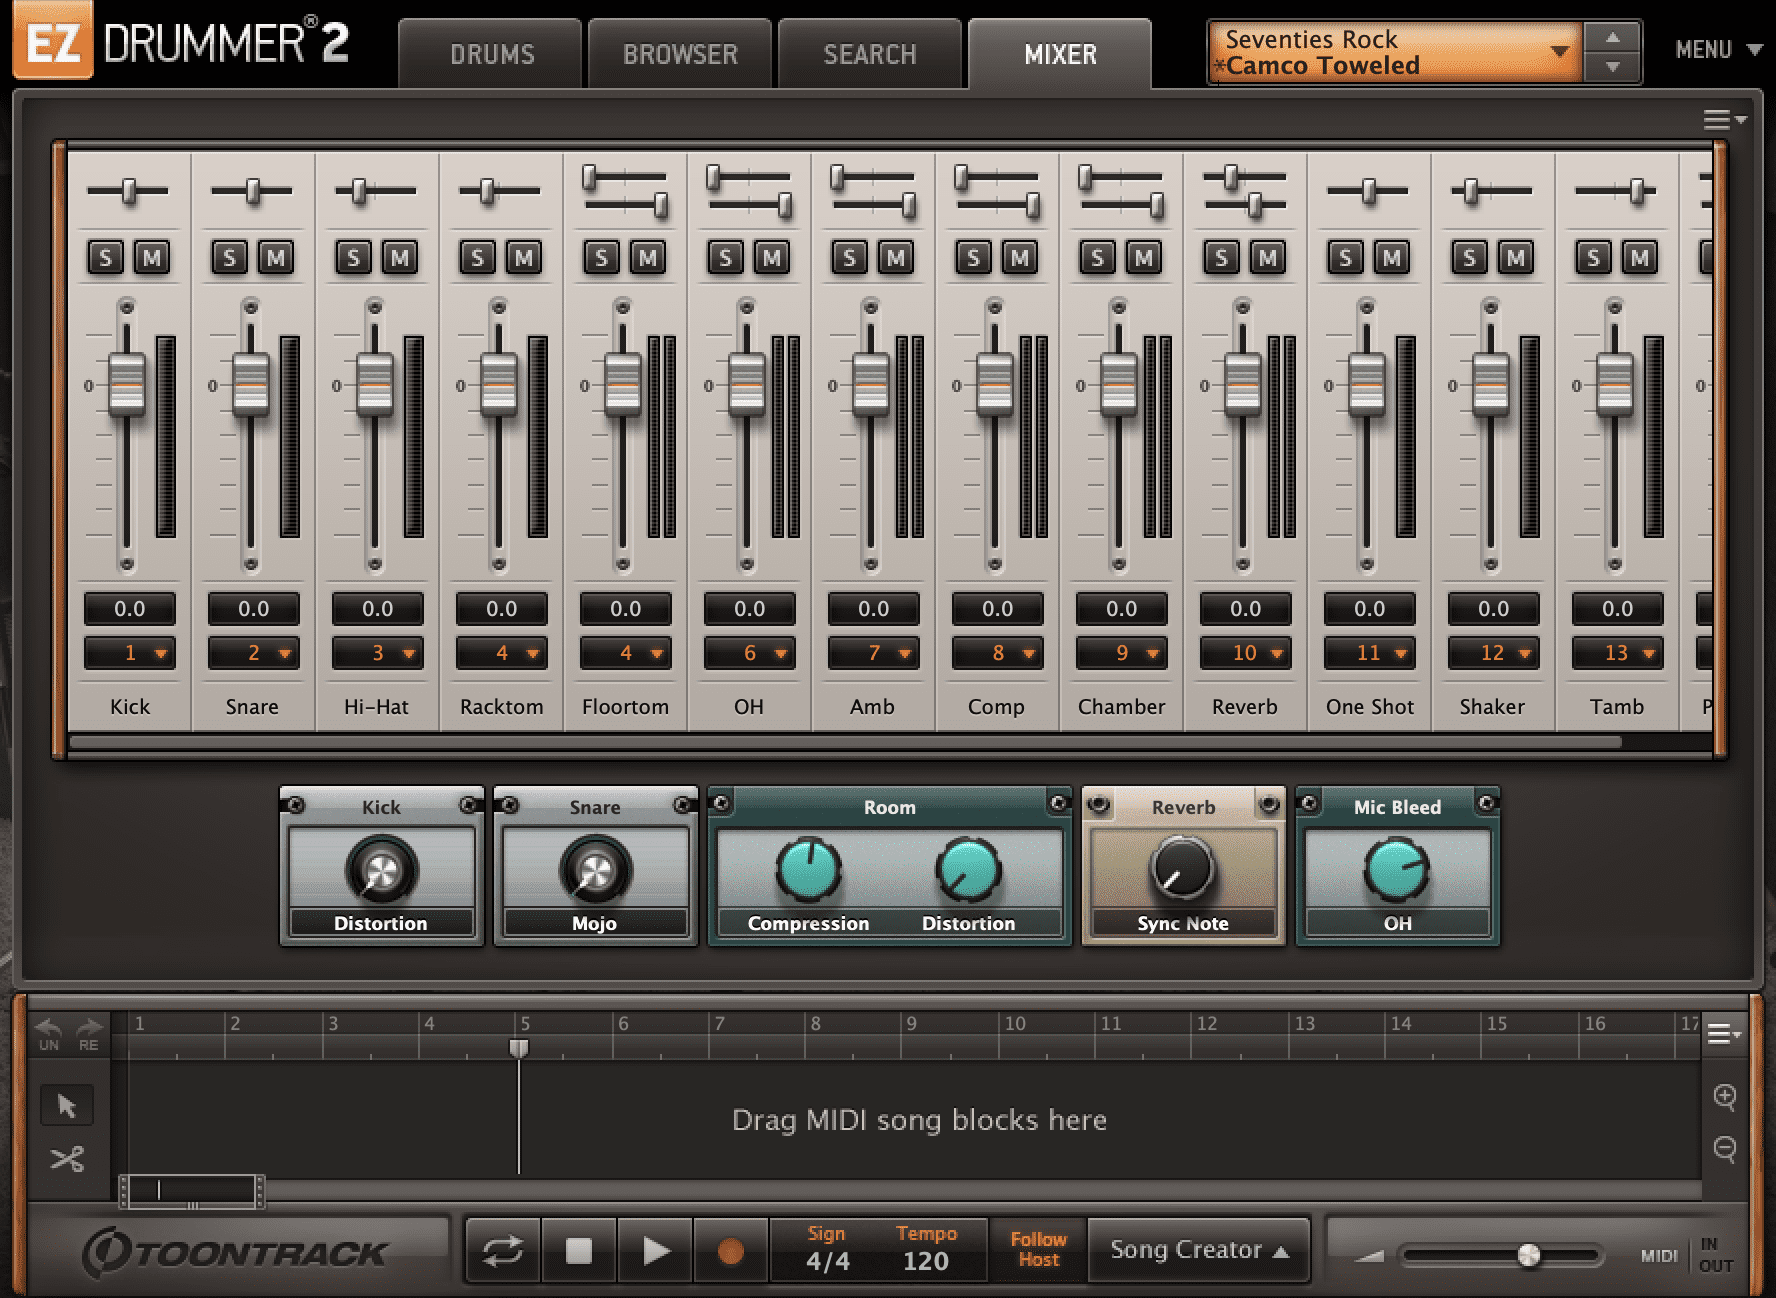
To do so, click on the mixer tab in the plugin. Then notice above each channel name there’s a small orange number 1 in a dropdown menu. That indicates which output channel/bus you’re sending that part of the kit to. By default, everything goes to output 1 so you can hear the whole kit on one instrument track in your DAW. But, you can click on it and change the assignment. Assign each channel to its own output as pictured.
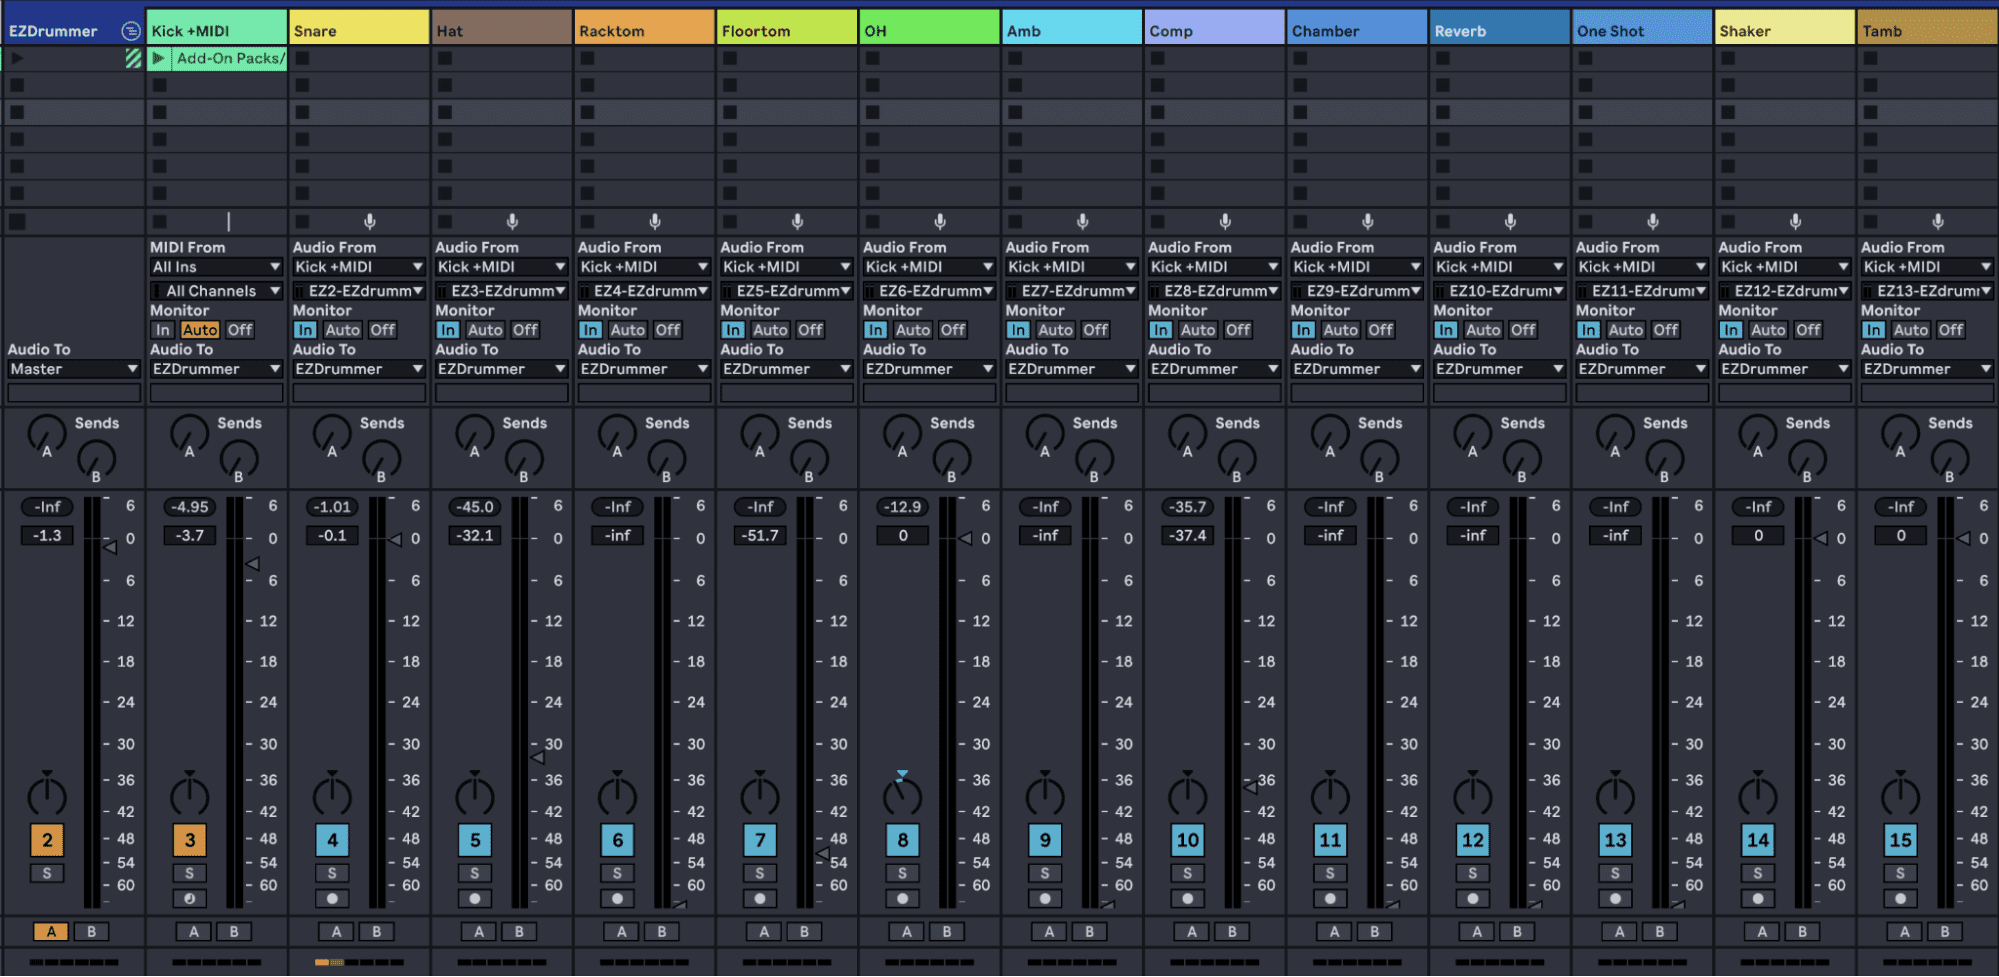
Then, create a new track in your DAW for each channel, and set the audio input for each track to EZDrummer and the corresponding channel number. Make sure the channel is set to monitor incoming audio. It will look a little like this in Ableton Live:
Finally, notice that I set the mixer in EZDrummer up so that every channel is at zero, also known as unity gain. This allows for plenty of signal to work with and I can make all the volume, pan, and processing changes in my DAW rather than the plugin.
Right off the bat, it will sound terrible. At this point I recommend pulling every fader down all the way, then building the mix from the ground up, starting with the kick, snare, and overheads. Notice my fader positions in the Ableton session. I’ve pulled out almost any reverb or room-type mics and only brought the overheads in judiciously so I can maintain a tight, punchy tone.
Make sure to group the channels too, so you can easily organise your session and process the whole bus if you like.
Step 3: Process the kick
You’ll hear that the kick is a bit unruly:
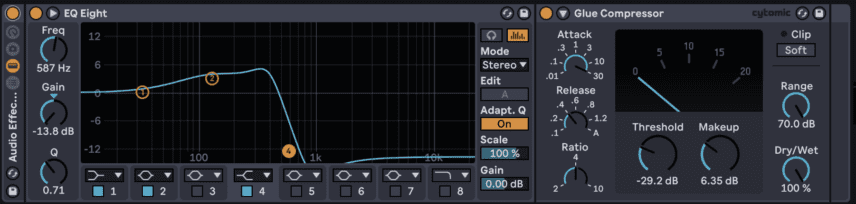
I want a tight, dry sound, as you’d hear on a Chic record. I’ve put an instance of EZMix 2 on the track to tame it. EZMix 2 is a Swiss army knife processor that can do any combination of dynamics, EQ, reverb, and more.
Just like the other “EZ” products Toontrack offers, EZMix 2 is largely preset-driven and offers a few custom macro controls for each preset. I’m going to use the stock “Kick2” preset, which offers gating, EQ, and compression that you can’t mess up. I’ll turn the gate up a bit and you’ll hear an obvious difference.

Step 4: Process the snare
Here’s the snare sound as it is out of the box. It’s serviceable but needs some serious love if it’s going to have that disco vibe.
I’m going to gate the snare to cut down on bleed, use another factory preset in EZMix to bring some life to it, then give a seriously aggressive boost to 100 Hz, the frequency that makes snares fat.
Step 5: Drum Bus processing
If you haven’t already, make sure you’re sending all the drum channels to one bus so you can do some bus processing. In Ableton, that’s as easy as selecting them all and hitting Command+G to group them.
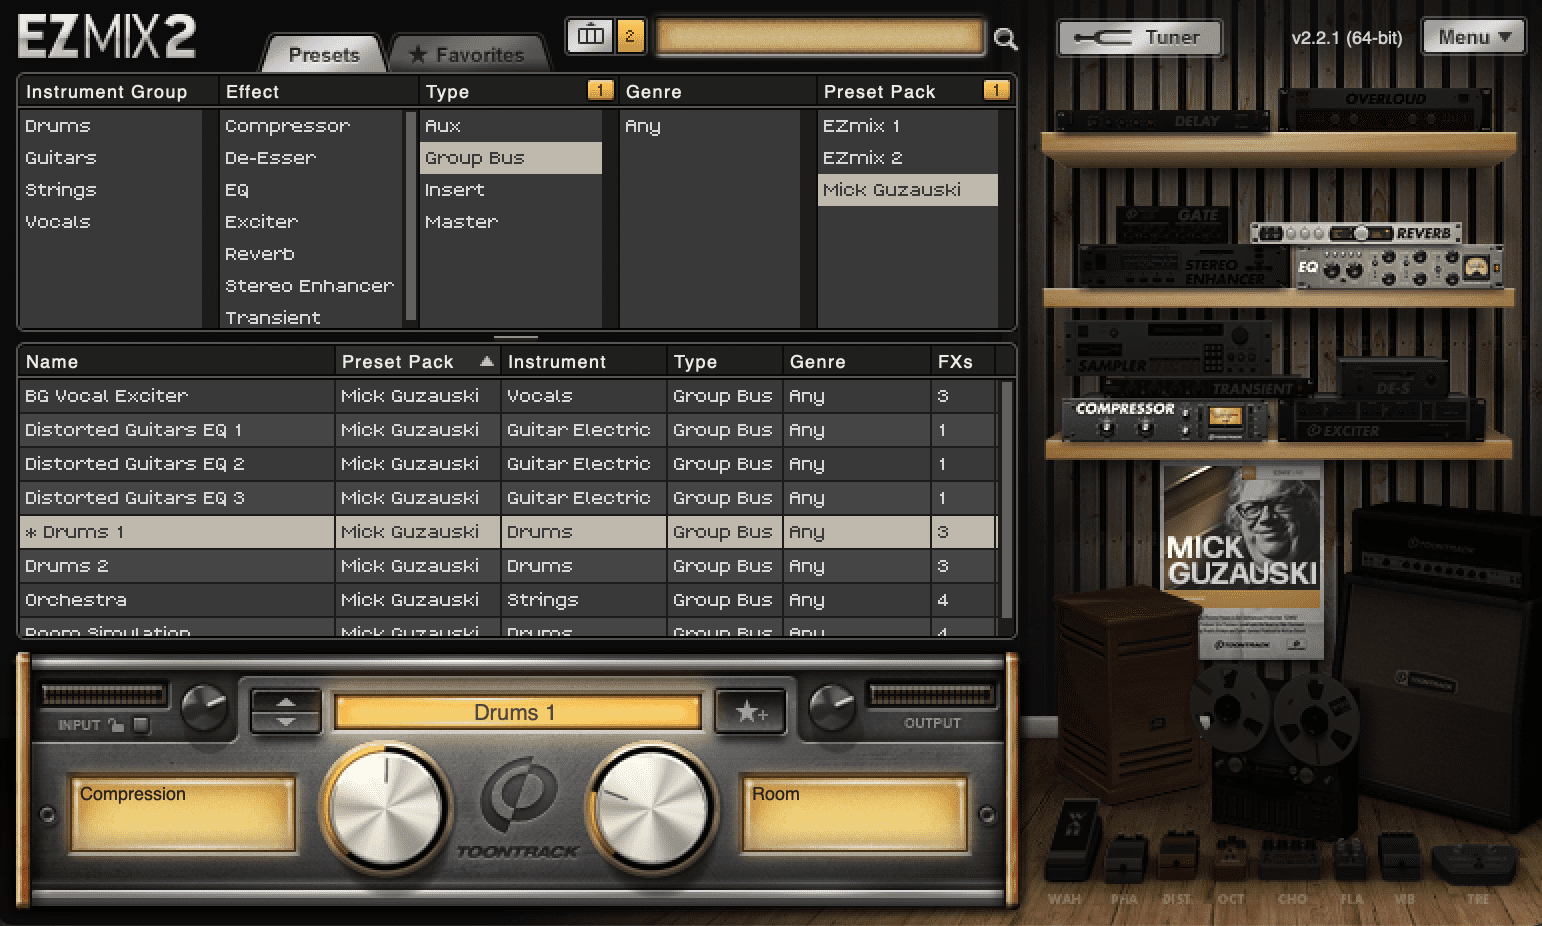
I’m going to add another instance of EZMix 2 to the drum bus. Grab the Drums 1 preset from the Mick Guzauski settings pack (Random Access Memories, anyone?) and bring the compression to about 50 percent. Now that we’ve processed the kick, snare, and the drum bus, let’s see what we’ve got:
Step 6: Programming the bass
Moving on to bass. The punchy fingerstyle tone of Chic’s Bernard Edwards is what I’m targeting. I’ll pull up an instance of EZBass and choose the EZBass Vintage “Clean DI” preset.
Rather than use one of the built-in MIDI loops, I’ll program my own. I want to emulate the vibe of Le Freak by Chic, which has a great, fast-moving, syncopated bass-line with very brief and percussive notes. Here’s what the MIDI looks and sounds like right out of the gate.
Notice that I pushed the notes off the grid so that they’re a few milliseconds late. I wanted the bass to sit back in the pocket a bit for an extra vibe. I also moved a few notes here and there by a few milliseconds and added minor variations in the velocity at certain points to humanise it a bit, but not so much that it sounds inconsistent.
Step 7: Bass tone shaping
To get that punchy disco vibe, I enhanced the low mids, pulled out the highs, and compressed aggressively with Ableton Live’s stock plugins.
Let’s hear it in context with the drums:
Step 8: Keys
I could have easily gotten the sound I needed from Ableton’s stock instruments or any other virtual piano out there, but EZKeys’ MIDI loops came in really handy. See, after writing the bass-line, I found a funky guitar riff on Splice (from the Nu Disco House 2 library) that worked perfectly with the key, vibe and practically everything else.
I couldn’t really transpose it much without losing too much sound quality. EZKeys really shines here. More than just a virtual instrument, EZKeys has a fantastic MIDI arranger section that allows you to take a MIDI loop from its library that’s close to what you want, but further allows you to slice it up, change the chord structure, and make it fit your track perfectly without diving into deep MIDI editing. You can just click on chunks of your MIDI after putting it into EZKeys’ built-in arranger and select a chord from a handy menu that pops up:
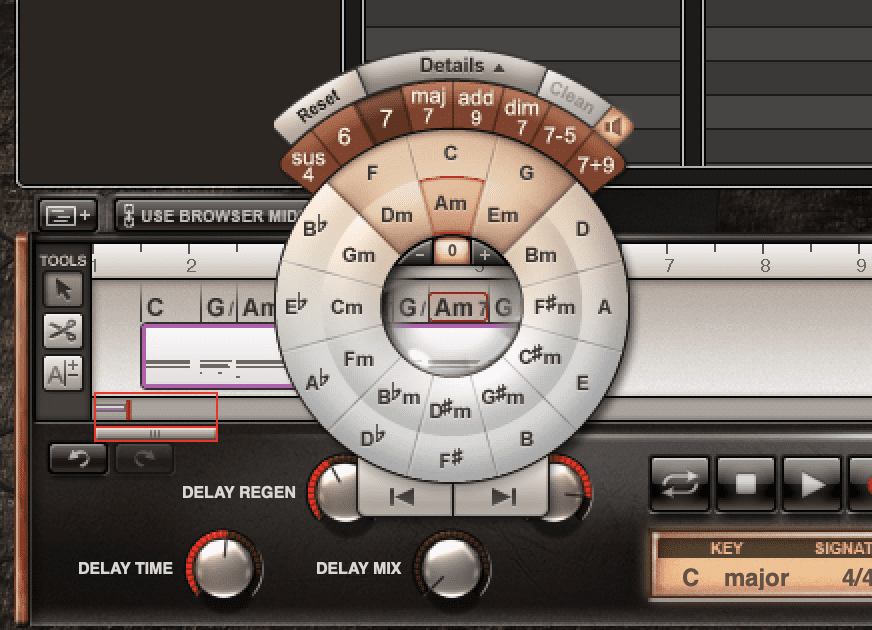
This allowed me to chop up the stock MIDI loop that had tons of feel and color to it and make it fit my very specific chord progression. Here’s the loop solo’d, using EZKeys’ Electric MK I “Soft Ballad” preset:

The keys sit pretty far back in the mix, so you definitely miss them when they’re gone, but hardly notice them when they’re there.
Step 9 : Master Bus processing and finishing touches
I added some claps on the four of each measure for a little extra sauce, using Palmas, a Max For Live ensemble from SufiPlugins. This is a very easy way to get great organic claps into a track. Then, after dropping in a few string hits from the “Disco Strings” library on Splice, I wanted to add some finishing polish.
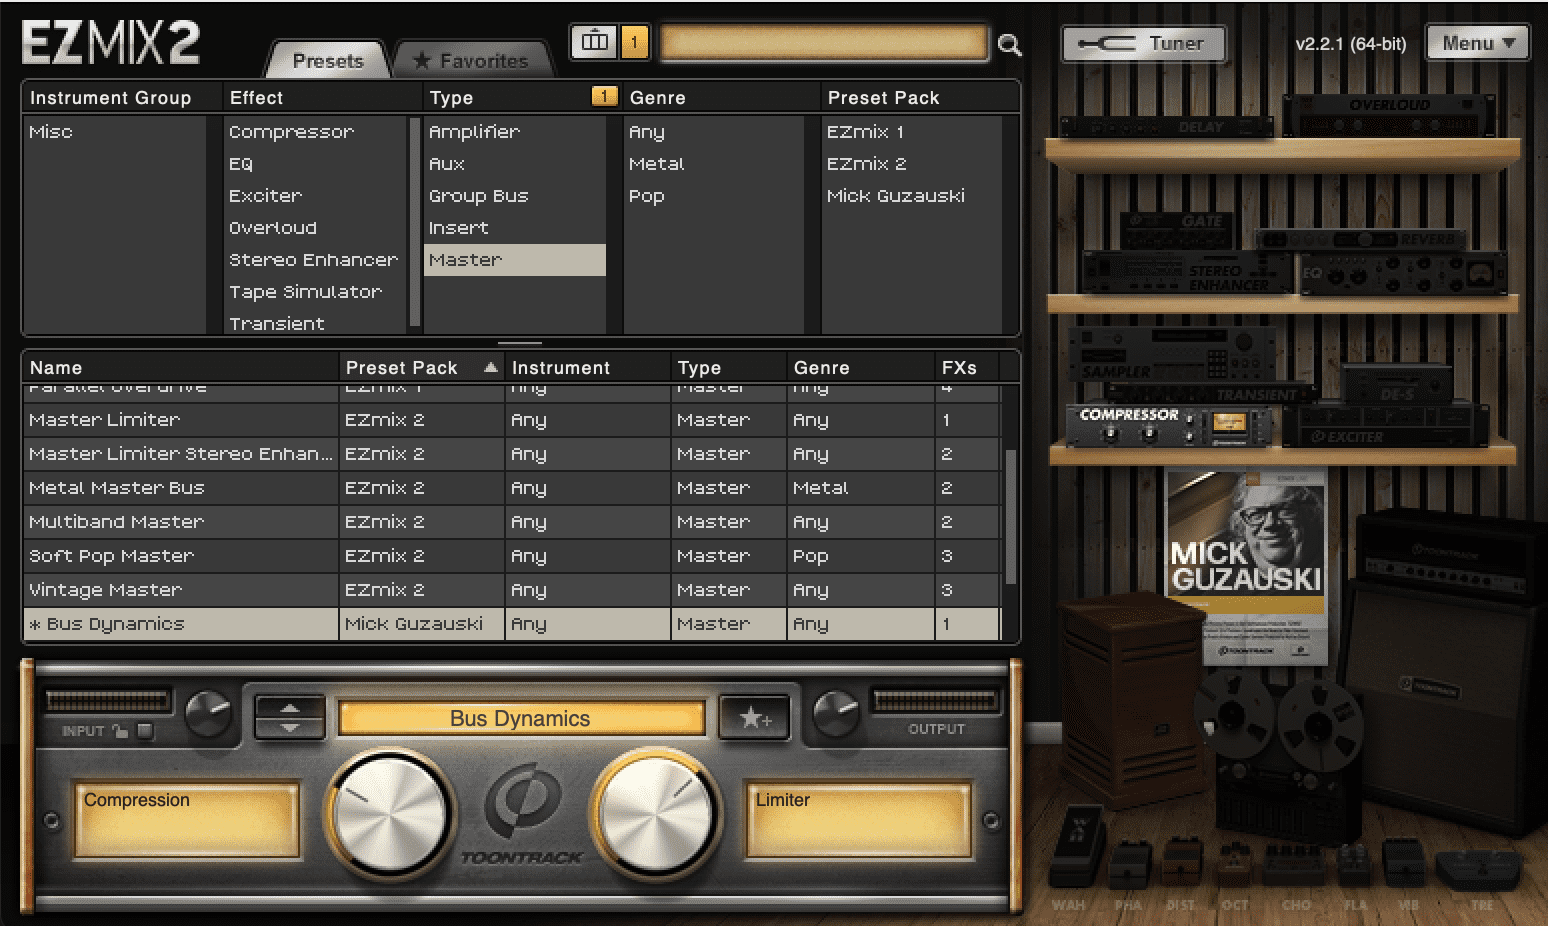
I dropped one more instance of EZmix 2 onto the master bus, selected the Mick Guzauski “Bus Dynamics” preset and gave it a good push with the compressor and limiter.
That brings us to our final product. Listen below once more for reference.
Now we’re halfway to some house music!
*Attack Magazine is supported by its audience. When you purchase through links on our site, we may earn an affiliate commission. Learn more.