
There are a tonne of sequencers out there. How does the new CATALYST stack up with the rest?
CATALYST is a new sequencer designed by Toneworks. It’s the company’s first offering in the plugin market.
You will need a sequencer if you’re serious about making electronic music. They are in the genre’s DNA and suitable for drums and melodies.
On the face of it, CATALYST looks relatively simple. But looks can be deceptive as some excellent workflows can get you sequencing your dreams quickly.
What features does Catalyst have?
Before we get started, let’s get familiar with the instrument first.
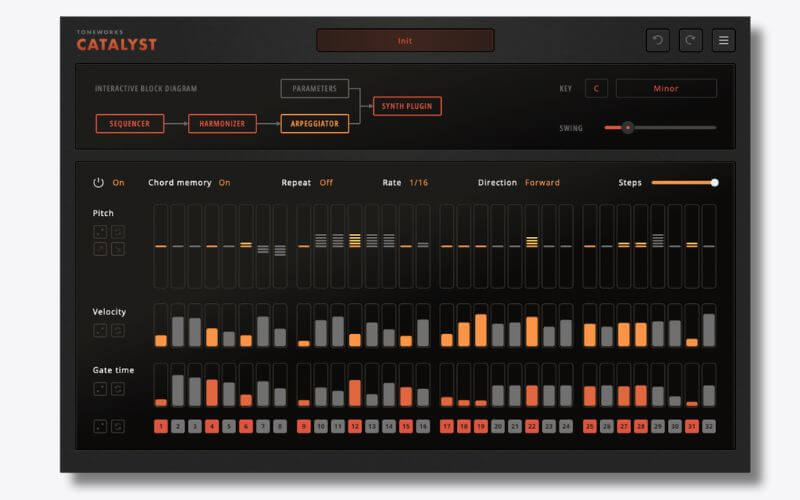
There are four main modules within CATALYST. We will run through them in the order they appear on the interface:
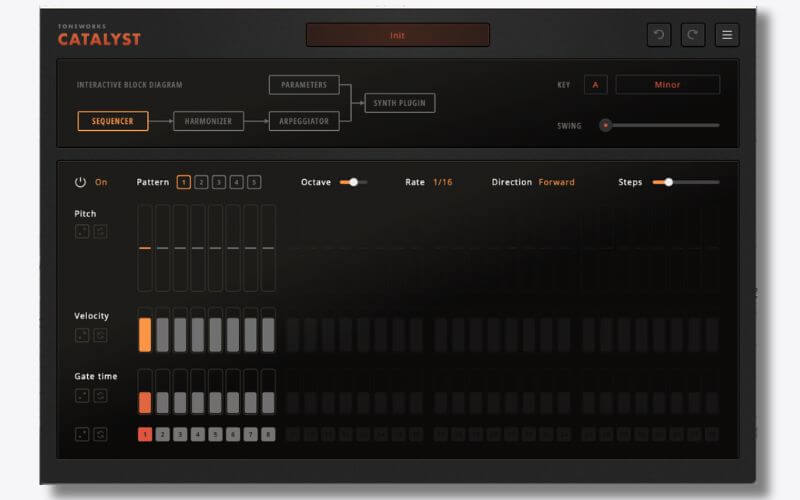
Sequencer
A monophonic 32-step squencer. You can select key and scale – hooray, no wrong notes! The steps have individual pitch, velocity and gate times.
You can also join notes together to give you glide between your notes. The sequence patterns (up to five) can be triggered from a MIDI controller.
Harmoniser
Working along the row of modules, the step sequencer feeds into THE HARMONIZER. You can use it to create full chords from single notes.
It will only play the seven fundamental chords in the selected key. You can add 6th, 7th and 9th notes to each chord.
There’s also the option to change the inversion, which is helpful for progressions or transitions. If you’re not quite Jacob Collier, you can draw upon the voicing presets and then use a slider to adjust how many notes feature in each chord.
Arpeggiator
Next up, you’ll find an easy-to-use arpeggiator. If you’re channelling your inner Debussy, this is where you can develop your single-note patterns into lush chords.
The arpeggiator works similarly to the sequence as you can control pitch, velocity and gate time controls. Adding notes above or below the incoming chord can also create more extended patterns. Rising and falling patterns are also possible thanks to a set of dedicated editing functions.
Configuration
Each module can be played together, toggled on or off, and used individually. Whichever module is active first in the chain will play first and is highlighted yellow.
CATALYST also features dedicated parameter sequencers, which can be used to apply automation to their controls. Additionally, the sequencer, harmoniser and arpeggiator sections can send MIDI back to the DAW, so taking advantage of the plug-in’s features without directly hosting an instrument is possible.
Step 1: Getting Started
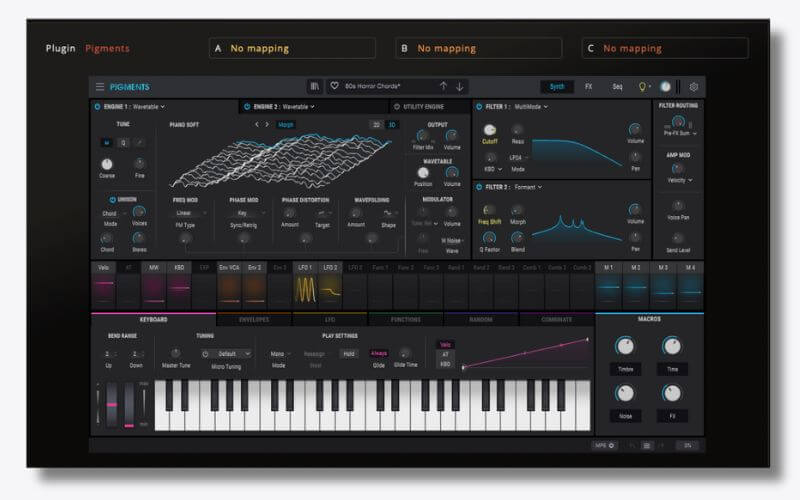
When you load up CATALYST, it loads the SEQUENCER window. But before you do anything you need a sound source. If you’ve used similar plugins like Chord Prism or Chordjam you’ll be familiar with routing the MIDI to your host.
But CATALYST, however, scans your plugin drive, and you can load your sounds directly into the interface. No routing is required. Just click SYNTH PLUGINS and choose your instrument. We are using Pigments, and the preset is 80’s Horror Chords. You can use any sound you want; this is not a synthesis tutorial.
Now hit a note. You should have sound. Or hit play, and the sequence will begin.
Remember to click any image to enlarge!
Step 2: The Sequencer
The sequencer is the first module and a good place to start. We want to make a chord stab progression incorporating a house and techno feel.
Here’s how it sounds with THE SEQUENCER:
What did we change?
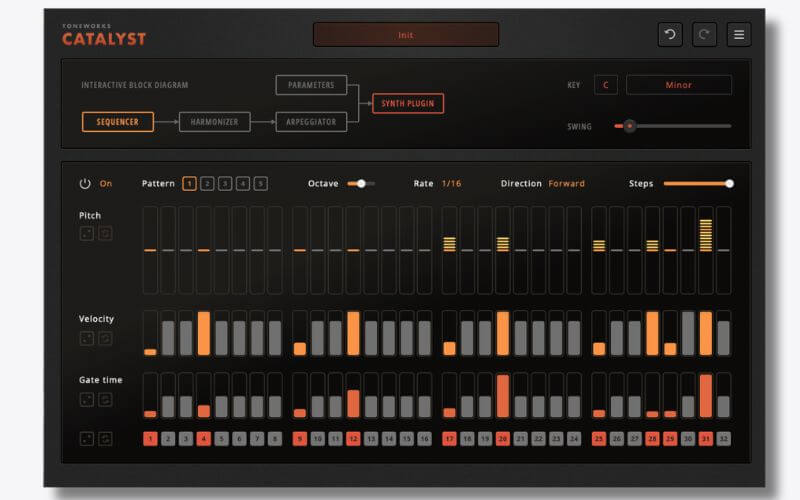
We began with the key. After toggling through a few choices, in the top right on the interface, we settled on C Minor. It felt right, but Toneworks provides several options across minor and major scales.
On launch, your sequencer is eight steps. So head over to the Steps slider on the far right and drag it as far as possible. We want a 32-step sequence.
Next, program your part. In our sequence, we have kept the C Minor on the first bar and in the second bar, we’ve jumped up to G, with one C followed by F, up the octave, played on the upbeat. It sounds “classic” straight off the bat.
Simply drag the bars in the step you’re working with to affect the pitch. You have the option to go up or down and as Toneworks is intelligently designed, you won’t play a wrong note. So have fun with it.
We have kept the Direction on Forward. You have options here such as Ping Pong and Reverse; if you hover over them, there is an explainer at the bottom taskbar. Very helpful. Forward, for this works just right, however.
The next step is affecting the Velocity and Gate Time. This is so helpful for making your sequence sound more human, adding groove and feel. Notice that where we programmed the notes, we have reduced the Velocity and Gate time simultaneously. It makes the second chords in the repeated stab sequence more punchy. Gate time can be really effective with ghost notes when programming drums.
The last two things in the SEQUENCER section are we have kept the Octave on zero. Doing this now’s a good idea as it affects how the HARMONIZER works later. A good workflow tip when you get to the HARMONIZER is to go back and forth with the Octave in the SEQUENCER until you find the best register.
It wouldn’t be house music if it didn’t have some swing. The built-in swing slider, top right, is straightforward. We applied a setting of 12. Not too much but enough to get the head bobbing. Remember that Swing is a global setting so it will affect your other modules too.
💡 Top Tip: If you want to copy your sequence to a new pattern or duplicate your steps, highlight the part and right-click for copy and paste controls.
STEP 3: THE HARMONIZER
It’s worth saying that you don’t have to follow the modules one at a time. In fact, you might prefer to jump around – there’s no right way to do this. But for our tutorial, we’re working along the line and showing you the changes we’re making.
Here’s how it sounds with THE HARMONIZER:
What did we change?
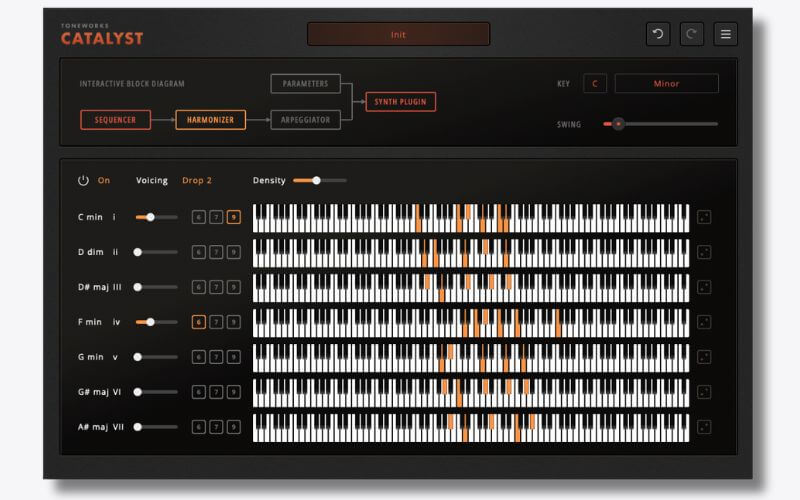
THE HARMONIZER is where you can elevate your chords. The first thing we worked on is Density which adds notes to the chord. You can go up to 7, and we have settled on 3. For big chord stabs, we want them broad and to cover as much of their space in the mix as possible, mainly in the mid-range frequencies.
Next to Density, you have Voicing. With Voicing, you are affecting every chord in your chord scale. “Closed” is the default chord voicing (i.e. the “textbook” way to play the chord). This voicing works well with arpeggios, but not so much if you want to play the chords.
“Drop 2” means that the second note in the chord will be dropped down an octave (the other “Drop” voicings work the same way). Pianists commonly use the voicings and generally produce better-sounding (more coherent) chord progressions.
Underneath is where you can really get your Kerri Chandler going. Here you can choose inversions and whether to add 6, 7 or 9th notes. Or in layman’s speak – some flavour!
For our first chord, we have set it to Inversion one, which takes the chord’s root note and places it above the other notes. We have also added in a 9th note. In the key of C Minor, that is the note D.
We repeated the same thing for the F Min, our IV chord, except adding a 6th note. The F Minor plays on the upbeat of our sequence, and we want to highlight it. Now that it’s further up the register, it stands out a bit too much, so we toggled back to THE SEQUENCER and reduced the velocity to halfway.
💡 Top Tip: Toneworks is designed as a creative tool. Each module and each lane has a Dice (randomisation) on the far left. Use it as a song starter.
STEP 4: THE ARPEGGIATOR
An arpeggiator is a common synthesizer feature. It plays an arpeggio when a chord is played. In our example, we are in C Minor, so it will play the C, Eb, G and high C. But arpeggios can be much more than that; you can change the notes, the order they are played, the speed, and much more.
Here’s how it sounds with THE ARPEGGIATOR:
What did we change?
The first thing we did was add some glide. We dialled in about 146ms in Pigments and most synths will have a glide feature. We wanted a smoother transition between the notes.
The ARPREGGIATOR has a similar layout to the SEQUENCER. You should find getting started simple.
We are not looking for lush arpeggios like you might find in a synth wave song. What we wanted to add is more notes between our stabs. Stabs wouldn’t typically use an arpeggiator but used subtle, which sounds good.
On the second bar, you’ll notice we added three steps with rising velocity and decreasing Gate time. Across our 32-bar arpeggiator, we also added small Pitch increases, for example in step 7. You can always pitch down too, but we stay going up the scale for our purposes.
Pay special attention to the Gate Time and velocity like we suggest when using THE SEQUENCER. We also kept Direction on Forward. We want it to work seamlessly with our sequencer. You should be able to hear the pitch jumping up with the glide effect working.
💡 Top Tip: Setting Gate Time to max will “TIE” to the next note giving you legato. Look out for the “TIE” appearing underneath the note.
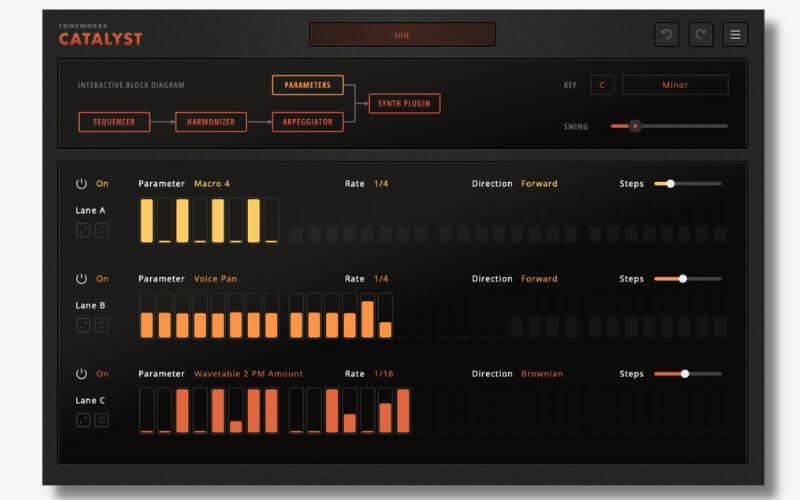
STEP 5: THE PARAMETERS
The PARAMETERS module is impressive. Toneworks scans your plugins, allowing you to open them within the interface. This means you can automate any parameter without configuring it first. Super helpful and great for saving time – a powerful modulation matrix. Think of it like automation on steroids.
Here’s how it sounds with The Parameters:
What did we change?
You have three lanes to choose from. Lane A, B and C. You can independently change the targets in each lane and the Direction and Rate.
In Lane A, we selected Macro 4 as our target. The workflow is the same as SEQUENCER and ARPEGGIATOR: You can choose up to 32 steps and draw in the pattern and values you want. We have kept the Direction on Forward.
In Lane B, we did something slightly different. Rather than stick to a divisional rhythmic setting, for example, 8, 16, 24, and 32 steps, we have set Lane B’s sequence to 14 steps. The target is the Voice Pan (one of the two layers in our sound source Pigments), with a pan left and right for the last two steps.
As the sequence is 14 steps, the panning effect does not happen “on cue,” and it helps to keep things interesting. This is far easier than drawing it by hand in the piano roll! We have held the Direction on Forward.
In Lane C, we changed things again. This time we are using the Brownian Direciton. This is a lot of fun. It means your pattern will start randomly, moving a single step left or right at every increment. If you don’t want your music to sound too obvious, these features will help. The target is the Wavetable 2 PM Amount, and it gives us a little sizzle bouncing around under the mix.
STEP 6: EXTRA LAYERS
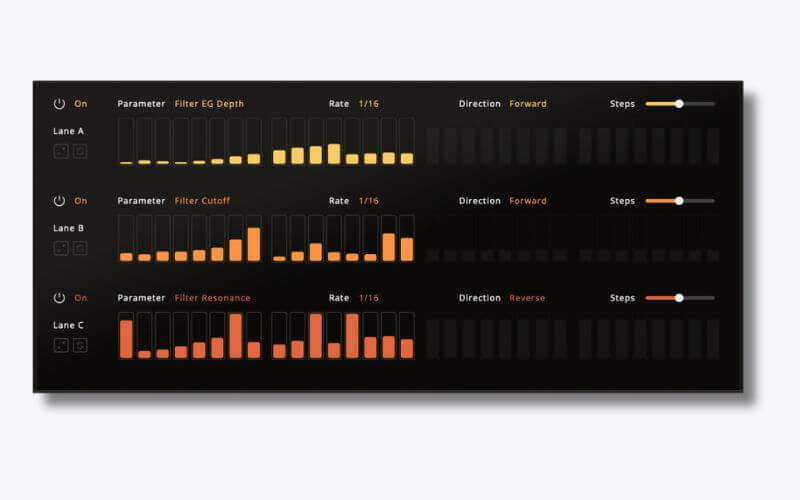
To round things off, we added a counter melody. We wanted to add a squelchy lead to thread through the track. Using all the above, we very quickly loaded up Baby Audio BA-1, and with some very quick amends to the randomisation, and some PARAMATERS, we could get a sequencer very quickly to sit nicely in the groove. We also added a bassline in Live, not with CATALYST, just for fun.
Here’s our final sound:
FINAL THOUGHTS AND TIPS
If you want to take your sequencing to the next level, here are some ideas to build upon:
- You can program up to 5 patterns in your sequencer. Consider having the first 32-step pattern in one key and then modulating pattern two into another. For example, A Minor going to D Minor. Using your MIDI keyboard, you can trigger when the patterns change or draw it in the piano roll.
- Once you are happy with your part, duplicate it and tweak the second part. It could be, for example, that the second part is in a different octave, or playing in polyrhythms (change the step sequence length). Why not slap Halftime or an Effect Rack on it and see how it goes?
- Export your sequences into your session and chop them up! Then add your slices into a sampler and trigger them in different ways.
CATALYST is one of the least intimidating step sequencers we’ve used. At 79 Euros (49 Euros on sale currently), it’s a bargain.
It’s super low on CPU, and with its built-in modulation matrix, you won’t be disappointed.
Have fun!
Follow Attack Magazine