u-he are makers of award-winning software synthesisers and effects including Diva, Repro-1, Zebra2, Hive, Bazille, Presswerk and Satin.
Visit U-he
Technique » Synth Secrets »
Techy Stabs in NI Massive
This channel is sponsored by

Synth Secrets is a series of programming tutorials in which we show how to make a range of classic and new synth sounds using plugins such as Massive, Sylenth and Predator.
The type of techy stab we’re creating in this walkthrough is hugely versatile, working well in house, techno and tech house tracks. As we’ll demonstrate, once we’ve got the crux of the sound together there’s plenty of automation and processing techniques we can apply to keep interest and progression with the sound.
Here’s an audio example of the sound we’ll be making:
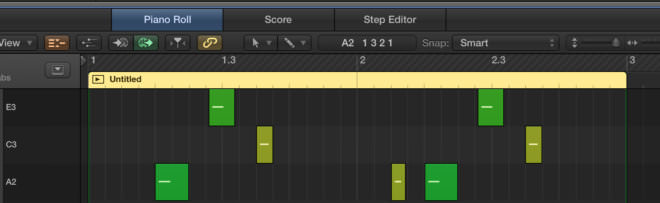
And here’s a screengrab of the notes we’ve used to create our hook. We’ve applied quite a big swing to the notes for that rolling techy flavour:
Step 1
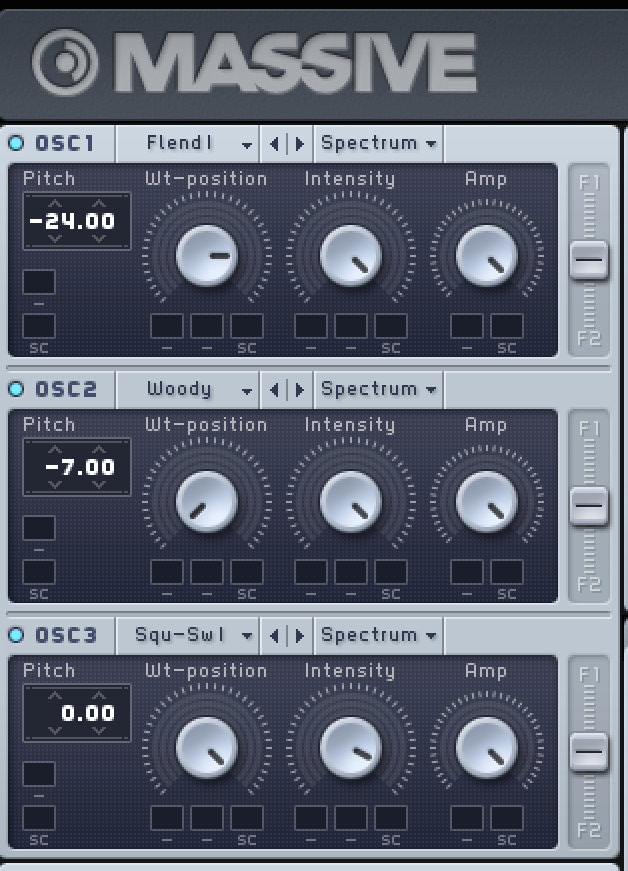
Begin by loading an instance of Massive and select ‘new sound’ from the File drop-down menu. Now, over on Osc1, load the Flenders I wavetable from the Digital/Hybrid section (for an explanation of how Massive’s wavetables work, read our guide here). Take the Pitch control down 2 octaves to -24.00, and push the Wt-position up to around 75%.
On Osc2, load up a Woody wavetable from the Basic section and take the pitch down to -7.00. Experiment with the Wt-position here and dial it to taste; we’ve kept it fully to the left but with the intention of automating this control later.
In the Osc3 section, simply turn the oscillator on and leave everything as it is. This adds a Sawtooth wave to the sound, which helps to fatten up the sound.
Step 2
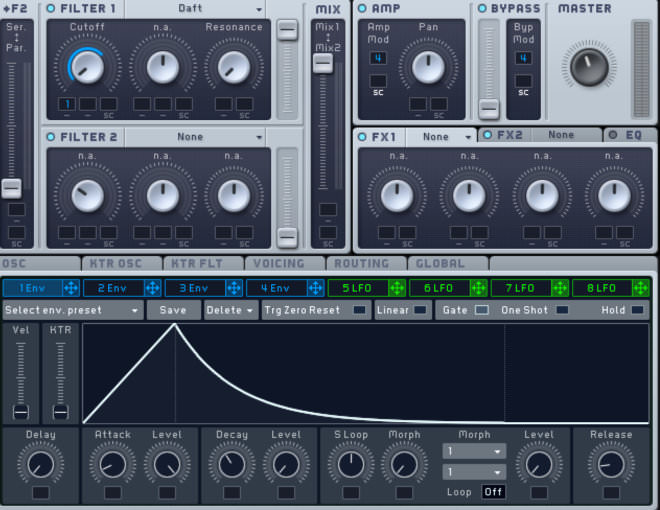
Next, load a Daft Filter in Filter 1. Take the Cutoff and Resonance controls all the way down. We can now use an envelope to modulate the filter cutoff frequency in order to shape the stab. Click and drag the blue crosshair above 1Env in the modulation section, and drop it in the first modulation box found underneath the cutoff frequency control.
A blue 1 will have now appeared on the modulation box. Click and drag up on this to apply the envelope modulation. You will now see a blue band appear round the Cutoff control. Click and drag up so this extends about two thirds of the way round.
Now to tweak the envelope settings. Keep the Attack as it is, bring the Decay up to a little bit before halfway and bring down the Decay Level (Sustain) all the way.
Step 3
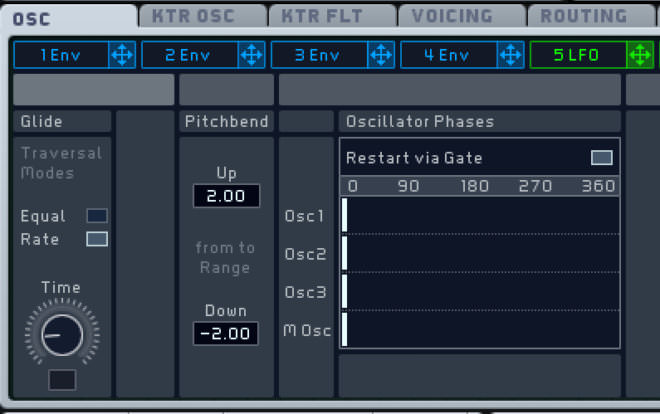
Now on the Voicing tab, check the Monophon box to make the sound monophonic, meaning we can only play one note at a time. You will also hear pitch glide as you play notes. We can set this on the Osc tab. In our case we’ve gone for a setting around quarter of the way up, providing a subtle transition between notes. We’ve also checked the Restart via Gate box for a more consistent sound.

Step 4
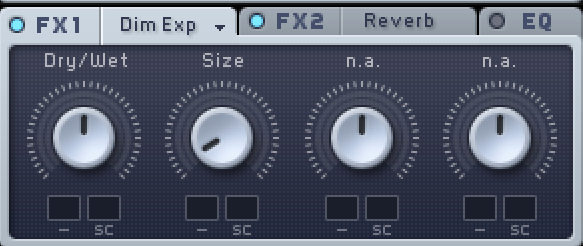
Using Massive’s built-in effects we can bring the sound to life a bit. In the FX1 slot, load a Dimension Expander. Keep the Dry/Wet control around half way and take the Size all the way down to centralise the effect.
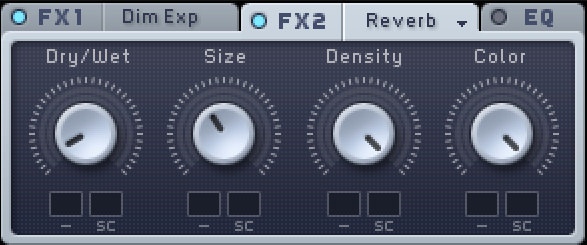
In the FX2 slot, load a Reverb. Bring the Dry/Wet control almost all the way down so the sound isn’t washed in reverb, pull down the Size slightly and push up the Density and Color controls all the way.
Step 5
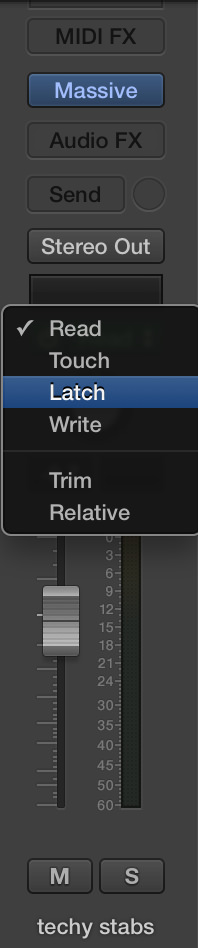
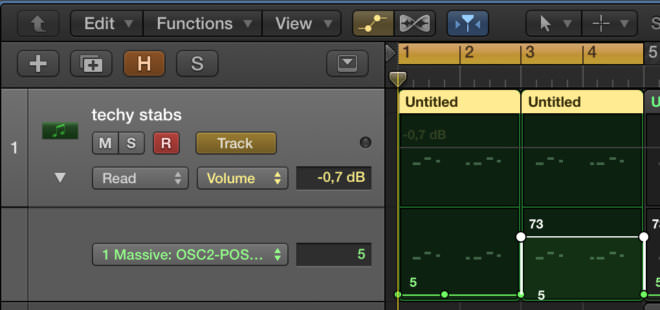
Using Logic’s Latch automation mode we can quickly bring up an automation lane in order to automate any parameter in Massive. On the mixer channel strip, select Latch from the automation drop-down menu found above the Pan control, then play back the sequence and click on any parameter you want to automate. In our case, that’s the Wt-position control of Osc2.
Now press A on your keyboard to show the automation in Logic and click the arrow on the track in the Main (arrange) window to reveal the automation lanes. We’ve taken the Wt-position control up to 73 for the second two bars of the sequence. Make sure you put the channel back into Read mode afterwards, otherwise you’ll accidentally start applying automation to numerous parameters on this channel.
Step 6
We can now add an extra layer to this sound by duplicating the channel in Logic (highlight the channel and press cmd-D), copying the MIDI regions over to this channel and moving the notes up by an octave. This adds a top layer to the synth, which you could bring in and out of the arrangement to add progression.
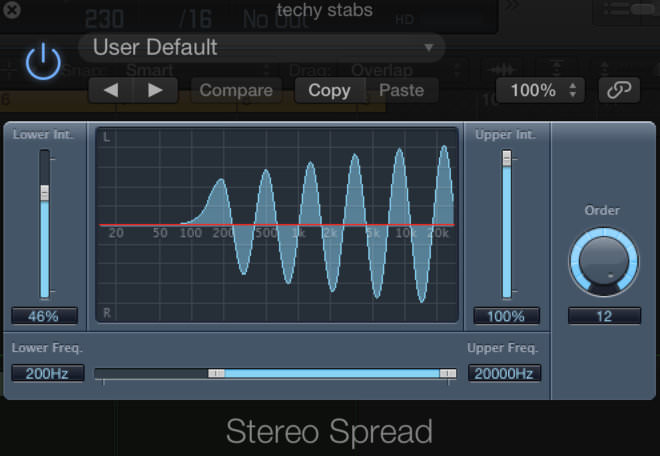
We’ll also apply some processing to this top layer synth, adding Logic’s Stereo Spread to add some width to the sound. Take the Lower Int control down to 46% and take the Lower Freq up to 200 Hz so we’re not applying any stereo imaging to the low end of the synth.
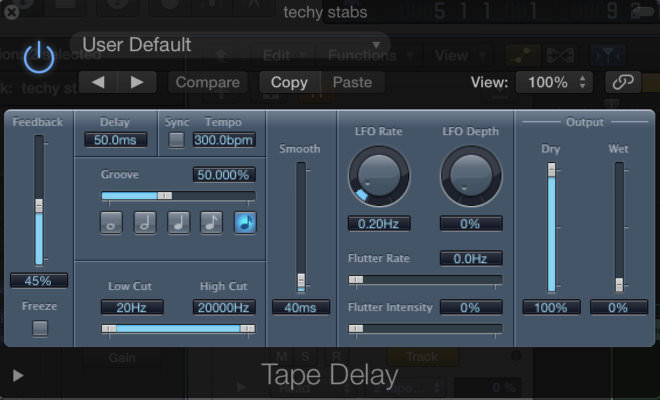
We’ll also add the Tape Delay plugin with the feedback to 45%, Sync off and the delay time set to 50.0ms. We’ll start with the Wet control at 0% and automate this, increasing it to 63% in the second two bars of the sequence, providing an end phrase fill.
Synth Secrets is sponsored by
u-he are makers of award-winning software synthesisers and effects including Diva, Repro-1, Zebra2, Hive, Bazille, Presswerk and Satin.
Download the demos and try them for yourself at www.u-he.com