
In this Synth Secrets, we’re going to be recreating Effy’s high energy rave-focused track ‘Not Yours’ using the recently updated Twin 3 soft synth from FabFilter.
Since her first release back in 2020, rising rave star Effy has been putting out single after single with impressive consistency. In that short space of time, she’s garnered the respect of some heavyweight tastemakers – her discography includes a collaboration with Mall Grab, and her DJ sets have been heard at the likes of Warehouse Project and Printworks.
Last year saw the release of one of her stand-out tracks ‘Not Yours’ on Ladbroke Grove-based label LG105. This warehouse-ready behemoth of a tune garnered mainstream love when it was picked to feature on the soundtrack of FIFA 23.
However, despite its newfound place blaring from the TVs of living rooms up and down the country, Not Yours’ true home is pumping from the sound systems of the world’s gnarliest warehouse clubs.
In this Synth Secrets, we’re going to be recreating the main synth riff that gives this track its driving energy. We’ll be using FabFilter Twin 3 to recreate the sound.
Here’s what we’ll be making today:
And here it is with drums for context:
Want to follow along? Download the session:
Let’s get into it.
Step 1: Programming the MIDI
The first step is to program in our MIDI pattern. As you can see from the below image the bassline is a relatively simple pattern that repeats every bar. We’ve built it out to make a four-bar loop.
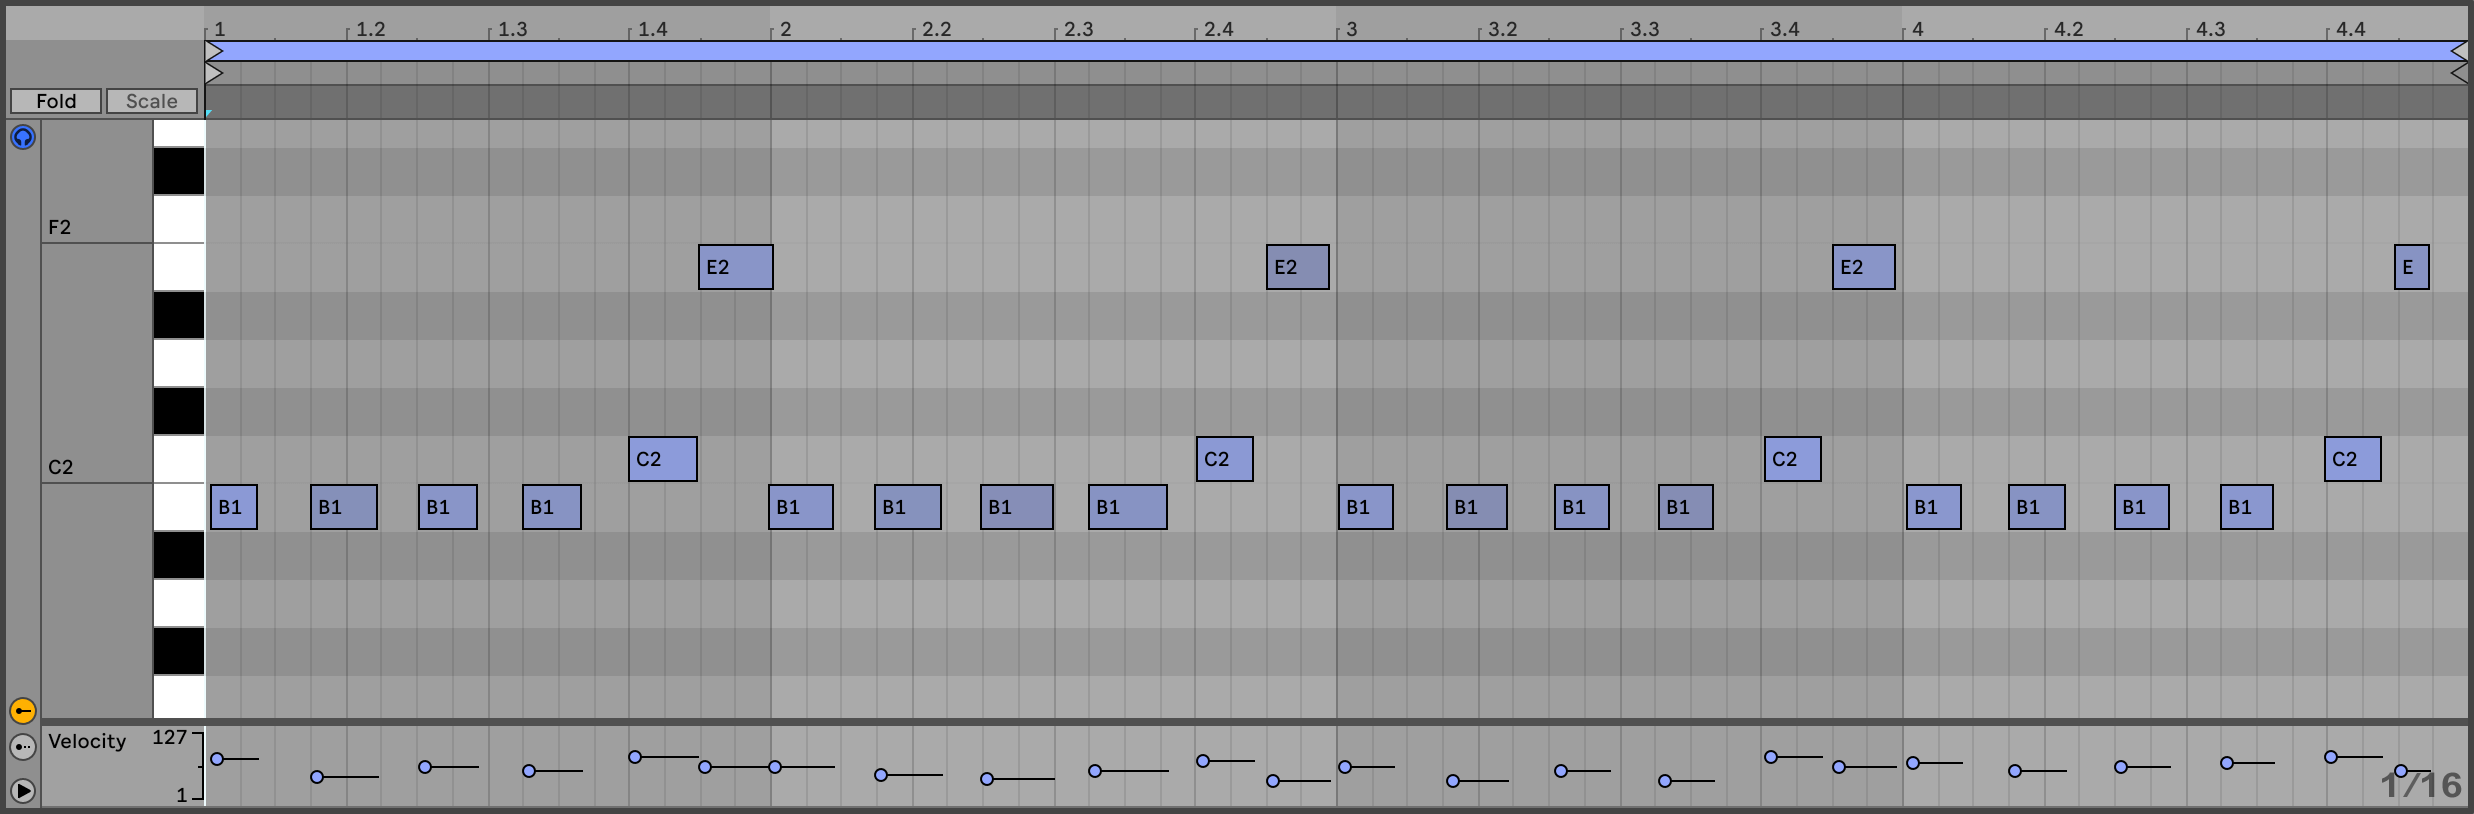
Look closely at the MIDI and you will notice a variation in velocity, note length and timing.
With the MIDI programmed, load up FabFilter Twin 3 on the MIDI track. Select the “Clean” preset so you have a blank slate on which to build the patch.
Step 2: Select Oscillators
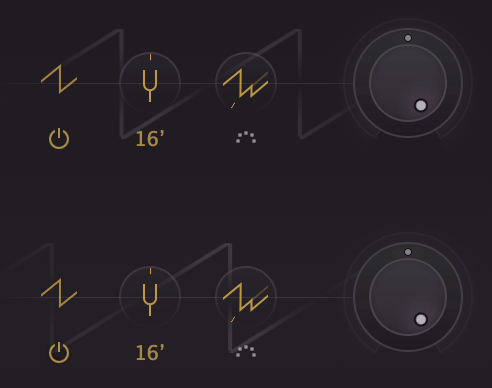
Twin 3 allows up to four oscillators per patch – for this sound we will only need three.
For a soft but slightly harmonic lower-end load a Square wave oscillator. Set the oscillator tuning to “-1 octaves”. This will be represented by the number “32’” under the tuning dial.
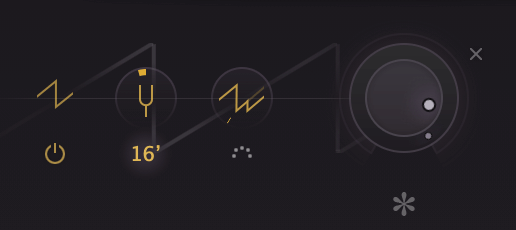
Next, create two identical sawtooth oscillators pitched to 0 octaves. Detune one of the sawtooth oscillators by around 0.1 semitones, and the other down by the same amount. This will cause them to go out of phase creating the feel of a retro, analog synth.
Here’s what that should sound like:
Step 3: Filter programming
Next up, it’s time to dial in our filters.
As the name suggests, FabFilter is renowned for its gorgeous filter models. Twin 3 gives you the power to use up to four of these iconic filters in either parallel, serial or per oscillator configurations.
For our purposes, we’ll be working with the oscillators in a serial configuration.
Set filter one to a low pass filter with a peak of 0.56 and a cutoff frequency of 113.56 Hz. Select the “Hollow” filter type and a slope of 24 dB/oct.
For filter two, choose a “Clean” high pass filter with a slope of 12 dB/oct, a cutoff frequency of 53.6 Hz and a peak of 0.34.
Filter three is a bell filter with a cutoff of 75.5 Hz, a peak of -.855, a wide Q and set to “Hollow” mode.
Finally, set filter four to a “Classic” bell band with a cutoff of 1541 Hz, a peak of -0.23 and a wide Q.
Your filter section should now look like this:

And the pattern should sound like this:
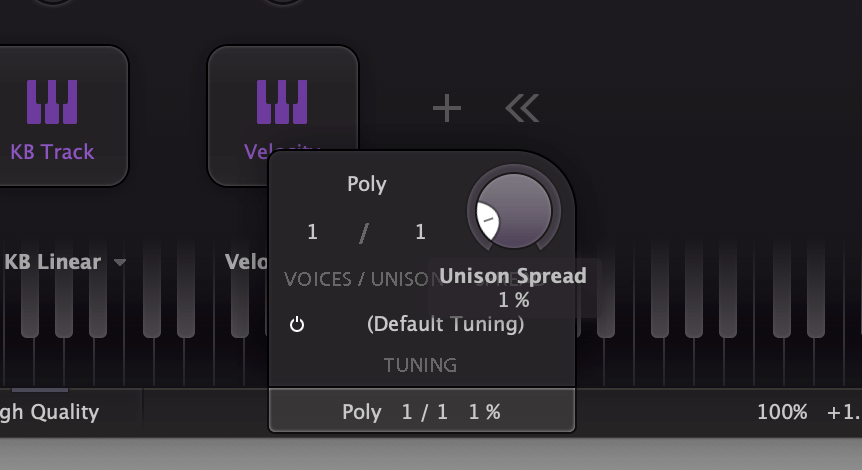
Step 4: Amp Envelope
Only minimal amp envelope adjustments are required for this patch.
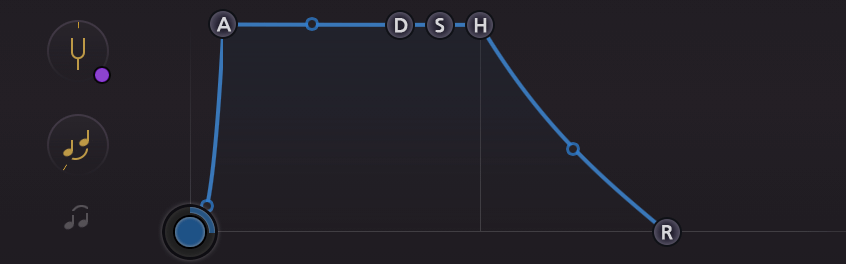
Set the attack to 0.9 ms and the attack slope to -1. Set the release to 426.5ms.
Now that we have a longer release you’ll notice that the notes start to bleed into one another. We don’t want this.
Set the synth to monophonic mode by setting the number of voices to 1 in the Poly section right at the bottom of Twin 3’s UI.
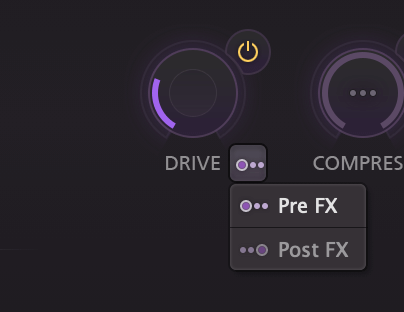
Step 5: FX
Twin 3 has six effect units built in, for this sound we’ll be using the Drive and Compress modules.
Set Drive to around 7% and make sure its routing is set to Pre-FX – AKA before the compressor we’re about to use.
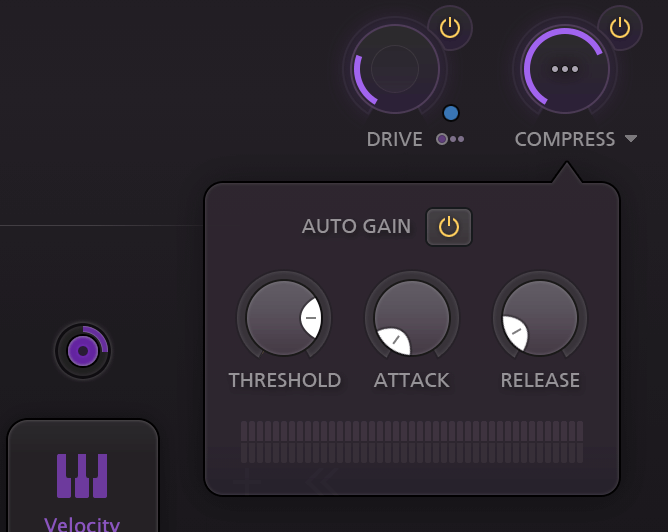
Now set Compress to 52% with Auto Gain activated, a threshold of around -14dB, an instant attack, and a release of around 30ms. This will tame the transients in the final sound.
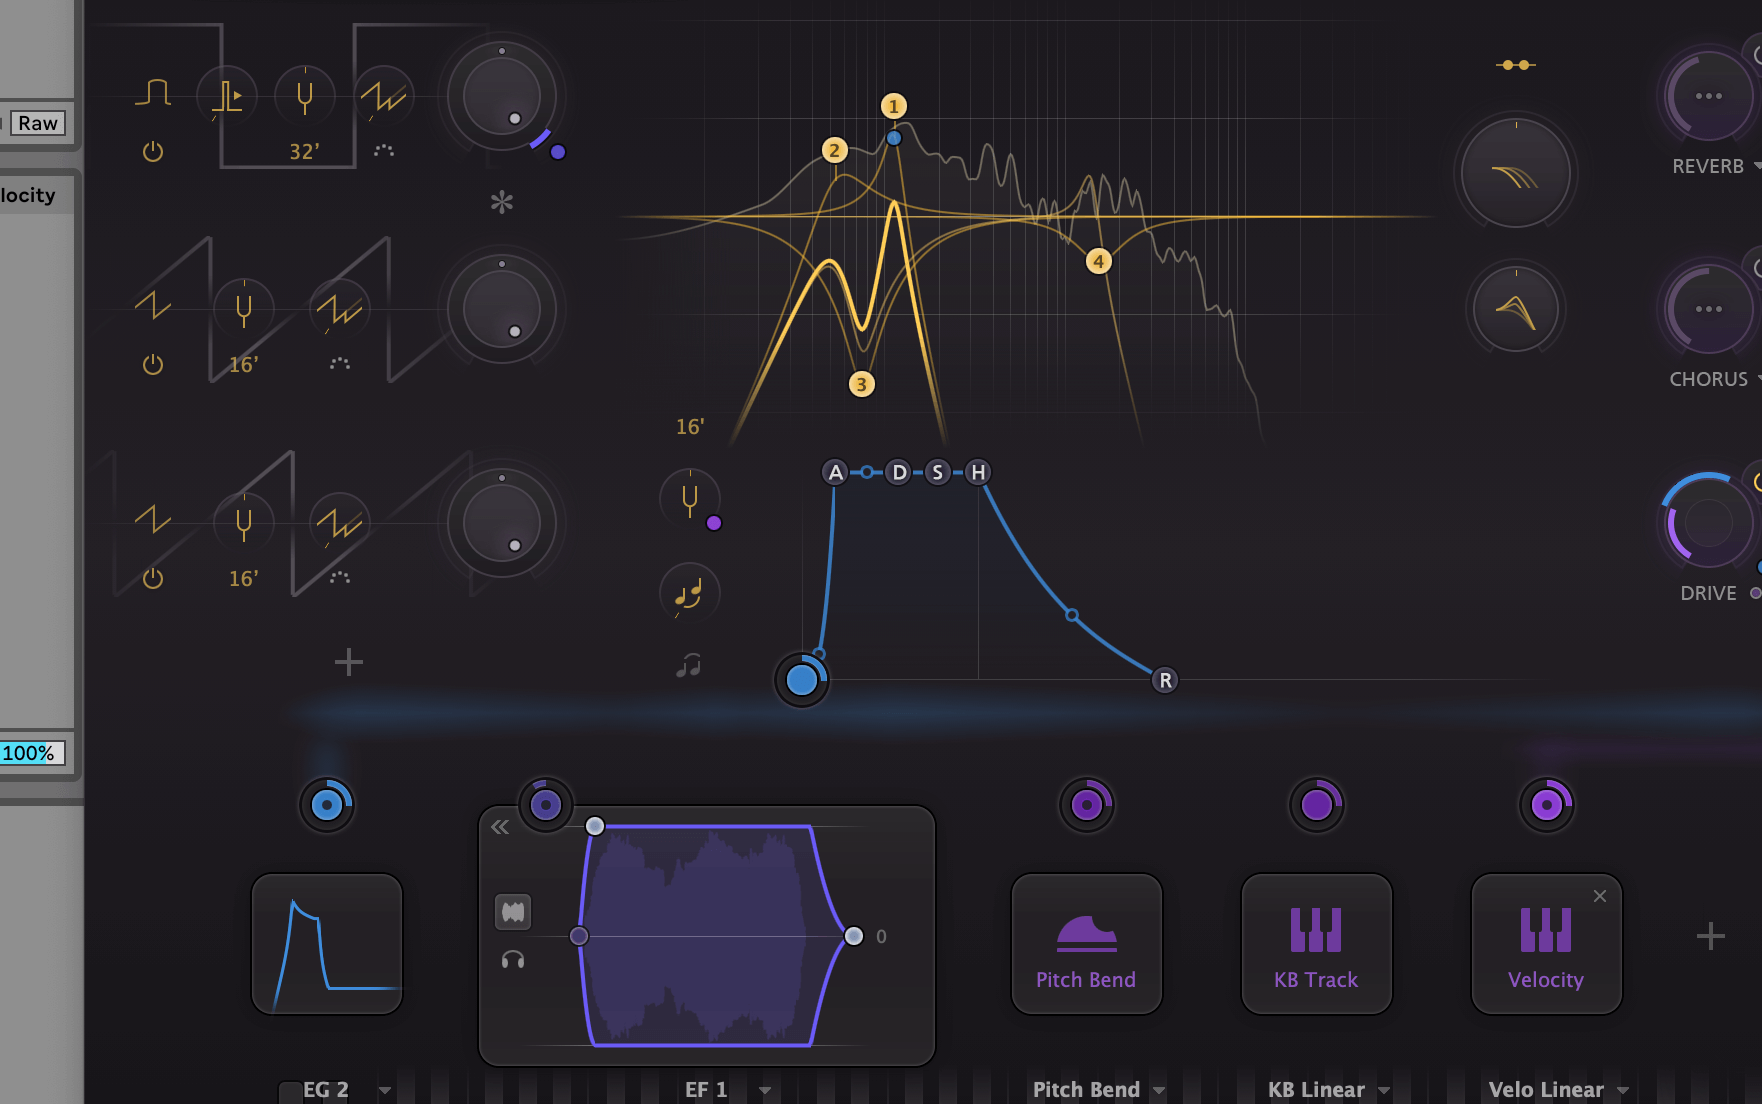
Step 6: Modulation
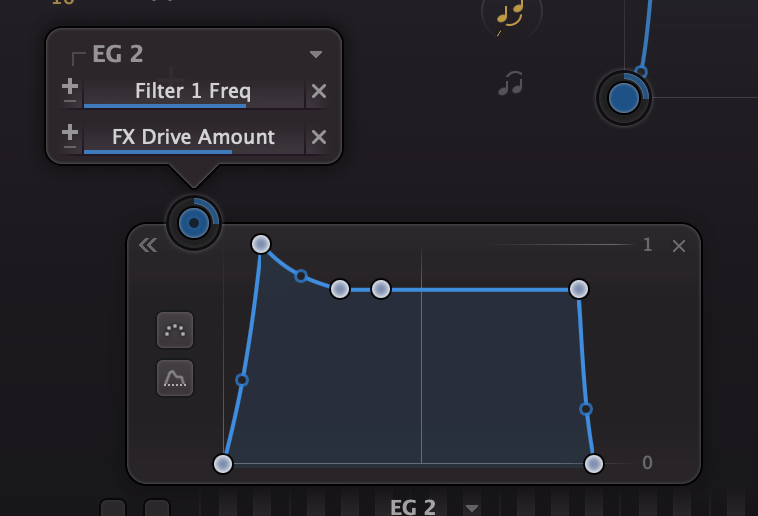
Now for the most important step! Modulation is the source of the movement and flavour in this synth sound.
First up, and most importantly, the low pass filter cutoff has to be modulated using an envelope to open up on every note. To access the modulation section click the “Show Modulation” button in the bottom half of the UI.
Click the + button and choose “New Envelope Generator” from the drop-down menu. Assign the envelope to modulate filter one’s cutoff by clicking and dragging from the blue circle in the top left of the envelope window onto the filter node.

Set the envelope attack to 4.5 ms, the attack slope to -0.3, decay to 250ms, sustain to -2dB, hold to 770ms and release to 1ms. Set the modulation amount so that the filter movement peaks at around 1500Hz.
For extra movement route the same filter to the drive amount so that the drive dial peaks at around 45-50%.
To stop the kick drum in our track from clashing with this bass sound we need to sidechain the sub oscillator in our patch. We can do this within Twin 3 using an envelope follower.
Create a new modulation source and select “New Envelope Follower” from the menu. In the small interface of Twin 3 in the Ableton instrument/effect chain, set the Sidechain source of Twin 3 to your kick channel. This then creates an envelope in Twin 3 that perfectly follows the kick drum in your track.
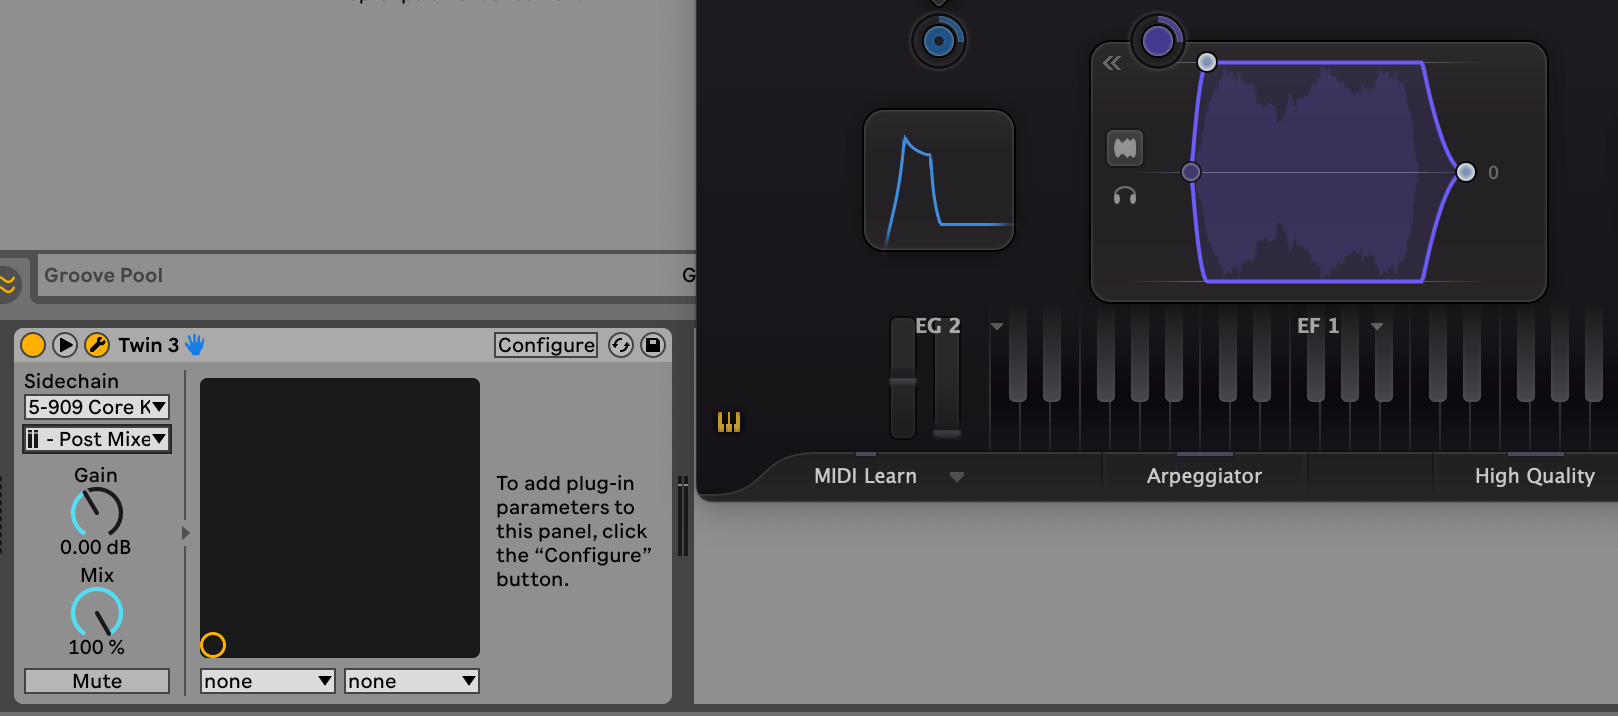
Route the envelope follower to duck the volume of the square wave bass oscillator by a couple of decibels every time the kick hits.
With the modulation applied the synth part is really starting to come alive:
Step 7: External processing
Finally, it’s time to beef up our sound a little with just a touch of external processing. We’ll be using a combination of Ableton stock effects and FabFilter plugins.
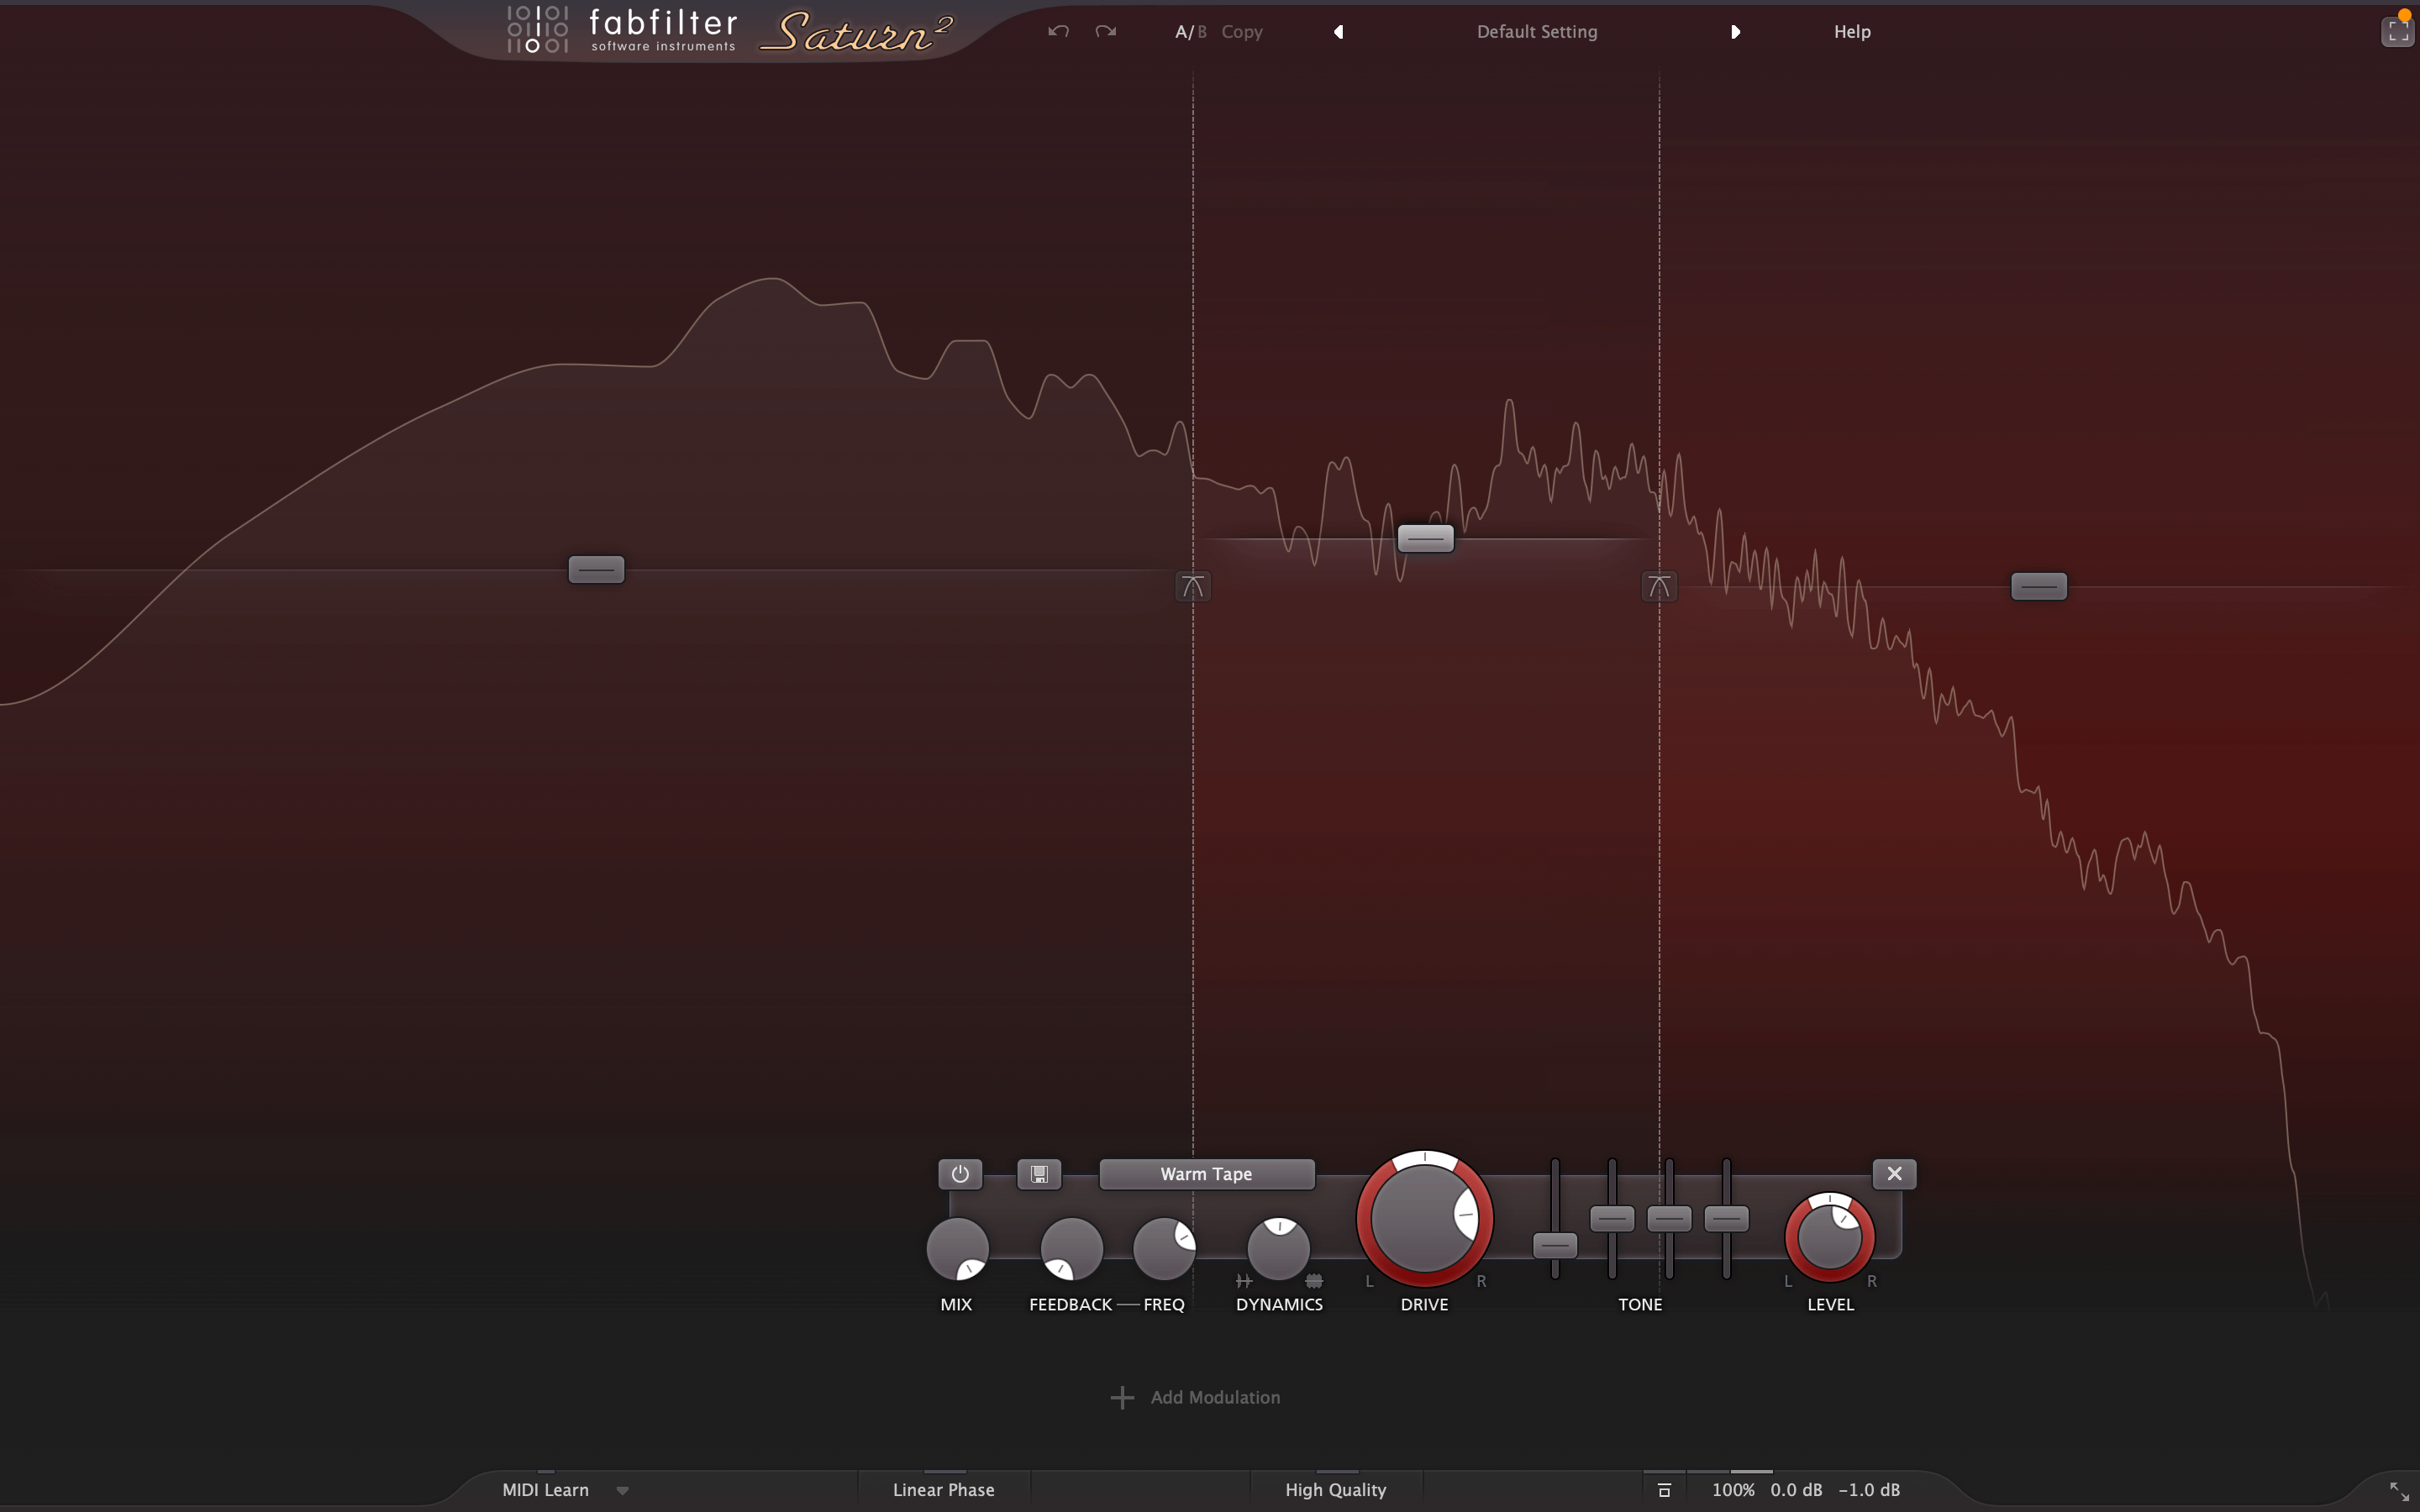
Starting with Saturn 2, create a band from 520Hz to 2400Hz, apply some Warm Tape saturation and boost the band by 3.5dB.
Additionally, add Warm tape saturation to the very top band and max out the drive.
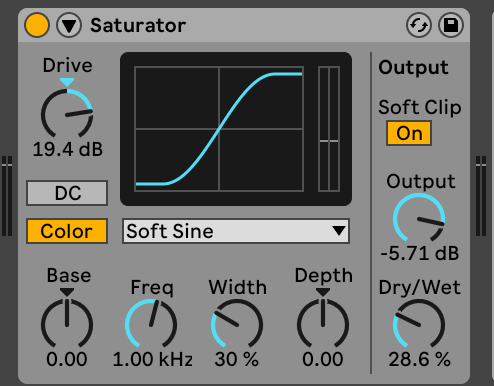
For extra all round saturation load Ableton’s Saturator, apply 19dB of Soft Sine drive and roll off the output and dry/wet mix.
If you don’t have Saturn 2 you can just use Saturator on its own.
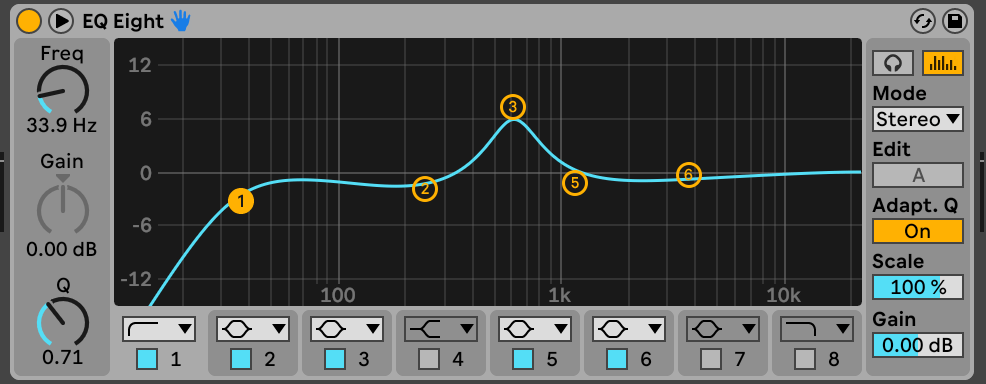
Finally, use EQ 8 – or FabFilter Pro Q 3 – to boost around 610Hz by 8dB. Set a high pass filter at 30Hz.
Here’s the final synth part on its own:
And here it is with drums for context: