u-he are makers of award-winning software synthesisers and effects including Diva, Repro-1, Zebra2, Hive, Bazille, Presswerk and Satin.
Visit U-he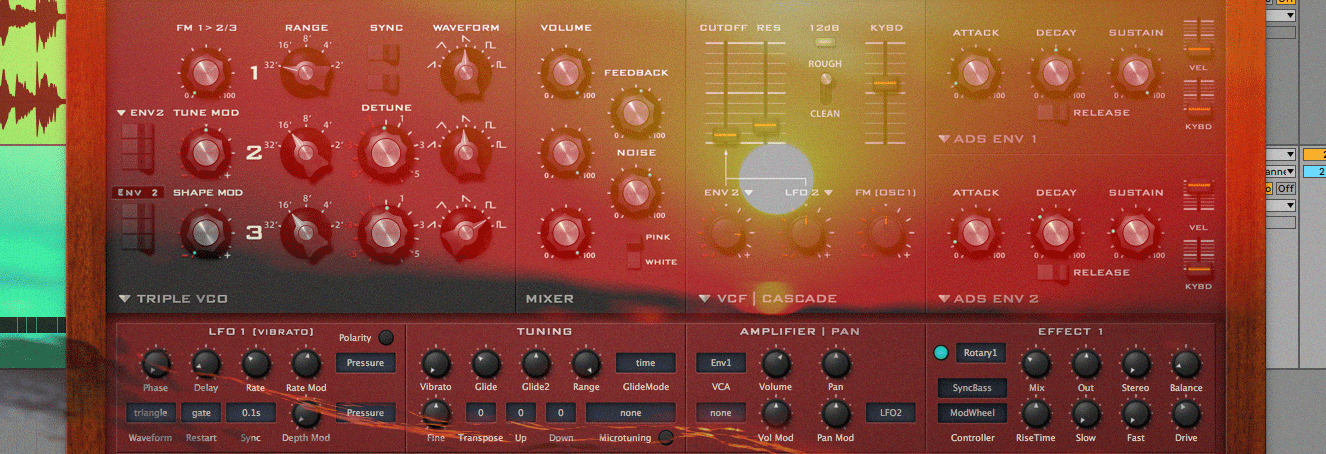
Technique » Synth Secrets »
Nu Disco Bass
This channel is sponsored by

Synth Secrets is a series of programming tutorials in which we show how to make a range of classic and new synth sounds using plugins such as Massive, Sylenth and Diva.
In this Synth Secrets we’ll be making an analogue sounding Nu Disco bassline using U-he’s Diva synth. We’ll add a little master bus processing at the end using some of Ableton’s native plugins. Please note, if you don’t own Diva, any virtual analogue soft synth will be up to the task. And if you’re not an Ableton user fear not! Your DAW’s native reverb, delay and compressor plugin’s will be more than adequate. Before we begin let’s also enjoy the brilliance that Diva stands for ‘Dinosaur Impersonating Virtual Analogue’ synthesizer. Clever bunch the U-he team…
Anyhow, we digress. Here’s the loop we’ve created:
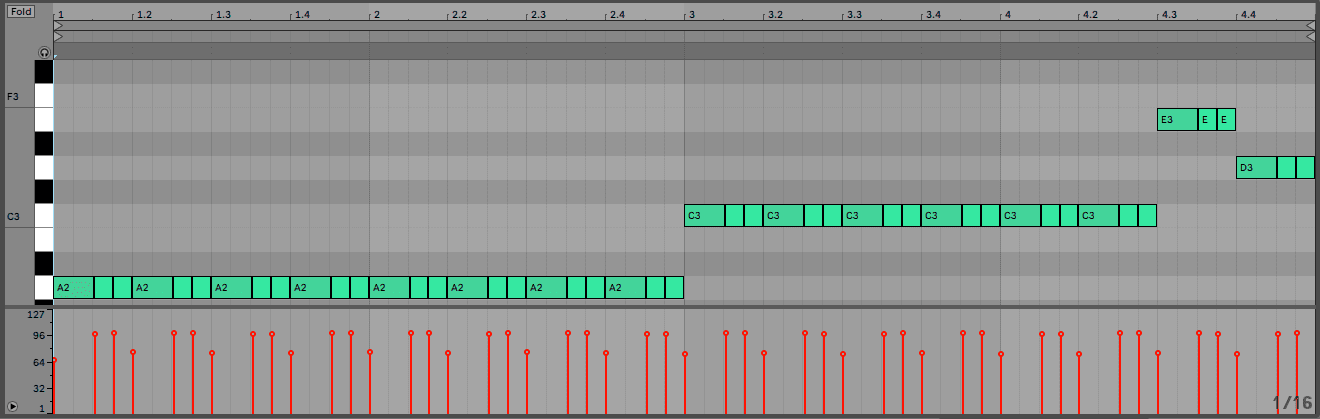
And here’s the MIDI we’ve used for the bass, programmed in the key of Am:
Step 1
With our MIDI region programmed, we load an instance of Diva, head to the Presets tab and load the Init Minimono preset from the 8 Templates section.
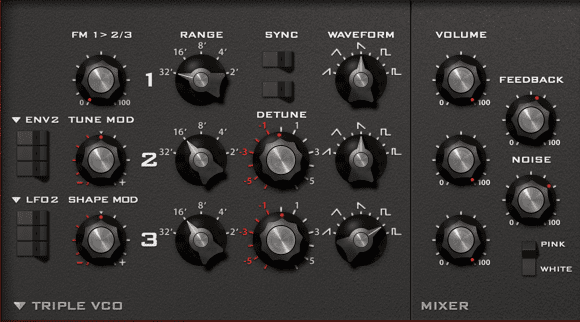
Navigating back to the main front panel, we begin by setting up the oscillators. We turn the Range down on oscillator 1 to 32’ (- 2 octaves), and the Range on oscillator’s 2 and 3 down to 16’ (-1 octave).
We keep the Waveform for oscillator’s 1 and 2 as a sawtooth wave and for oscillator 3 we turn the dial up so it’s halfway between a square and a pulse wave.
We then Detune oscillator’s 2 and 3, setting oscillator 2 to -12.15, and pushing up oscillator 3 to 11.92. In the Mixer section, we need to turn up the Volume for both oscillator’s 2 and 3. We also turn the Feedback up to just past halfway and the Noise to 67.50.
Step 2
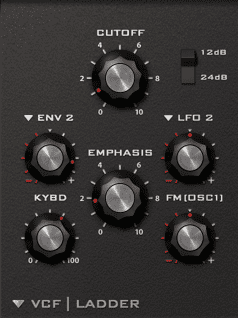
On the filter section (titled ‘VCF | Ladder’) we bring the Cutoff down to 42.00, and push up the ENV 2 dial to 80.00, thus applying envelope modulation to the filter cutoff frequency.
We also turn up the Emphasis (resonance) to 18.00 for extra tone. We turn up the Kybd to 60.00 which applies key tracking to the filter cutoff, meaning the filter will be open and more effective for higher notes in the scale. This gives us a good amount of variation.
Step 3:
As is the case with many synth patches, the envelopes are one of the most powerful tools at our disposal. When it comes to shaping and controlling the sound you want to treat the envelopes with plenty of respect.
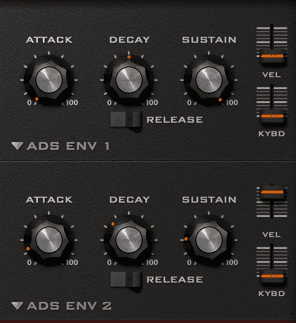
Focusing our attention on the filter envelope, which is called Ads Env 2, we reduce the Attack to 12.50, set the Decay to 35.00 and the Sustain at 21.50. We also increase the VEL (velocity) slider up to 85.00, meaning higher velocities will yield higher modulation amounts with a wider filter.
If you refer back to the MIDI screengrab, you’ll notice that we’ve turned down the velocities on the downbeats and they sound ever so slightly muted. This technique acts in a similar way to sidechain in allowing greater space for the kick drum and giving our programmed part a human feel.
Top tip: Playing with velocities is one of the easiest ways to give your music a human feel.
Step 4:
Diva has many defining qualities and one of these is it’s semi-modular design. At this stage, we audition different modules and explore how they blend with our sound.
In the filter section, we click the dropdown next to VCF | Ladder and select ‘Cascade’ from the list, loading a Roland style filter, but with all the same settings. It’s only a slight difference on the previous sound, and not an essential step, but for us it softens the tone.
Next we head south on the panel to the Effect 1 slot and load Rotary 1. The Rotary effect is based on the classic Leslie speaker cabinet, and creates a modulated sound similar to a phaser. We bring the Mix down to 31.50, the Stereo down to 0, Balance to 13.50, Slow and Fast to 0 and Drive to 40.50. Now the sound is constantly shifting, full of character and movement.

Step 5:
For the grand finale, its all about using FX to place the sound in the mix and control the dynamic.
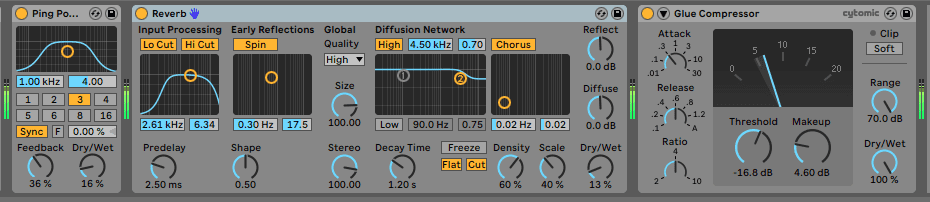
We begin with our trusted companion the Ping Pong Delay. Dial the Feedback to 60% and the Dry/Wet to 16%. Voila, a subtle stereo delay which widens the sound.
After delay comes reverb. Turn on the Lo Cut for the Input Processing and sweep the frequency to 2.61 kHz. Set the Decay to 891 ms, the Dry/Wet to 13% and quality to High. If the CPU is struggling you can reduce the quality setting.
And lastly, load up the Glue Compressor. Set the Attack to -3, pull the Threshold to -16.8 dB (applying approximately -5 dB of compression) and level compensate with the Makeup pushing the overall level to -4.60 dB.
Synth Secrets is sponsored by
u-he are makers of award-winning software synthesisers and effects including Diva, Repro-1, Zebra2, Hive, Bazille, Presswerk and Satin.
Download the demos and try them for yourself at www.u-he.com