u-he are makers of award-winning software synthesisers and effects including Diva, Repro-1, Zebra2, Hive, Bazille, Presswerk and Satin.
Visit U-he
Technique » Synth Secrets »
Modulating Risers with Additive Synthesis and Pitch Delay in Arturia Pigments 3
This channel is sponsored by

In this installment of Synth Secrets, we use the third and latest version of Arturia’s Pigments synth to build a pre-drop riser full of movement, automation, textures and effects.
Risers are unfortunately sometimes regarded as a simple checkbox to tick during the productions process. However, they’re a true shortcut to effective transitions between sections and the contrast between a riser’s craziness and a slick drop can make or break a tune.
As this is the case, many producers can spend hours of sound design on just one riser part to get it exactly right. In this article, we emulate this mindset and program a riser using Arturia Pigments’ new sound engines and effects. Here’s our riser with some drums for context:
Step 1: Additive Synthesis
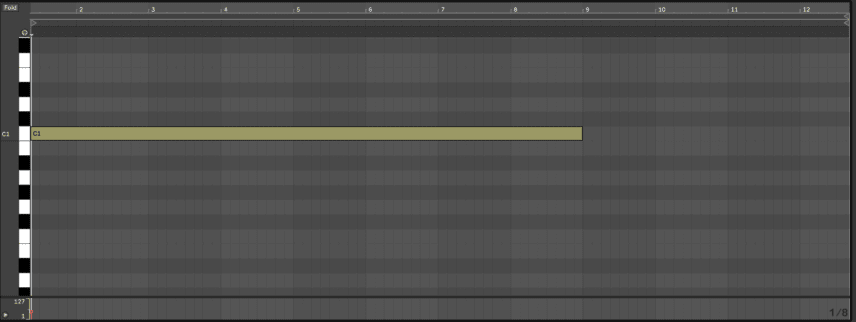
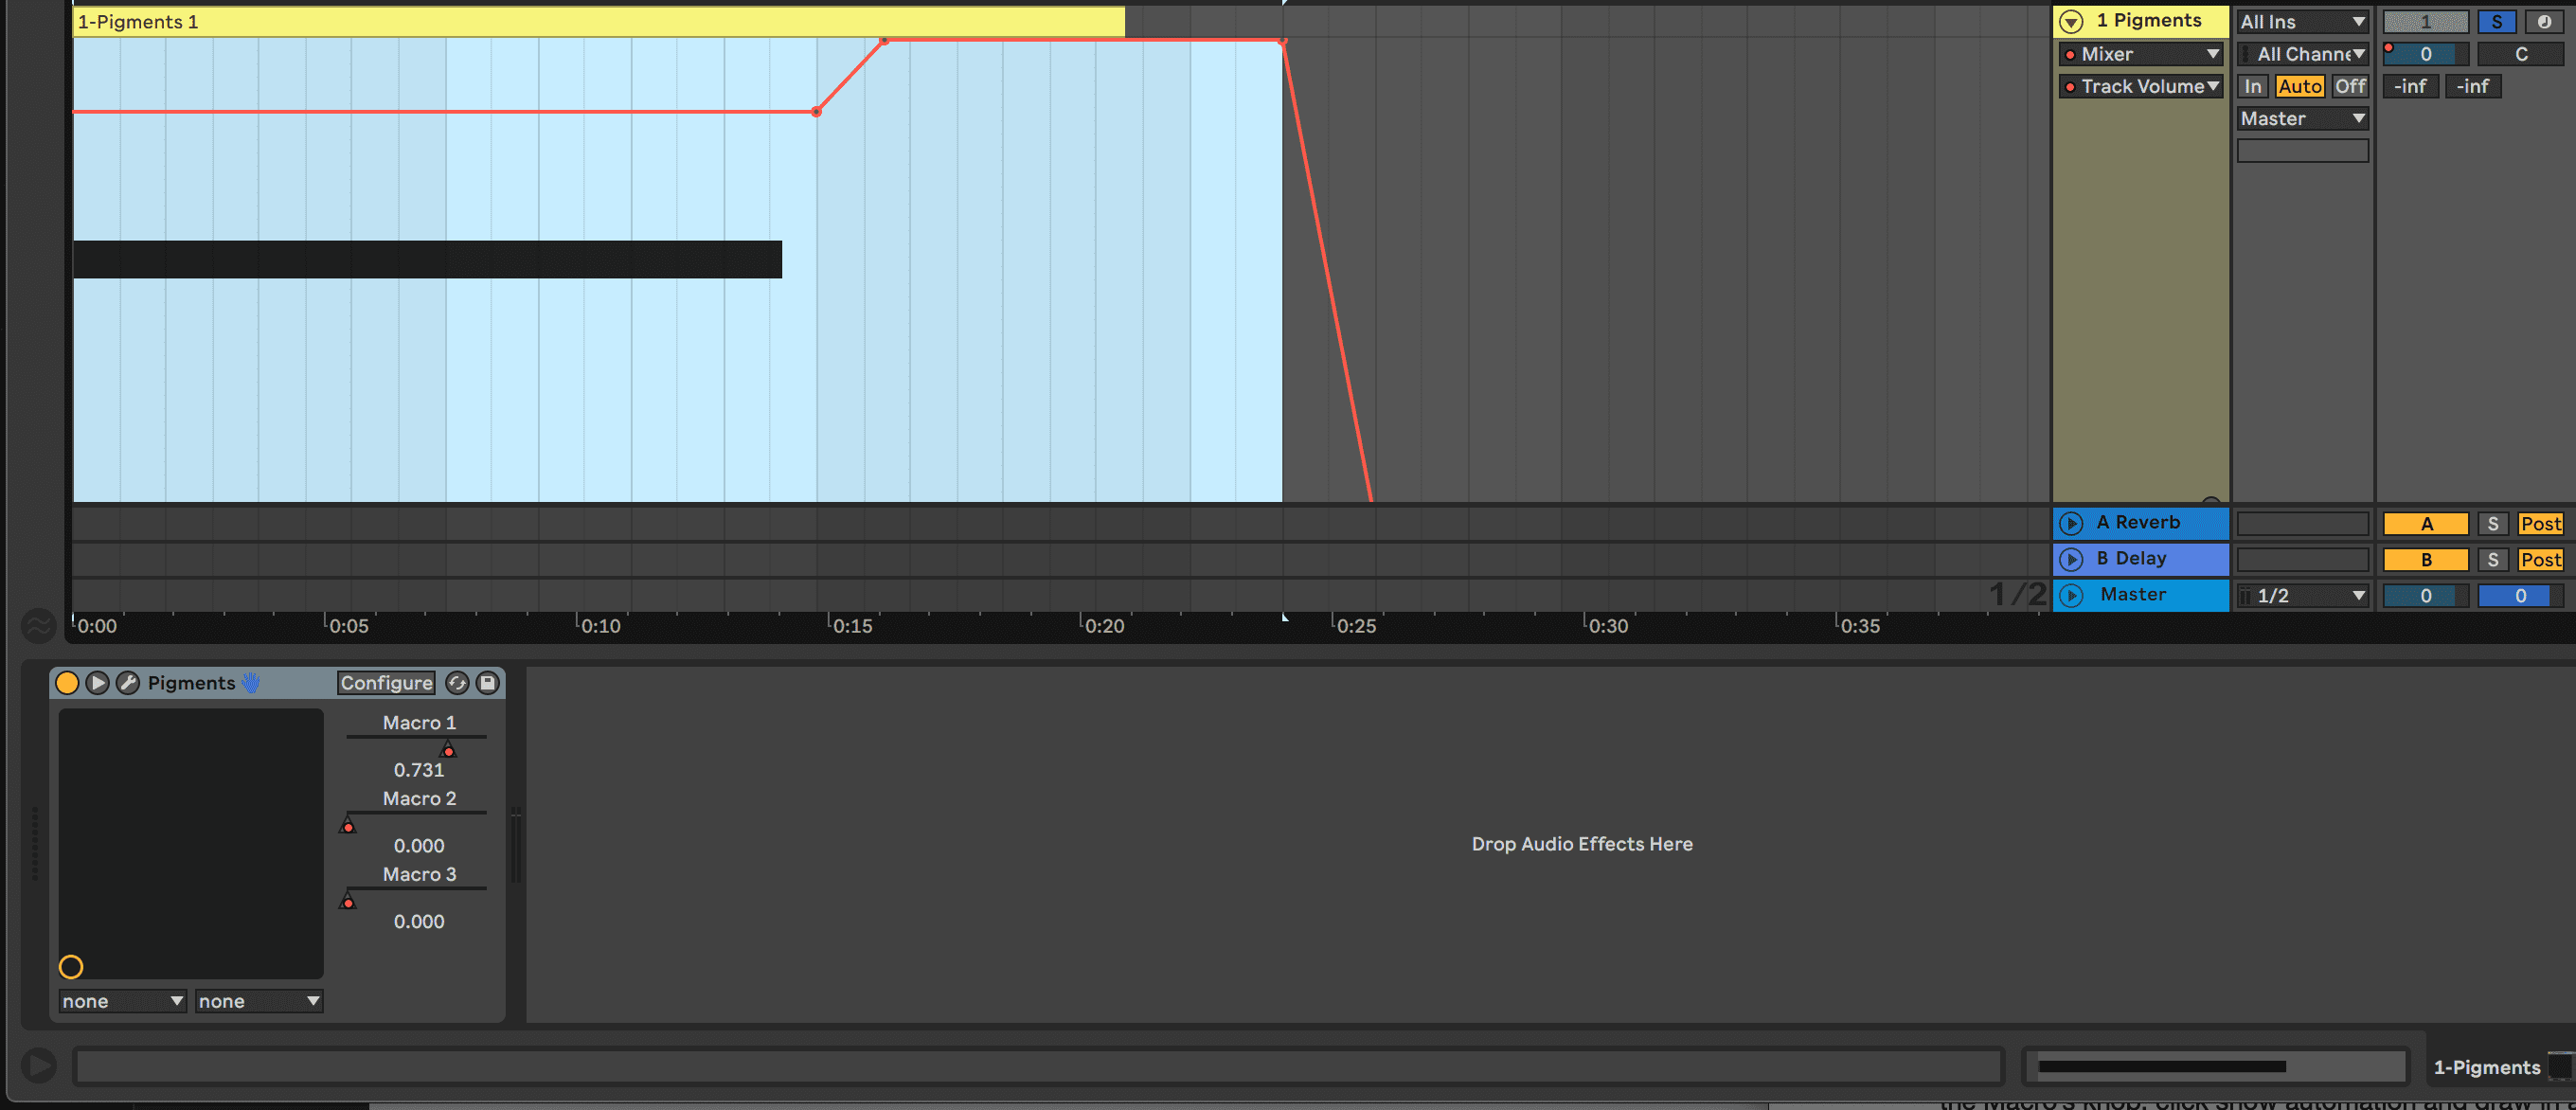
Set your BPM to 130, create a new MIDI channel and load an instance of Pigments 3. Search for the Default preset in the preset browser and select it to get an empty template. In Arrangement view program a C1 note that plays for about eight-and-a-half bars.
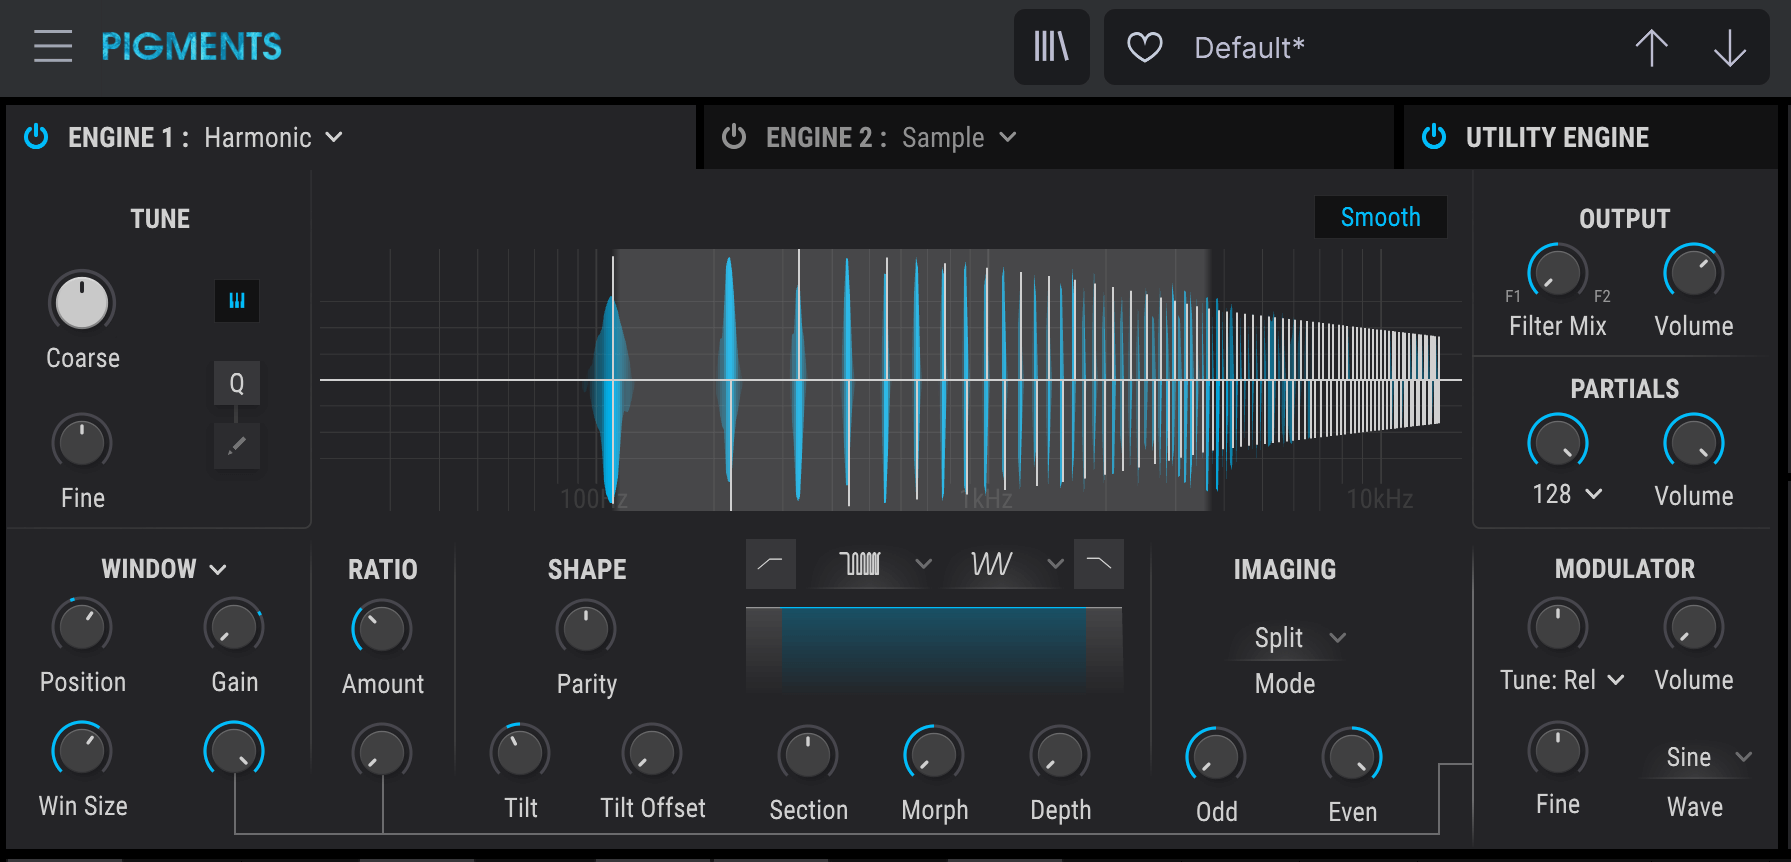
The crux of our sound will come from Pigments’ Harmonic Engine. This new engine is one of the highlights of the update and it is great for some powerful additive synthesis. Unlike subtractive synthesis, in which you start with a harmonically rich oscillator and remove frequencies with a filter, additive starts with a simple sine wave and adds harmonic partials.
First, in the Partials module to the right, set the maximum number of partials to 128 and increase the knob to max – even though the knob says 512, the number of partials will still be limited to 128.
The Window is the white space in the graph and its purpose is to process groups of the harmonic partials separately. The window position parameter affects which partials are in the group and the options for processing include window size, window gain and frequency modulation via the knob at the bottom right of the Window module.
Set the Window Position to around 27, the Gain to 1dB, the Win Size to 56.3 and the FM Gain amount to its maximum value.
Here’s how this sounds:
There’s also a great imaging module in this engine that allows you to separately pan the even and odd harmonics for a stereo width effect. We panned the even harmonics all the way left and the odd ones all the way right.
Step 2: Mapping Macros
The parameters in this section work great with modulation and automation. We’re going to map the window position knob to LFO 1. To do this, hover above the parameter with your mouse, click on the ‘+’ that appears at the top right and then raise LFO 1’s bar up to around 0.27.
In LFO 1, set a slow rate and tweak the phase so that the LFO movement starts at a higher value.
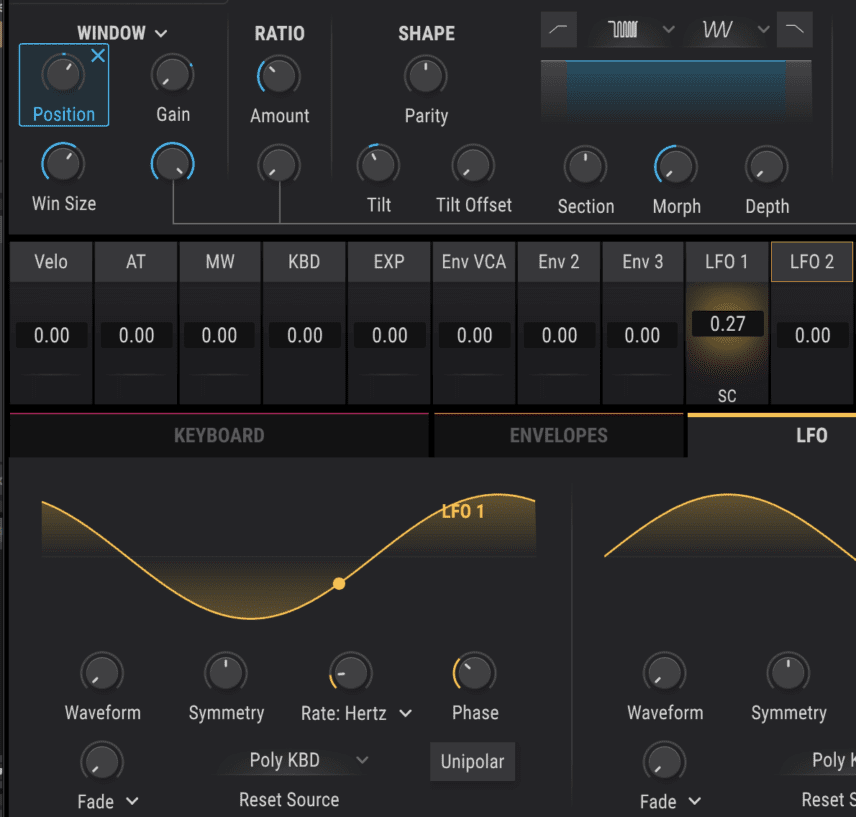
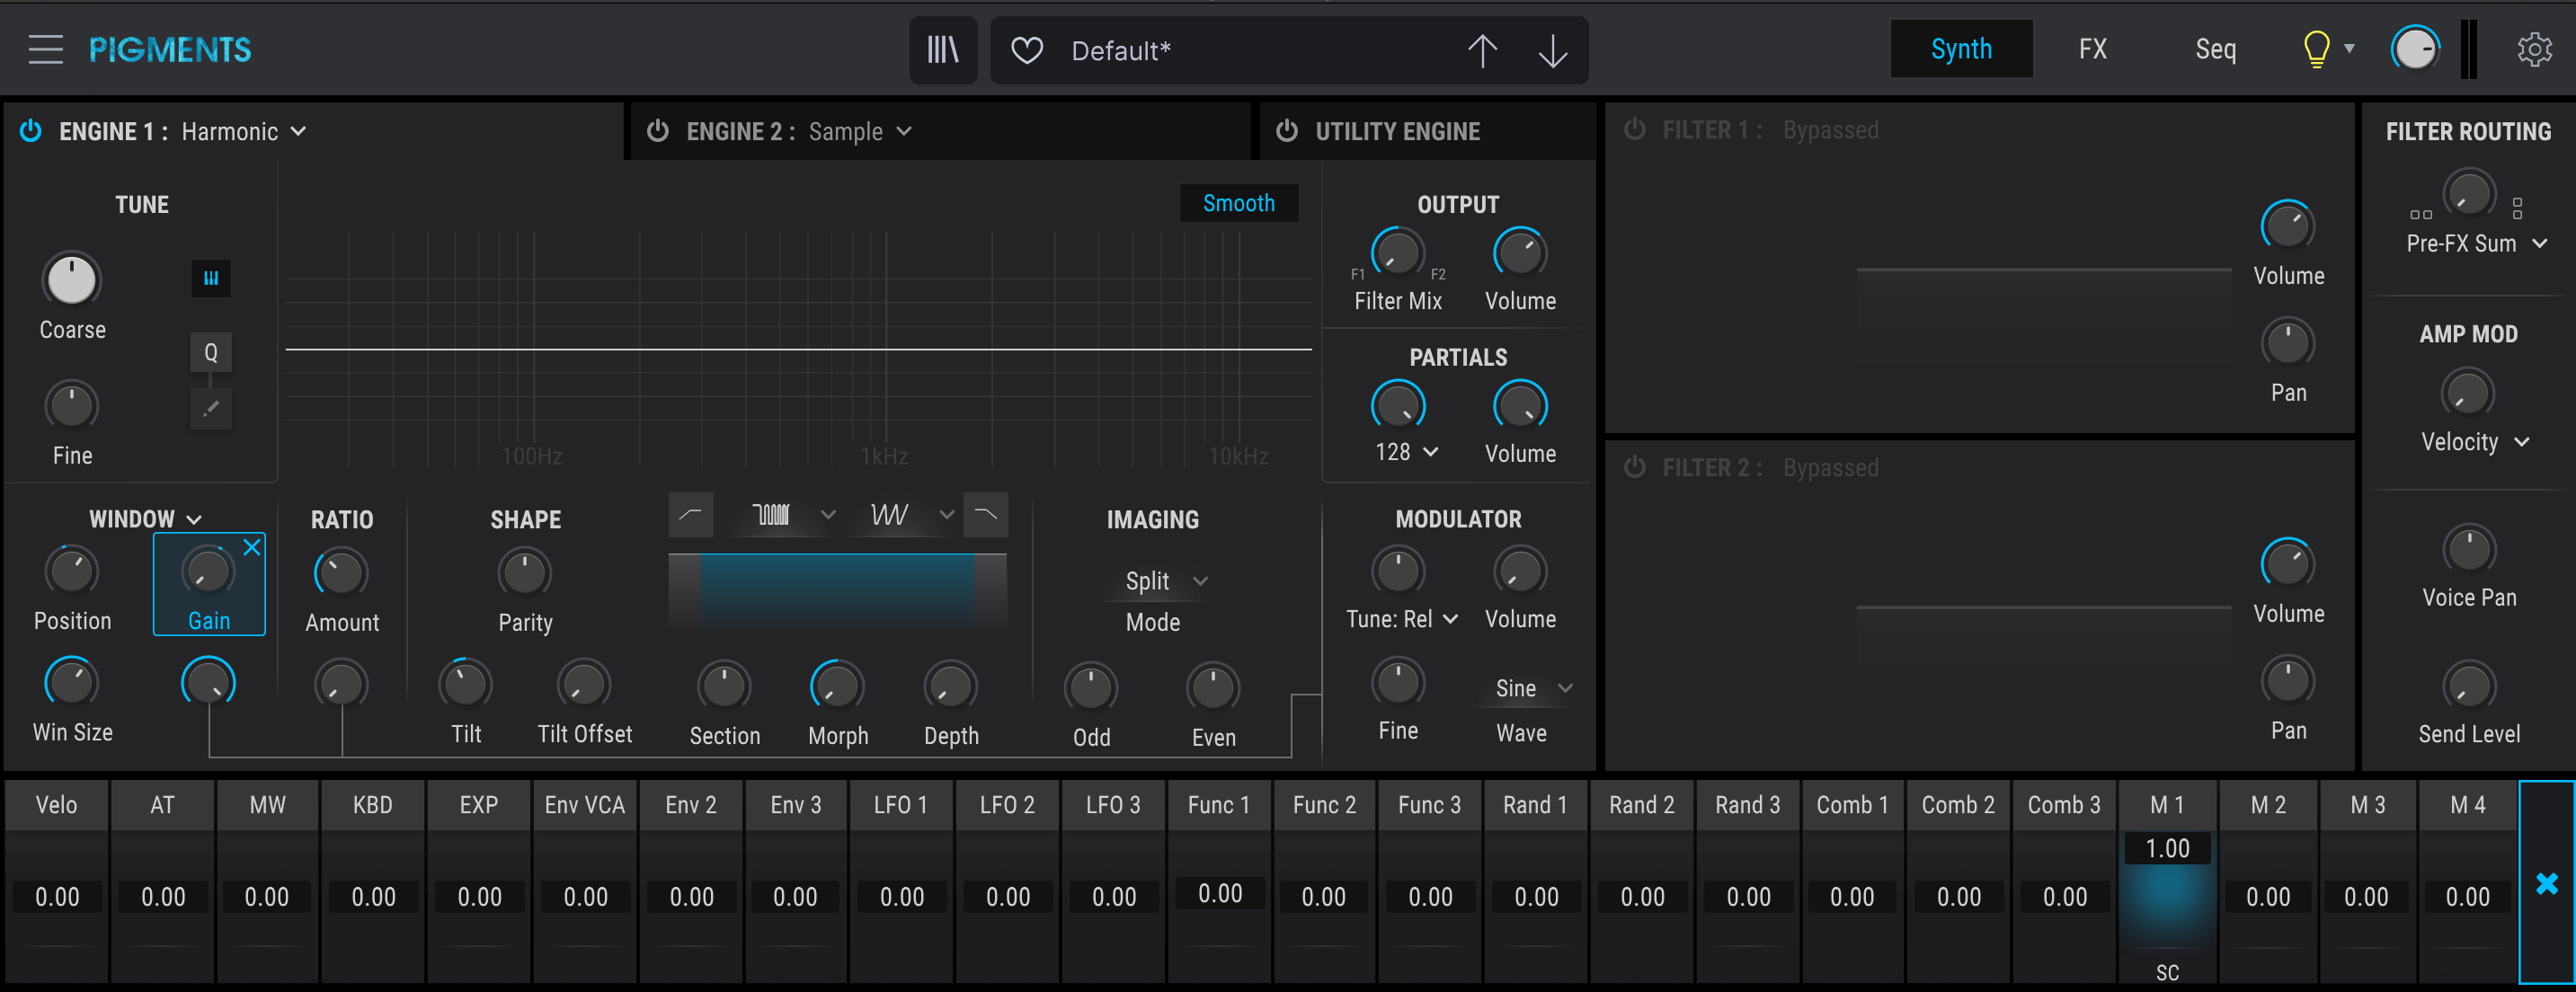
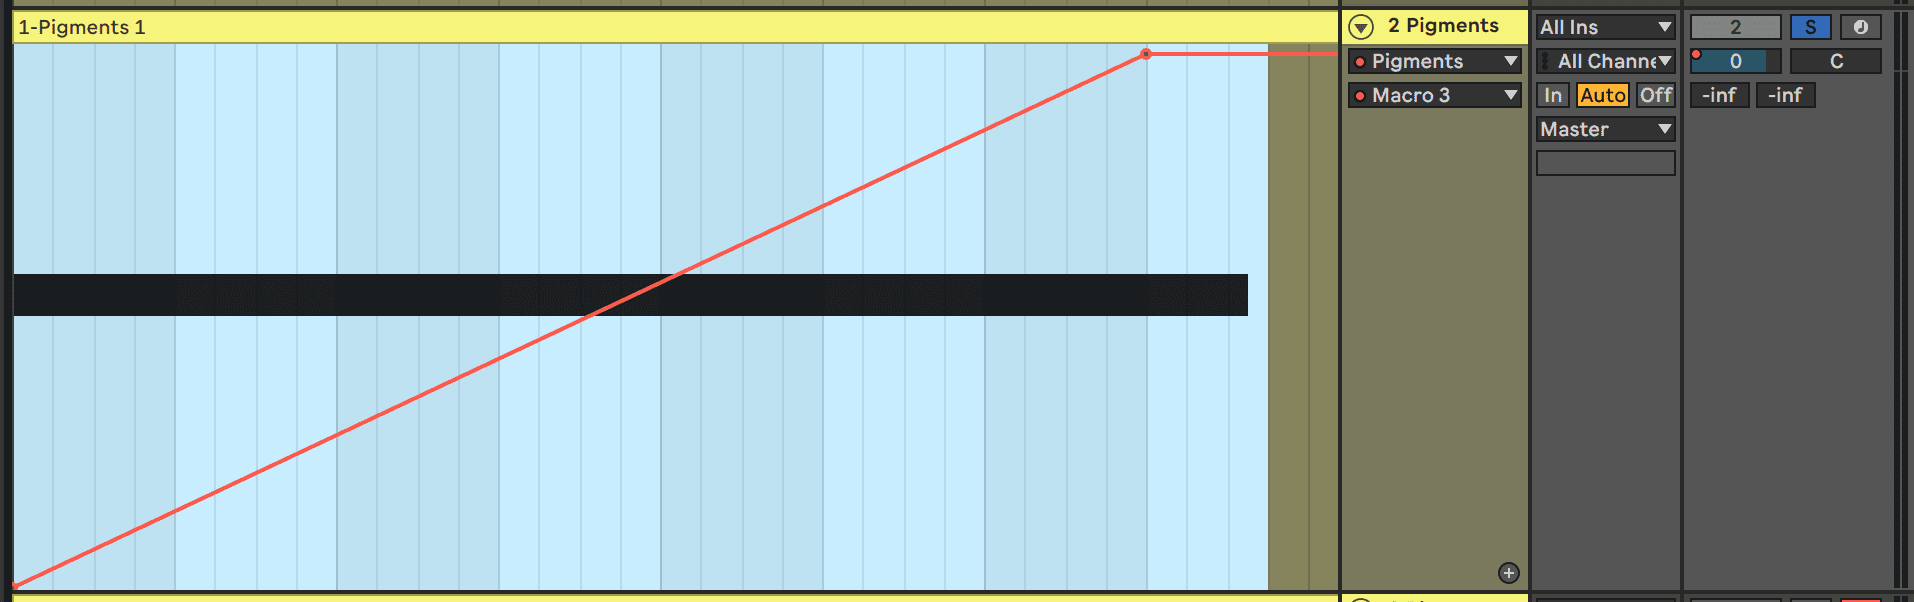
This definitely gets harsh at certain points so we’re going to automate the window’s gain in Step 4 after we add the effects. To have it ready to automate, map it to Macro 1 by clicking its plus sign and increasing M1’s bar to 1.00. After doing this, go back to the gain knob and bring it all the way to its minimum value so that the macro knob has full control over it. Then raise the macro knob to around 0.700.

Step 3: Utility Engine
Another new engine Arturia introduced in the latest update is a Utility Engine that houses a sub oscillator as well as two noise generators.
Power on the Utility Engine along with one of its noise generators and map the Tune knob to one of the Macros. The goal is to have the noise’s pitch going all the way from -36 st to +36 st for a rising effect. Right-click the macro mapped to the noise tuning in Ableton, click Show Automation and draw in a rising automation envelope.
To tame low end rumble resulting from the lower pitched noise, increase the noise generator’s Filter knob to 70% HiPass.
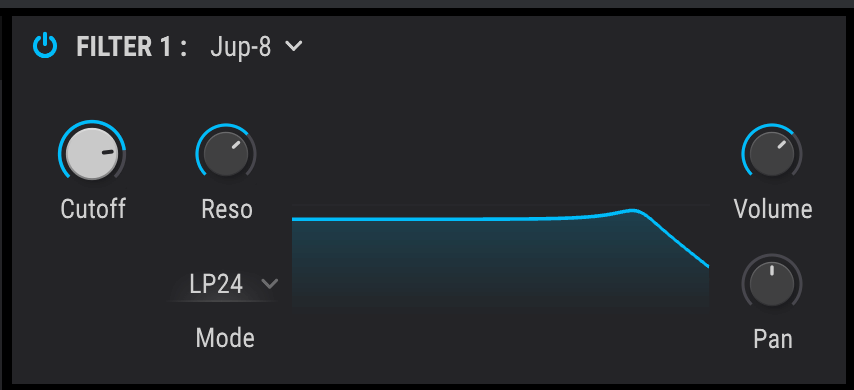
To take care of the high end harshness, enable Filter 1 and select the new Jup-8 lowpass filter emulation. Set the cutoff to around 5-6k (to taste) and increase the resonance to around 0.700.
Here’s our progress so far:
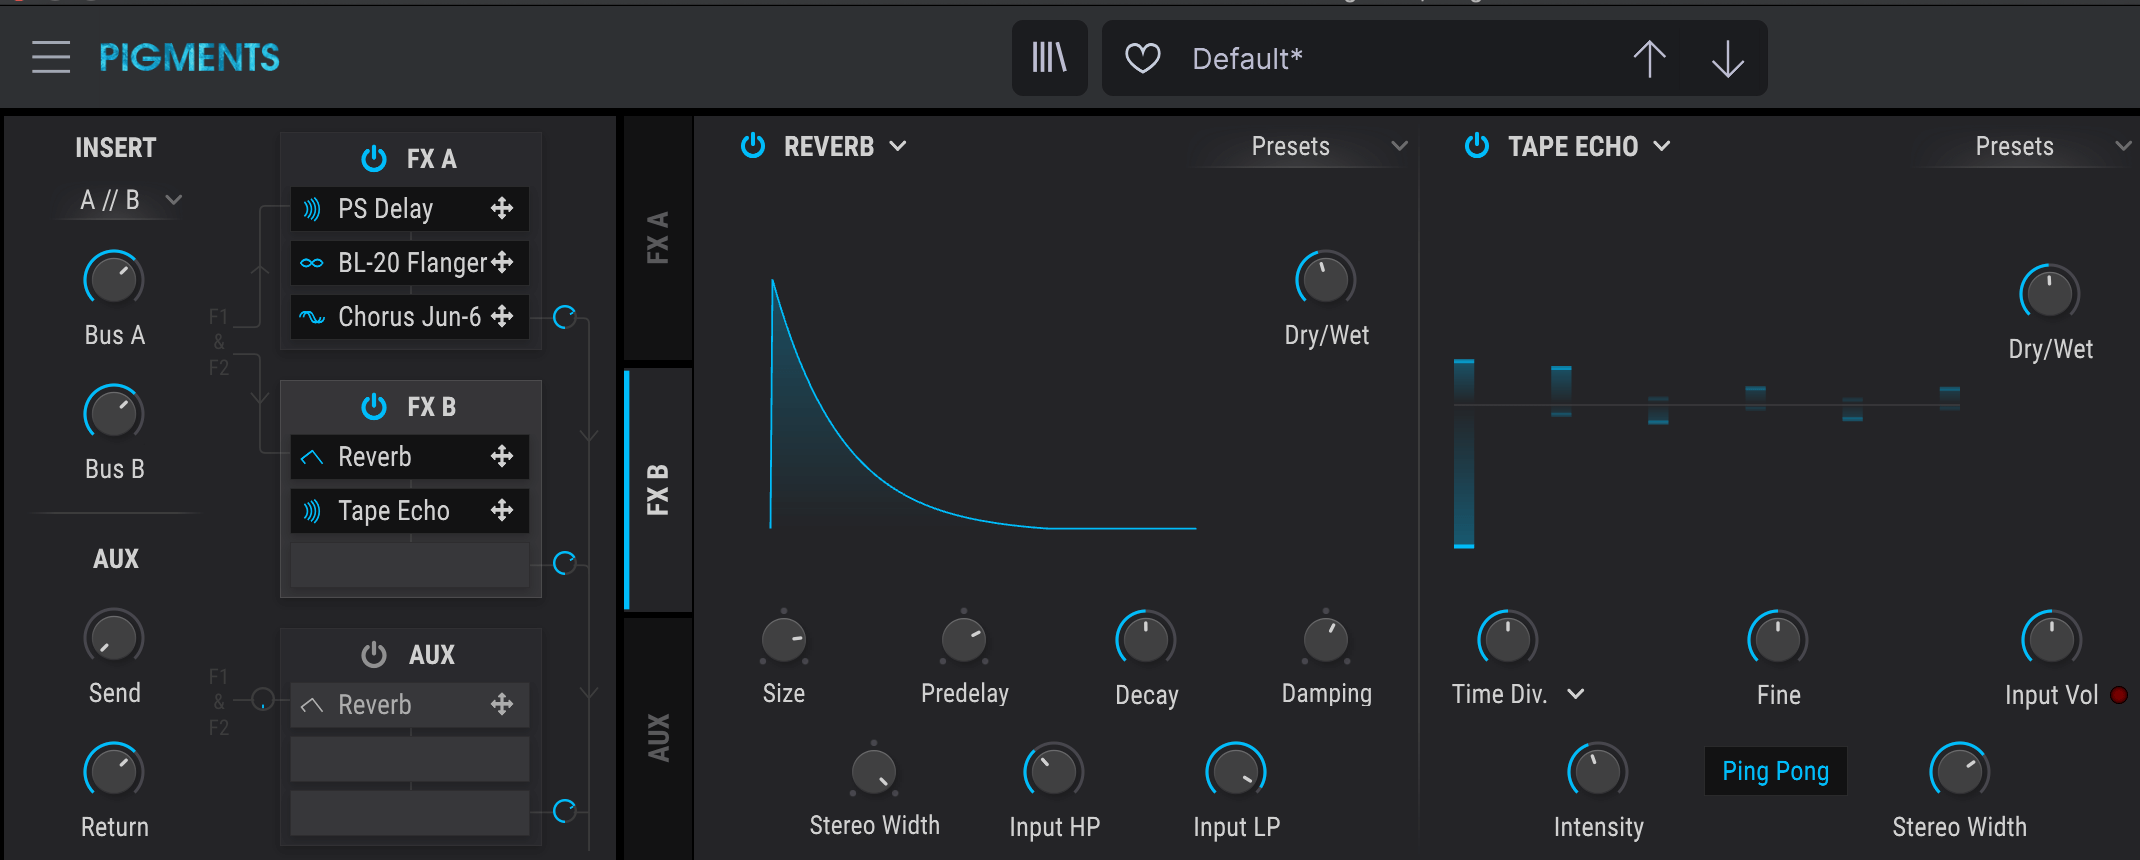
Step 4: Pitch Delay And Effects Routing
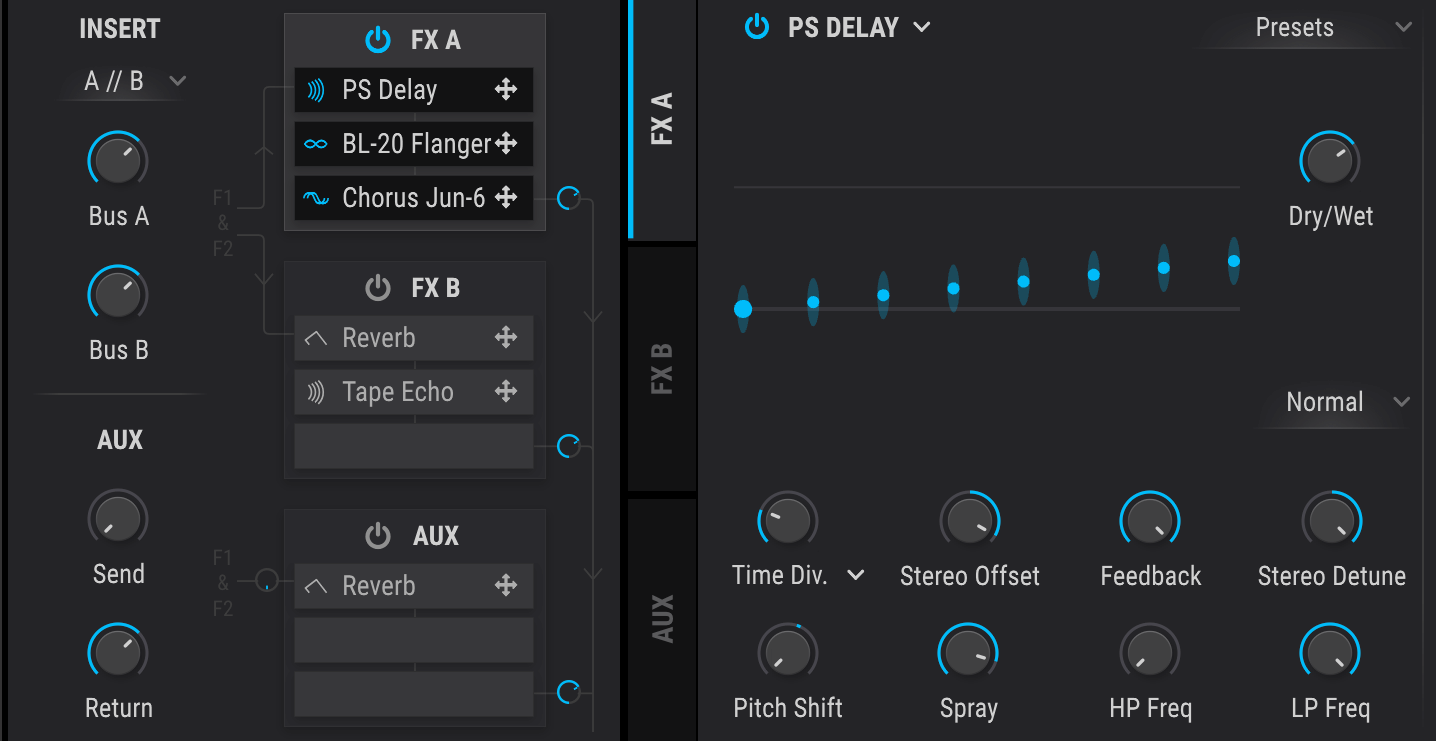
The FX page has FX A and FX B groups and an AUX group allowing for separate routing of effects. In the Insert dropdown list at the top left select A // B so the groups don’t feed into each other. Next, power on the FX A group and load up the new PS Delay. This is a pitch delay that modulates the pitch of every single echo.
First, set the Dry/Wet to 70%, the Feedback to its maximum value of 1, the spray to around 360ms and the time-division to 1/8 in order to generate eighth-note patterns. The feedback being at its maximum value will generate so many modulating echoes the sound will have a more drone-like character.
As we did with the noise riser, we’re going to map a knob to a macro in order to be able to easily automate it to continually rise. For this, map the pitch shift parameter to another macro and have it automate all the way from -24 semitones to +24 semitones. The lower pitched delays will almost sound like an underwater bubbling effect.
Here’s how this sounds:
You can really hear the high pitch delay after the note is lifted at 00:14.

Step 5: Flanger And Chorus
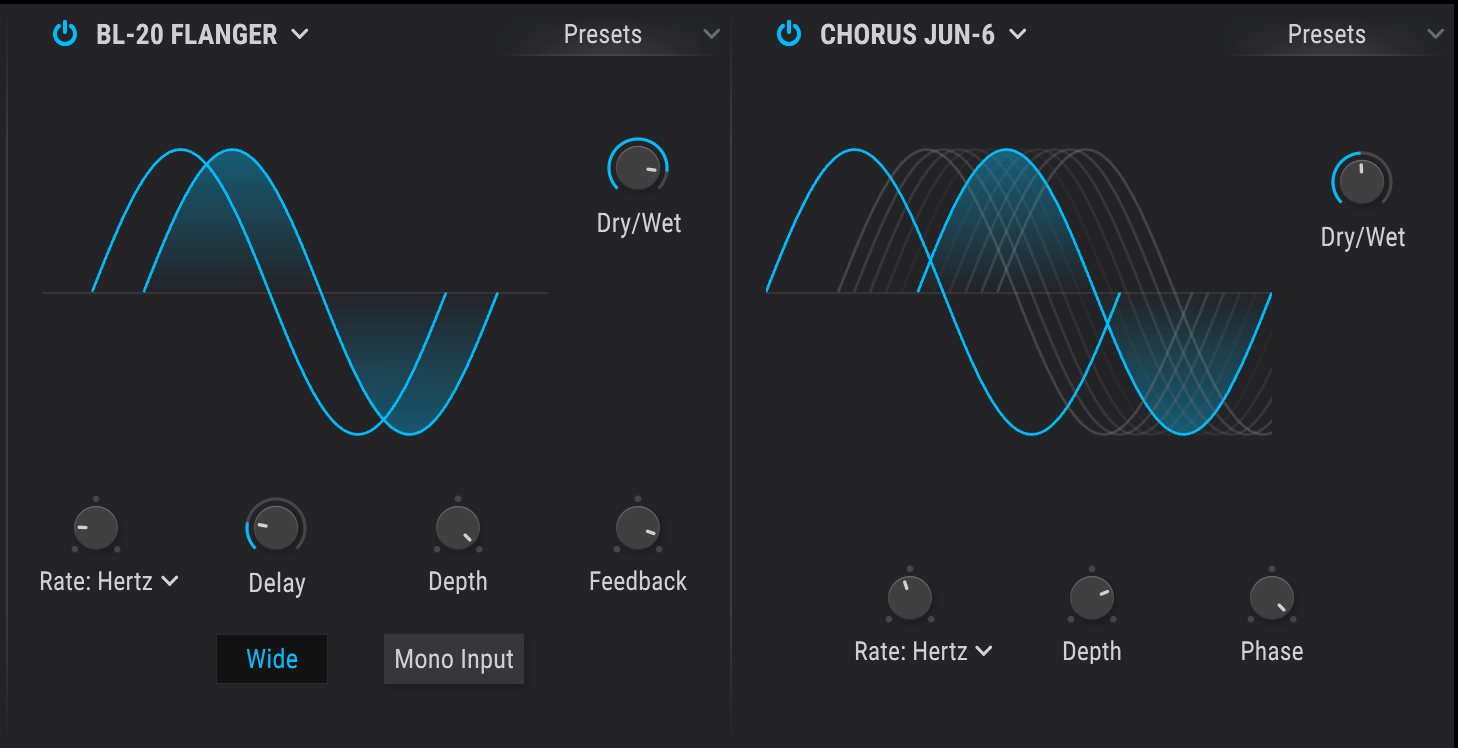
Next, add the BL-20 Flanger and Chorus JUN-6 effects. The Flanger will make everything more silky while its feedback will add yet another moving element to the mix. Make sure to keep the rate slow to drag out the movement and keep the feedback high so that the effect is heard.
The Chorus JUN-6 is a recreation of the famous chorus circuit in the Roland Juno-6 and is perfect for adding that last bit of width and fatness.
Now let’s go back and automate the Window Gain parameter from Step 1. We had already mapped that parameter to a macro so in Ableton just right click the Macro’s knob, click show automation and draw in an automation envelope. The aim here is to lower the volume when things sound harsh while also adding some more rising movement to the end.

Step 6: Delay And Reverb
What’s any patch without some delay and reverb? In the FX B group, insert the Reverb and Tape Echo effects. In the Reverb, increase the size to 1.55 and Dry/Wet to around 44%.
The Tape Echo is especially crucial for the end of the riser, as we want some repeating chord-like sounds before the beat fully comes in. Set the Dry/Wet to around 50%, the Time Division to 1/2 and the Intensity to around 0.500. Also, enable Ping Pong mode so the echoes go from left to right. Intensity acts like a feedback knob so at higher values you start to get old tape-style feedback effects.
Lastly, we automated the channel’s volume up 6dB when the note is lifted so the delay gets even louder.
Here’s the end result in solo and then with the drums – you’ll hear the tape echoes very clearly starting around 00:14:
Synth Secrets is sponsored by
u-he are makers of award-winning software synthesisers and effects including Diva, Repro-1, Zebra2, Hive, Bazille, Presswerk and Satin.
Download the demos and try them for yourself at www.u-he.com