u-he are makers of award-winning software synthesisers and effects including Diva, Repro-1, Zebra2, Hive, Bazille, Presswerk and Satin.
Visit U-he
Technique » Synth Secrets »
Detuned Pad
This channel is sponsored by

Synth Secrets is a series of programming tutorials in which we show how to make a range of classic and new synth sounds using plugins such as Massive, Sylenth1 and Predator.
In our latest Synth Secrets we’re using Sylenth1 to create a detuned pad sound with heavy modulation.
Here’s an example of the sound we’ll be making:
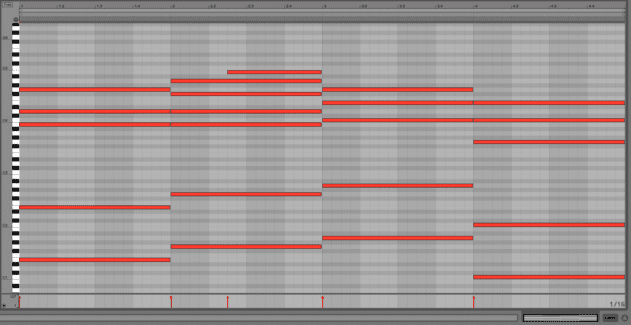
Here’s the MIDI pattern. Each chord is underpinned by bass notes in lower octaves for a bigger sound. You may wish to omit them in your own arrangement to leave space in the mix for other elements.
Step 1
Create a new sound in Sylenth by selecting Init Preset under Menu.
The MIDI pattern with this blank Init patch sounds like this:
Under Polyphony (top left), increase the number of voices to 10.
Increase the number of Voices allocated to Oscillator A1 to 5 and lower the pitch by one octave.
Now move to Oscillator A2. Increase Voices to 7 and select a sawtooth wave by clicking and dragging over the green backlit Wave graphic (you’ll know you’ve got a Saw by reading the display in the central info panel). This is a good foundation for a basic pad sound.
To fatten the sound and inject a first taste of analogue goodness, detune Oscillator A1 by around 4 cents (4.05), turn the Phase dial up to around 300.
Move onto Oscillator A2. Detune it by 3 cents, set Phase to 100 degrees and turn on the Inv button.

Step 2
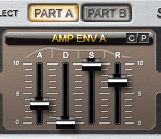
A typical pad patch starts and ends slowly. Under Amp Env A, increase attack (A) to 3 and release (R) to 7. If the ‘hangover’ lag between chords is too long, pull back on the release.
Step 3
Most pads use some form of modulation to keep the sound shifting, typically using a low frequency oscillator as the modulation source.
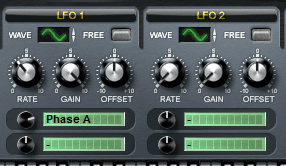
To set this up, go to the LFO 1 panel, select Phase A from the dropdown menu, then turn the knob alongside it up to the 2 o’clock position (around the 3.52 point).
Again under the LFO 1 label, set Gain to maximum and adjust the Rate setting so that it’s somewhere between 10 and 11 o’clock (higher settings have a more dramatic effect).
You should now hear a wandering, moving sound as the phase of the oscillator is modulated.
Step 4
With the basic pad sound nailed, it’s time to work on the timbre.
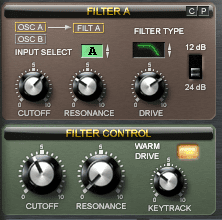
We’re after a warm, gritty sound, so move to the Filter A panel (not to be confused with Filter Control, below it) and click/drag to select the Lowpass filter under Filter Type (this is the first option, with the curve shown below – if you’re in any doubt, check the central info screen).
Increase Cutoff to 7 (around the 800Hz mark), Resonance to 3 and Drive to 7. While you’re at it have a play with the filter cutoff value to hear the kind of subtler back-in-the-mix style pads you can achieve with lower values.
Move down to Filter Control, turn on Warm Drive, set Cutoff to around 60 Hz and increase Keytrack to 3.
Step 5
Pads often benefit from liberal doses of modulation effects such as chorus and flange.
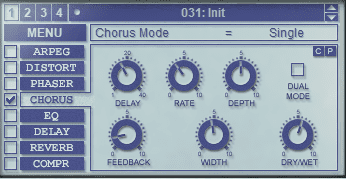
Highlight then tick the box alongside Chorus in the central panel, then tweak the controls alongside as follows:
Delay: 16 ms
Rate: 0.22 Hz
Depth: 50%
Feedback: 12%
Width: 50%
Dry/Wet: 60%
Dual Mode: Off
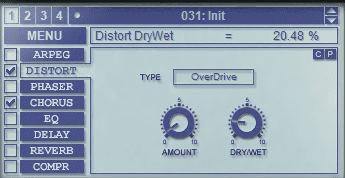
To add some grit, select and tick Distort andset the OverDrive effect with the following parameters:
Amount: 0.3
Dry/Wet: 20%
At extreme levels you can kind shredded Khonnor-style pad sounds.
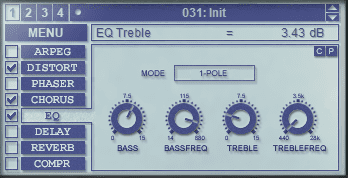
EQ can be used to add a little more warmth. Click/tick EQ with the following settings:
Mode: 1-pole
Bass: 9.00 dB
BassFreq: 570 Hz
Treble: 3.50 dB
TrebleFreq: 440 Hz
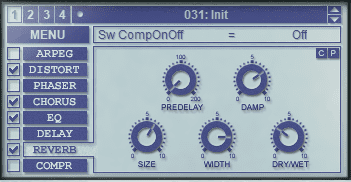
The pad should be sounding pretty epic now. For an even bigger sound, you might want to add some reverb (though note that adding too much verb to pads is unnecessary and often has the effect of swamping the mix):
Size: 6.00
Predelay: 0 ms
Width: 80%
Damp: 7.00
Dry/Wet: 30%
Step 6
That’s the sound complete, but if you want it to pump against the kick drum – either as an obvious effect or to clear up the mix – you may want to experiment with sidechaining or automation.
We’ll go over the top here to demonstrate the effect at its most extreme using an LFO to imitate sidechain compression.
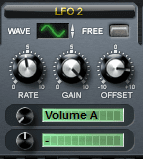
Set this up by heading back to the LFO section and selecting Volume A from the dropdown menu under LFO 2. Set Rate to 1/4 (this is tempo-linked), Gain to 10 and Offset to 7. Now turn the knob next to Volume A all the way anti-clockwise to -10. The intensity can be reduced using the Offset control.
Synth Secrets is sponsored by
u-he are makers of award-winning software synthesisers and effects including Diva, Repro-1, Zebra2, Hive, Bazille, Presswerk and Satin.
Download the demos and try them for yourself at www.u-he.com
07.23 PM
don’t understand why but after step2 my synth doesnt sound like example , a patch file of the tutorial would be welcome to understand …
07.04 AM
Hey abec7 – If you’ve got it sounding right after Step 1 it should follow through to Step 2, as you’re only changing the envelopes. How’s it different?
09.58 AM
Any possibility of making this in default Ableton instruments? I love that sound but I can’t pay for Sylenth just right now! And I don’t think the MicroKorg is up to it
05.57 AM
@djoremi: No reason at all why a MicroKorg can’t make this sound! Two oscillators? Tick. Filters? Tick. Envelopes? Tick. LFOs? Tick. Only problem is the polyphony – but just simplify the chords and you’re good to go.