We create a beat inspired by the hypnotic rhythms and textures of Hessle Audio’s Pearson Sound.
Pearson Sound has been at the cutting edge of dance music for more than a decade now, and it’s his willingness to experiment that has helped him stand out. It’s no surprise then that when tasked with curating a remix album for American singer St. Vincent, Nina Kraviz turned to Pearson Sound.
Nina Kraviz presents MASSEDUCTION Rewired features Pearson Sound going to work on ‘Dancing With A Ghost.’ The original version, taken from St. Vincent’s 2017 album MASSEDUCATION, was little more than an ambient interlude, but in his remix, Pearson Sound has made it wholly his own.
Beat Dissected is a regular series in which we deconstruct drum patterns, showing you how to program them in any DAW. Just copy our grid in your own software to recreate the loop.
You can download the MIDI file we used here and remember to click any image to enlarge.
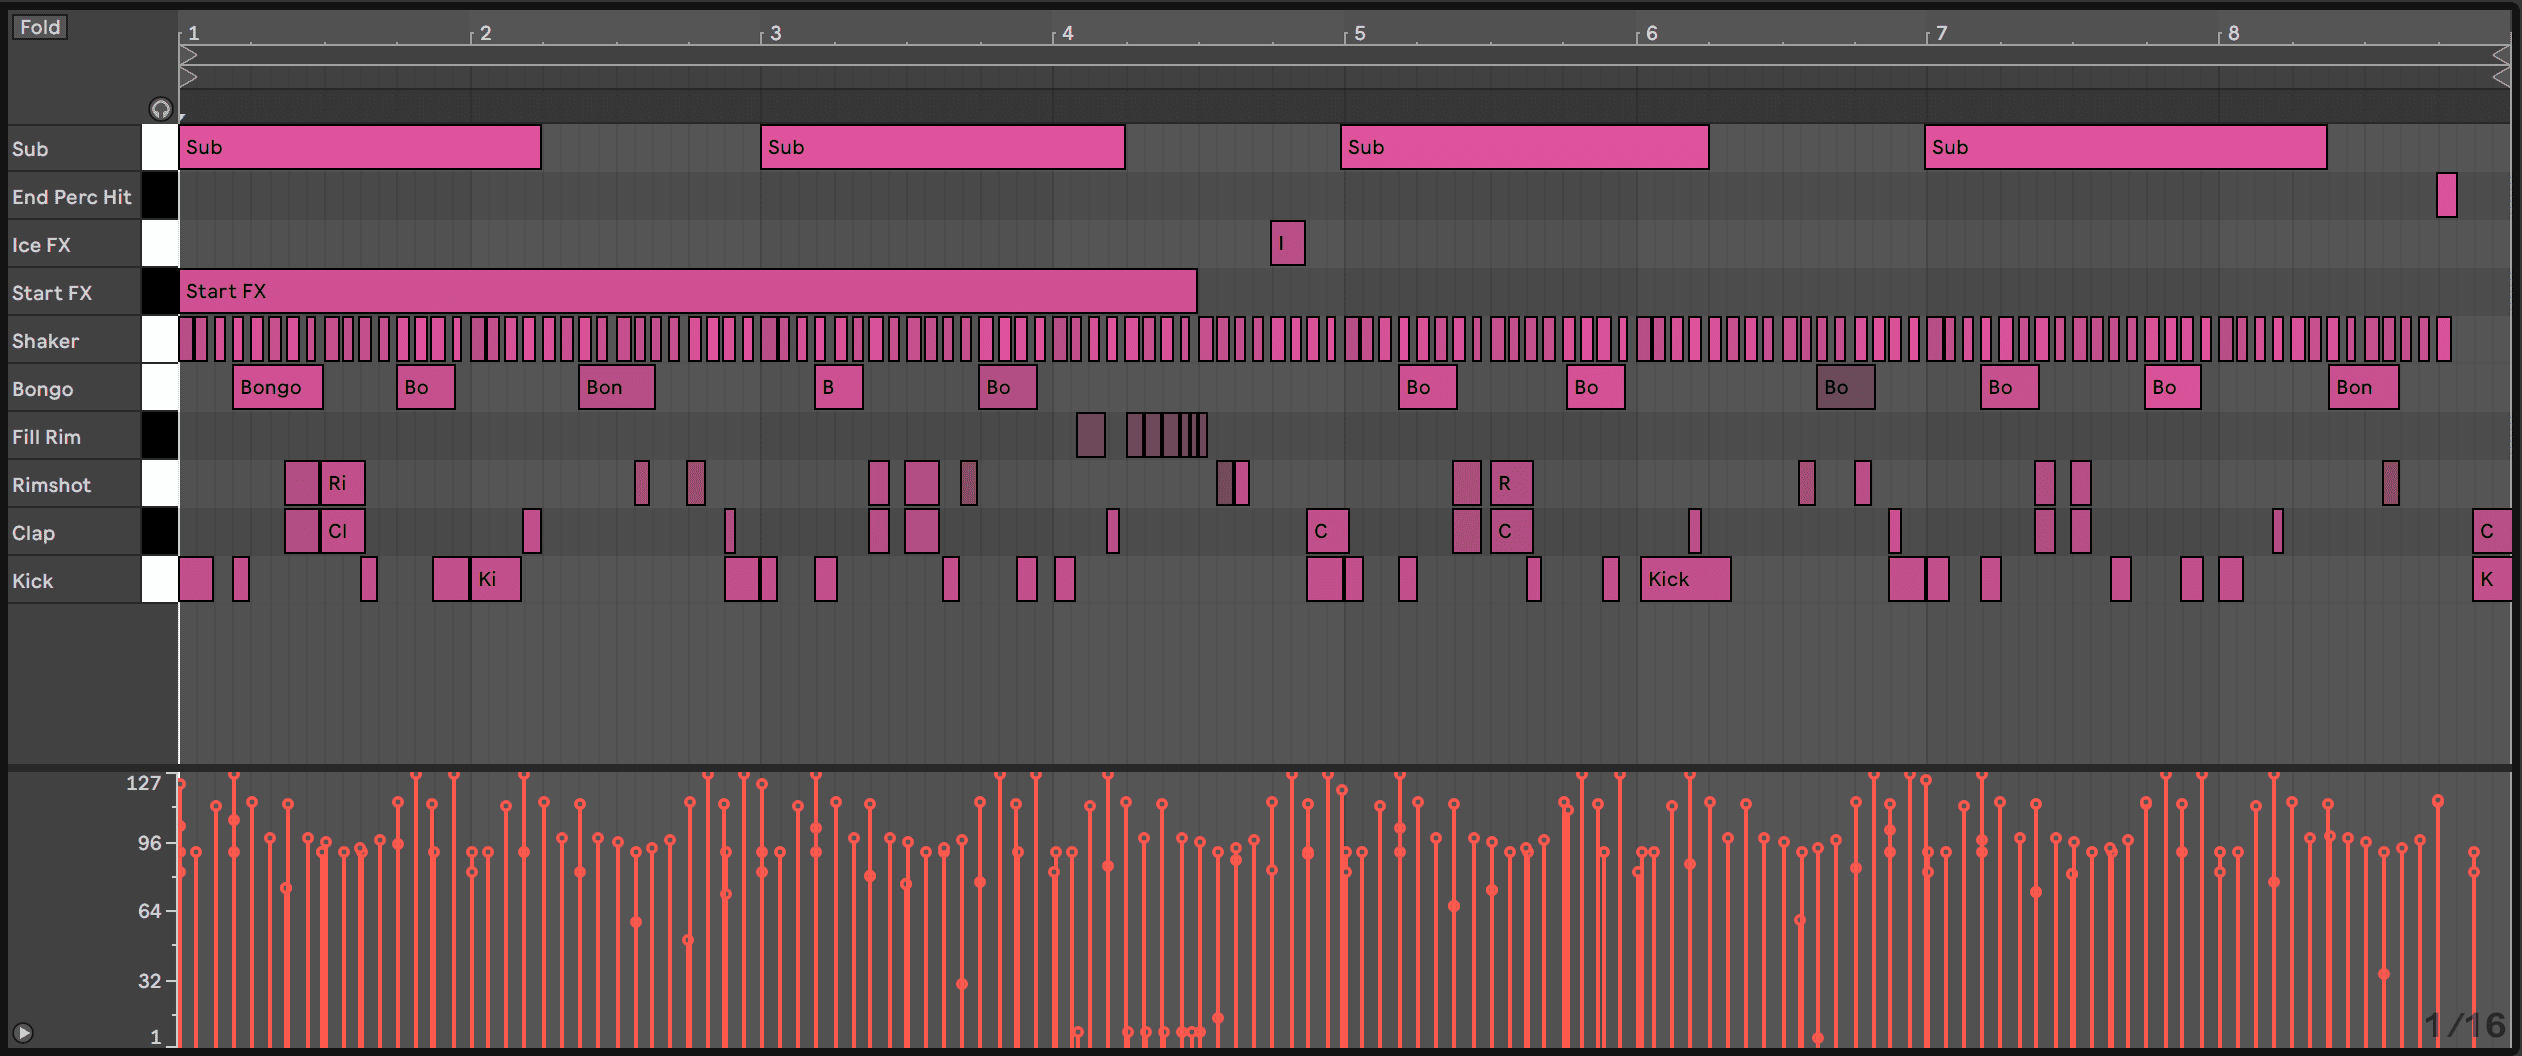
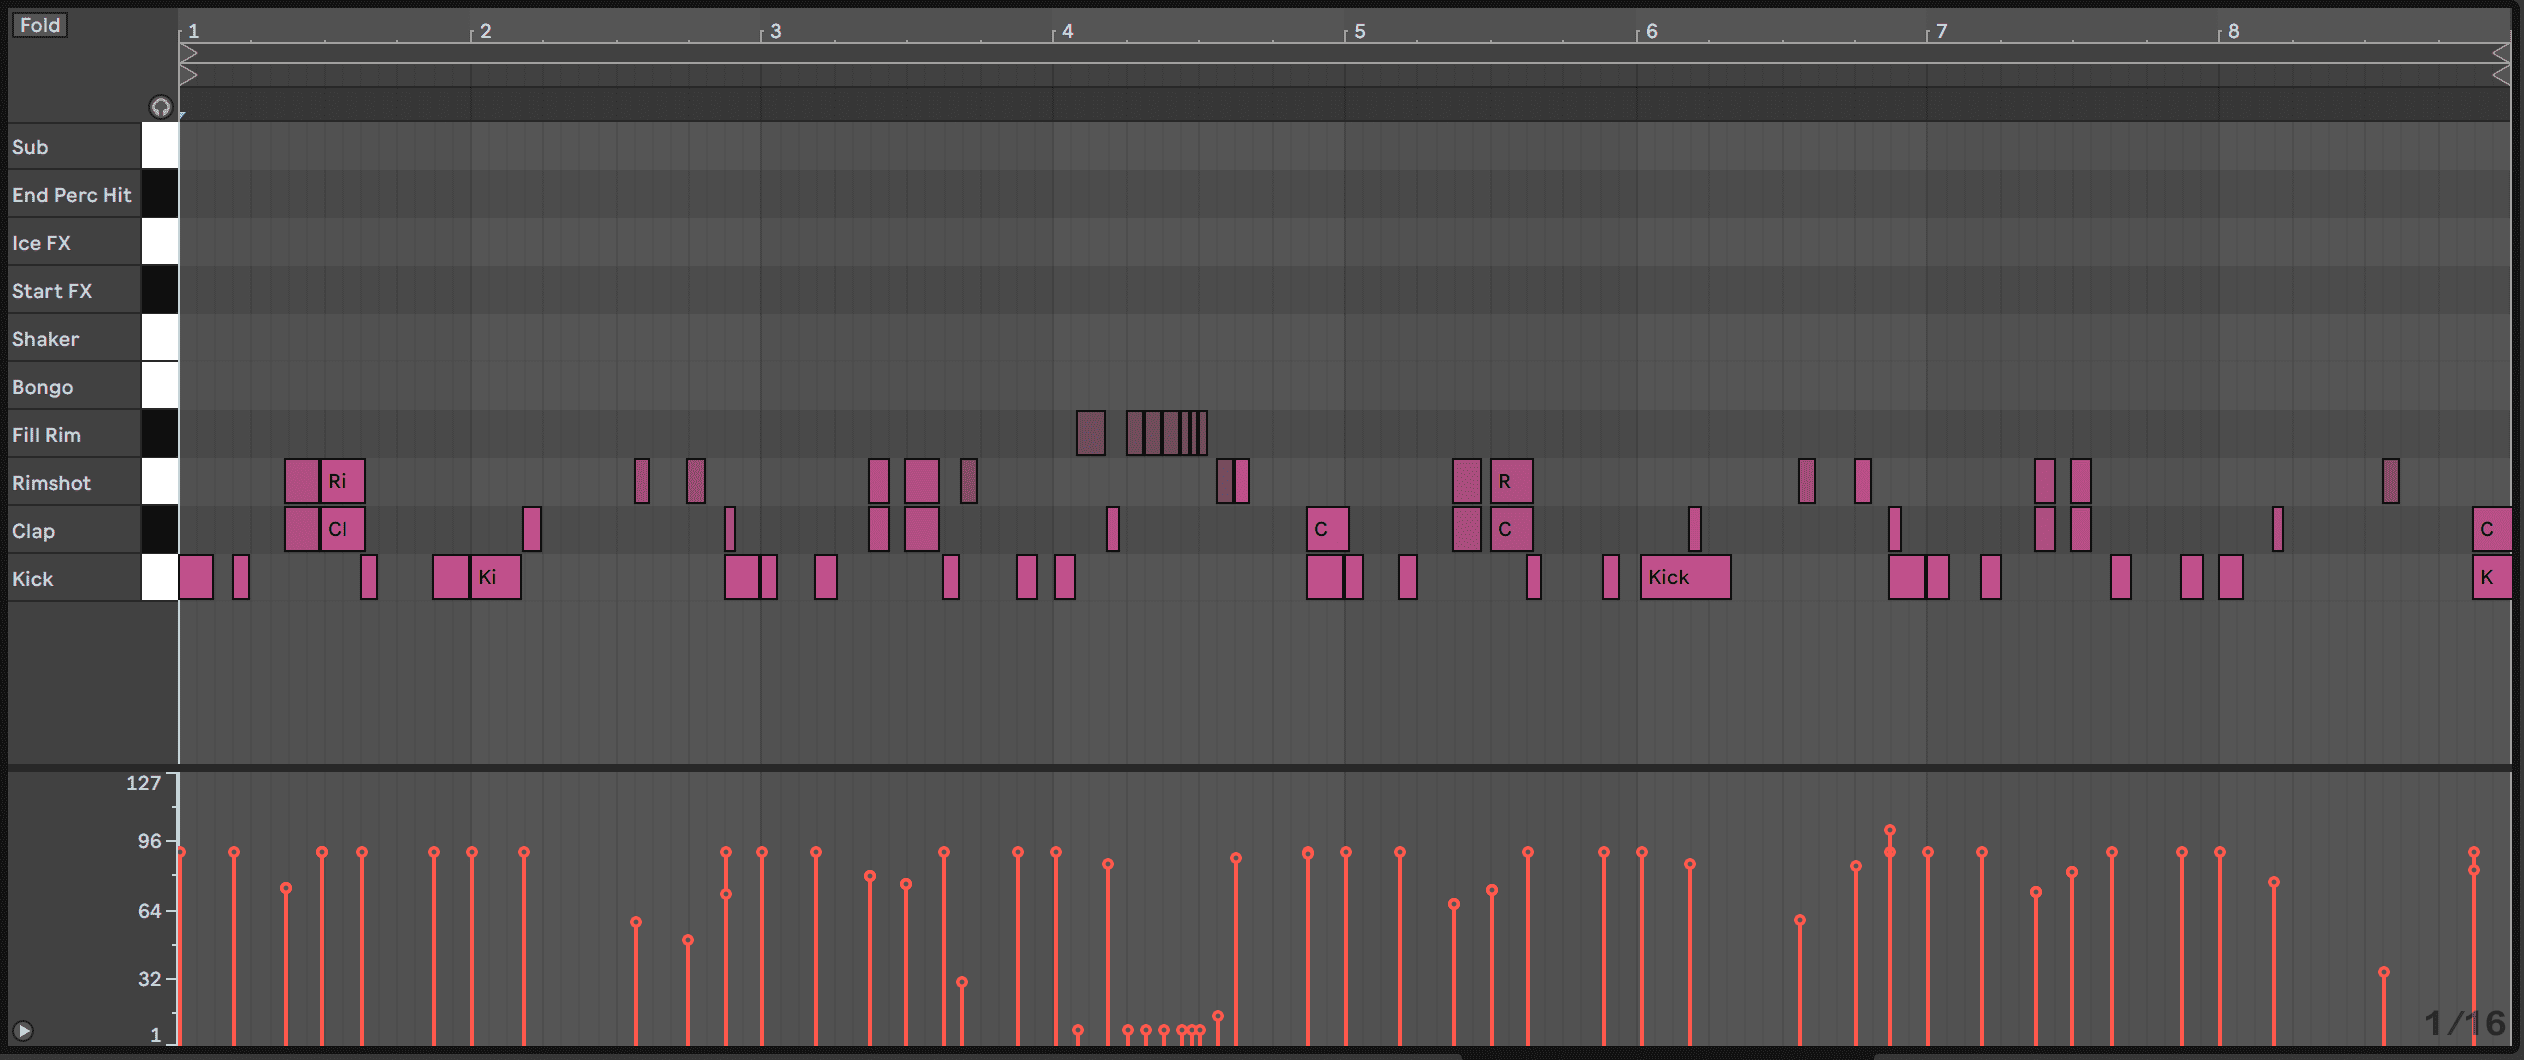
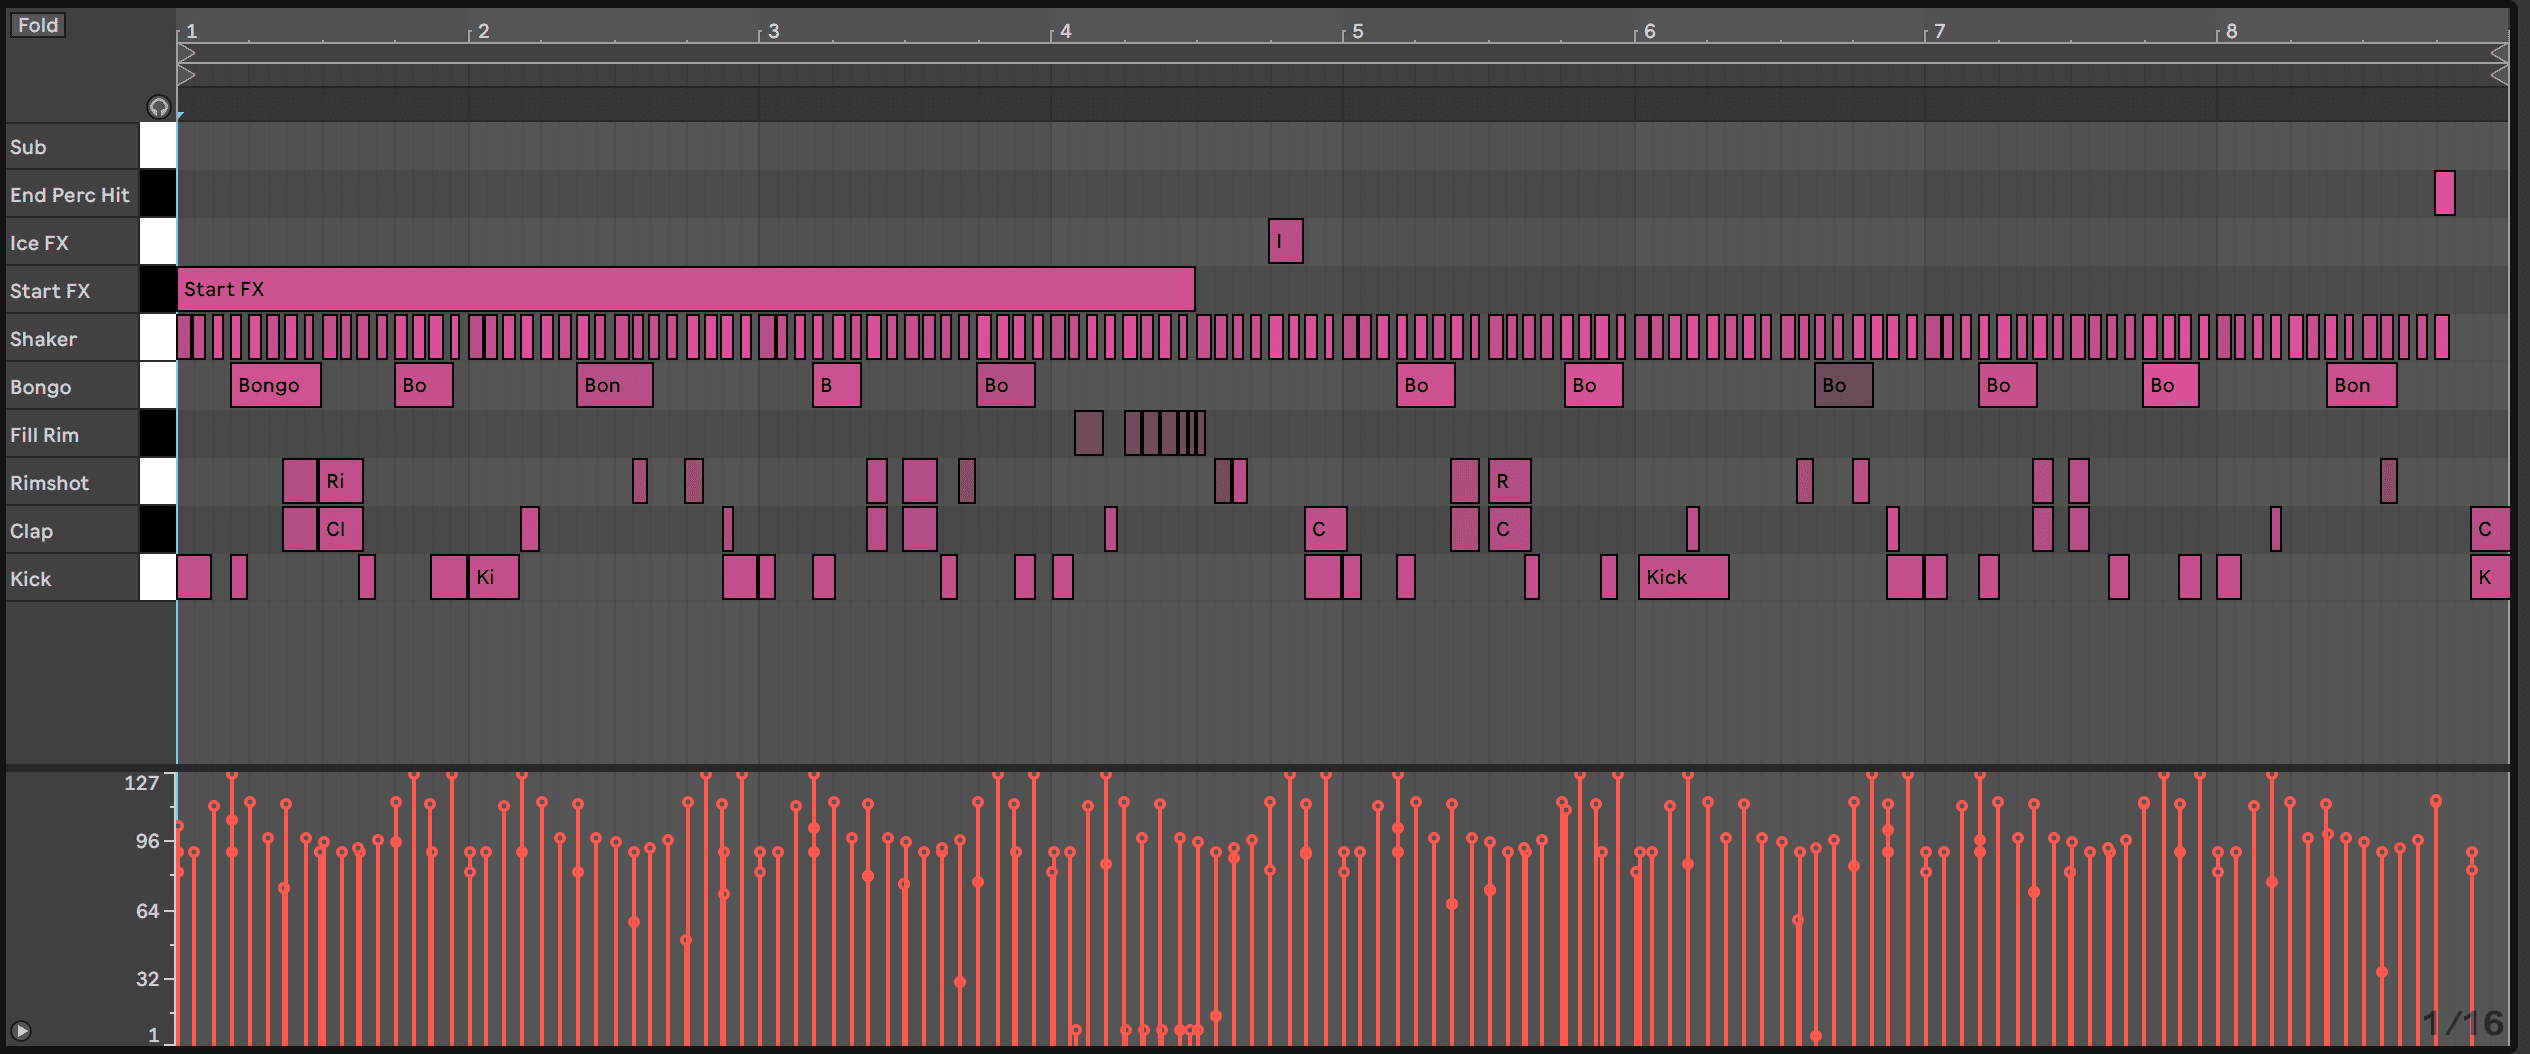
Here’s the beat we are making today.
Spec
Tempo
128 BPMSwing
50%Sounds
Splice & AbletonSTEP 1
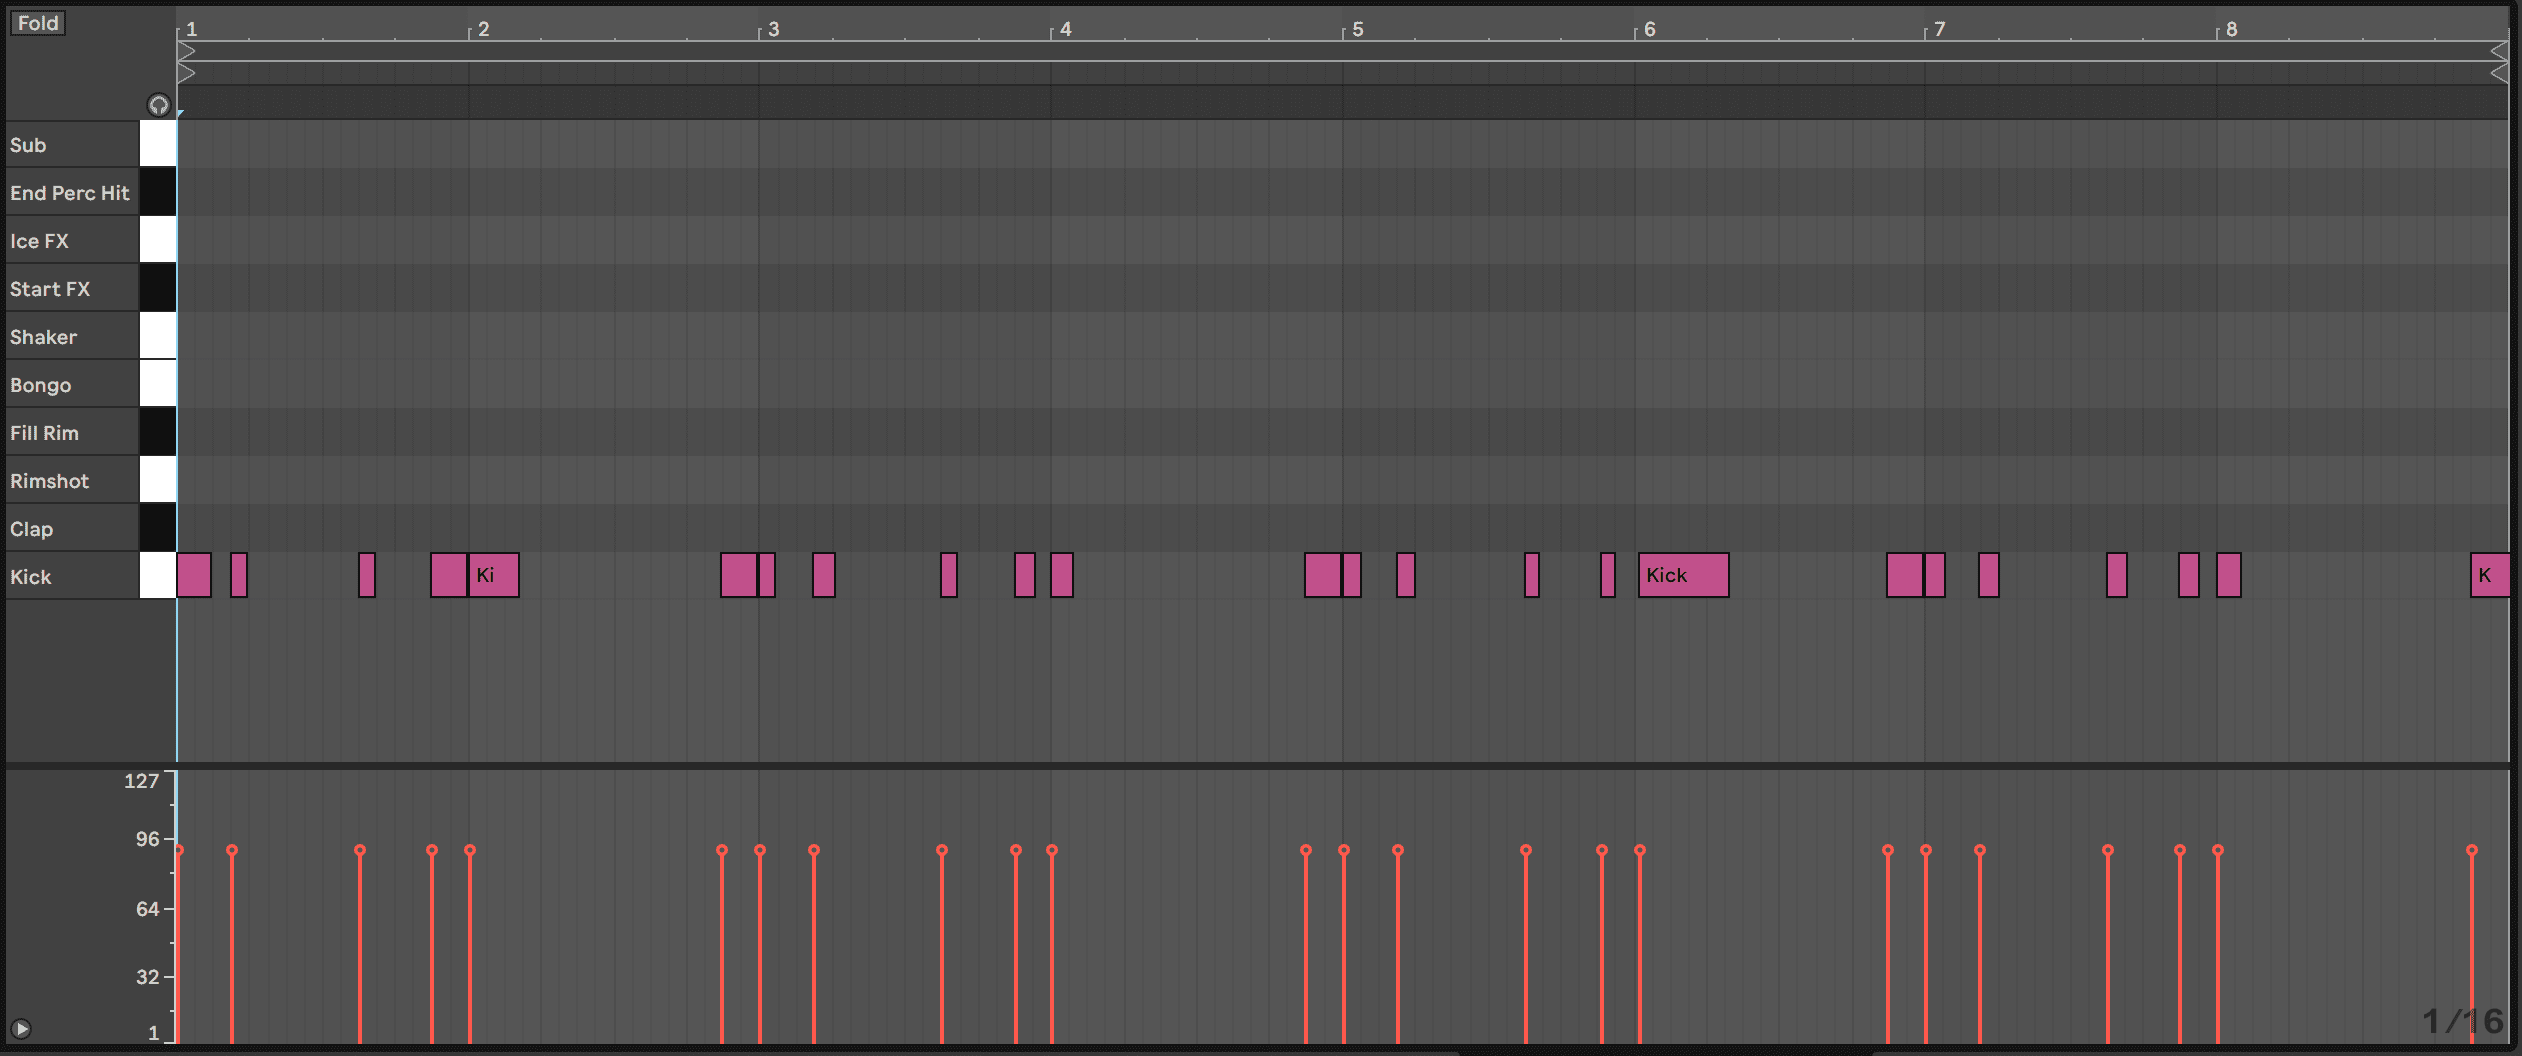
Load up a drum rack in Live. We start by laying down the kick pattern using “Kick” from Splice’s Deep Analogue House 2 pack. The pattern is in a breakbeat style, leaving space for the rest of the percussion to shine and build up tension before the next kick hits. In our example, the velocities are all equal but they can be tweaked for more variation.
Reduce the high frequencies of the kick to around 2.85 kHz within Simpler or Sampler, as we’re only after the oomph of the sub frequencies.
STEP 2
Drag a clap sample onto the second pad of the drum rack and draw in our clap pattern. We used “TAB_Clap_3” from Splice’s House + Tech House Essentials pack.
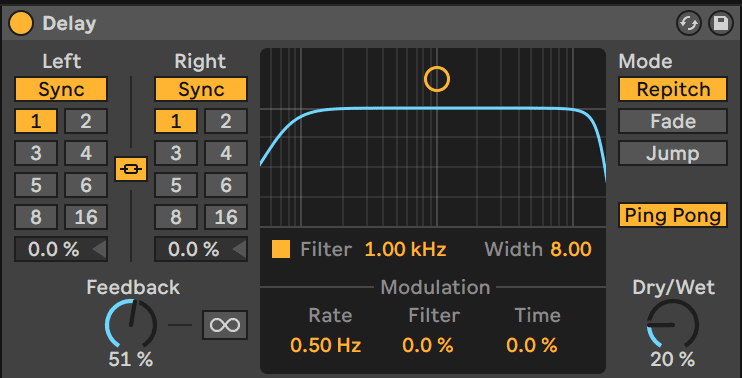
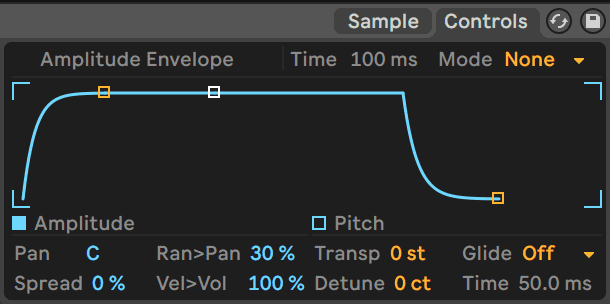
One technique Pearson Sound uses to give a sense of movement to the rhythm is delay, so add Live’s Delay Audio effect to the clap with the below settings. With delay the sky is the limit, so tweak the parameters to taste.
Notice how the delayed clap that doubles the kick before the downbeat creates anticipation for each next bar.

STEP 3
For this beat, we used two rim shot samples, “jc_lh_rim_one_shot_fluck” from Splice’s Luke Holland Beats + Shots pack and “SS_SS_rim_ndioum” from Splice’s Senegal Sessions pack. The former will be used for the main rim shot pattern, while the latter will be used to program one fill.
For the first rim shot, copy in our rim pattern. This creates syncopation with the claps. The rim shot’s velocity levels are programmed to be higher when playing at the same time as the clap to emphasize those hits.
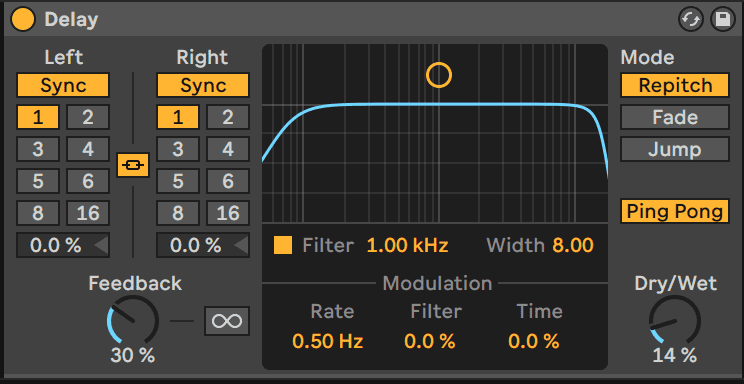
In order to implement the same delay technique used on the clap, copy the delay we used in the previous step and paste it into the rim shot channel. We kept the Feedback and Dry/Wet parameters lower on the rim shot to prevent its feedback from clashing with the clap’s.
For the rim fill, copy our pattern into the fourth bar. This sample is kept dry, as putting a delay on a 32nd note pattern can result in loss of clarity.
STEP 4
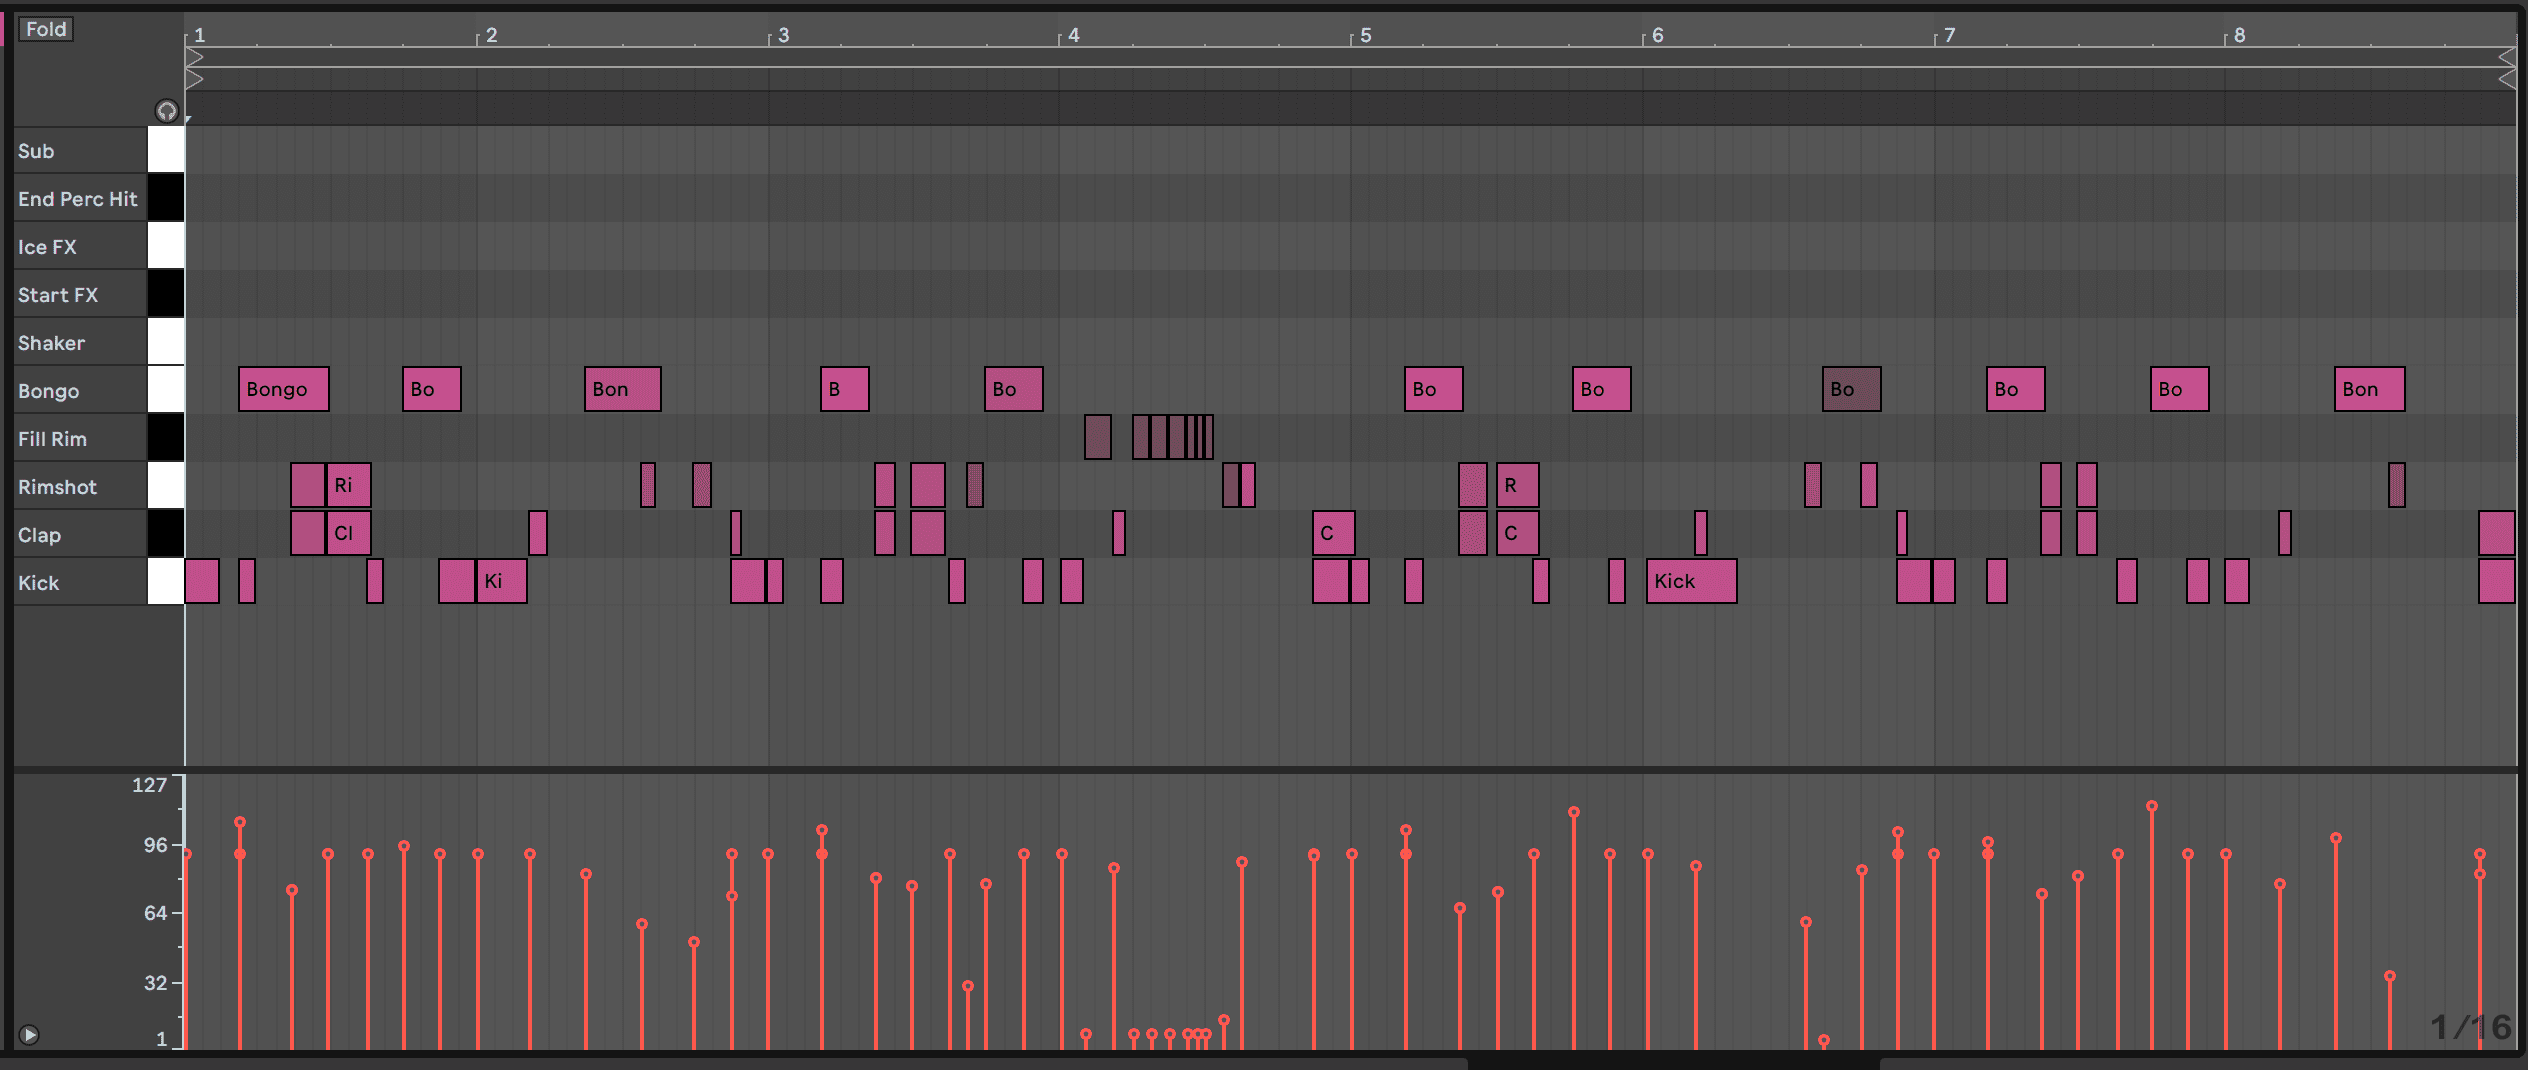
Now drag a bongo sample into your drum rack. We used “cd_2_oneshot_percussion_bongo_high_hiya” from Splice’s Crate Diggers 2 pack. Copy our bongo pattern and adjust the volume so that it sits comfortably with the clap and rim. All of the bongo hits are programmed at a different velocity to add a human feeling.
Add a 1.5-2.5 second room reverb to the bongo. Room reverbs can be a secret ingredient for breathing life into sampled percussion.
STEP 5
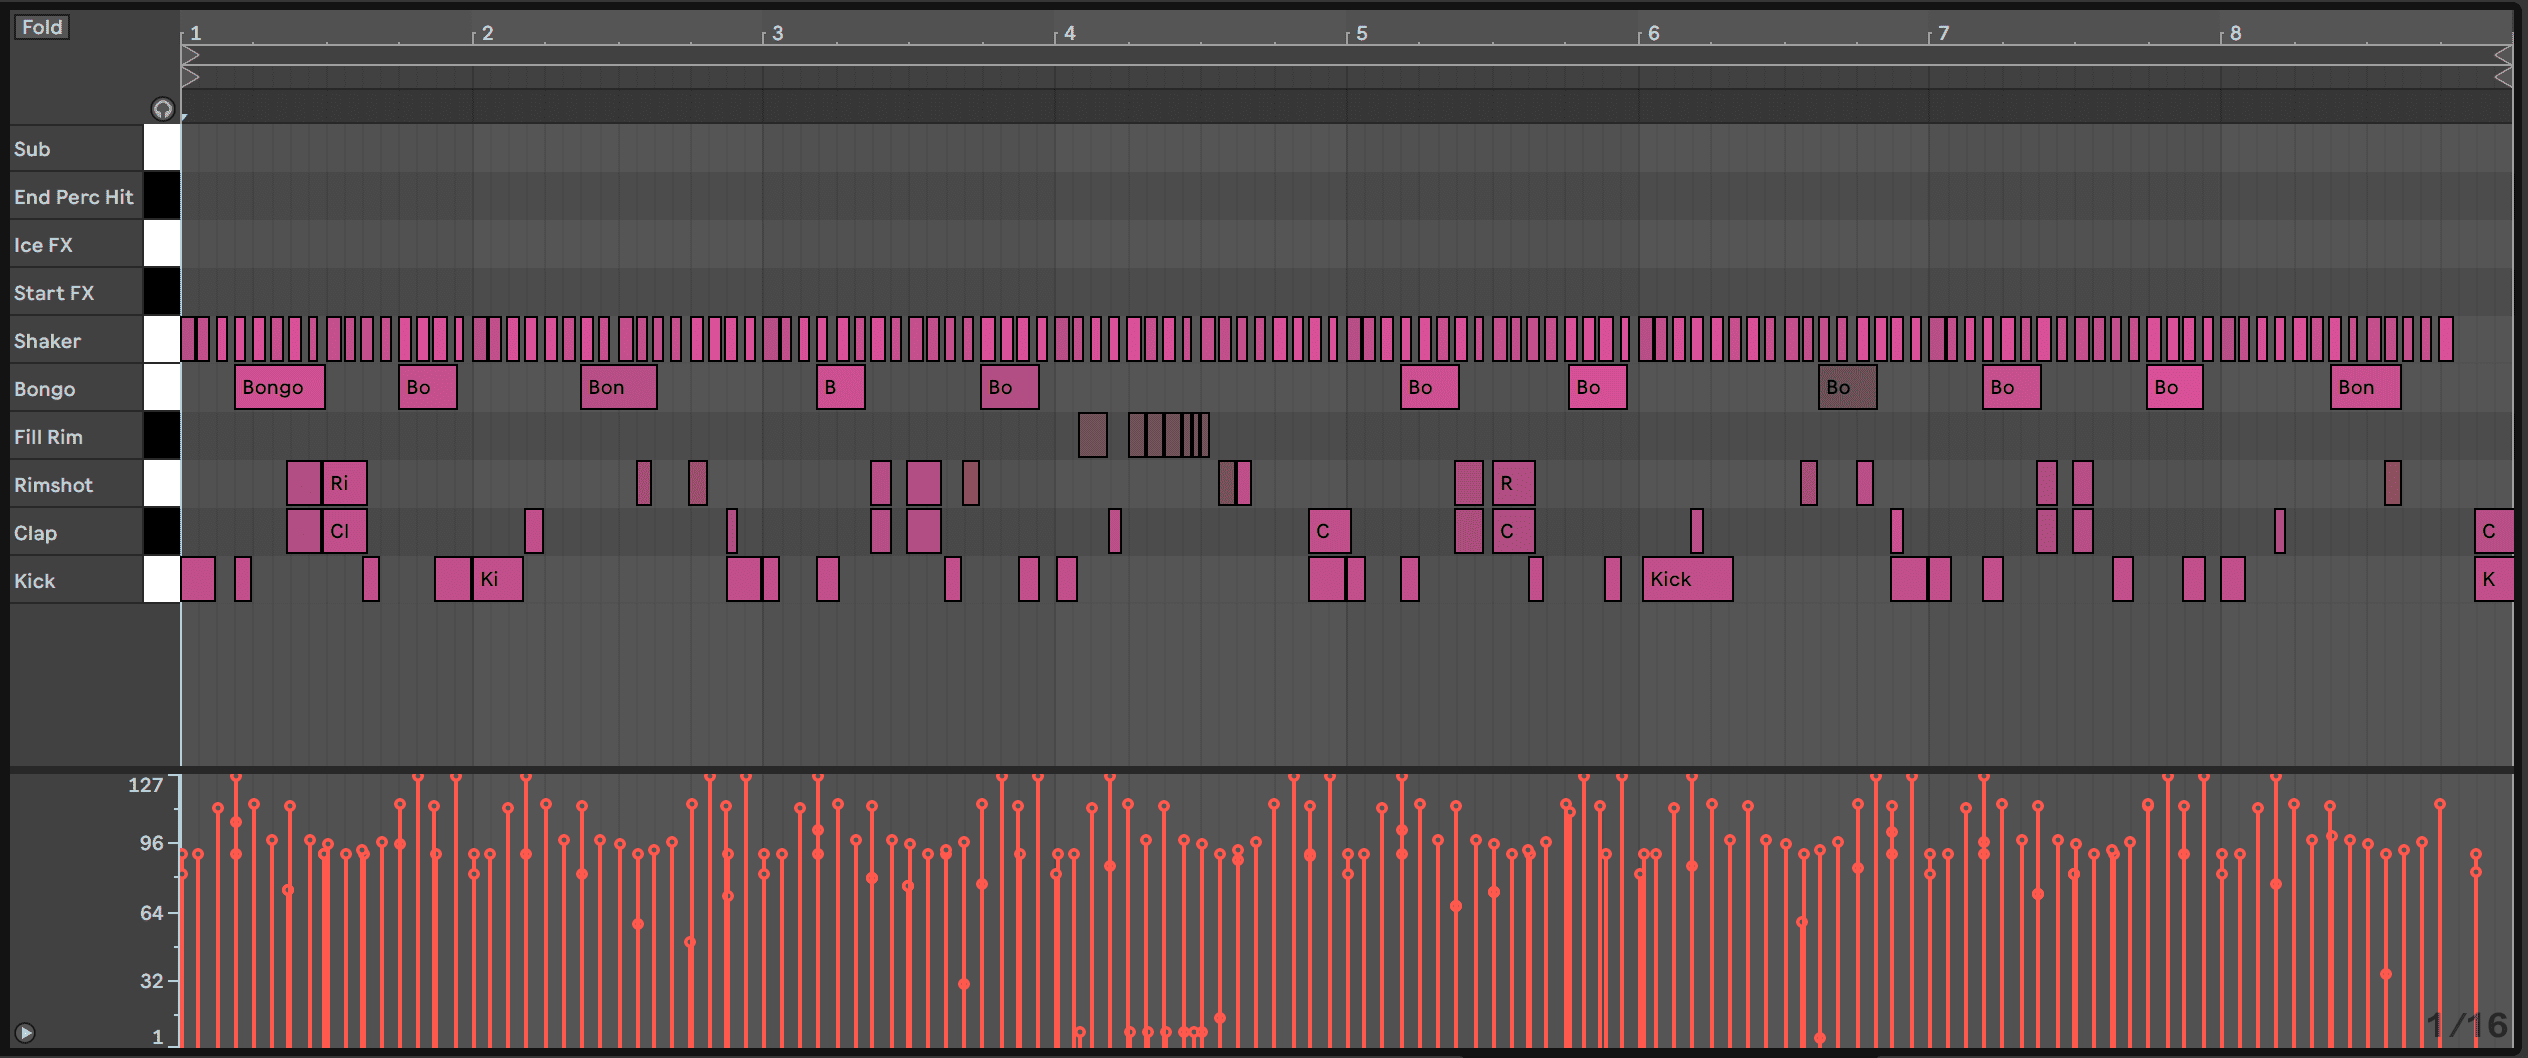
Add a shaker sample to the drum rack and reduce the transient by increasing the “Fade In” amount in Simpler/Sampler. We used “Shaker_Pseudo2” from Ableton’s Loopmasters Mixtape pack.
Program in the shaker pattern, which is essentially a 1-bar loop. The key here is increasing the Vel>Vol to 100% so that the velocity differences are emphasized. This helps, as the shaker loop relies on accented hits.
To add even more movement to the shakers, increase the Ran>Pan knob to around 30%. This will randomly pan some of the shaker hits left and right.
Make sure the shaker is quieter than the other elements as loud shakers can be overpowering. In our example, the shaker is at -36db!
STEP 6
Pearson Sound frequently uses long, resonating effects to create a textural ambience. This is where creativity with sound design comes into play.
To emulate this technique, we added three one-shots throughout the sequence:
- A synth note hit with a long delay sampled from u-he Bazille
- An FX sample from Splice’s new Iceland pack, “EX_Ice_sfx_intense_tonal_buzz_low”
- A percussion one shot called “KRANE_percussion_one_shot_wood_hi” from Splice’s KRANE Samples Vol. 6 pack.
The first one is placed on the first downbeat to add texture. The second one acts as a response to the rim fill and sets the texture for the rest of the beat. We added Live’s Delay and Reverb to lend this sample a drone-like quality. Finally, the third one acts as a new percussive sound that rings out to end the sequence.
STEP 7
In addition to the background ambience created by the effects, we added a 2.5-second reverb to the entire drum rack to give the impression that all of the sounds exist in a uniform space.
To prevent mud, make sure to EQ out the lows from the reverb.
Some compression, saturation and stereo imaging brings us to the final result:
Here is the beat with a sub note sample added at the start of each bar for some context.