u-he are makers of award-winning software synthesisers and effects including Diva, Repro-1, Zebra2, Hive, Bazille, Presswerk and Satin.
Visit U-he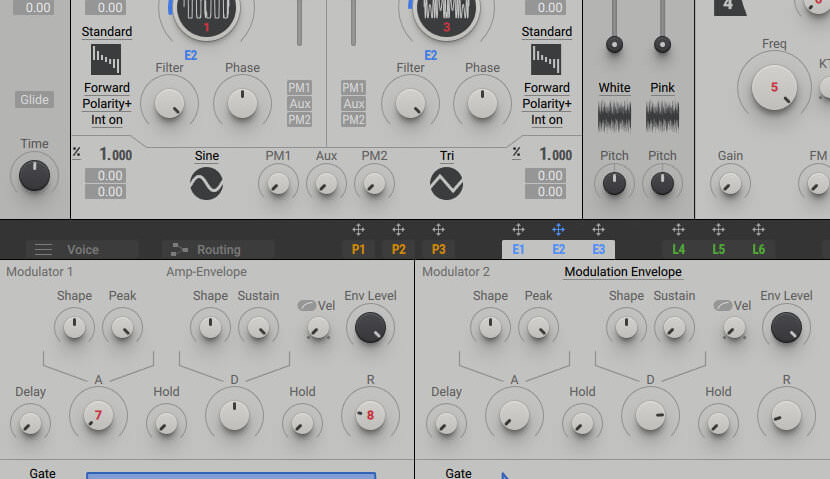
Technique » Synth Secrets »
Techno Reese Bass with Massive X
This channel is sponsored by

The ‘Reese Bass’ is an evergreen sound. In this Synth Secrets, we’re going to make a modulating ‘Reese Bass’ sound using Native Instrument’s Massive X.
Originally heard on Kevin Saunderson’s ‘Just Want Another Chance’, the ‘Reese’ bass sound became a staple of jungle when Ray Keith and Gavin Cheung sampled it for ‘Terrorist’ by Renegade. It’s been a mainstay of drum and bass and dubstep for years and it’s still a great way of adding a dirty, aggressive edge to tracks in just about any other genre.
The classic ‘Reese’ sound is simply two sine waves detuned, the detuning creates a wobble like effect between the slightly different beat frequencies of the 2 oscillators. The aggressive nature of this sound is one of the reasons it’s found favour in big-hitting techno tracks of late. For this feature, we’ll be using Massive X to create such a sound. The unique wavetables and ability to modulate the wavetable position make this synth perfect for our needs.
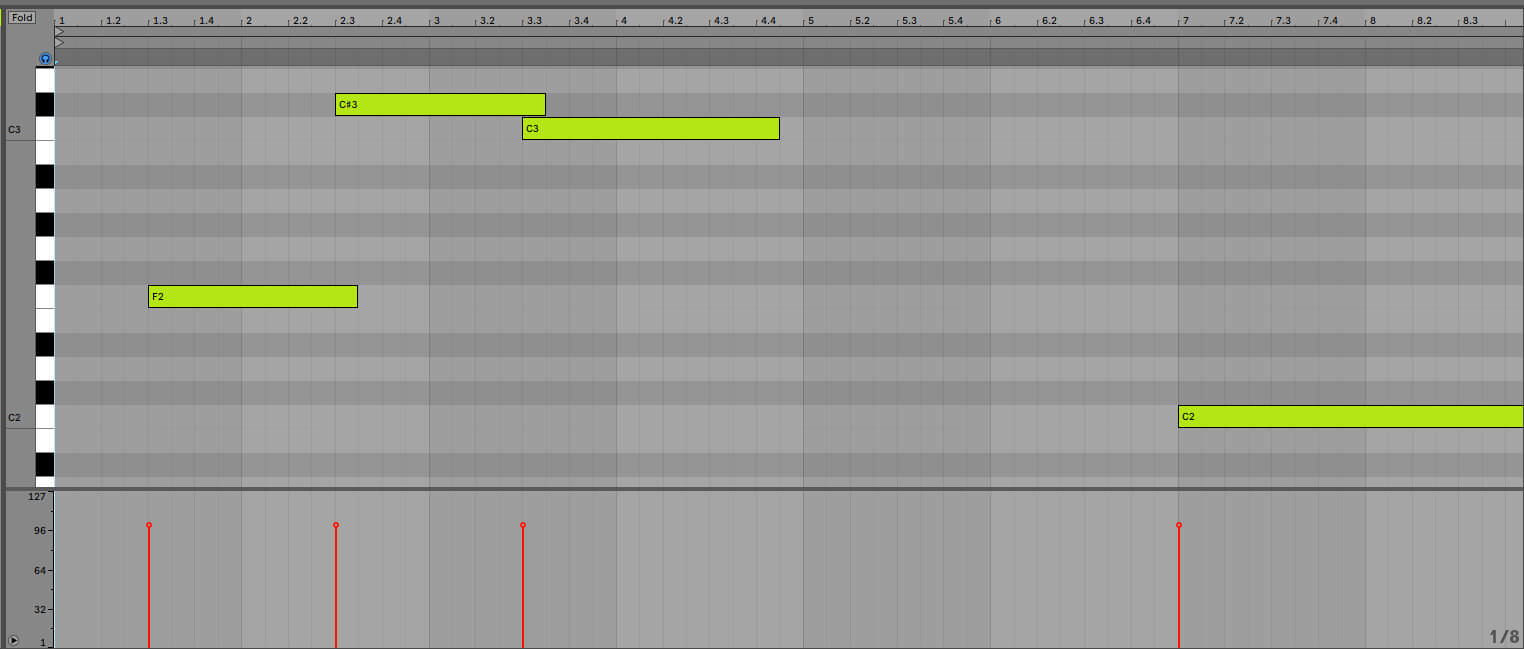
Here’s the part we’ll be creating:
And here’s the MIDI we’ve used for the hook. We’re in the key of F minor:
Step 1
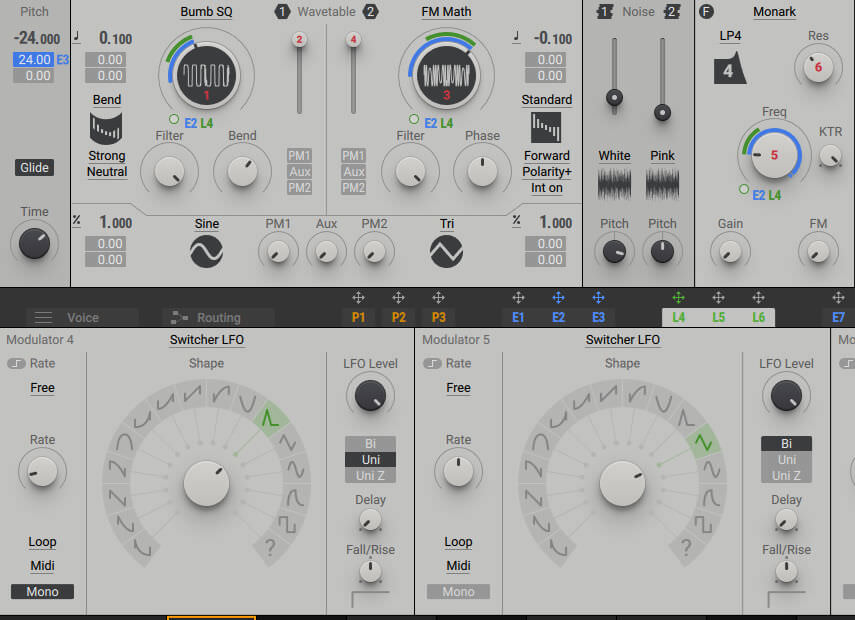
Loading an instance of Massive X and calling up the ‘Init – Massive X’ preset from the Quickstart section. A great way to preview wavetables in Massive X is to first add modulation to the wavetable position control, this way as you preview wavetables you’ll be able to hear the different timbres contained within each one as your modulator scans through the wavetable.
Add a Modulation Envelope to the first modulation slot on the wavetable position control on Oscillator 1. Modulation in Massive X is assigned by clicking and dragging the crosshair of a modulator to a modulation slot. Once added you can click and drag, up or down, to apply modulation.
Push up the Decay on the modulation envelope, and set it to Mono in the Gate section, meaning the modulation won’t re-trigger for each new key trigger. By clicking on the wavetable name (‘Sin-Tri-Saw-Sq’) we can select a different wavetable for the oscillator. Head to the Monster section and select the ‘Bumb SQ’ wavetable.
Over on oscillator 2, load the ‘FM Math’ wavetable from the same section, turn the level up to the full capacity and again apply the modulation envelope to the wavetable position control. Lastly, detune the master Pitch to -24.000 (- 2 octaves).
Step 2
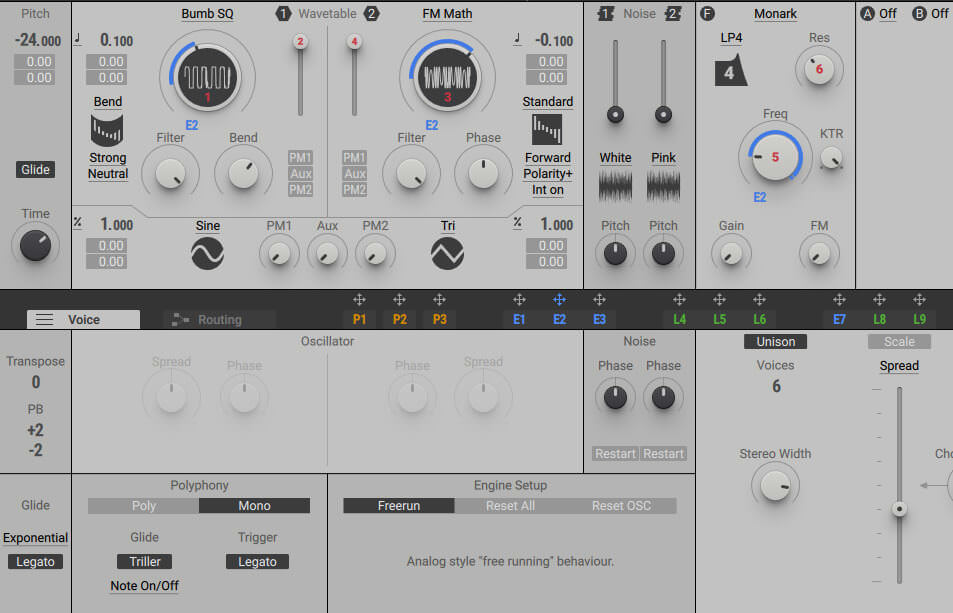
To get our sound more like a ‘Reese’ we detune each oscillator, changing the fine-tune and tweaking in opposite directions. Set the pitch of OSC 1 to 0.100 and the pitch of OSC 2 to -0.100.
Next up, navigate to the Voicing tab, and in the Polyphony section, turn on Mono and on the Glide section turn on the glide and turn it up just a little to taste. The notes now bend into each other.
Turn on Unison and increase the voices to 6, push up the Stereo Width and increase the Spread a fractional amount (or more to taste!). Adding these extra voices and detuning them across the stereo field thickens up the sound.
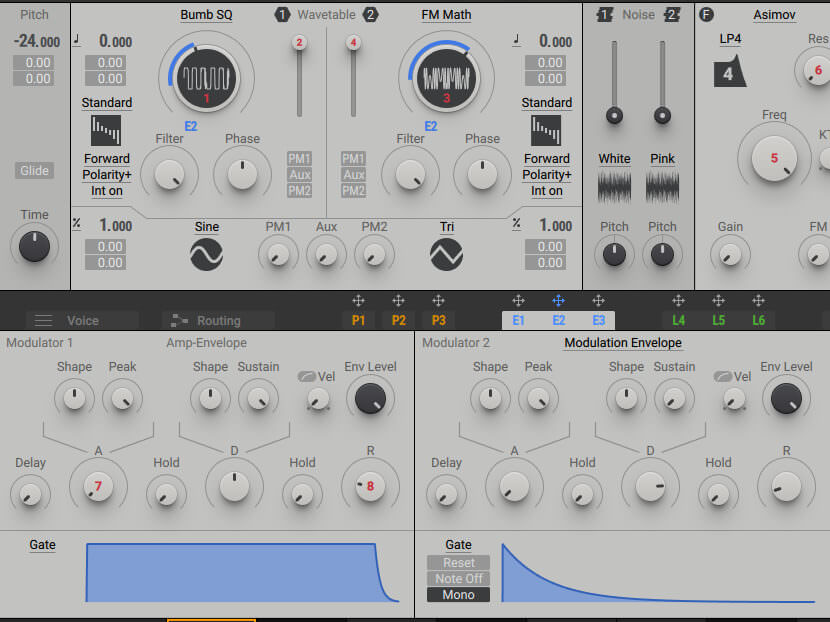
To apply more movement, load the Blue Monark filter, bring the cutoff frequency (Freq) down and push up the resonance (Res). Then use the modulation envelope to modulate the cutoff.
Back on oscillator 1, change the oscillator mode to Bend. The different oscillator modes dictate how the waveform is pushed and pulled apart and is a great way to expand to the sonic remit of each wavetable. Now we’re already close to that ‘Reese’ goodness!
Step 3
In order to punctuate the attack of the sound, we can add some pitch modulation via another envelope. Head to envelope 3, which by default is an Exciter Envelope, change this to a Modulation Envelope and use it to modulate the master pitch by 24.00. Back on the envelope, roll the Decay down until we get a punchy attack.
Now for some LFO action! On the first LFO slot change the shape to a short Saw wave, bring the Rate right down and again set it to Mono. Set the modulation to Uni (unipolar), meaning it will only modulate in one direction, as opposed to Bi (bipolar) which would modulate controls in both directions. We use this LFO to modulate the wavetable position controls on both osc 1 and osc 2 and the cutoff frequency of the filter.
We’ve also added a touch of White Noise, turning up the level of the first noise slot.

Step 4
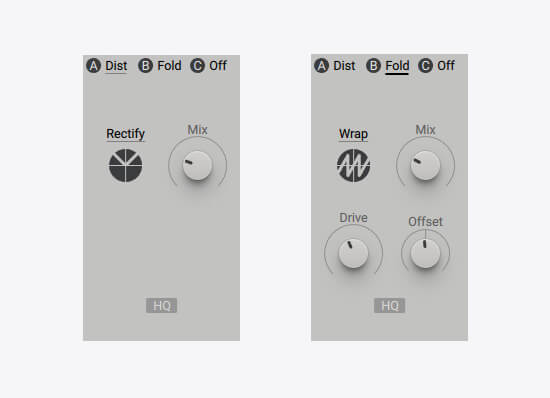
Massive X has an array of great-sounding effects we can utilise to for powerful sound design. Start off with the Utility effects, adding a Distortion in slot A, select the Rectify mode and turn the Mix anti-clockwise down. In slot B add a Folder effect, activate the Wrap mode and roll down the Mix and Drive, adding a suitable amount of aggression and grit to our synth.
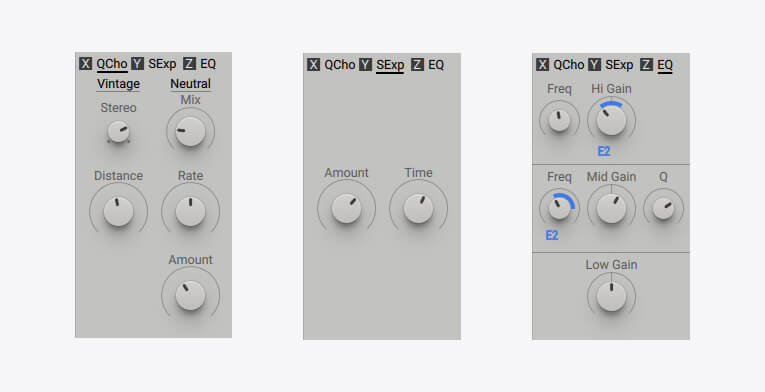
On the Master effects section, we add the Quad Chorus, lowering the Mix and increasing the Stereo. Apply a Stereo Expander, dialling up the Amount and Time controls. And finally, add an EQ.
Just read through. Maybe I should have referenced to use the same modulation envelope (E2) that was used in the previous step. And also describe the resulting effect in a little more detail:
Just in case we didn’t already have enough dynamics in the sound, we can add some more modulations here. Use the same modulation envelope from the previous step (E2) to modulate the Hi-Gain and Freq control on the Mid Gain, whilst also pushing up the Q (resonance) on the Mid Gain. These extra modulations will sweep the high and mid frequencies on the patch as the sound decays, whilst pushing up the Q makes this effect more pronounced.
Step 5
With our Massive X patch sounding appropriately nasty, we can now turn our attention to some DAW based processing.
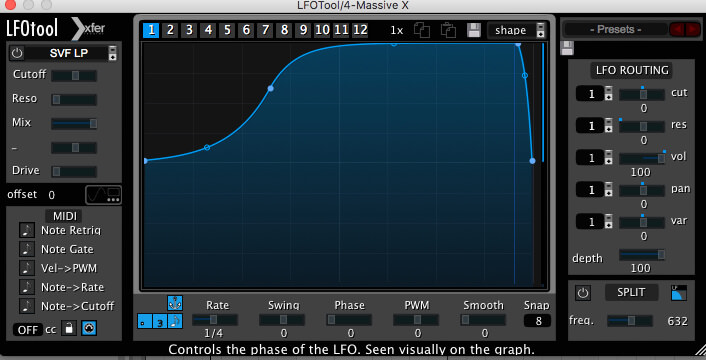
Kicking off with some basic side-chain compression via Xfer Records’ LFO Tool, ducking the sound on the kick drums. Add an EQ Eight and roll off the low end below 80Hz, and set a High Shelf to filter away some of the tops.
Next insert an instance of Ableton’s Drum Buss effect, increasing the Drive and Boom whilst level compensating by taking the Out down to -4.03 dB. And finally, a Reverb, keeping the Dry/Wet around halfway, we sweep up the Decay for some nice space and ambience on the sound.

It should now sound like this:
Synth Secrets is sponsored by
u-he are makers of award-winning software synthesisers and effects including Diva, Repro-1, Zebra2, Hive, Bazille, Presswerk and Satin.
Download the demos and try them for yourself at www.u-he.com