u-he are makers of award-winning software synthesisers and effects including Diva, Repro-1, Zebra2, Hive, Bazille, Presswerk and Satin.
Visit U-he
Technique » Synth Secrets »
Sine Percussion Lead With U-he Heckmann
This channel is sponsored by

A sine wave is more adaptable than you think. In this tutorial, we’re using Zebra by u-he to make a sine wave, the main arpeggio in our track.
There’s something about building a good sine wave synth patch that lends a track a kind of mellowness and atmosphere that you can’t get any other way. From the lead in Oakenfold’s classic club trance banger Resurrection to a supporting role in recent dance hall D&B like Wilkinson’s Here For You (the sound appears right about here, the sine wave proves it’s better for more than just sub-bass.
In today’s Synth Secrets, we’ll design an arpeggiated and percussive sine patch using u-he’s overpowered Zebra 2. To follow along, set your DAW’s BPM to 174, fire up an instance of Zebra (demo available here), and let’s go. We will be using this remarkably simple bit of MIDI.

We’re hardly scratching the surface of Zebra’s deep semi-modular interface, we’re simply choosing this synth for its capable arpeggiator and rather lovely built-in FX engine.
One thing to note about Zebra is how easy it is to navigate. When you realize that every main bit of the synth has its own dedicated tab at the bottom of the interface and a huge editor screen that spreads out when selected, you will quickly move from module to module, and most of that happens on those tabs.
Step 1: Setting the stage
Of course, it’s time for a new patch, init? So initialize the patch by selecting the init preset at the bottom of Zebra’s browser’s list. Next, select the GLOBAL tab at the bottom left of the interface and switch the MODE setting from poly to arpeggiator.
Now, we’ll leave the GLOBAL tab and head to the ARP/SEQ tab. In that menu, change the Sync setting from ¼ to ⅛, flip the Octave setting from 1 to 0, and then match the sequence’s settings to what you see in the screenshot. Pay special attention to the fourth row, the Voices setting. You can mute a step by setting its Voices value to 0 and it’s easy to miss that bit.
This is what we should end up with:

Step 2: Sines and Miracles
Make your way to the OSC1 tab and click on the wavetable selector, all the way on the left, which by default says None. You’ll select the wavetable Sine Tree from the default Factory OSCs folder.
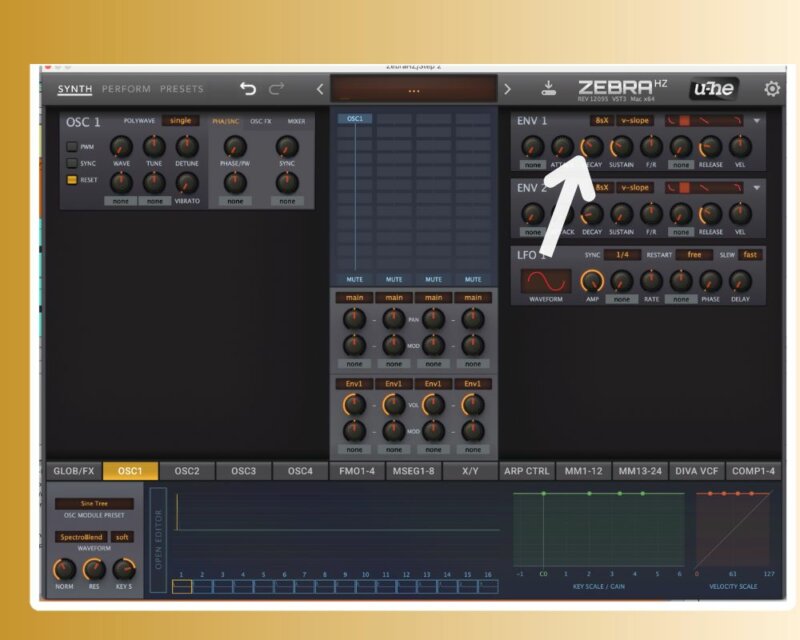
Then, we will shape the amp envelope a touch by moving up to the top right, pulling ENV 1’s decay sustain down a touch, and adding a little release. The idea is to emphasize the leading edge of the sound just a bit.
Now we’re getting somewhere.
Step 3: It’s Time for the Modulator
One thing that makes the sine arpeggiator in Here For You work so well is its really percussive transient, which allows it to establish a place in the mix even though its volume level is quite laid-back. By modulating oscillator 1’s pitch using envelope 2, we’ll achieve that impact.
Click on the MATRIX tab, and in the first slot, select Env2 as your source. Then click on the Target field and drag the crosshairs to the Tune setting on oscillator 1. You don’t hear anything immediately, but when you start turning up the SRC knob, you’ll start to hear the envelope modulating pitch.
Set it to about 2 o’clock for now, trust me, even though it sounds like…

Step 4: Shape the Transient
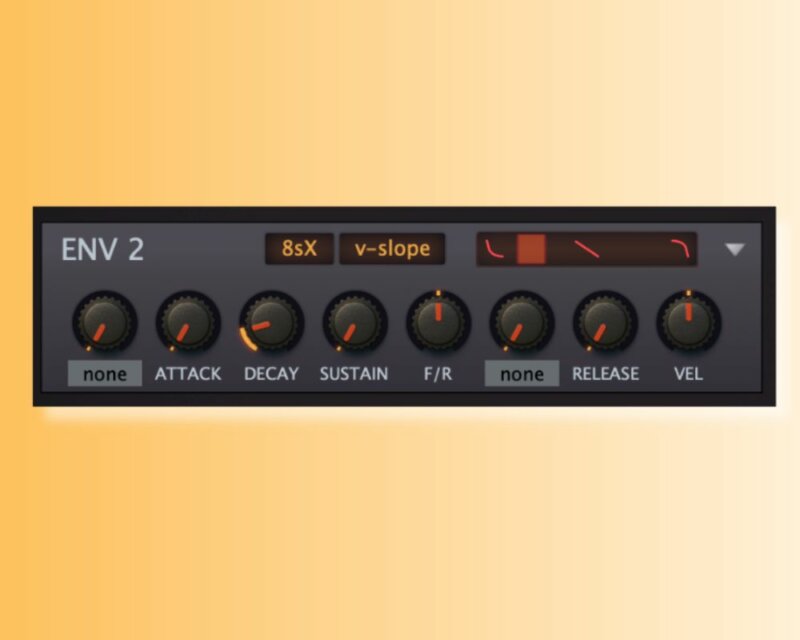
Move to the ENV 2 module and pull release and sustain down to zero. Then grab the decay knob and pull it down gradually until you’re no longer hearing a perceived pitch change but instead more of a knocking sound. That’s the sweet spot, and it’s at about 8 o’clock on the release knob in this case.
Here’s our progress:
Top Tip: If you want to fine-tune your patch for your own needs, now is the time to do it. Now that the decay is set right, you can move back to step 3 and adjust the SRC knob to change how much pitch modulation you’re adding to the sound. High modulation amounts give a metallic click. Low modulation amounts get more of a woody knocking sound.
Step 5: Ambience
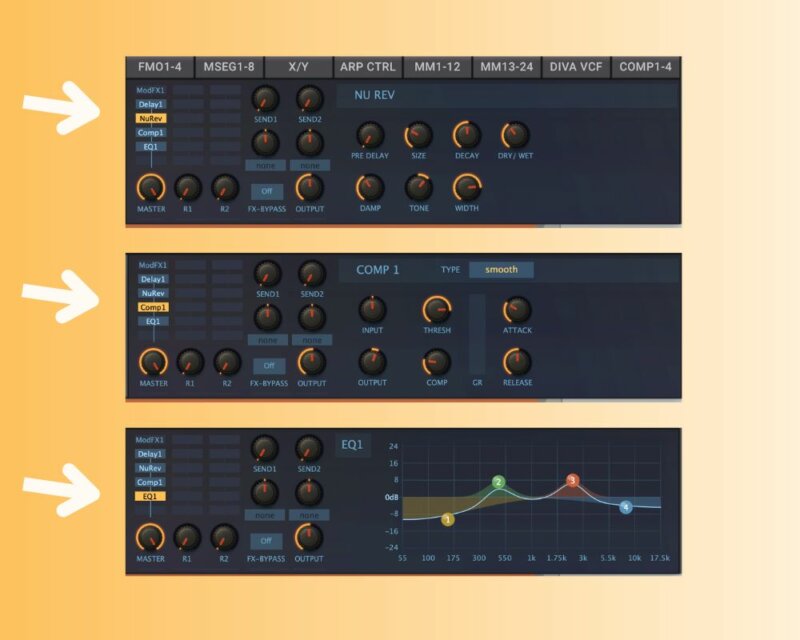
Just a touch of ambience is an absolute requirement here. Head back to the GLOBAL tab. The synth’s main mixer appears in the interface’s very center. Note that all up and down the center panel of Zebra you’ve got these empty blocks that look a bit like clip slots from Ableton Live. Clicking on any of those allows you to drop a new effect or sound generator into the signal path. Zebra can do incredible things this way, and I encourage you to experiment with it, but for now, we’ll use it in a very simple way.
In the master mixer, we’re going to click on the empty block below ModFX1 and select Delay1. Note that the parameters for the delay engine appear on the bottom right for our editing. We will switch the MODE to dubby 2×2, the time on the second tap to ¼ dot, and pull the mix up a touch. Then we’ll narrow the spectrum of the delay by pulling on the Lowpass and Hipass knobs, making the effect hypnotic without being over the top.

Step 6: A touch of sweetener
Finally, we will add a touch of reverb using the NuRev effect, which you can activate by choosing another empty block under Delay1 and selecting NuRev1. We will also add Comp1 after NuRev to emphasize the time-based effects we added.
Match the following settings and we’re there.
And in the context of a full song:
If you like this tutorial you may enjoy our Synth Secrets on YouTube or here on Attack’s website.
Find out more about Zebra – The workhorse synth.
Follow Attack Magazine
Attack Store

The Secrets of Dance Music Production
The world-leading book on dance music production. Comes with samples too.

The Producer’s Manual
Everything you need to take a mix, from initial recording to final master.

FinalFinal T-Shirt
A hilarious tribute to our never-ending battle with file naming chaos.

Secretos de la Producción de Música Dance
La guía definitiva para producir música electrónica de vanguardia.


Max For Live: Chance Engine
Add controlled yet random fluctuations to your most important parameters


Underground Resistance: The Final Frontier Poster
Anti corporate, political, powerful and progressive the power house of Jeff Mills, Robert Hood and "Mad" Mike Banks needs little introduction.

Synth Secrets is sponsored by
u-he are makers of award-winning software synthesisers and effects including Diva, Repro-1, Zebra2, Hive, Bazille, Presswerk and Satin.
Download the demos and try them for yourself at www.u-he.com