
Legato in dance music
Let’s take a look at the bassline from ‘Metronome’ by Redlight, which can be recreated using this technique. The passage we’re examining is the first eight bars of the drop, which occurs at 1:34.
Here’s the main bass part, shown in Logic’s piano roll editor:
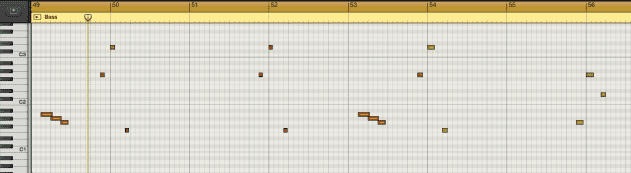
Note that there are two distinct techniques going on here. The first group of three notes are long eighth notes, each one overlapping into the next to produce a smooth downward bend that glides through the pitches thanks to the synth’s portamento setting being enabled. The fact that these notes are played legato is what produces the gliding pitch effect. Following this phrase, we have an answering cluster of three short, staccato notes. These chime in on the pitch instantly, the large gaps between them preventing the portamento from kicking in, and also retriggering the synth’s amplitude and filter envelopes, which is what gives each new note its strong, picky attack.
As we mentioned earlier, the envelopes can also be retriggered while using portamento effects, so that the pitch glides from one note to the next but the filter and/or amp envelope still starts again with each new note. Many modern synths describe these two settings as mono and legato modes. In mono mode, the envelopes retrigger with each new note that’s played, even with the first note held down. In legato mode, the envelopes do not retrigger when you play a new note. This makes for a smoother sound, as long as the sustain level setting in the both the amplitude and filter envelopes is set high, so that the initial trigger can sustain the successive notes at the same level of volume and brightness as the first note. Anything less, and the sound will get duller and/or quieter as the part progresses (which isn’t necessarily a problem, if that’s the effect you’re looking for).
Monophonic step sequencers
When talking about legato and synths, special mention needs to be given to the Roland TB-303, the famous monophonic released in 1982. Everybody went crazy for it during the acid house era, as this little silver box’s trademark slidey, squelchy sound fuelled much of the music of the time. The 303’s internal sequencer played a huge role in its popularity, featuring a very specific approach to legato sequencing, with a dedicated feature to ‘tie’ consecutive notes together and a slide button that, when applied to a particular step in the sequence, would drift the pitch of the oscillator from the selected note to the next. As an example, check out the multi-layered 303 parts in 808 State’s ‘Flow Coma’, released in 1988:
Polyphonic Legato and Forced Legato
Finally, let’s consider the use of legato techniques in polyphonic parts such as synth pads. When playing more than one note at a time, similar synth techniques can be used, but the result will be subtly different to monophonic techniques even on synths that implement polyphonic portamento. Polyphonic parts are a good reminder that if we go right back to the basics we discussed at the start of this tutorial, legato styles aren’t necessarily about fancy synth settings or gliding from one note to the next. It can still be just as simple as playing in a style which smooths out the transition from one note to the next.
For smooth pad parts, you need an envelope setting with either a long release phase to smooth out the transition between the notes or chords, or a high sustain portion, so the notes don’t die away as they’re held down. The notes must then be played or programmed with the right lengths to run smoothly into each other. This can be done either by lengthening each note by hand in your DAW’s piano roll editor, or by using a technique featured on some DAWs known as ‘force legato’, which automatically adjusts note lengths so that there are no gaps between the end of a note and the start of the note that follows it.
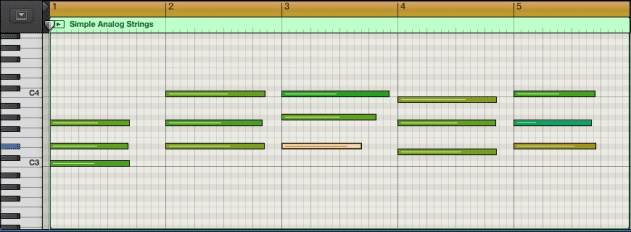
Here’s a pad part as originally played, using a synth sound whose amplitude envelope is set for a high sustain setting and an average release time. Note the gaps in between each chord change. There will always be a small gap as you move your fingers from one chord to the next, but these longer gaps are sometimes caused by not being quick enough at shaping the next chord to hold the previous one down for as long as it’s needed.
Here’s how it sounds with a longer release setting – increased from 1500ms to 3000ms. This helps, but the gaps still sound somewhat uneven, and doing this can blur the transition between chords too much if you’re not careful, as the sounds overlap.
And here’s the same part with the original release setting, but now force legato has been applied. There are now no gaps, and each chord flows smoothly into the next.
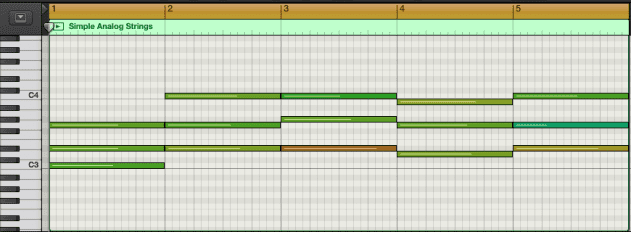
It’s an incredibly simple solution, but the result is a legato pad part more uniform than even the best keyboard player could manage.