
In this instalment of Beat Dissected we’ll be creating a jackin’ tech-house beat based on Roland TR-909 hits.
Beat Dissected is a regular series in which we deconstruct drum patterns, showing you how to program them in any DAW. Just copy our grid in your own software to recreate the loop.
Pull the project from Blend below to download the samples.
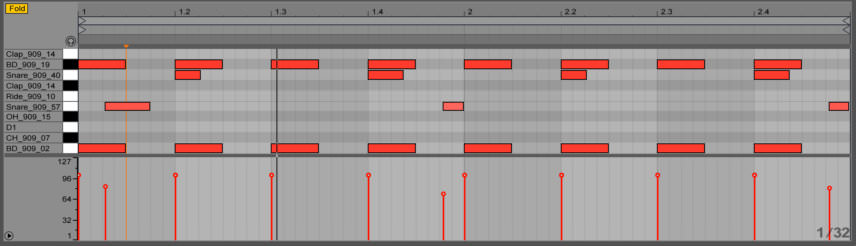
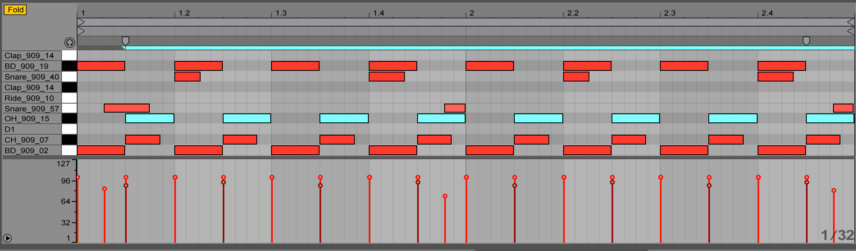
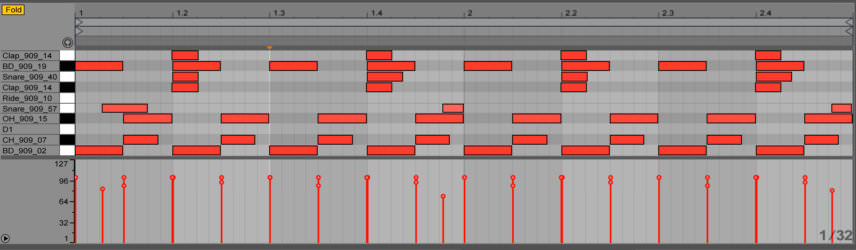
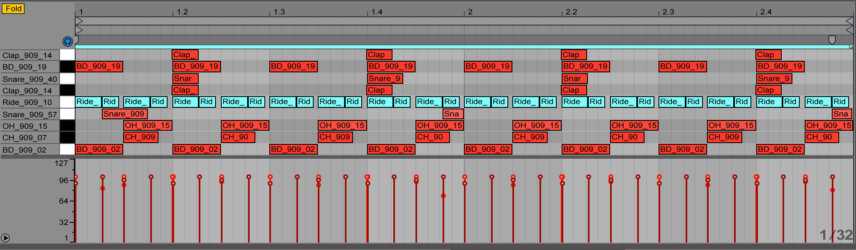
Here’s the beat we’re building today:
Spec
Tempo
123-126 BPMSwing
55-65%Sounds
Processed Roland TR-909 hitsStep 1
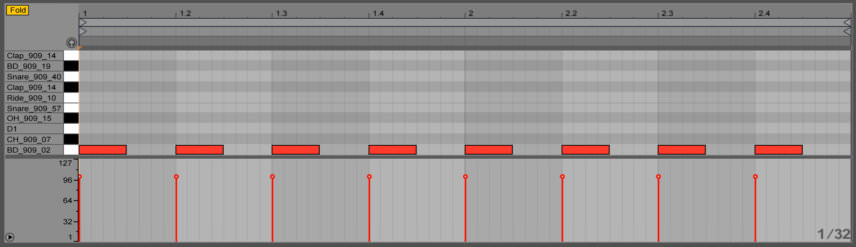
We begin with the bass drum. We’re using 909 samples taken from the Samples From Mars 909 From Mars pack. The pattern is a simple four-to-the-floor.
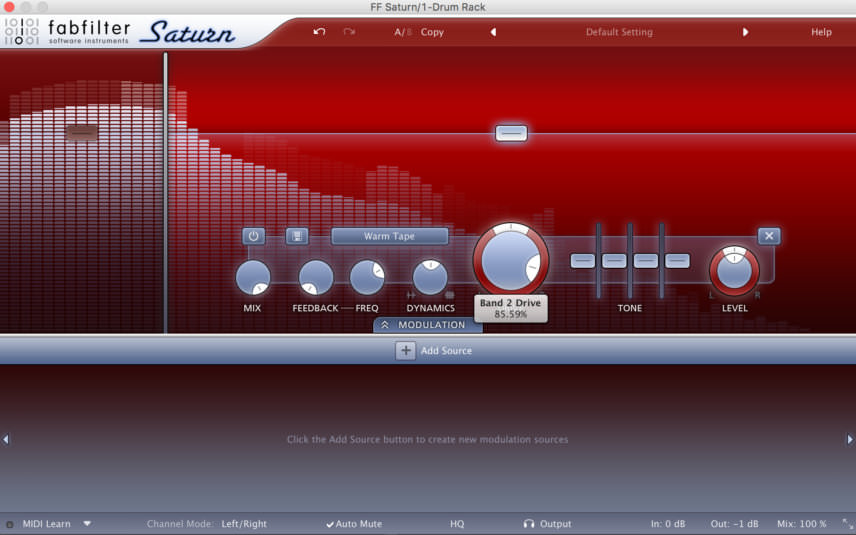
Considering it’s the driving force of our beat, we could do with adding some attitude to this sample. We load an instance of Fabfilter’s Saturn, applying the Warm Tape algorithm along with a moderate drive setting to 77 Hz and below.
We also apply the Warm Tape algorithm to range above 77 Hz, but here we push the drive right up to 85%. We follow this with an EQ, cutting everything below 30 Hz and pulling out a few mids.
Step 2
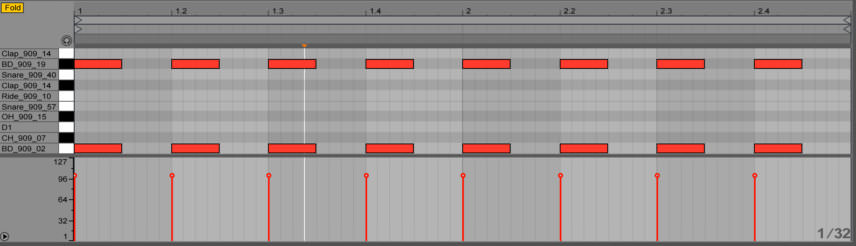
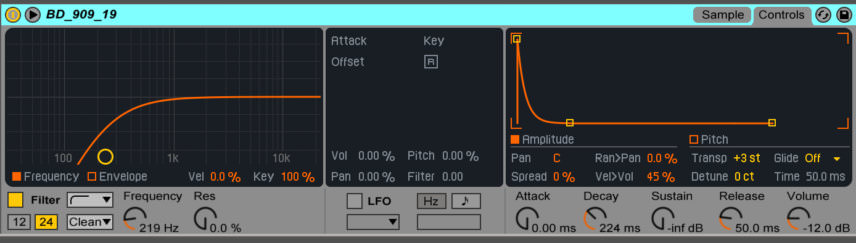
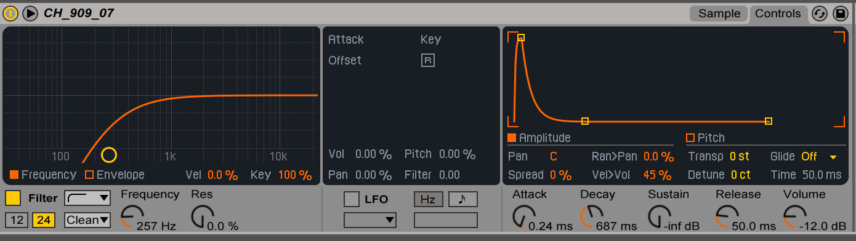
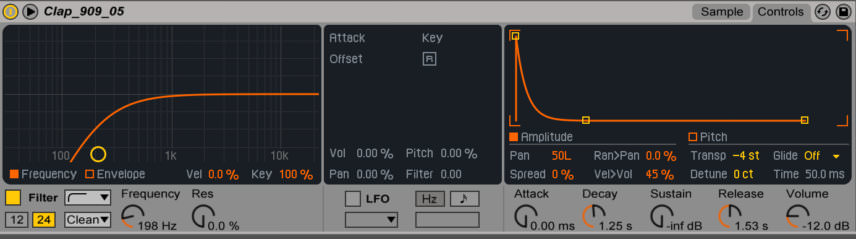
With the low end now driving along nicely, we can add an extra sample to the kick to apply more upper mid range presence and transient. We load a second bass drum sample onto a new slot and program the same pattern as our previous kick.
We engage the filter on Ableton’s Simpler to cut everything below 220 Hz and using the envelope section we take off the sustain and bring down the decay to shorten the sample. Lastly, we pitch it up three semitones.
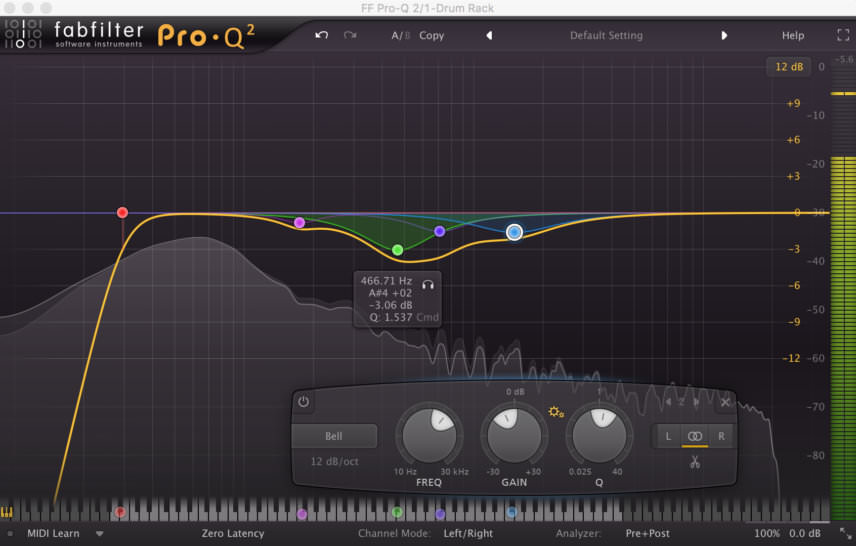
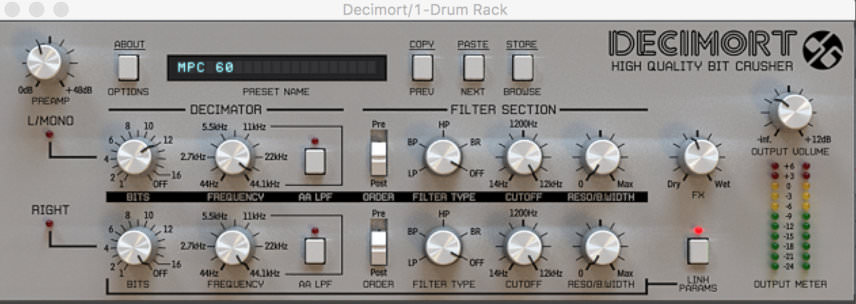
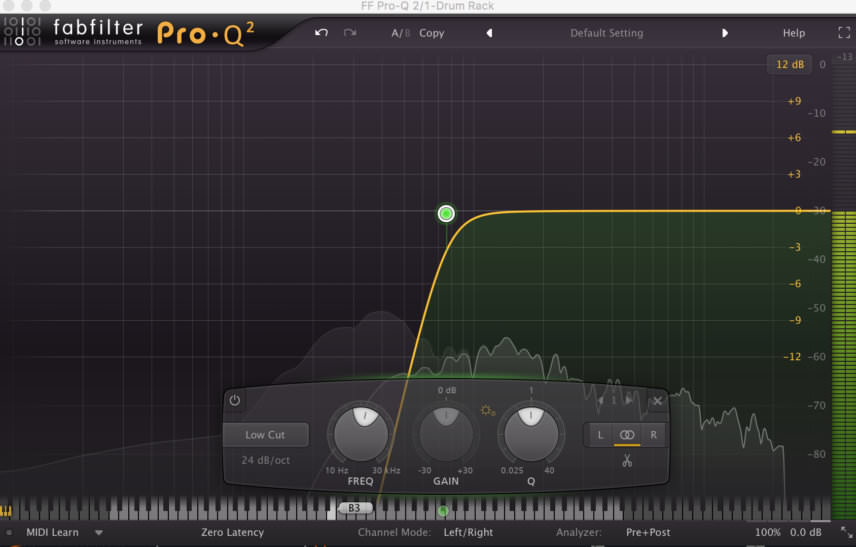
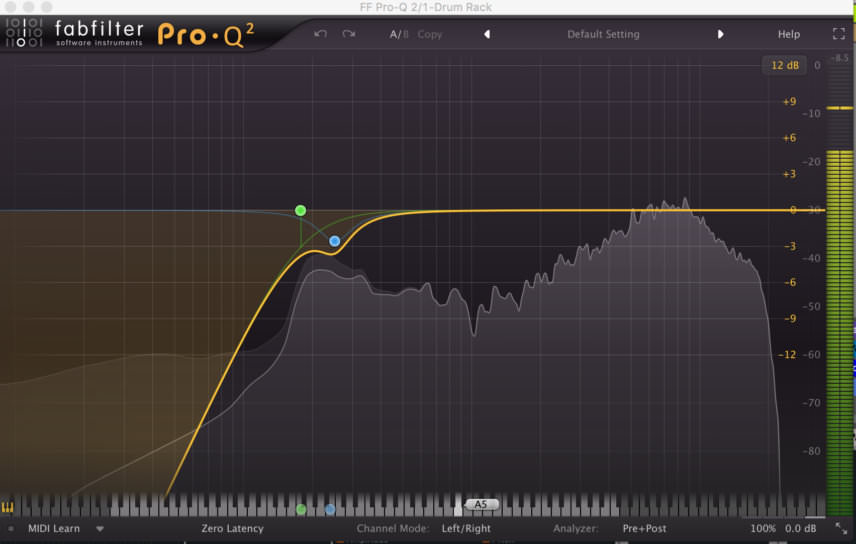
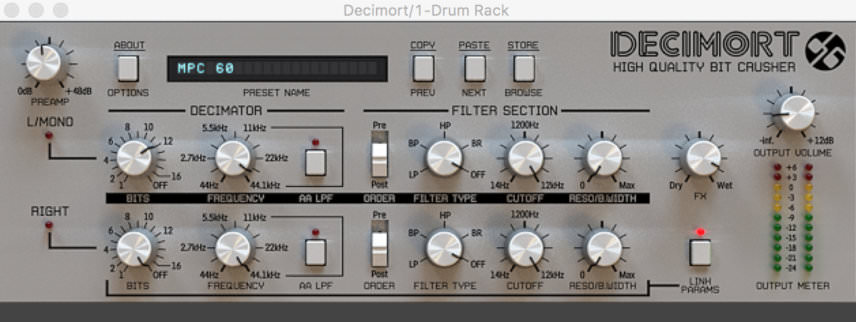
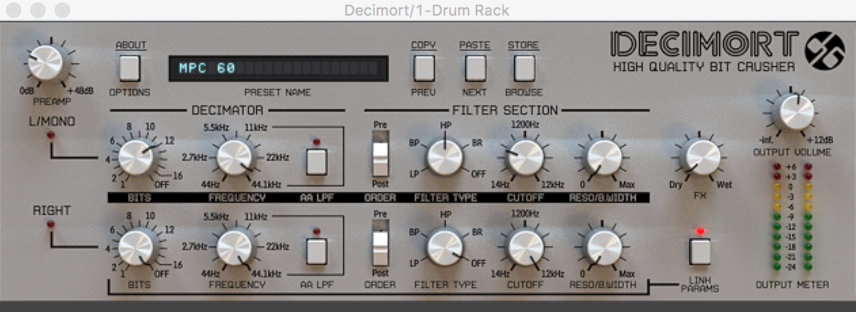
Next we add an instance of D16 Decimort, driving the sample quite heavily, then follow this with a more brutal high-pass using Pro-Q 2, sweeping up to 760 Hz with a low-cut filter.
Step 3
Next we add a snare to our loop, programming hits on the 2 and 4 of each bar.
We back off the attack and again process with a combination of Decimort and Pro-Q 2. On Decimort we set the PREAMP to halfway, the DRY/WET to 75% and level compensate with the OUTPUT VOLUME. Using the Pro-Q 2 we cut away any frequencies below 180Hz and also use a bell filter to duck around 250Hz, this is where the main body of the snare is sitting and is interfering with the kick slightly, removing some of this frequency range from the snare helps it to sit with the kick.
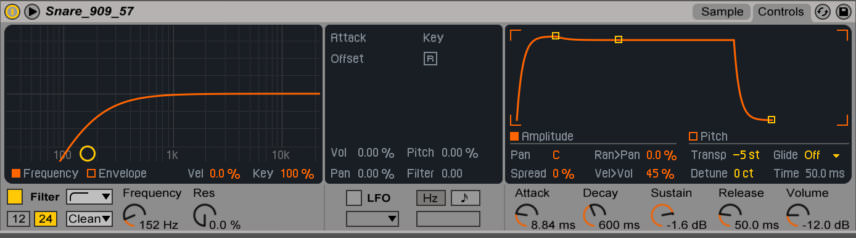
To add some groove and swing to our beat we add another snare and program some syncopated hits. We back the attack right off on our syncopated snare, pitching it down five semitones and cutting away any low frequencies. At this point you can start to experiment with different swing settings to adjust the groove.

Step 4
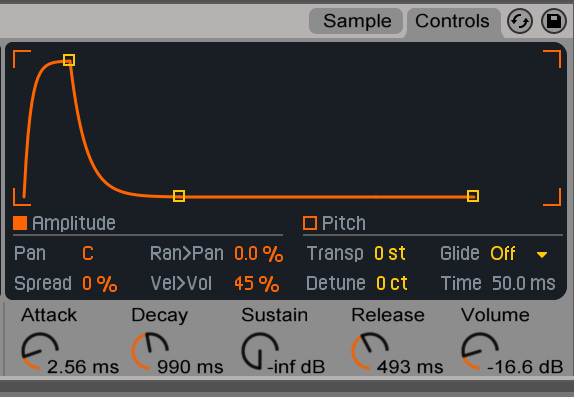
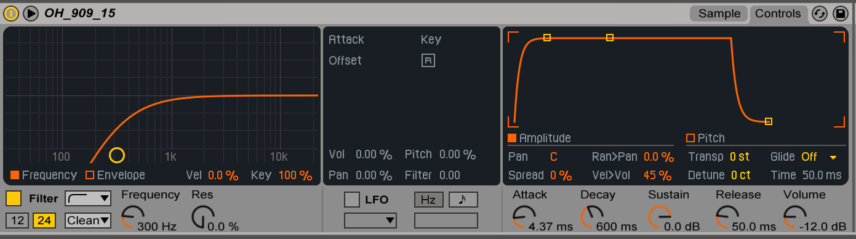
Now for some hi-hats. We begin with the closed hats, taking off the sustain and cutting the lows, emphasising the transient.
Next we add an open hat with some velocity variations, giving a nice groove to the beat.
Step 5
We use some 909 claps to add character to our snare and some width to the loop. We program the claps on the same beats as the snare, but nudge the hits forward in time ever so slightly so they won’t interfere with the kick or snare.
Once more we take off the sustain, shorten the decay and release, then we transpose down four semitones, cut the low and distort with Decimort. Using the default Decimort setting, we dial back the dry/wet balance slightly to soften the effect.
Finally we duplicate the drum rack slot, panning one version hard left and one hard right with a slightly difference clap sound. Using two similar but different samples paned left and right gives us a really wide sound that won’t suffer from any phase issues when collapsed to mono.

Step 6
The final sound we add to our beat is another closed hi-hat, playing 16th notes to emphasise the swing. We also slightly lower the velocities for hits landing on certain beats.
In terms of processing, we back the attack right off, shorten the decay and take off the sustain. We also sweep away any low or mid frequencies, thus applying a bit more movement and groove to the tops in our beat.
o keep the sample interesting and give it some movement, we add a chorus and flanger effect, dialling down the dry/wet mix for both effects to add some subtle movement and width. The sample still has a bit too much midrange, so we apply another instance of Pro-Q 2 after the modulation effects, sweeping up to 4 kHz.

Step 7
For the icing on the cake, we apply some group processing, the idea being to subtly enhance what is already present, to add a more coherent ‘glued-together’ feel.
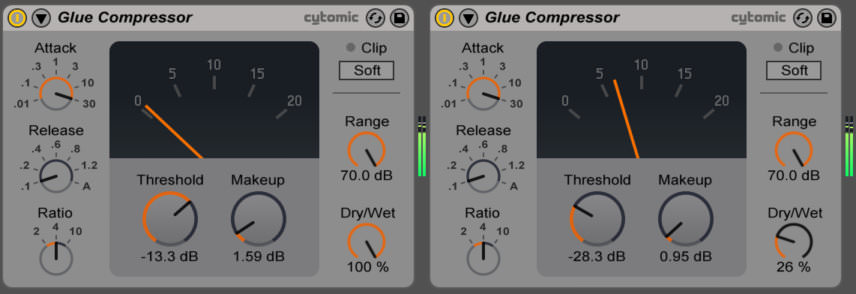
First we opt for another instance of Decimort, this time going extremely subtle with the effect. Next we add a Glue Compressor set to around 2 dB of gain reduction with slow attack and fast release.
With the first compressor levelling things out, knocking back the peaks when the snare hits, we can now apply another compressor with some more extreme settings to add more punch to the beat. Again we use the Glue Compressor, this time bringing down the threshold until we have around 10 dB of compression with slow attack and fast release. In combination, the group processing here glues the sounds together and adds some warmth and punch.
11.44 AM
Enjoyed how this also went a bit deeper into the processing side! Thanks.
04.46 PM
It’s so stiff and straight? Where’s the jack?
09.36 PM
They never seem to ever mention how and where they apply the swing settings
they show all the drum programming on a single midi channel, but then talk about swing applications on single instruments, which isn’t very easily done inside a single clip
09.09 AM
open your MIDI clip, click on the Groove drop down, choose your Groove, hit commit. Only grooves added to your groove pool will show here, so any Grooves you want to apply add them into the Groove pool first.