Two simple techniques for analysing any beat in Ableton Live and learning to programme better grooves of your own. We break it down.
Today we’re going to show you how to break down any beat very quickly using two easy tricks. One is a mostly forgotten classic, devised back in the distant past of dance. The other was first made possible by automatic loop-slicing, then turbo-charged by Ableton Live.
We’re going to demonstrate these by dissecting the beat we created for our recent UK garage Beat Dissected. Over just a handful of simple steps, we’ll show you how to analyse and recreate this beat, isolate the kick, and capture the grooves to apply to your own parts.
First up, here’s the beat we’re copying:
And now the recreation made in a couple of minutes using a completely different sample library:
Part 1: Match the Kick
The kick is the defining element of most beats. To get the right kick, here’s a trick from the early era of house: put simply, you use an envelope and LFO to control the cutoff on a low-pass filter. It works on about 90% of songs, takes less than a minute, offers loads of room for tailoring the sound, and suffers from none of the unpleasant artefacts and transient softening you get with AI-powered solutions.
Here is the same sample with the trick applied, first off and then on:
Step 1: Select A Kick
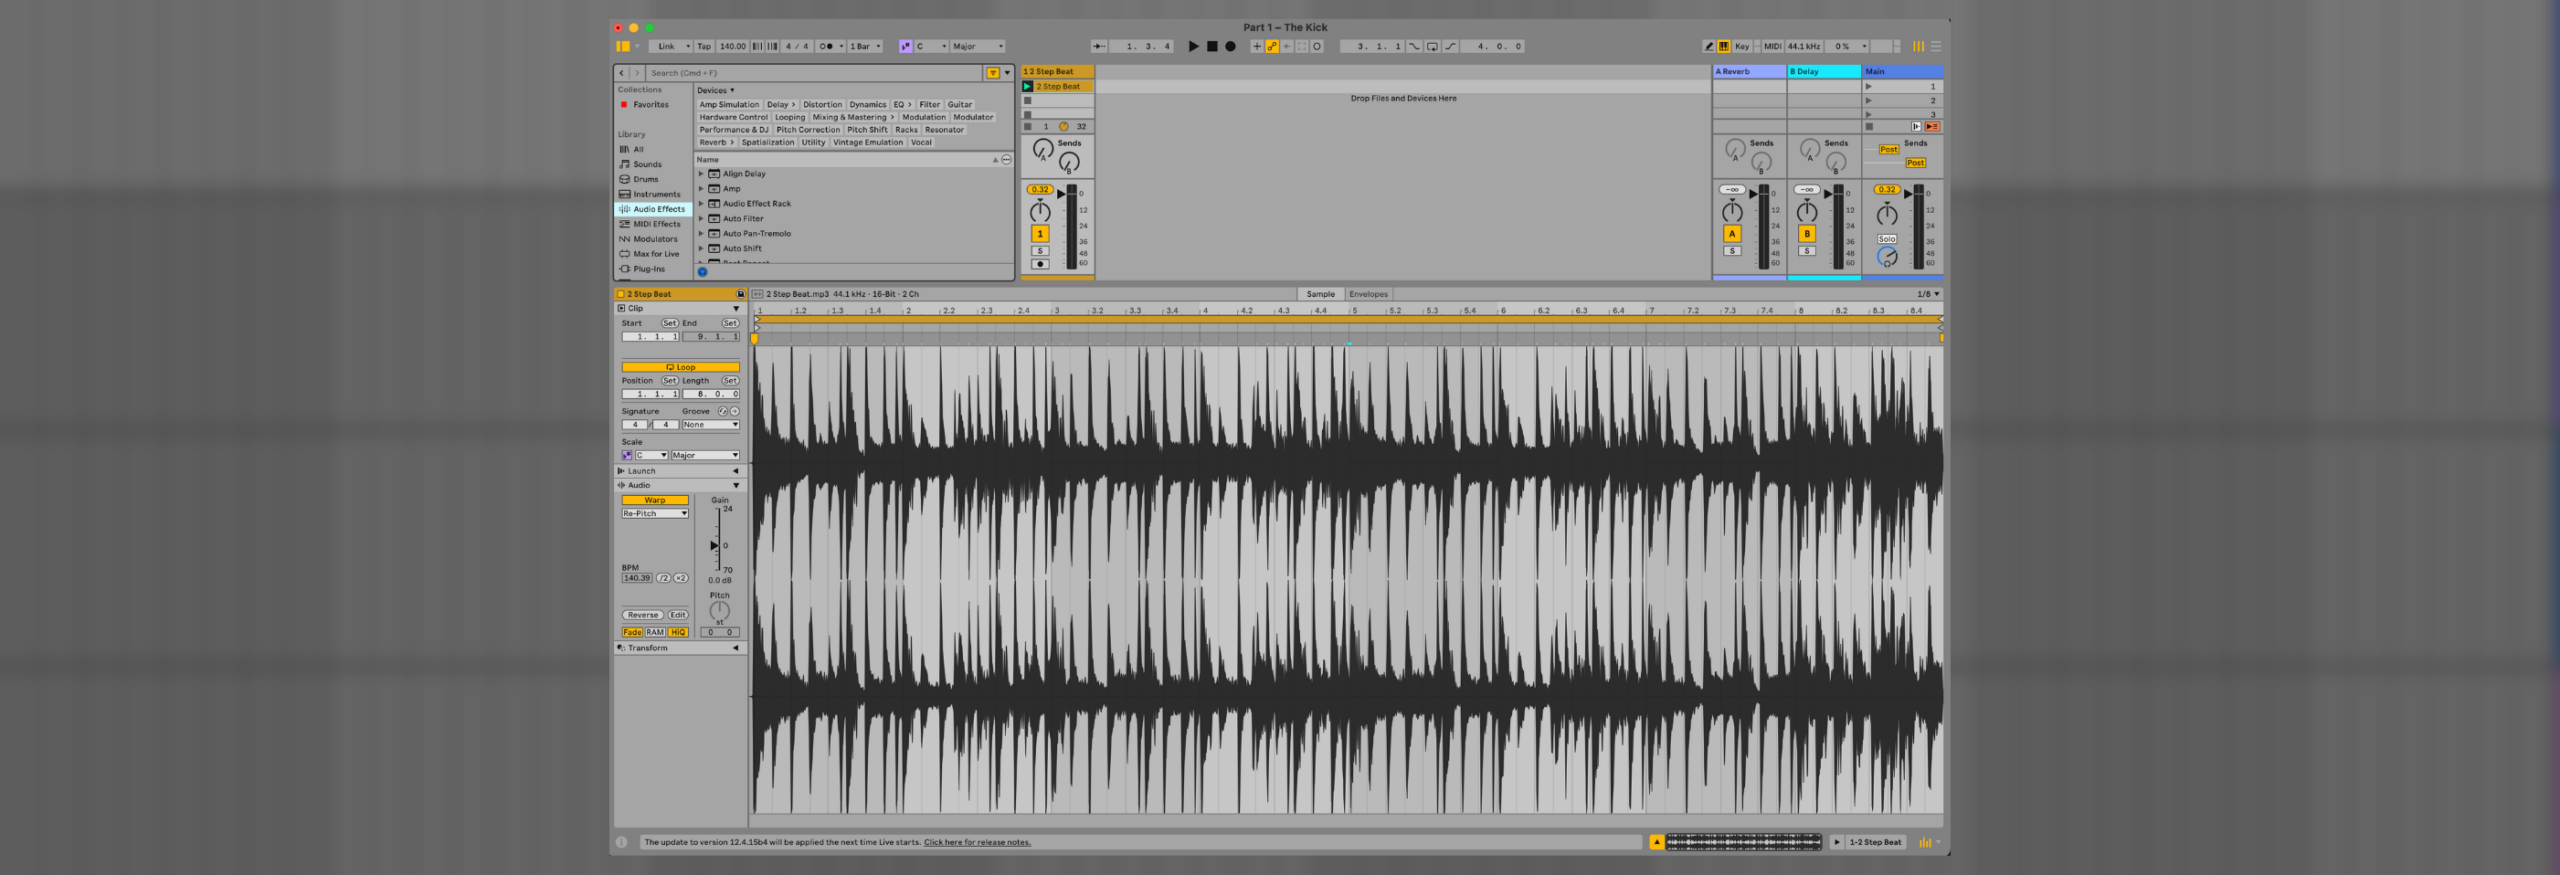
We load a loop into Live, set it to 140 BPM, and select the non-destructive Re-Pitch warping algorithm. Now we listen for a spot where the main kick plays without another kick drum right after it, a long bass note over it, or within a quarter note of it.
Top Tip: Look for a kick drum playing without bass, particularly in radio edits, extended or dub versions, and at the end of eight-bar sections. If needed, use stem separation to remove the bass while preserving the rest of the track and its transients.
Step 2: Slice To New MIDI
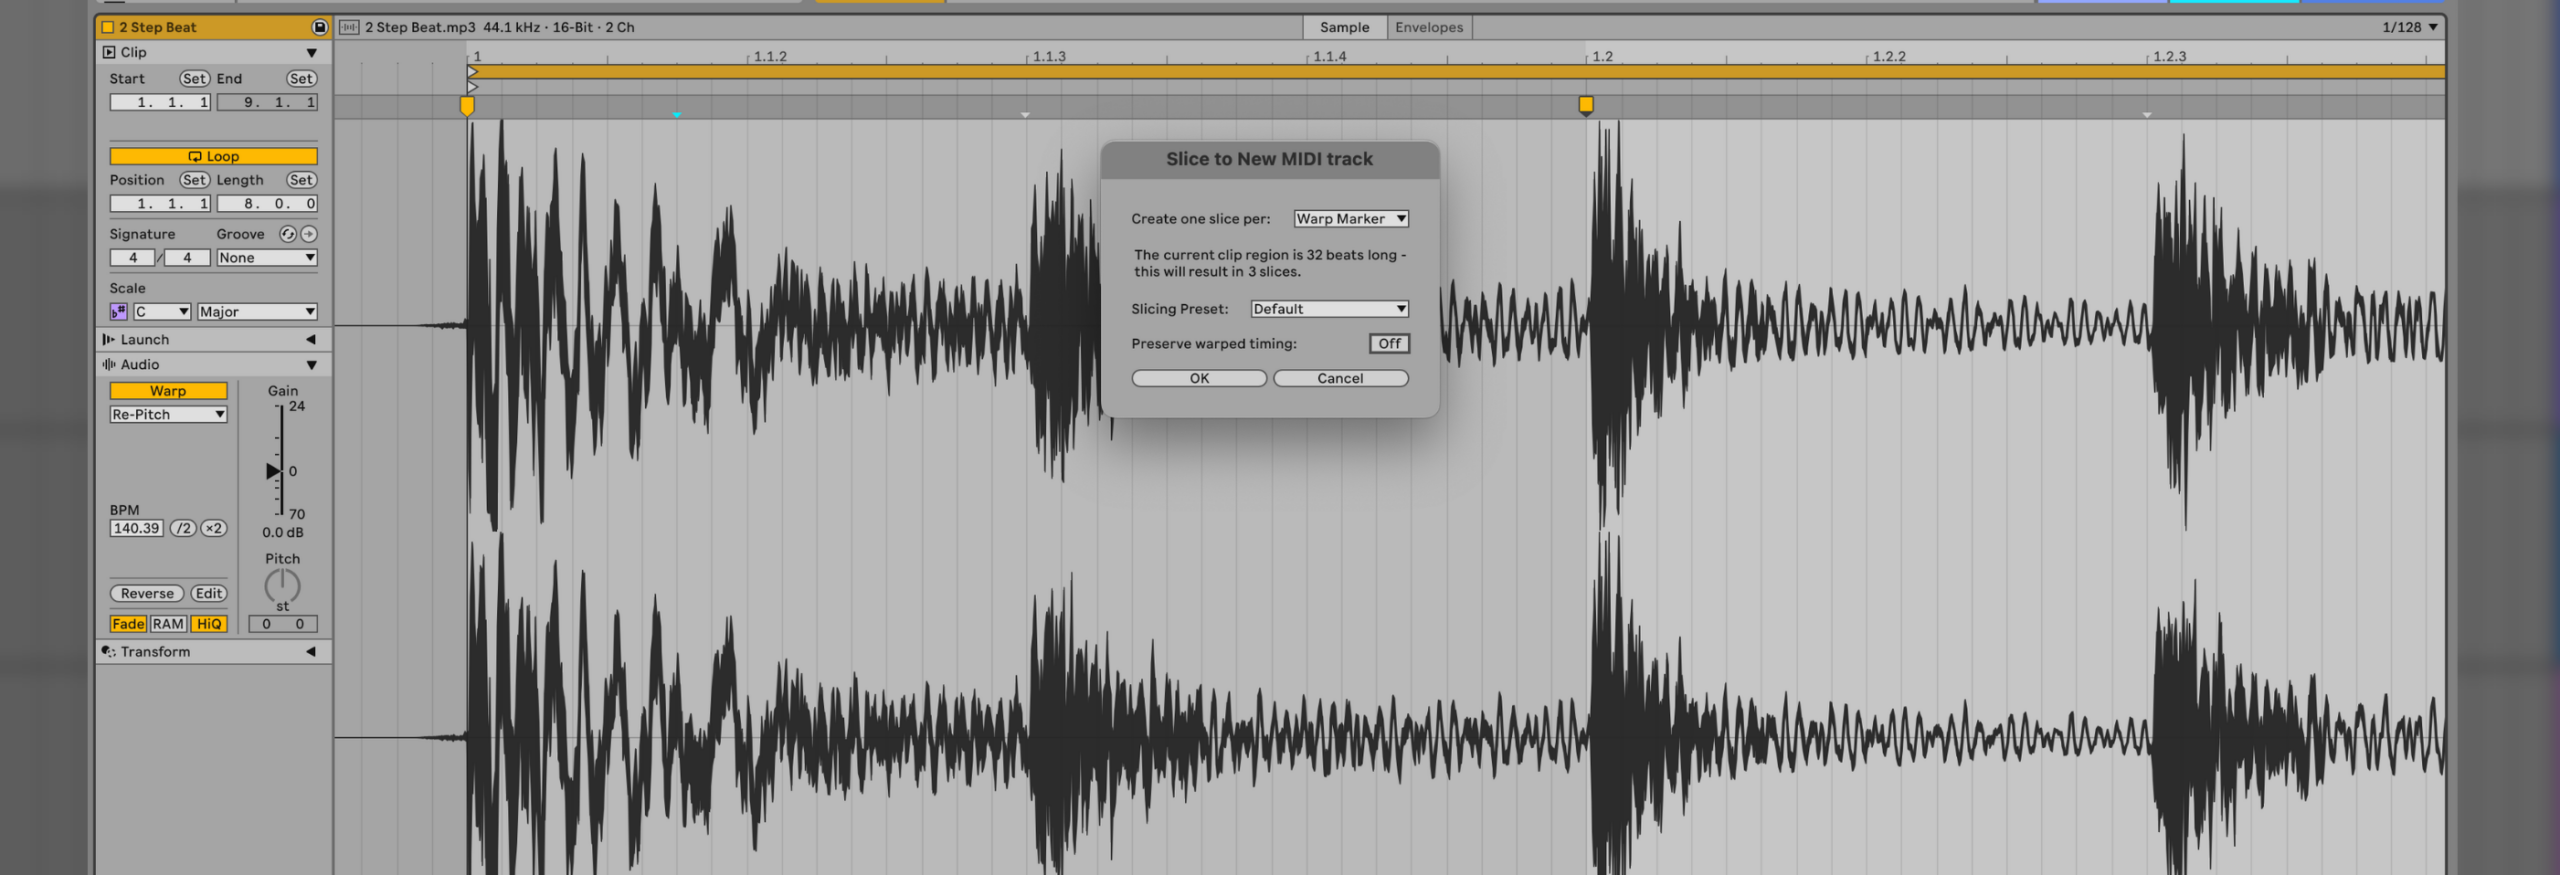
Now create a warp marker at the start of our selected kick, then at the start of the next kick or snare (or about a quarter note after). In this case, that’s the first rim/snare. Now use the Slice to New MIDI Track feature, using the Default preset and deselecting ‘Preserve Warped Timing’.
Step 3: Draw MIDI Notes
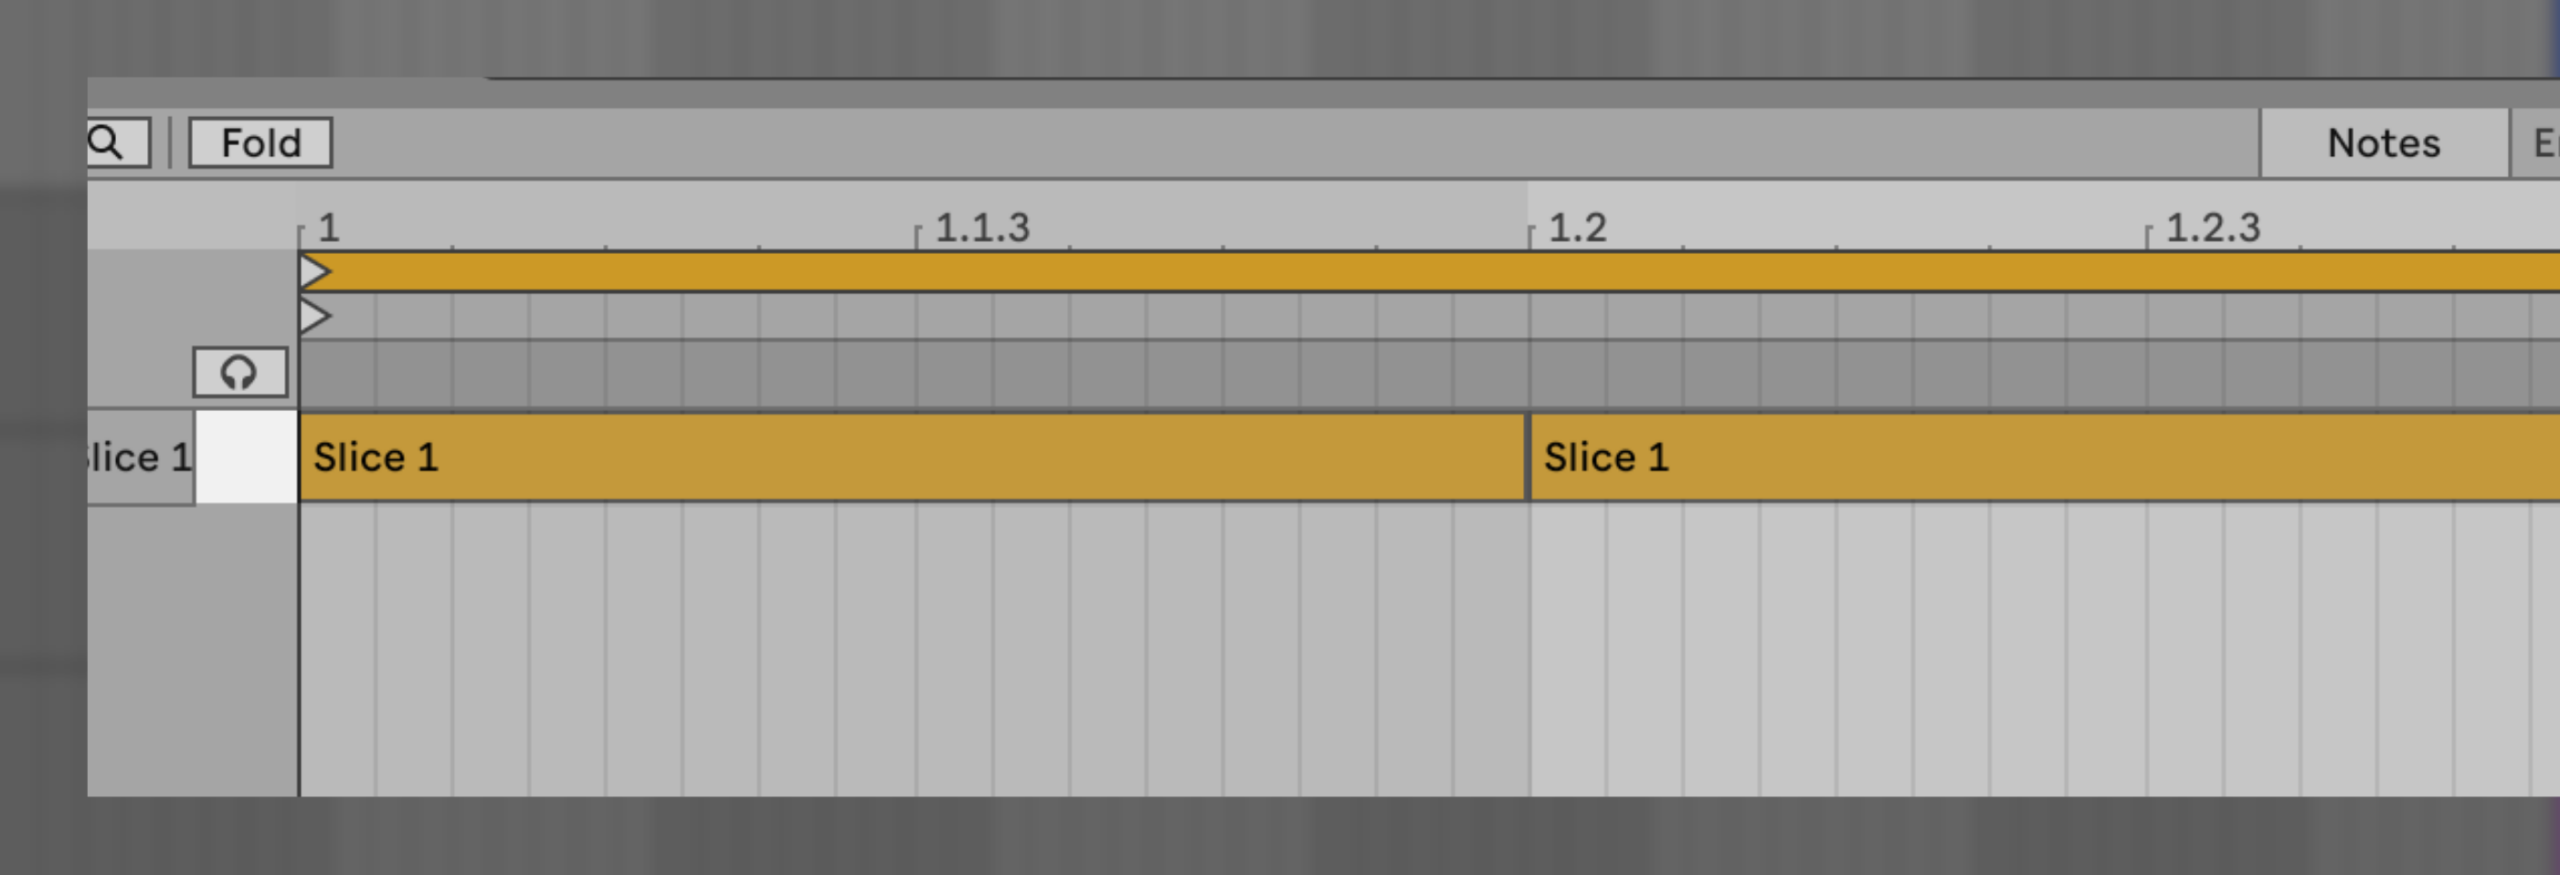
Delete both the MIDI notes and Drum Rack tracks for the other slices, keeping only our kick on Slice 1. Then set the clip to loop over one bar and draw quarter-beat-long MIDI notes on each beat. This lets us audition the kick on a loop while we work our magic. You can also raise the Simpler Output Volume to -0.50 dB. The Default sets it to -9 dB, and we don’t need that extra headroom.
Step 4: Filter Envelope
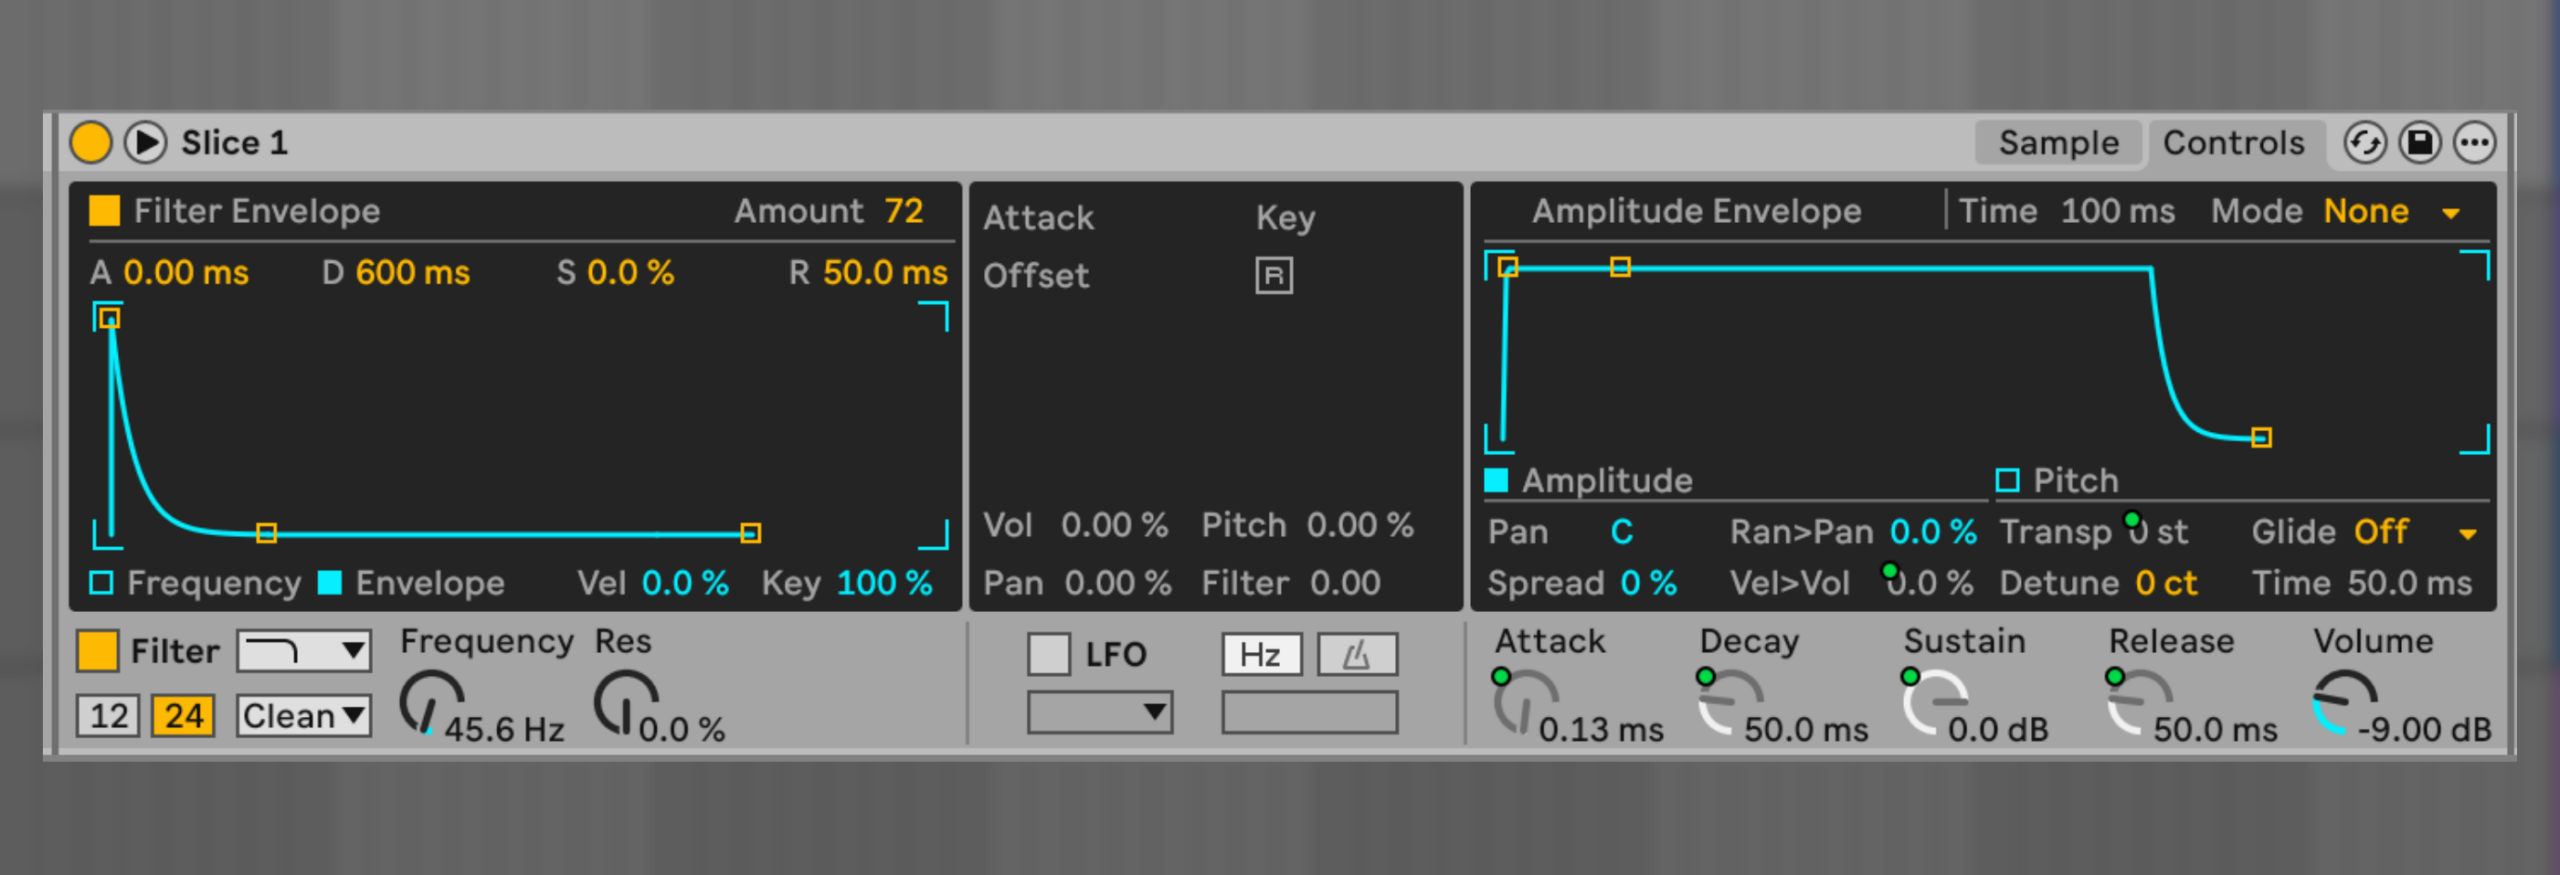
Open the Simpler player for Slice 1 and click on Controls to show the filter envelope and LFO section. For the filter, engage Envelope, then raise the amount to 72. This means the filter cutoff will now be controlled entirely by this envelope. Press play now to hear the loop without any filtering, and then slowly reduce the filter cutoff to around 45Hz.
Step 5: Tighten Decay
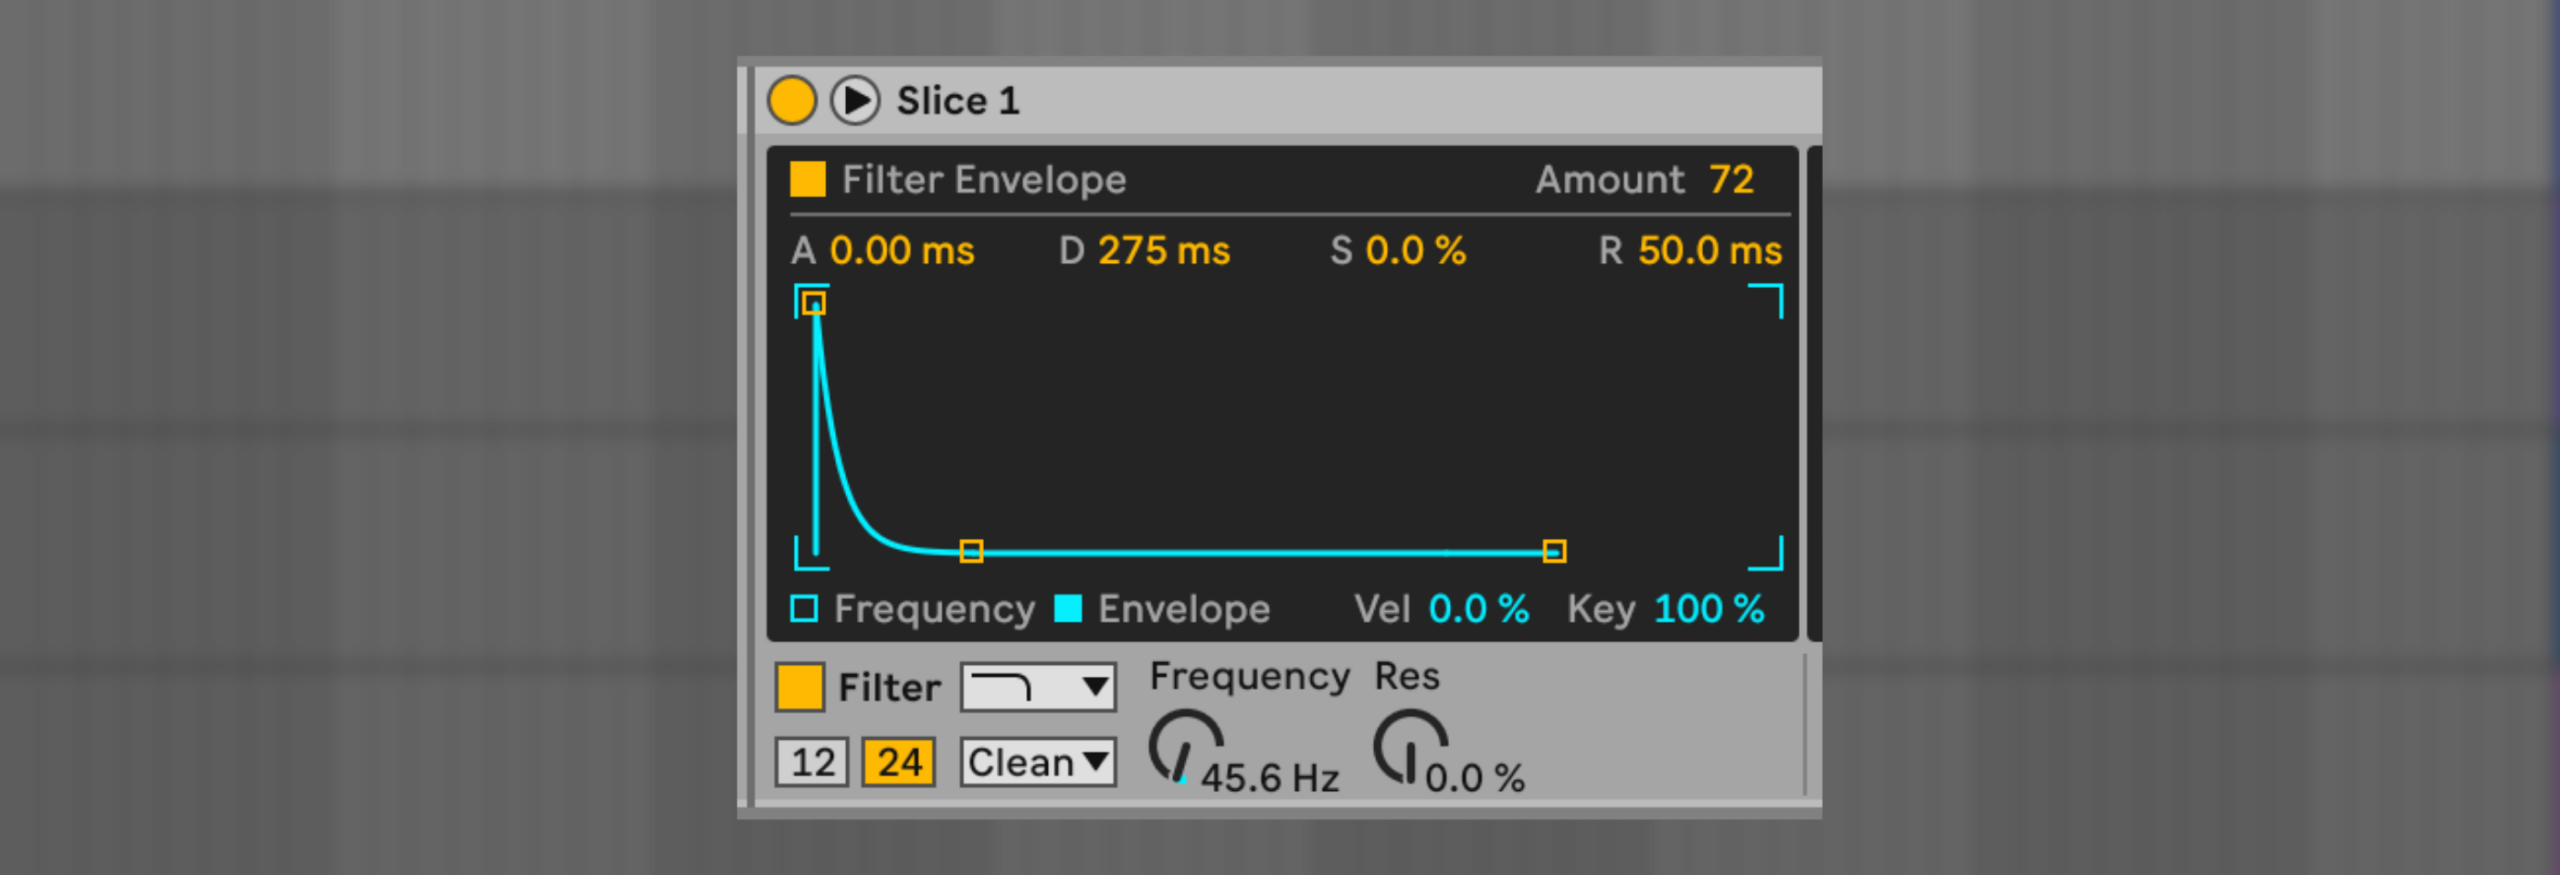
Crazy, no? It’s just playing the kick now. But we can improve it even further. Double-click on the Decay value and change it from 600ms to 275ms. Even tighter still. Just beware that while this makes the kick punchier, it progressively removes some of its tonality, so balance to your preference. To A/B the effect, simply click on the filter button to engage and disengage it. Studio magic!
Step 6: Bring In The LFO

The last trick is to add the LFO as a cutoff modulator. Engage the LFO and select the downward sawtooth, then raise the Filter control amount to 24 and select the beat-sync LFO rate mode at 1/4 note. You’ll need to reduce the decay value to around 60-70 ms, but the results will be much, much punchier and tighter. This is ideal for more techno- and minimal-style kicks.
Top Tip: For techno and minimal styles, experiment with shorter LFO sync rates like 1/12, 1/6 or 3/16 to create interesting syncopated grooves. The results depend on your kick’s frequencies and can even spark a new track using just one kick.
Part 2: Slice It Nice
The second technique is just as simple. Essentially, we’re going to micro-slice the target loop and then replace all the slices with our own samples.
There’s no better way to learn what makes drum patterns work. Often it’s down to one or two tiny hits placed off the rigid groove, or a little reversed noise you hadn’t even noticed. This technique exposes those tricks.
Step 1: Load The Loop
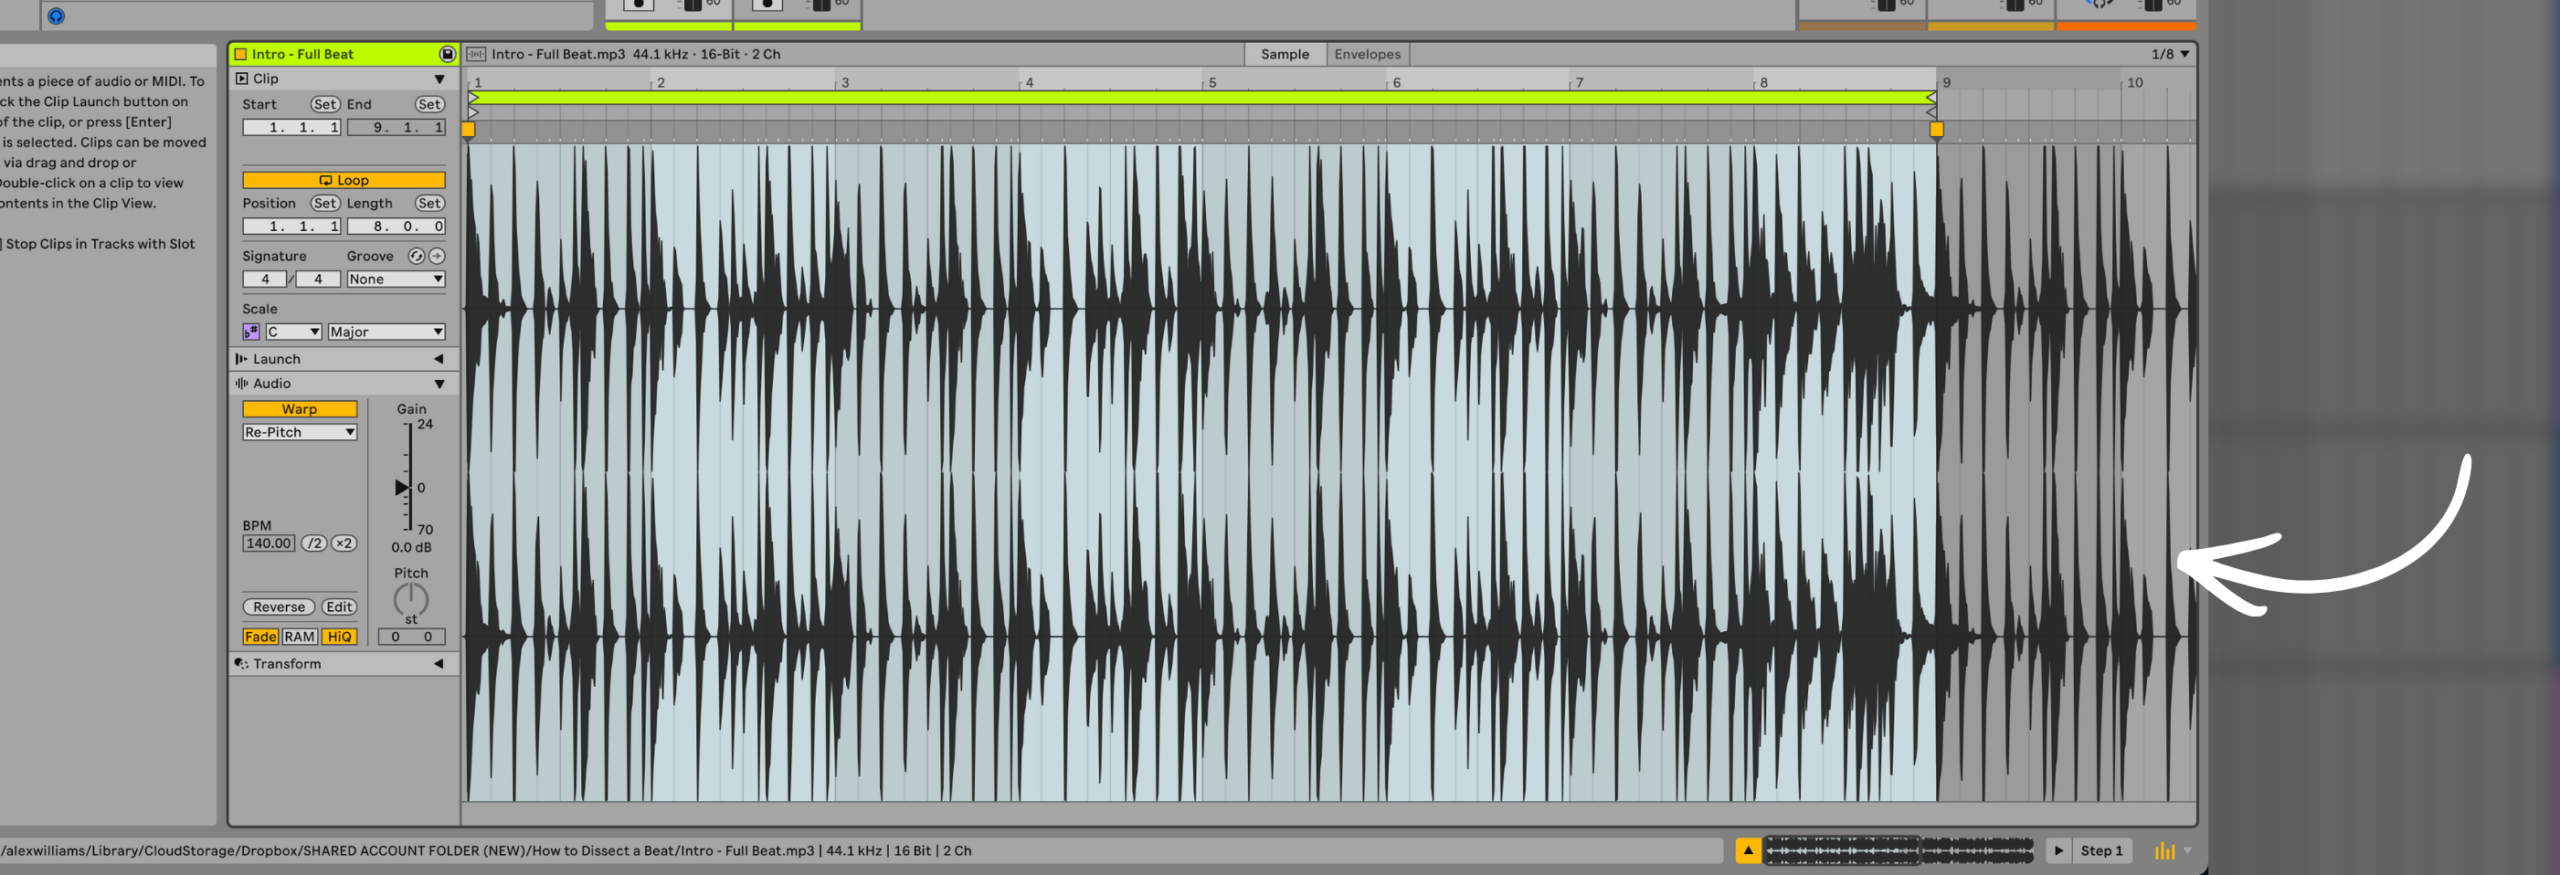
Start by loading the drum loop you want to copy and set the project tempo to match the loop. As with the kick, it helps to hear what’s going on without bass, so either find a section without bass or use a stem separation tool to remove it. We’re not actually planning to use the original drum samples, so the leftover audio artefacts from AI-powered processing are less problematic here.
Step 2: Set Loop Length
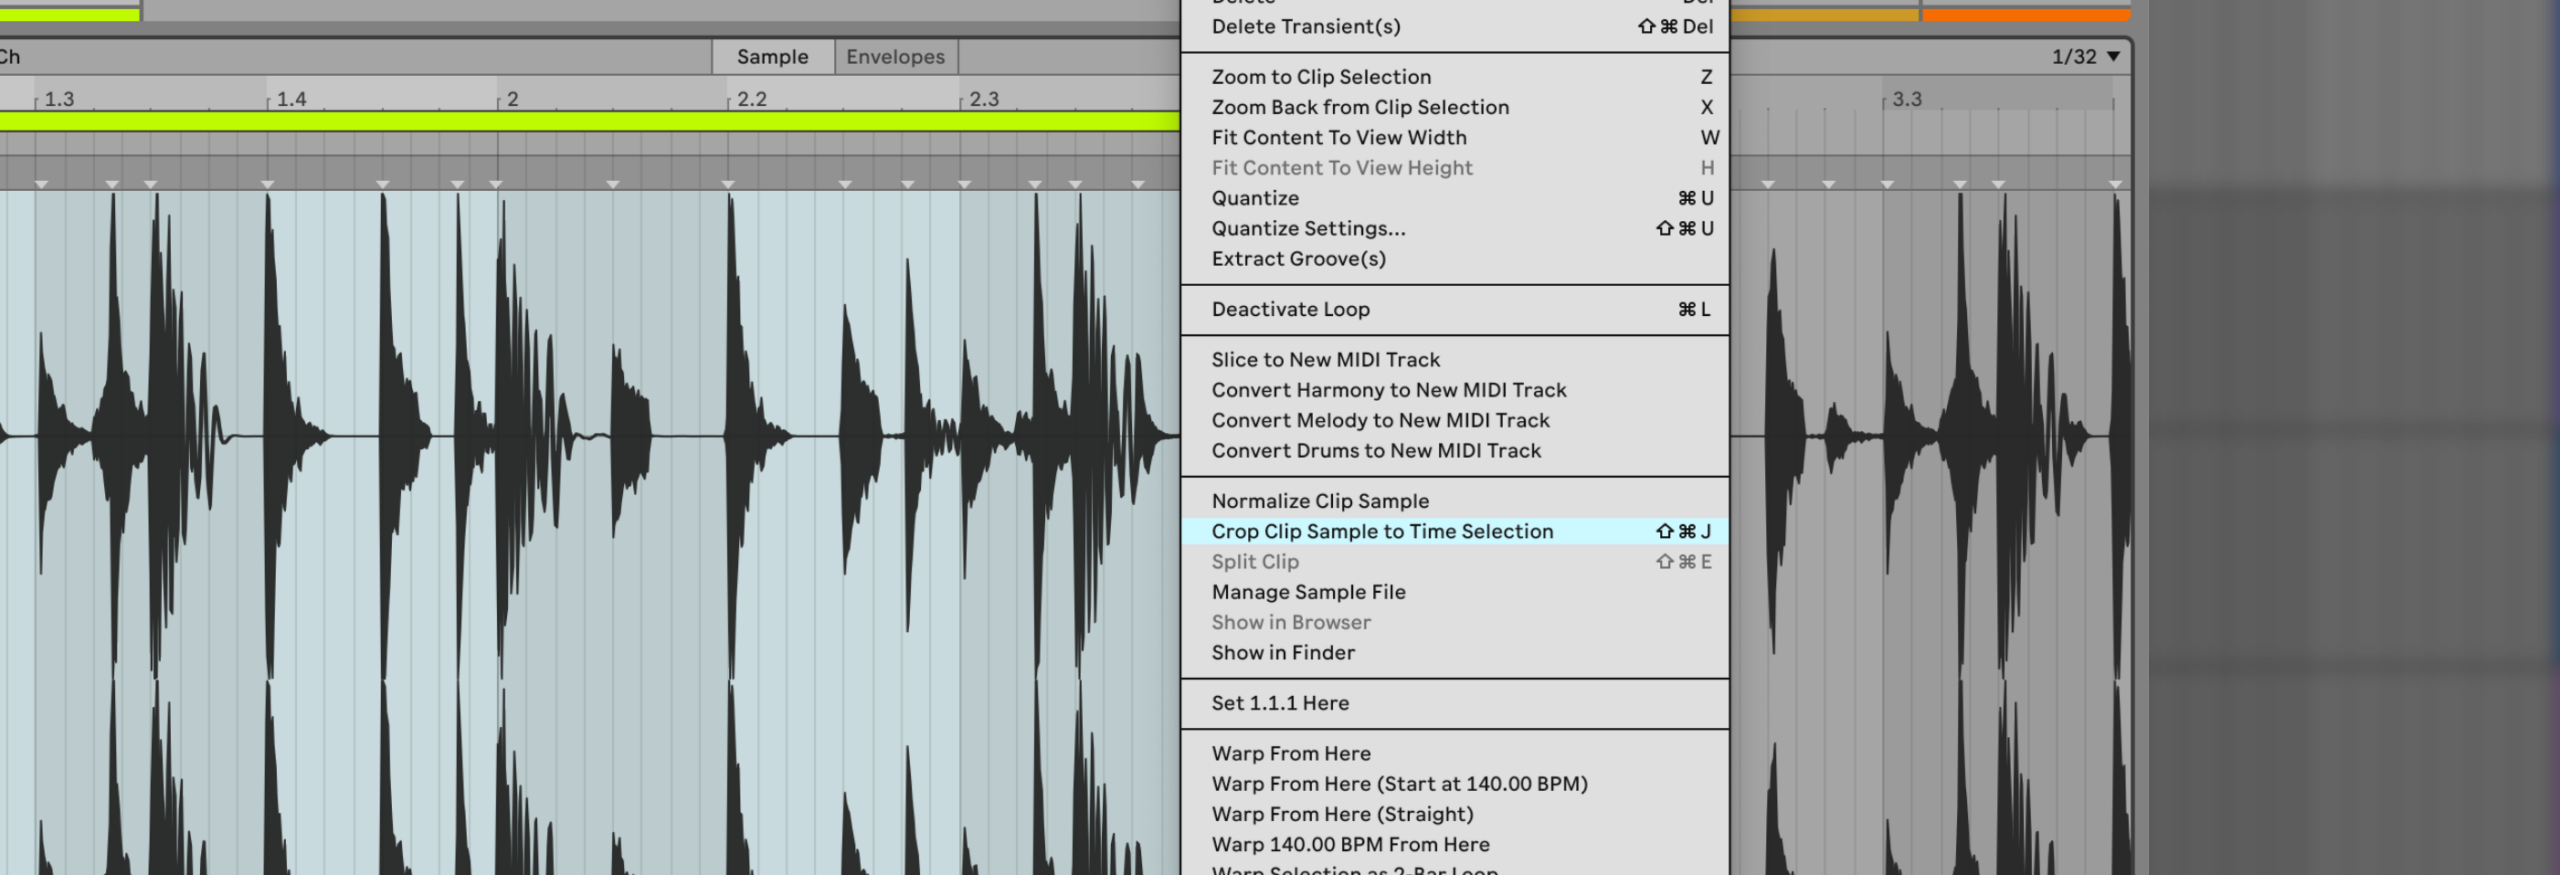
Now select a useful loop length that captures the vibe. This beat has lots of variation over eight bars, so there’s a case for analysing the whole thing, but for this walkthrough let’s keep it simple with a two-bar loop, as that’s how often the core rhythm cycles. Next, crop the sample to two bars to keep things clear. Also, set Warp mode to Re-Pitch.
Step 3: Add Warp Markers
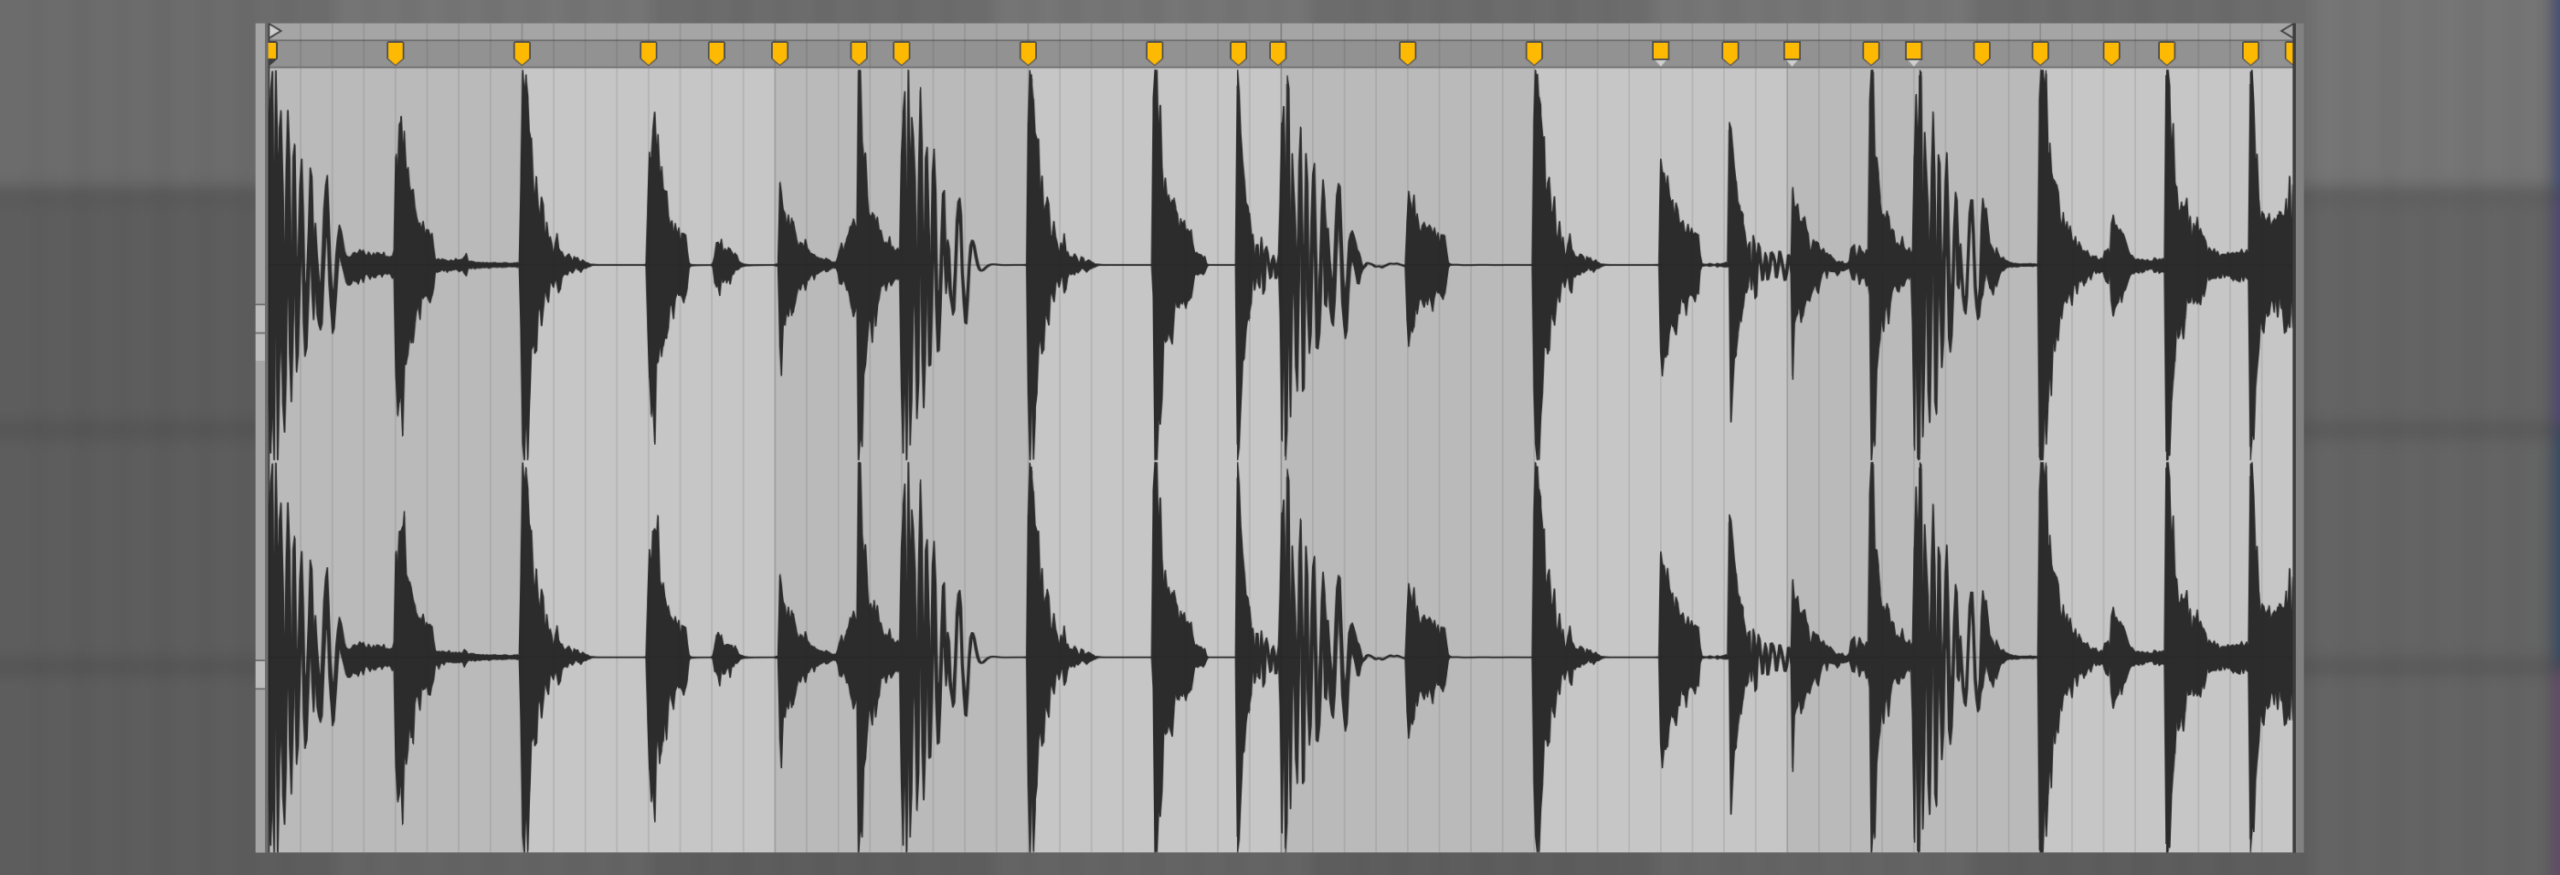
Manually add warp markers for every individual sound in the loop. This might mean slicing up a shaker or tambourine halfway through a shake, but it’s important not to miss any sounds. Choose Slice to New MIDI Track using Default mode and one slice per Warp Marker.
Step 4: Turn On MIDI Note Editor Preview
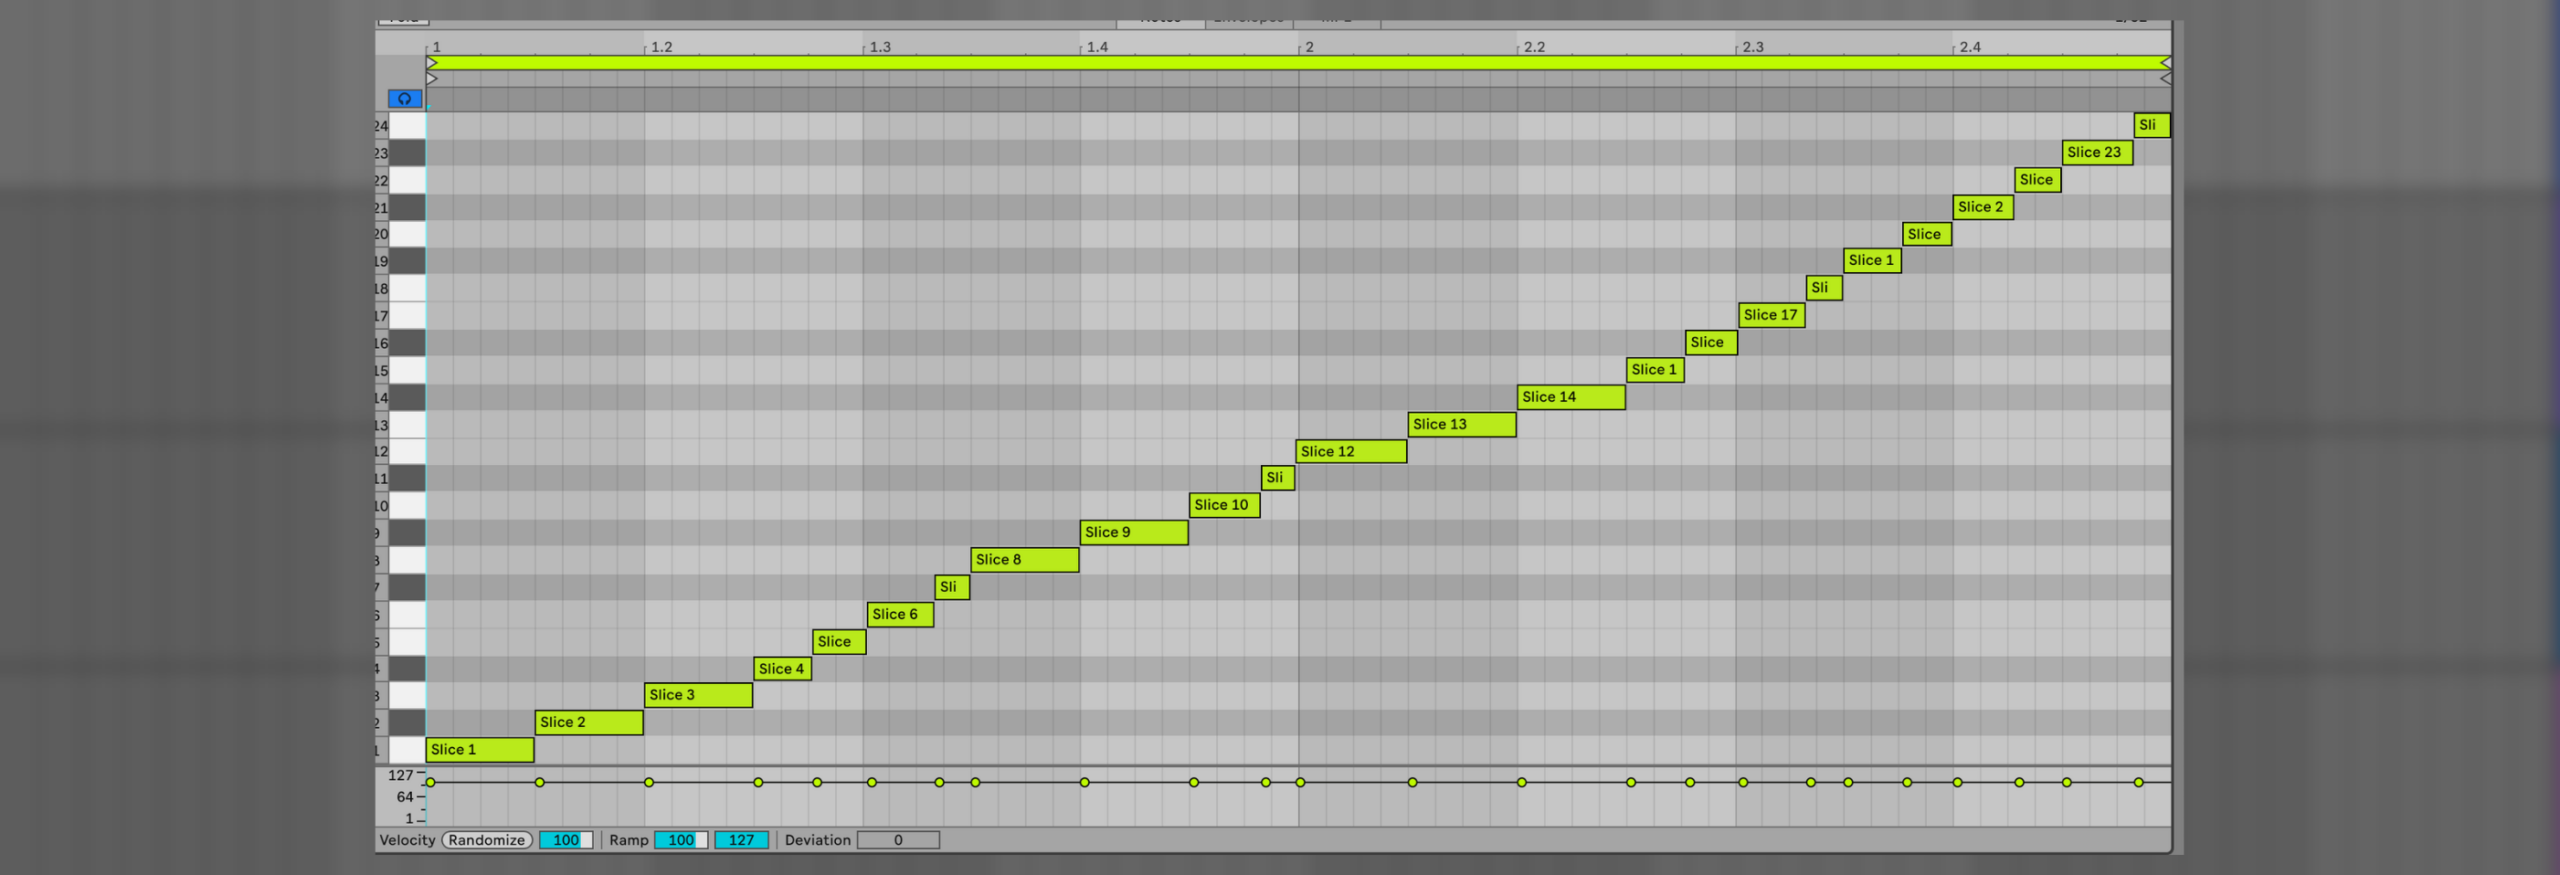
Engage the MIDI Note Editor Preview button so that clicking a MIDI note or clip event triggers the slice. Now click on each note to make sure you haven’t accidentally missed a slice point/sound.
Top Tip: Once sliced, create a groove template in Live to apply the same swing to other elements, such as percussion, chopped vocals and MIDI notes.
Step 5: Clean Up Lanes
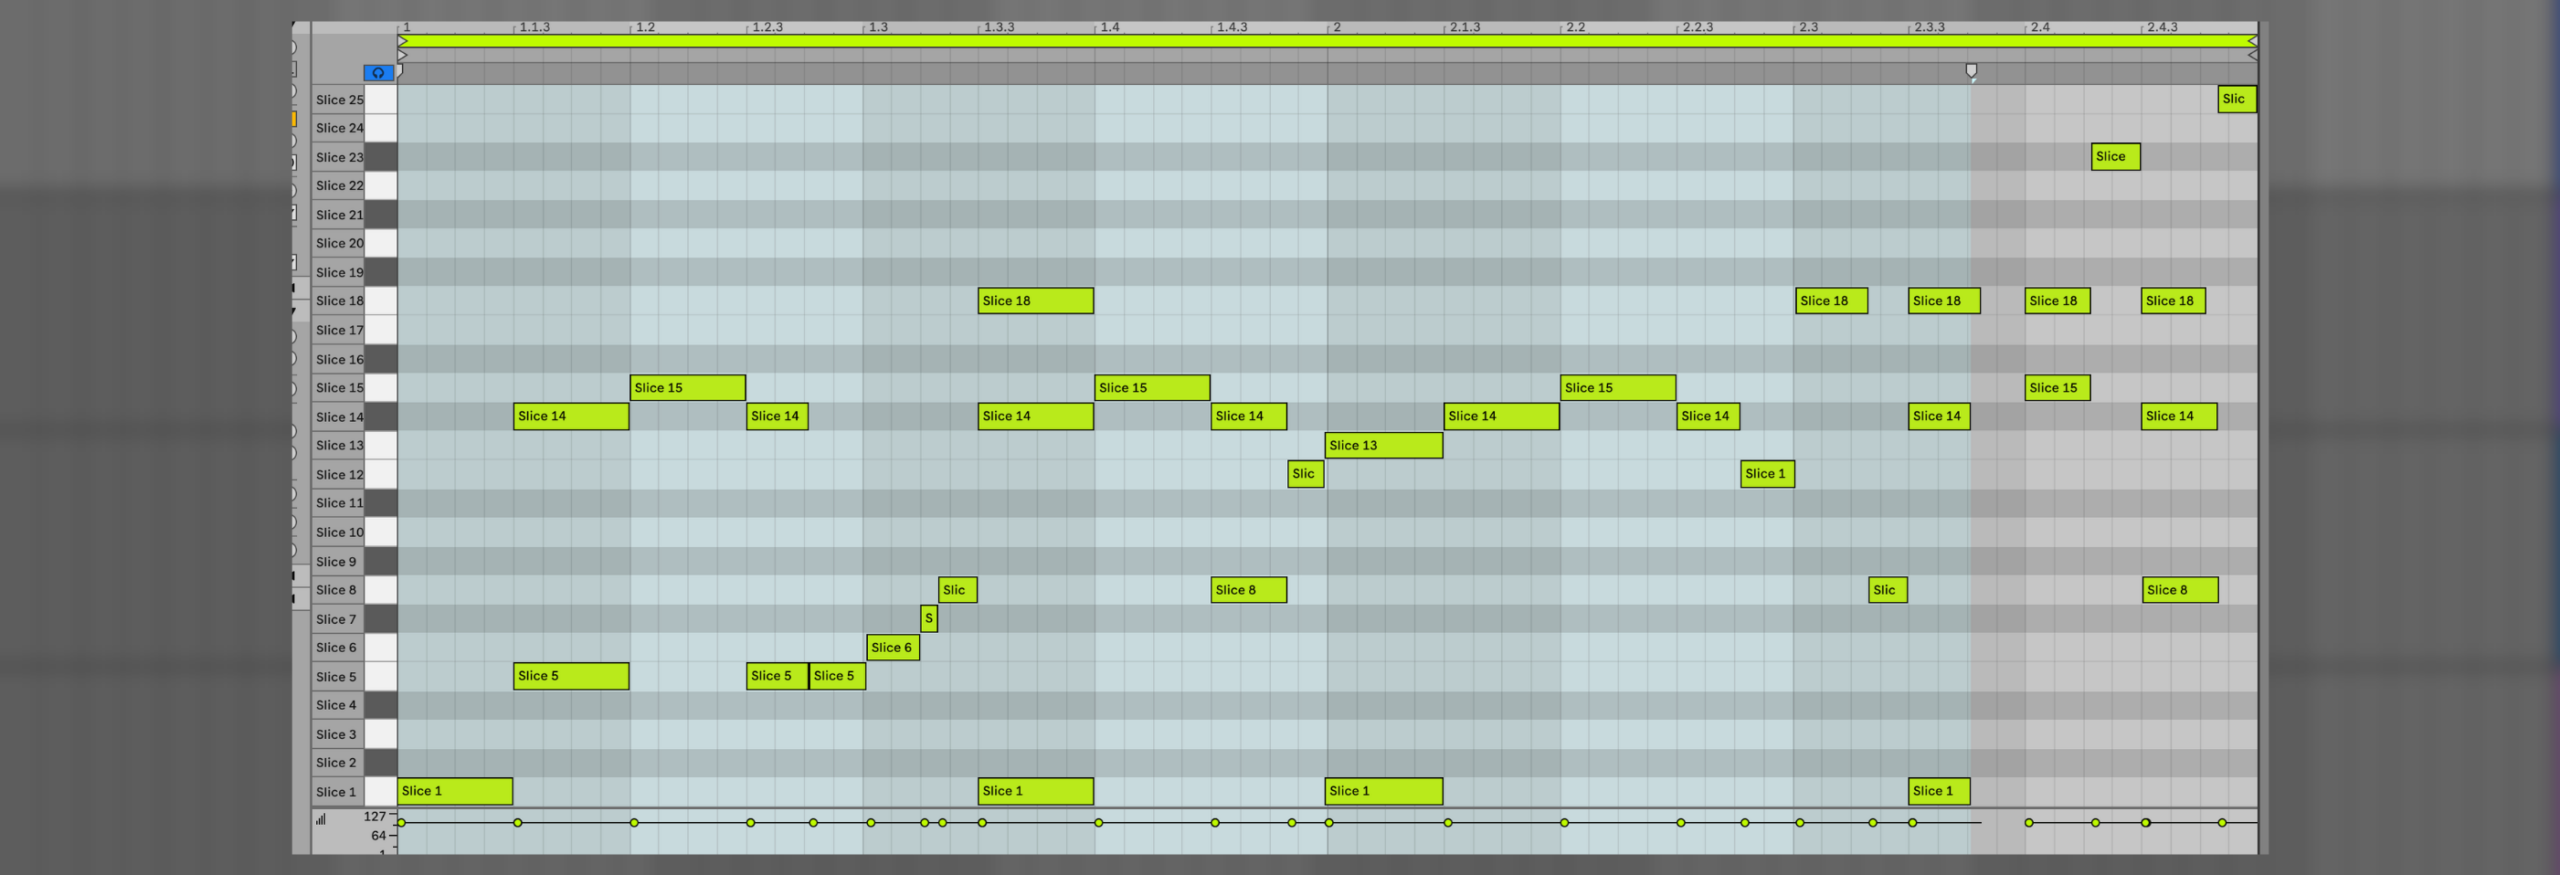
Look for identical hits and pick the cleanest one. Then move all the other MIDI notes for that sound to the same drum lane. Note: sometimes two sounds might occur at the same time, so be sure to include both. Our second kick of the bar, for example, also has a tambourine hit, so we make sure there’s a note on both our kick and our tambourine lane. Then we can delete all the unused Pads/Slice lanes.
Step 6: Replace Slices
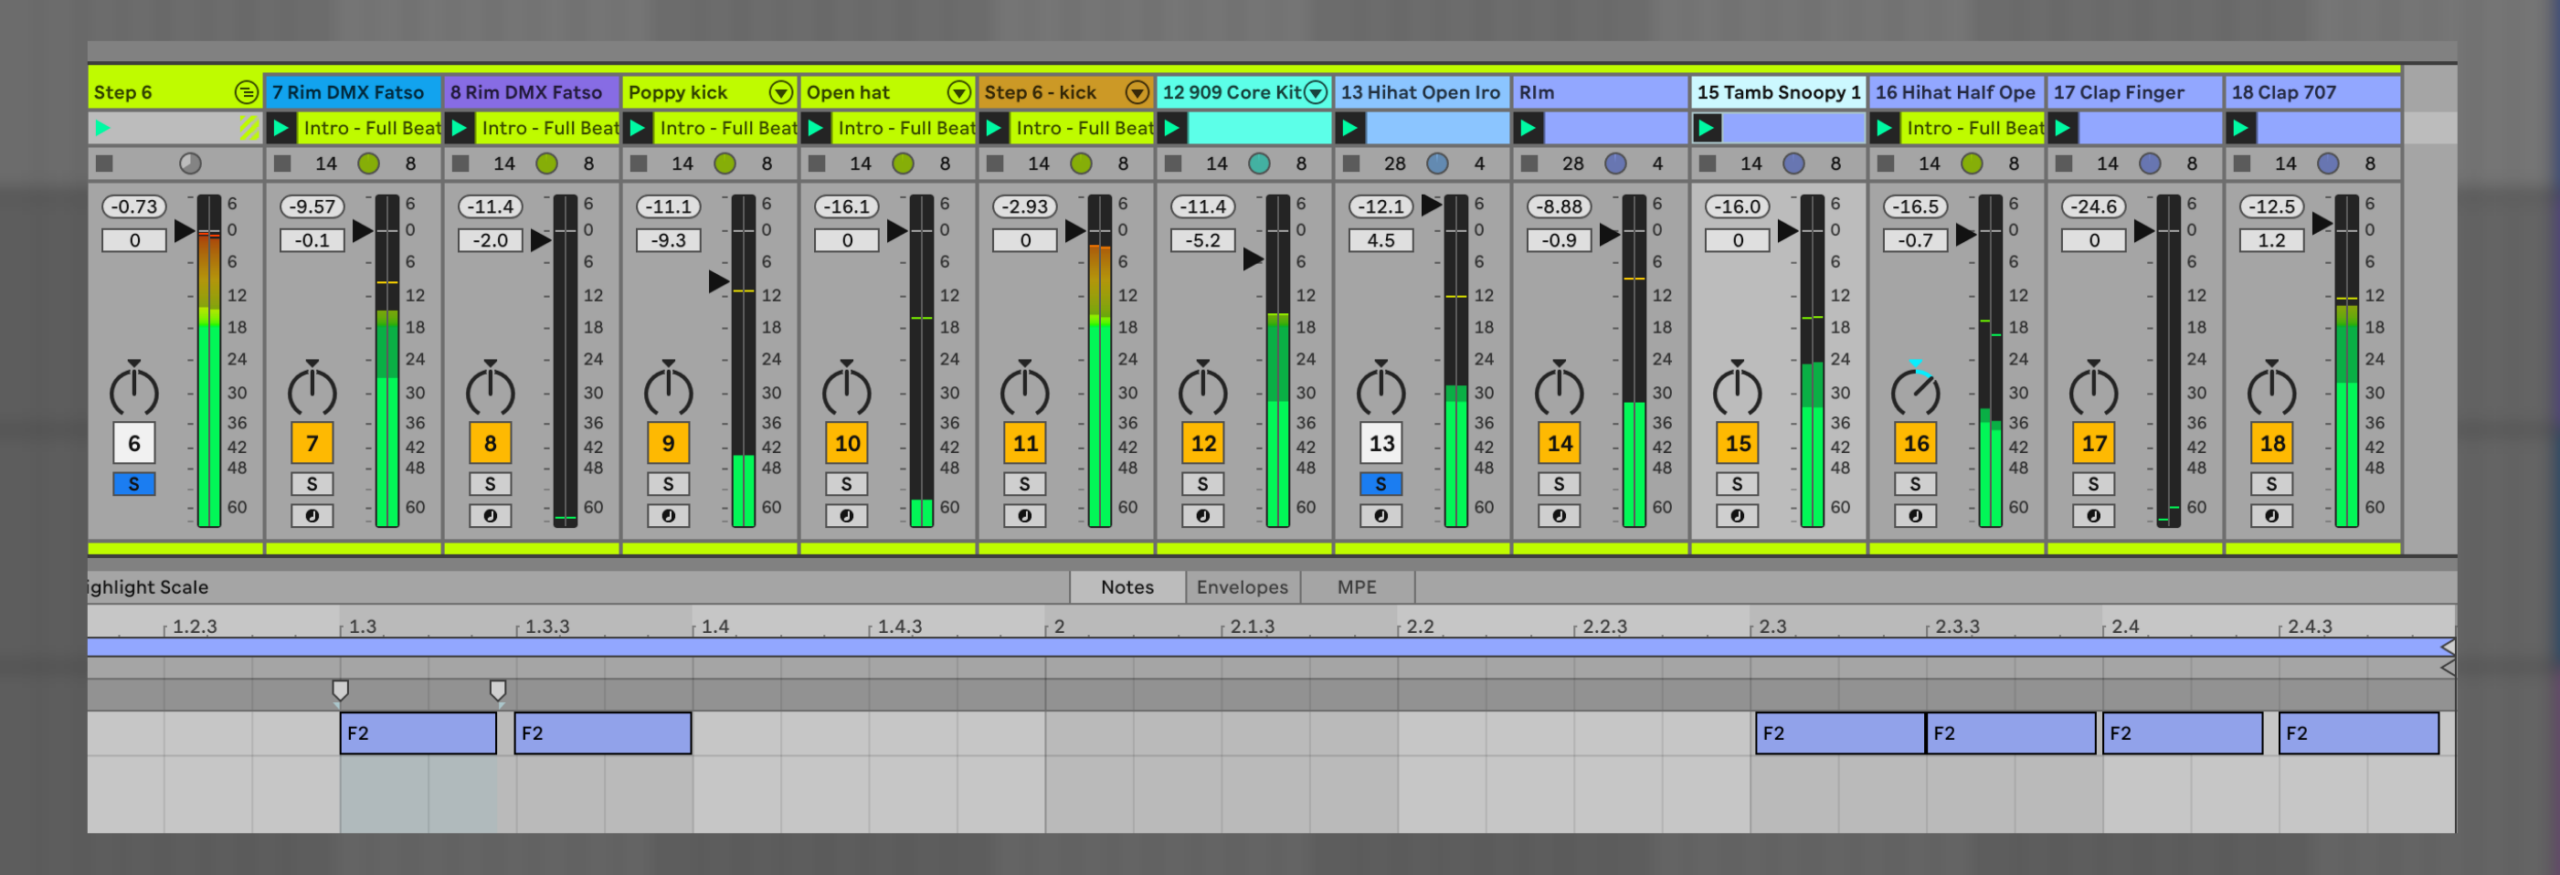
Now we just need to replace each slice with our own similar-sounding sample. You can copy the MIDI clip to a new channel, drop the new sample into the corresponding slice pad, or do a combination of both.
Top Tip: Different pitches in the rim shot slices suggest the producer used tuning or layering. To recreate this, put the rim on its own channel so you can trigger it chromatically at different pitches.
And that’s it. In less than 10 minutes, we’ve recreated a complex, skippy rhythm. From here, we could tweak each sound to match the original beat, or enjoy the freedom to customise each sample.
We’ve left ours here fairly untreated, just to show how easy it is to get something really similar to the original loop, even before you do any advanced processing and mixing.
And remember, you could also substitute all of these drum samples to really personalise it for your track, or simply use one or two little touches you like – such as a reversed sound in a cool place you wouldn’t have thought of yourself – and add them to your own beat.
Happy recreating!
Don’t have Ableton Live? Buy it here. Heads up, it’s an affiliate link. If you buy through them, we may earn a small commission (it doesn’t affect the price).
Follow Attack Magazine
Attack Store
Dance Music Producers’ Power Book Bundle
Get 2 best-selling music production books. Buy more, spend less.
The Secrets of Dance Music Production
The world-leading book on dance music production. Comes with samples too.

The Producer’s Manual
Everything you need to take a mix, from initial recording to final master.
Secretos de la Producción de Música Dance
La guía definitiva para producir música electrónica de vanguardia.

Max For Live: Chance Engine V2
Add controlled yet random fluctuations to your most important parameters.


Underground Resistance: The Final Frontier Poster
Anti corporate, political, powerful and progressive the power house of Jeff Mills, Robert Hood and "Mad" Mike Banks needs little introduction.