A few simple tweaks to your studio can make mixing easier and your productions stronger. In part one of a new two-part series on hacking your workflow Paul White explains the science of sound and outlines the key tools in your armoury.
Why acoustics matter
While many of us are happy to spend our hard-earned cash on new synths, sounds, plug-ins and speakers in the pursuit of a better sounding mix, we often give rather less thought to the more mundane but arguably more important business of treating the room we mix in.
When you mix do you find that some frequencies – usually in the bass area – leap out at you while others appear quieter than they should? And have you ever made a great sounding demo in your studio and then played it back elsewhere to find that it sounds not only different but much worse?
These types of problems are common if you mix in an untreated room, when you can end up using unnecessary EQ to get what you imagine to be an acceptable sound, only for the track to sound wrong when played elsewhere.
Why does this happen? Take two different spaces. Space A is an untreated studio, which has a room layout that emphasises the bass frequencies and reduces the upper-mids. Space B is a friend’s neutral-sounding living room.
You mix in space A, your studio, where you end up using EQ to reduce the bass frequencies that the room itself is emphasising, while also increasing the upper-mids your room has dulled. The result is a mix that might sound great in your studio, but which when taken to space B – the neutral-sounding living room – sounds bass-light and overly forward in the upper-mids. Your friend is understandably unimpressed and the flawed mix is said not to ‘translate’ well.
The fact is that getting studio acoustics right is neither a luxury nor an afterthought; it is a pre-condition of a solid mix. An appropriate room acoustic is also key to a good recording: around 90 per cent of the quality of a recording is determined before the sound even hits the microphone.
Acoustic treatment does more to improve both the quality of recordings and accuracy of mixes than even the most expensive mics, plug-ins or outboard. What’s more, treatment need not be costly – especially if you take a DIY approach and build your own kit.
While the approach I describe below won’t give you the same tightly controlled acoustic environment you’d expect in a professionally-designed studio, you may be surprised at how much better your mixes end up sounding after applying even very basic acoustic treatment.
/**/What you hear in the studio
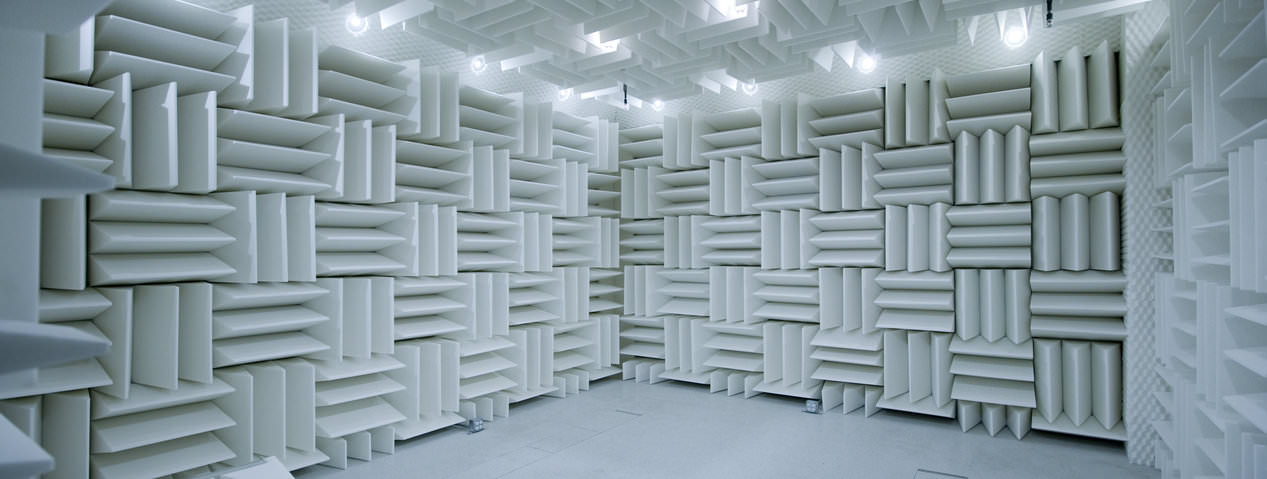
When you listen to a pair of speakers in the studio what you actually hear is a mix of direct sound from the speakers plus reflections from all hard surfaces in the room, including the walls, ceiling, desk and equipment racks. This is to be expected – we live in a reflective world, and without reflections everything sounds unnaturally dead, like in an anechoic chamber (a specially designed test chamber that absorbs all sound to avoid any reflections).
In the real world we don’t mix music in anechoic chambers, nor would we want to: people who have tried mixing in very dead studios say that find them oppressive. Besides, you’d end up with a final mix that would only properly translate to the handful of worldwide music listeners with access to their own anechoic chamber.
The typical studio, then, is still somewhat reflective. But these reflections need to be kept under control to allow your monitors and ears to do their jobs properly. At middle and high frequencies excessive room reflections compromise both the clarity and stereo imaging of the speakers while at low frequencies reflected sound builds into resonant peaks that can make some bass notes appear significantly louder than others.
A carpeted room with soft furnishings will always sound more dry than one with a hard floor. Although this might suggest that carpeting the walls will produce a better listening environment, this is not the case.
In the ideal studio, reflections are controlled in such a way as to allow all frequencies to decay at the same rate (a reverb decay time of around 0.3–0.5 seconds). The problem with carpet is that it is too thin to effectively absorb anything other than high frequencies, so carpeting the walls produces a short reverb decay time at high frequencies but does nothing to tame the mids and lows. The outcome is an even worse spectral balance than before you applied the carpets, with a sound that is both boxy and dull.
Sound waves – the physics
Where sound reflects from a solid surface it causes a pattern of constructive and destructive interference as it combines with the incident sound. At lower frequencies related to the room dimensions, the peaks and troughs in the waves ‘stand’ in fixed positions in the room.
Standing waves are undesirable in the studio as they can cause large peaks and troughs in the frequency response – especially at low frequencies – that can seriously hinder making informed mixing decisions. These standing waves are responsible for the resonant room modes – read on for more on those.
wavelengths
Sounds travel at roughly 340 metres per second (m/s). If it were possible to see sound as sine waves (pure tones of a single frequency) in space, you would see a 1kHz tone repeating every 340 divided by 1000 m/s = 0.34 metres.
A 50Hz bass tone, on the other hand, repeats every 340/50 = 6.8 metres. This distance between cycles is known as the wavelength. You can work it out by dividing the speed of sound by the specific frequency. As this example shows, high frequencies have short wavelengths, whereas low frequencies have wavelengths of many metres. A basic awareness of how sound travels is useful for understanding the different approaches to soundproofing and explains why some approaches are more likely to work where others fail.
Tools of the trade
In the quest for the perfect room there are two main tools in the acoustic treatment armoury: diffusors and absorbers, both of which deal with a different acoustic problem.
Diffusors scatter sound energy over a wide angle rather than bouncing it back like a mirror. They randomise hard reflections that might otherwise confuse stereo imaging and cause flutter echo.
Absorbers absorb sound energy, reducing reflections and reverberation in the room. They are used to reduce a room’s reverb time at different frequencies.
Diffusers
The simplest type of diffusor is an irregular solid surface, often made from different sized wooden blocks fixed to a flat panel or from moulded plastic. By breaking up hard reflections and scattering them, diffusors help create a more even, musical sound without reducing the room’s reverb time significantly. This explains why diffusion is often used to sweeten the sound of larger live rooms, as well as control rooms.
Large commercial diffusors typically comprise a series of rectangular wooden chambers of differing depths, where the depth and spacing is calculated to give optimum diffusion. However, a shelving unit partly filled with randomly positioned items – books and DVDs for example – also scatters sound well at mid and high frequencies.
You can glue different sized wooden blocks to a backing board for a cheap, practical alternative. The heights of the irregular features in diffusors need to be a quarter wavelength or more of the sound being scattered for them to work.
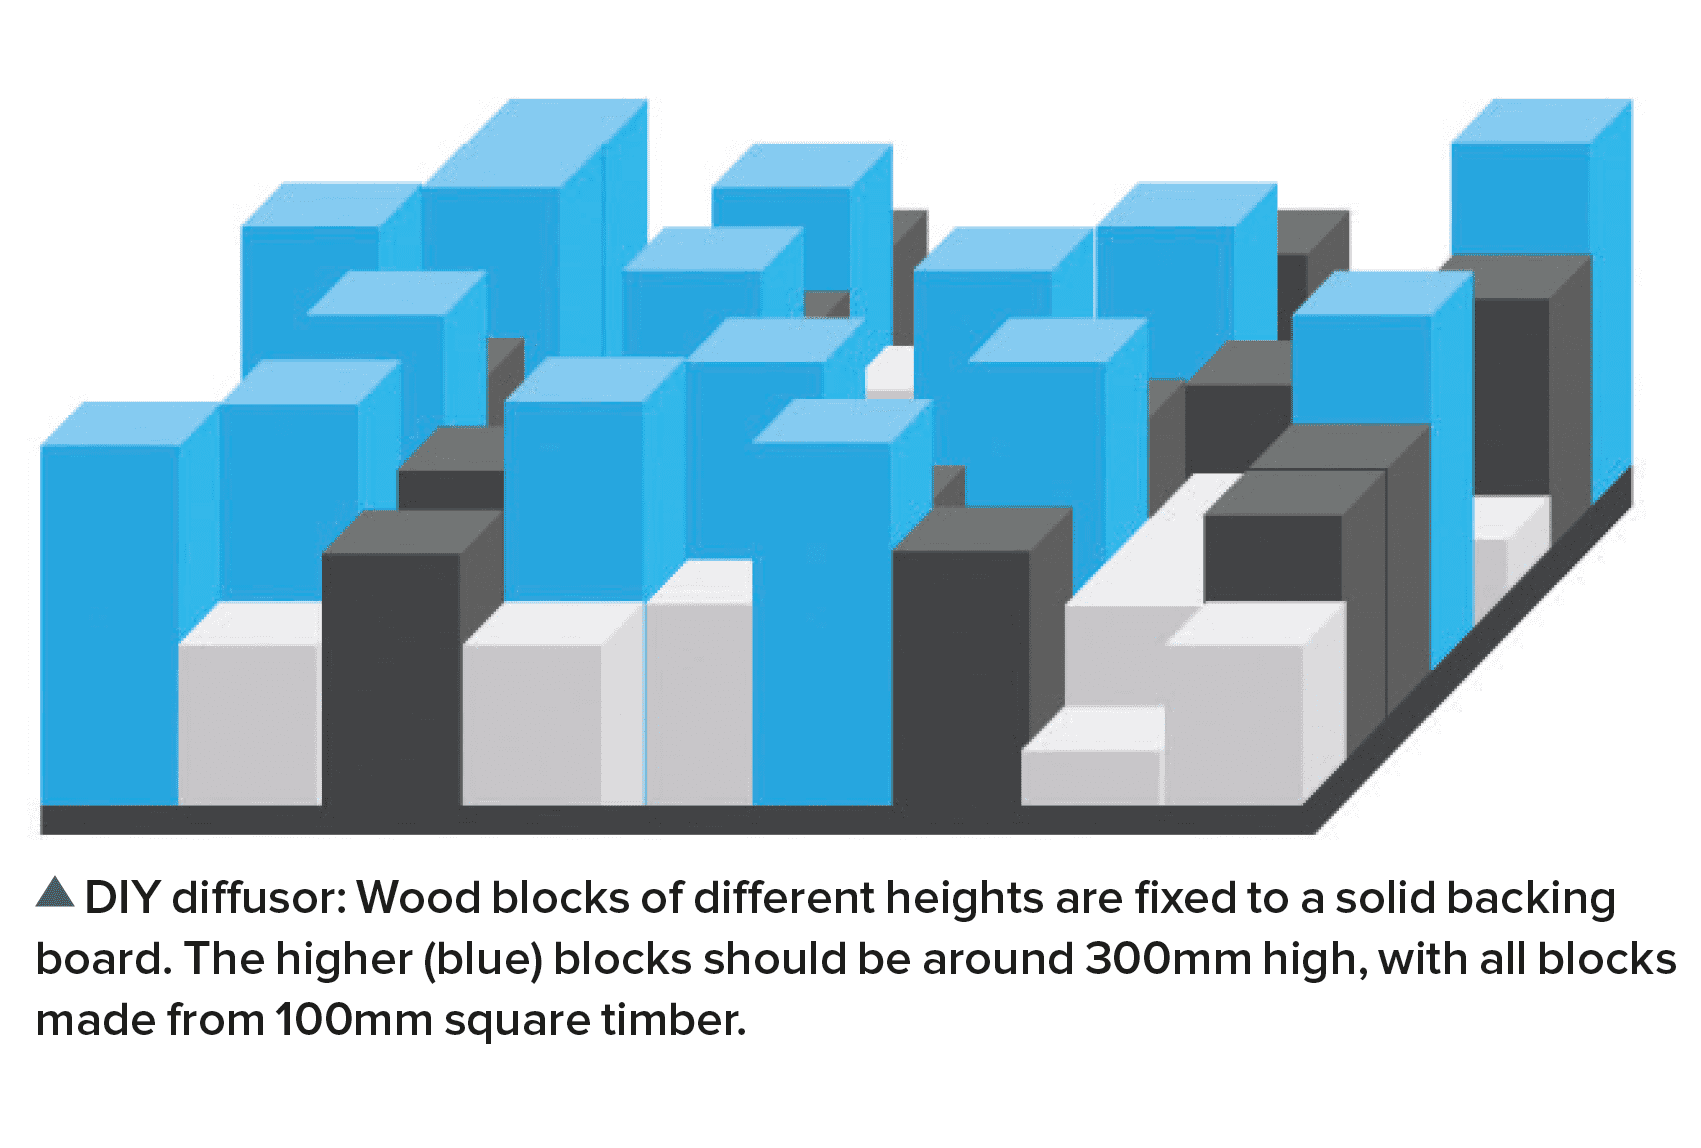
DIY Diffusor – click to enlarge
In practice this means surface height variations of 100mm or greater are required to have any real effect at mid and high frequencies. 100mm is most effective at approximately 1kHz and above.
Diffusors are often used in larger rooms or on the rear walls of mid-sized spaces, and in the vast majority of studios they are used alongside absorbers. Diffusors tend to be less effective in very small rooms as there isn’t space for adequate scattering to take place.
Tip / At one time it was believed that putting egg cartons on the walls of a studio would improve soundproofing and introduce useful diffusion. In reality, egg boxes are too light to do anything useful on the soundproofing front and their profile is too shallow to produce much scattering other than at very high frequencies. So bin those egg boxes (and the myth) – there are far better solutions available nowadays.
Absorbers
Absorbers are panels of porous materials, such as mineral wool, glass fibre or opencell foam, that dampen sound reflections. They do this by allowing sound waves to pass through them and back out, but in the process friction converts some of the sound energy to heat – meaning less sound is reflected out than goes in (Fig 1).
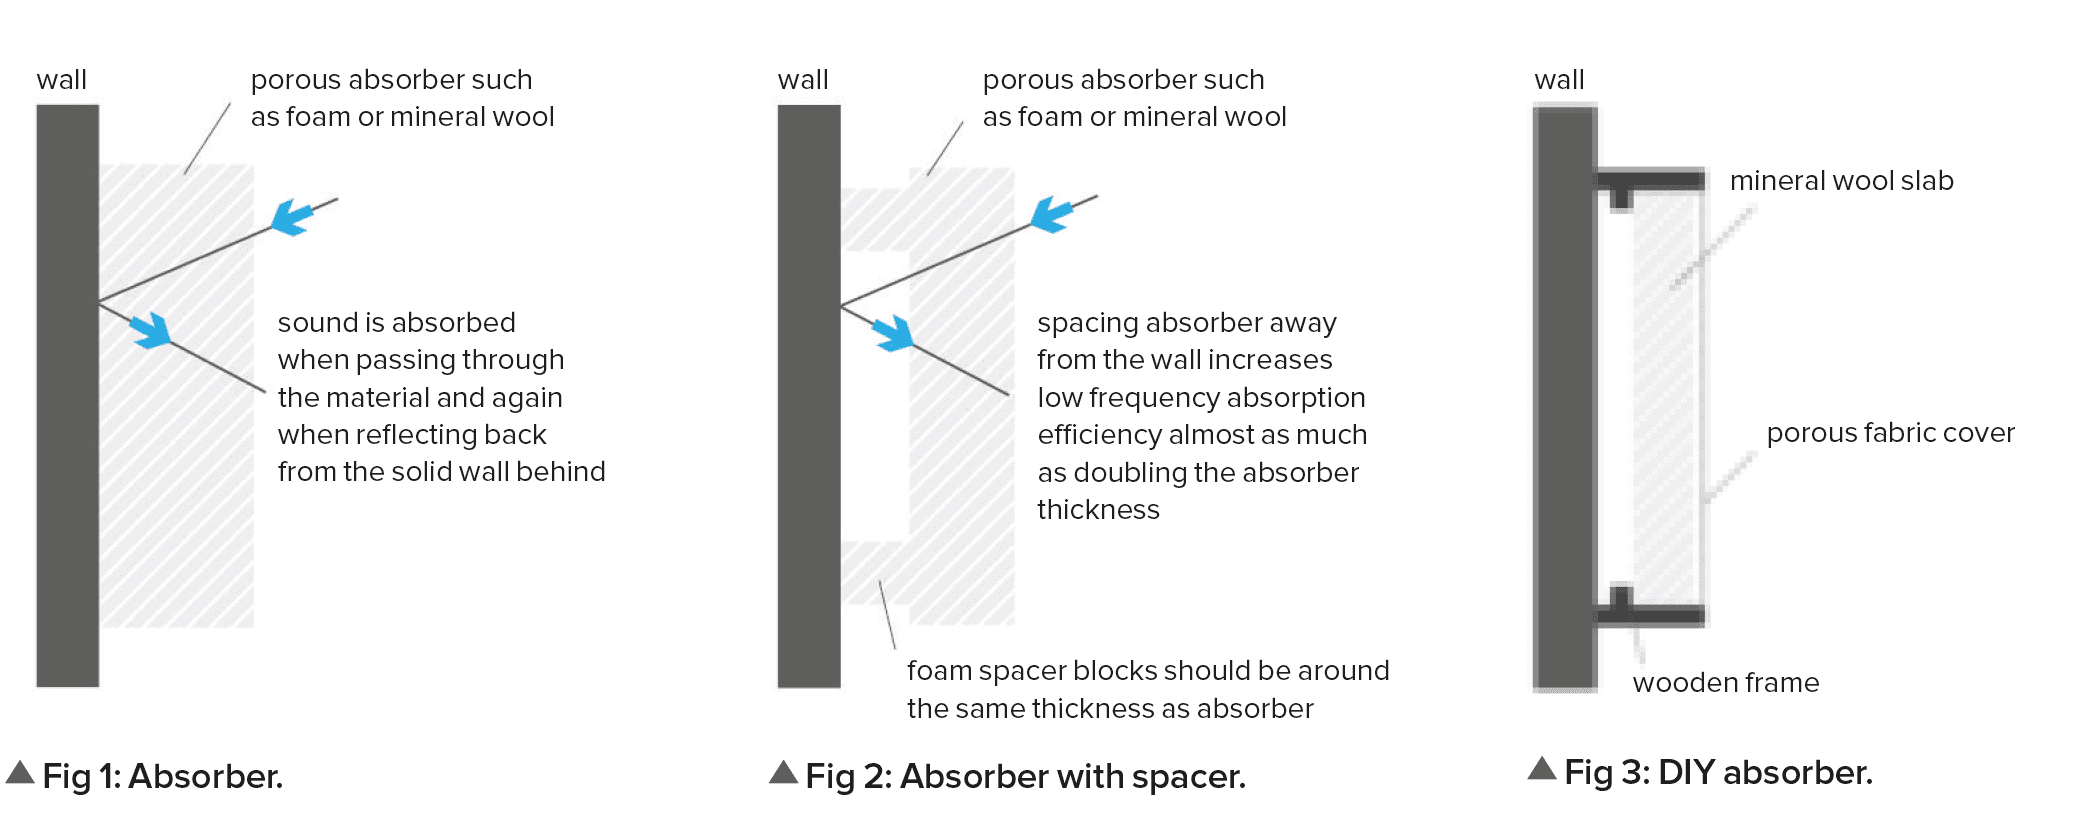
Absorbers – click to enlarge.
With absorbers, size matters. For a porous absorber to be effective, it needs to have a thickness comparable to a quarter wavelength of the sound being absorbed, which means that at 1kHz, where the wavelength is approximately 340mm, the material needs to be 85mm thick. A porous panel this thick absorbs frequencies of 1kHz and above very efficiently, but it can also do useful work lower down the audio spectrum. The reason for this is that not all sound arrives at right angles to wall-mounted absorbers and the more oblique the angle of approach, the greater the thickness of material the sound wave has to pass through. The outcome is that in real-life situations porous absorbers are effective to a lower frequency than their thickness might suggest.
Tip / Spacing an absorber away from the wall improves its ability to absorb lower frequencies (Fig 2). A 50mm absorbing panel spaced 50mm from the wall is almost as effective as a 100mm thick panel fixed directly to the wall. Use offcuts of foam to make spacer blocks and glue these to the back of the main absorption panel to create these cheap artificially thicker panels.
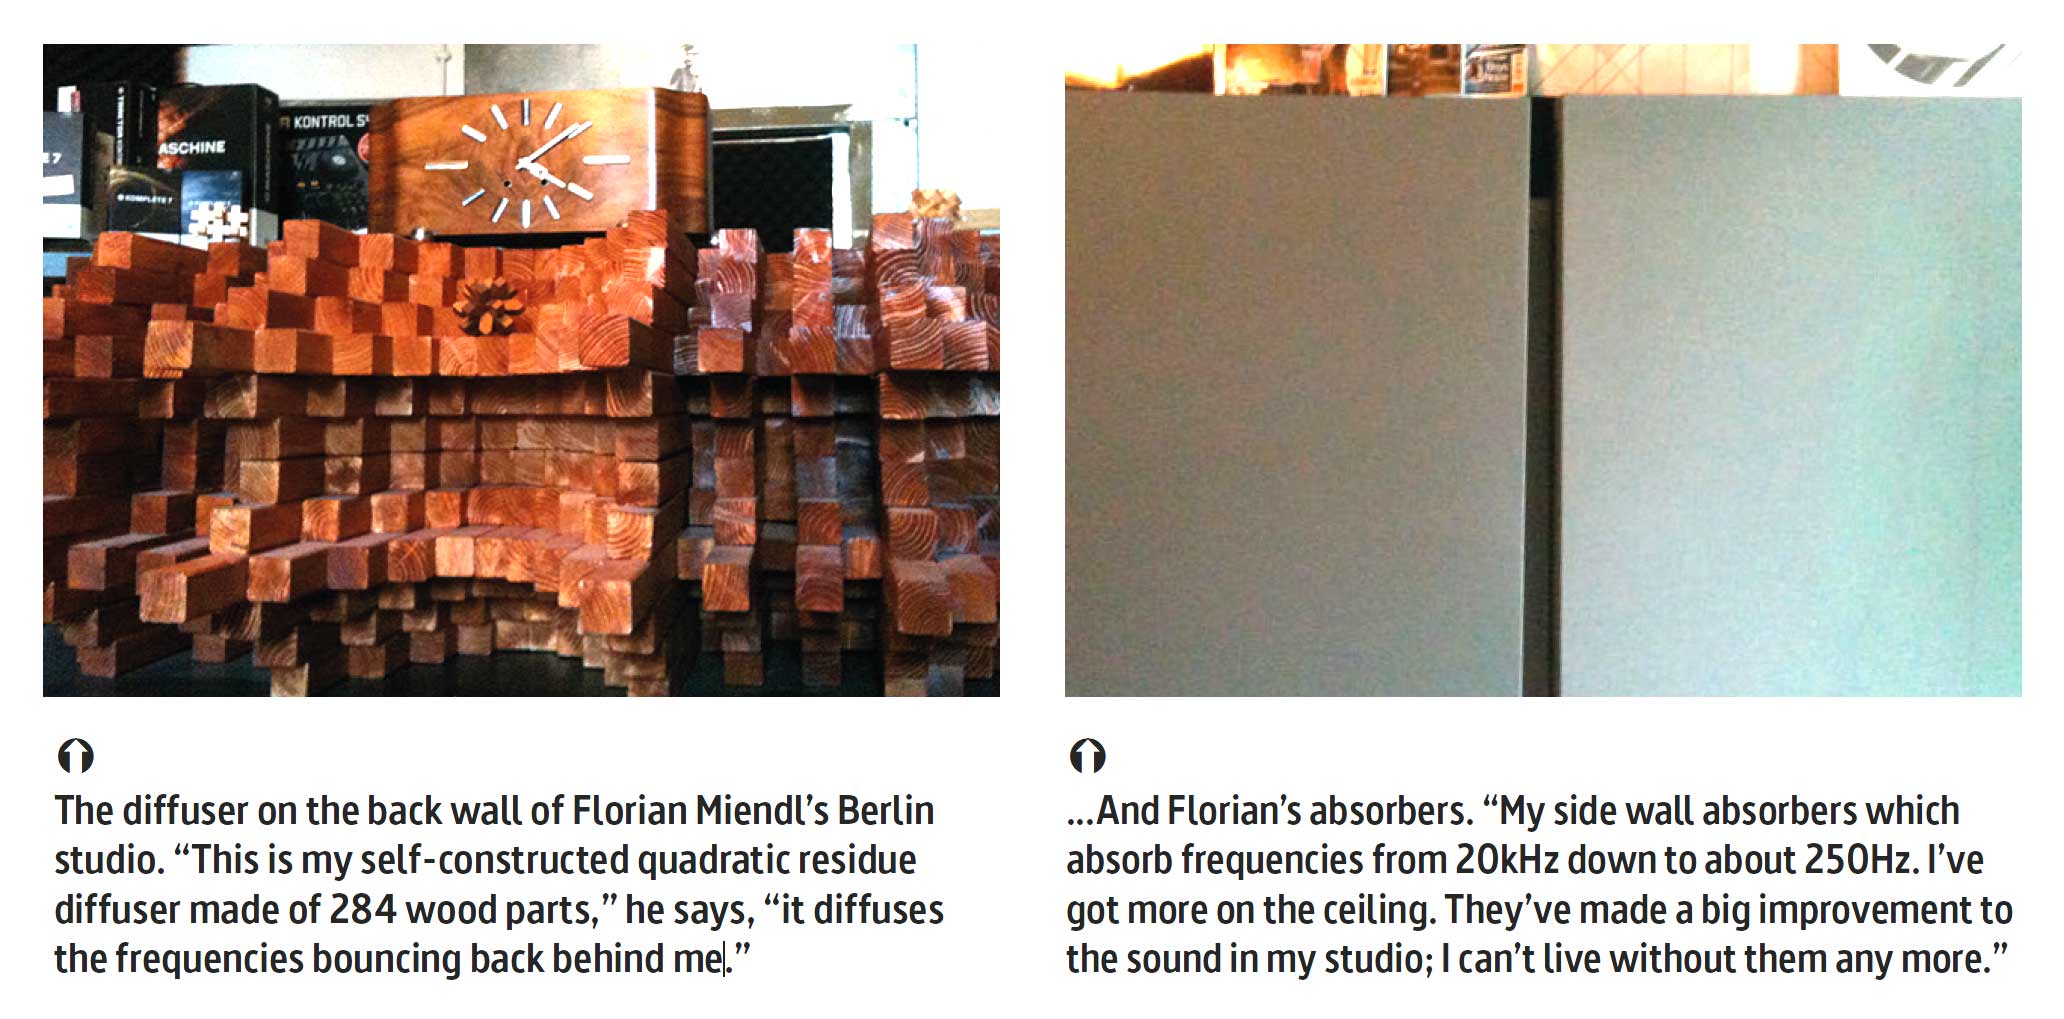
Florian Miendl’s Berlin studio – click to enlarge
DIY absorbers
You can make your own mid/high frequency absorbers by putting 30 or 50mm mineral wool cavity wall insulation slabs into 100mm deep wooden frames where the mineral wool is flush with the front of the frame so as to leave an air space behind (Fig 3). These will be at least as effective as an equivalent thickness of acoustic foam, and a lot cheaper. Cover the whole thing with porous fabric, such as cotton or a polyester bed sheet, staple it around the back of the frame and hang it on the wall just like a painting.
Wear gloves and a dust mask when handling mineral wool or glass fibre as the fibres can cause irritation to the skin and lungs. Always cover DIY traps with material to prevent fibres from escaping into the air.
Tip / If you don’t want to damage walls by glueing foam directly onto them, simply glue an old DVD to the back of the foam panel and then hang this onto a screw or picture nail on the wall.
Where to place absorbers
Absorbers – click to enlarge
You don’t need to cover the entire surface of a room with sound absorbing panels: doing so results in a dark and oppressive sound (remember, high-frequency sound is more easily absorbed than low, so by adding more absorption to the studio the overall reverberation will become more bassy in tone). Instead aim for coverage of around 20 per cent: you’ll hear a big difference.
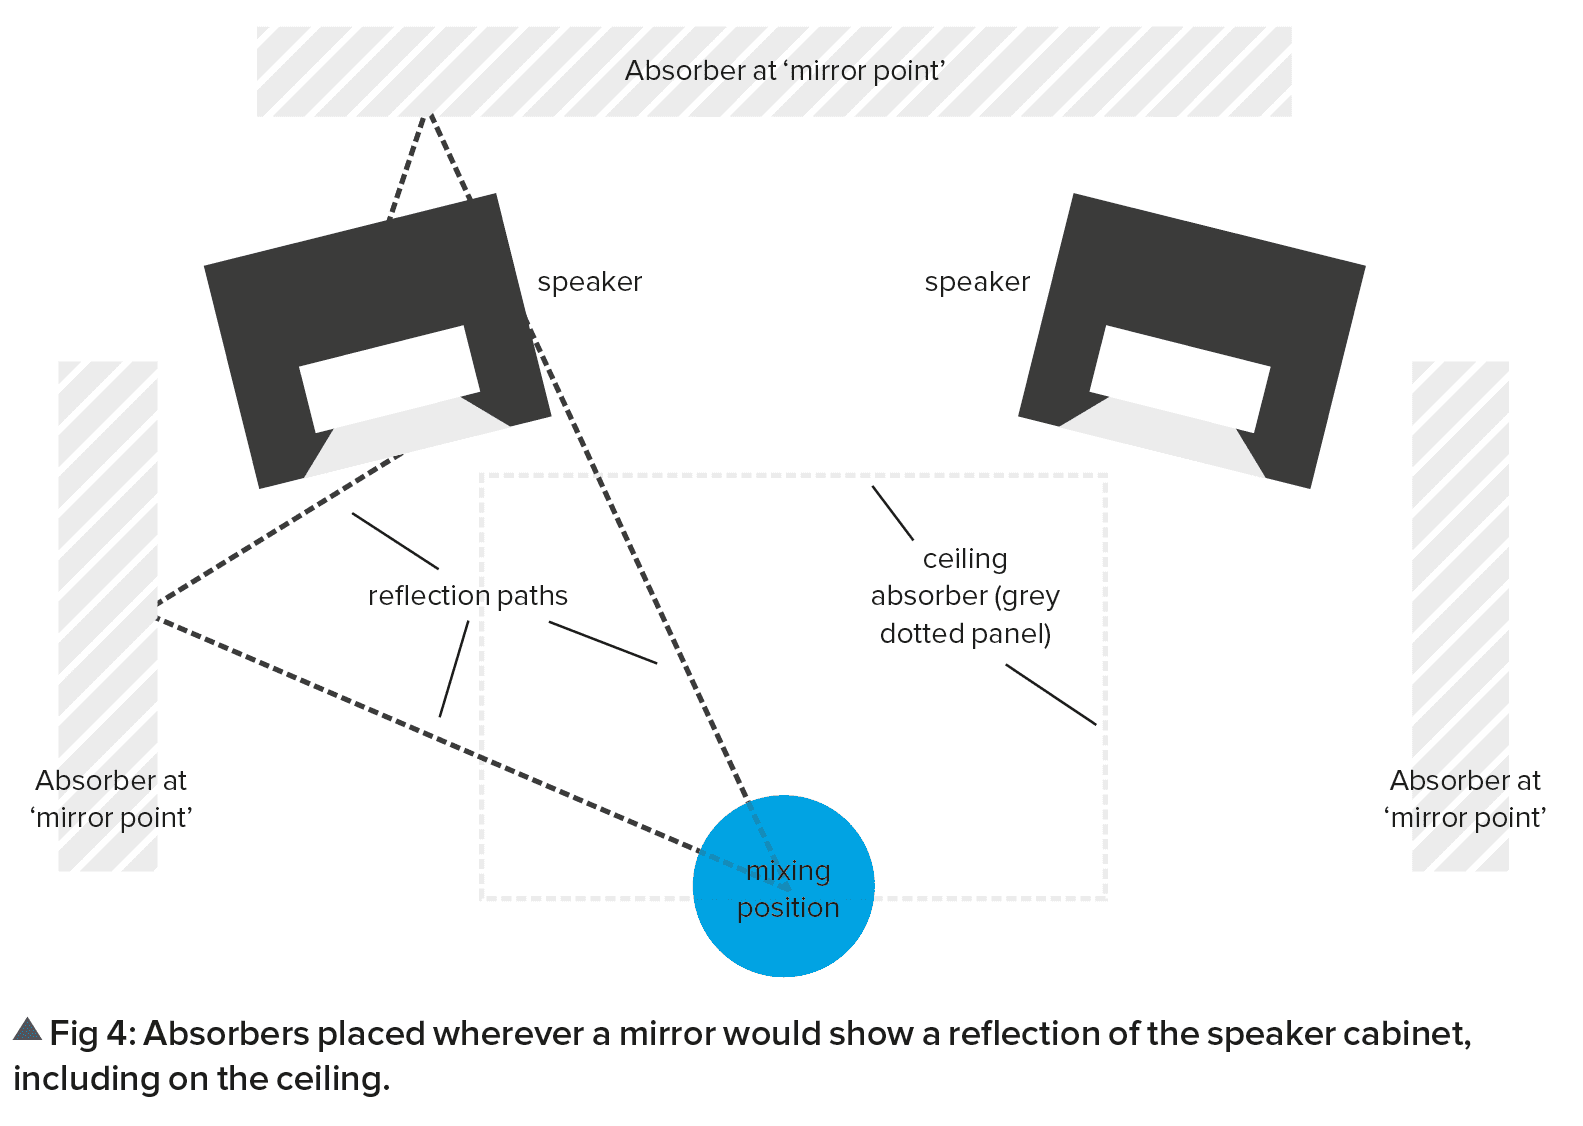
But which 20 per cent? When deciding where to place absorbers you need to keep in mind at all times this single overriding aim: to reduce the effect of room reflections from the perspective of the mixing position – not the perspective of the bed in the corner, or the cupboard by the door (Fig 4).
While large commercial studios may be able to get a consistent sound in the areas where clients sit, in smaller project studios the acoustics of the wider room only matter in as much as they impact on the sound in your mixing position.
Fortunately, there is a tried-and-tested method to help decide where absorbers should go. Get a friend/significant other to move around the front of the room holding a mirror held flat against the wall while you sit in your usual mixing position. Wherever you see a reflection of one of your monitors in the mirror you need to place an absorber to prevent a reflection bouncing directly back at you.
In most rectangular rooms these mirror points are found on side walls between the mixing position and the speakers, and also behind and between the speakers. Look up and you’ll find one on the ceiling too. Don’t worry about the floor – we’re so used to hearing floor reflections that our ears tune them out.
Where the rear of the room is also reflective, hanging absorbers there may also help, although you may find that diffusers are a better bet: a sofa with shelves above it containing books, CDs and DVDs is often all you need to break up strong reflections.
Home-made absorber – click to enlarge
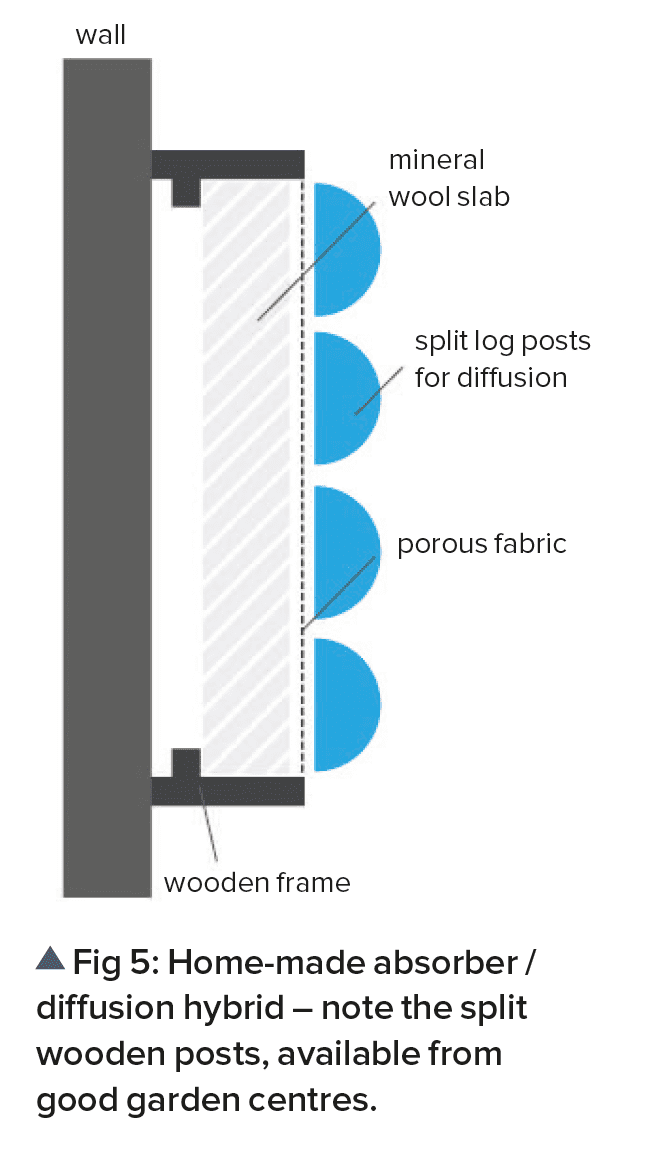
To make your own combined absorber and diffusor for use on a rear wall, first build a large mid/high mineral wool absorber (Fig. 3, above) and then fit vertical split-log fence posts on top with a 20mm gap between each (Fig 5). The curved wooden surfaces provide some useful HF scattering, especially in the horizontal plane, while the mineral wool absorbs some of the mid and high frequency energy. The same kind of wooden posts can also be used to add reflection and diffusion to studio walls that have been carpeted in error.
Flutter echoes
A side benefit of absorbing mid and high frequencies at the mirror points is that it helps dampen so-called flutter echoes, which occur when sound bounces back and forth between parallel walls or between a hard floor and a ceiling. In smaller rooms the spacing of these echoes is so close that it forms a musical pitch or ringing sound. You hear the effects of flutter echo when clapping your hands while standing between two buildings or in an empty, rectangular room.
Professional studio designers use nonparallel walls to reduce flutter echo, but in the type of rectangular room most of us work in absorbers at the mirror points will prevent flutter echo from being a problem at the listening position, even if it remains audible elsewhere in the room. Diffusors also help reduce flutter echo.
(Note that flutter echoes are different from standing waves: flutter echoes affect mid and high frequencies while standing waves are most problematic at low frequencies.)
Bass problems
A typical absorber that is 100mm thick or a 50mm absorber spaced 50mm from the wall gives useful absorption down to around 250Hz. Below that its efficiency decreases rapidly. For lower frequencies a different approach is needed.
Taming bass starts with the model of speakers. A common mistake made in home studios is choosing monitors that are too powerful for the room. A good rule of thumb when choosing speakers is not to put more low (bass) energy into your room than it can deal with. If you use large monitors or a system with a sub in a small room with marginal acoustic treatment then the low bass region is likely to be very inaccurate. A better strategy is to pick smaller speakers with a more modest bass response.
If the speakers you own have too much bass extension for the room check any rear panel controls to see whether you can reduce the bass output. As long as you get used to the sound of your monitoring system with some commercial recordings and don’t try to EQ any frequencies lower than the monitors can reproduce you should be able to get good results even with quite small monitors.
Fortunately, for all their faults, the kind of residential space the home producer typically mixes in does a reasonable job of controlling bass energy – albeit inadvertently.
While bass frequencies are efficiently reflected by thick walls, more lightweight walls, such as those made from plasterboard on a wooden frame as found in many modern houses, allow a significant amount of bass to pass through them.
It’s not just standing waves we need to be wary of though. At other frequencies the reflected sound may be out of phase with the direct sound and so will cause a reduction in level. We call the resonant peaks related to room dimensions room modes; the more solid the walls, the stronger they are. Other modes exist caused by less direct reflection paths. These ‘tangential’ and ‘oblique modes’ tend to be less severe in their effect than the primary modes related to room width, depth and height.
Cube-shaped rooms are the most difficult to work in as all room modes occur at the same frequencies, creating very strong peaks. To make matters worse there’s invariably a dead spot around the centre of the room where the bass level dips alarmingly. In smaller home studios this is often where the engineer is forced to place the mixing seat, and from my own experience no amount of practical bass trapping ever completely fixes the problem. The best sounding rooms are ones where the room modes are evenly distributed, which usually means fairly large rooms where the principle dimensions are not equal or exact multiples of each other.
Tip / A good way to check for bass problems without resorting to specialised test equipment is to program a musical sequence to play a chromatic (semitone) scale over the lowest octaves and to use a sine wave as the tone. Ensure all notes play at the same velocity and then listen for unduly loud or quiet notes as the sequence plays back. Expect the level to gradually fall off as the pitch decreases – this is quite normal. What you’re looking for are individual notes that stick out as being too loud or too quiet. If you find one (or more) it’s a sign that you need to add more bass trapping and/or move the speakers slightly.
Bass trapping
Using solid chunks of porous material to absorb bass is problematic as the wavelength of sound at 50Hz is around seven metres, so a quarter wavelength deep trap would require an absorber almost two metres thick – a thickness few home studios can accommodate.
However, as mentioned above, not all sound arrives at an absorber head-on – some of it approaches at an angle – so filling the corners of the room, from floor to ceiling, with large acoustic foam blocks or wedges can help.
At between 30–40mm these absorbers have a limited effect on bass frequencies hitting them dead on, but reflections coming at steeper angles pass through a far greater thickness of foam. There are many commercial bass traps based on this design, either with plain or decorative surfaces. Where space is an issue, corner traps can also be fixed along the wall/ceiling joins.
Some commercial bass traps combine heavy, limp membranes (often mineral-loaded vinyl sheeting) with porous absorbers. These can be very effective but tend to be more costly than simple foam or mineral wool absorbers. It is important to understand that bass traps are not designed to reduce the amount of low-end you hear in a room, but to even out level fluctuations at different frequencies.
Finally, it’s worth saying that it’s almost impossible to install too much bass trapping, so if you do have bass problems fit as much in as you can.
Tip / If you’re handy at DIY you can build your own corner traps using 600 x 1200mm sheets of high density mineral wool slab (30 or 50mm cavity wall insulation slab is good for this) fixed diagonally across the room corners and then stuffing the space behind with insulation-grade mineral wool.
“This article is taken from ‘The Producers’ Manual’ the definitive guide to recording and mixing in the project studio, written by Sound on Sound editor Paul White and published by the same team who bought you The Secrets of Dance Music Production”.
/**/
08.09 AM
As we are building our own studio from scratch this came right on time. very useful
THNX