
In the latest instalment of Beat Dissected, we create a techy house pattern with real depth.
Beat Dissected is a regular series in which we deconstruct drum patterns, showing you how to recreate them in any DAW. Just copy our grid in your own software to recreate the loop.
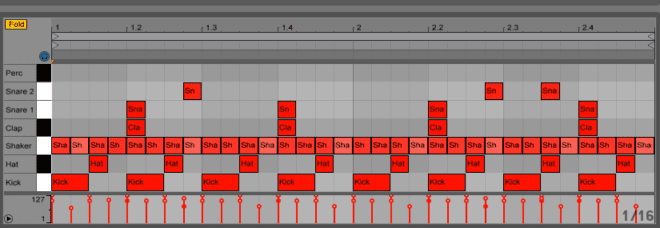
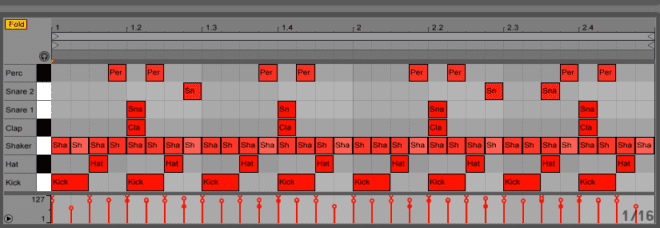
Here’s the beat we’re building today:
To download the samples for this beat, click here. The samples are provided on a completely royalty-free basis. They may not be sold or given away, either in whole or in part.
You must register for a free Attack account and sign up to receive our newsletter in order to download the samples. New members can register here. Existing members can log in here.
Spec
Tempo
125-130bpmSwing
60-65%Sounds
Mixture of analogue and digital drum machine sample plus acoustics hitsStep 1
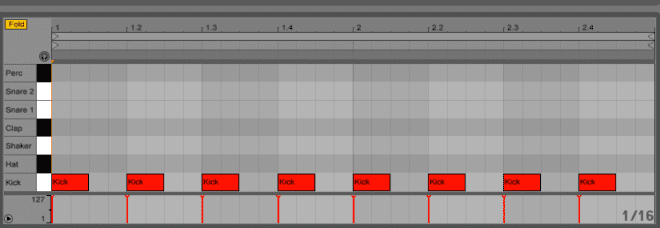
We could go for a TR-808 kick sample in this beat, but we’ve chosen a 909 for its techy sound. [Note: an earlier version of this article erroneously suggested we’d used an 808 kick – apologies for any confusion.] We’ve layered a shaker sample over the top to add a little character and compressed the layered sound very lightly to tighten up the transients.
We can return to the tuning at a later point, ensuring that the kick plays nicely with our bassline and any harmonic elements. For now, we simply add the kick sample to every quarter note.
Step 2
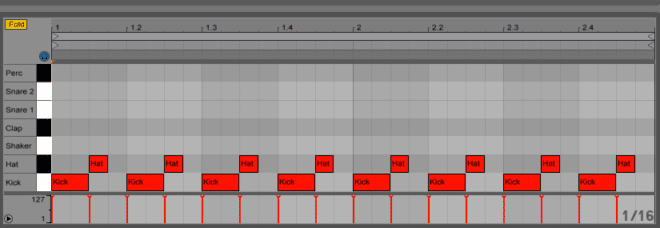
For the hi-hat, we’ve layered a very simple live-sounding acoustic hat sample with a wider, more open analogue hit. In this case we’ve gone for a Roland CR-78 sample but any kind of hit with analogue white noise character will work.
The pattern is as simple as can be, following the tried-and-tested approach of an open hat on every offbeat.
Step 3
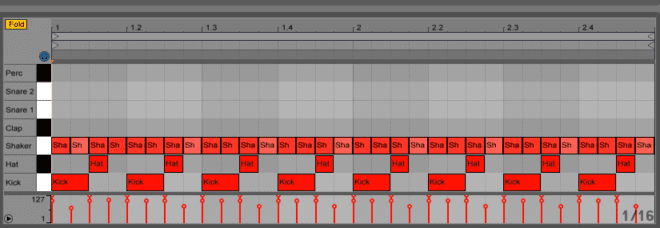
To emphasise the swing of this beat, we’ll add a 16th-note shaker pattern. Any acoustic shaker or maraca sound can work well here, or you could try a tambourine sample so long as it has a relatively short attack transient and short decay.
The velocity variations play a very important role here, avoiding a robotic sound and adding a subtle groove. You can also begin to adjust the swing setting, since the 16th-note pattern will highlight the effect.
The level of the shaker is crucial. Too loud and it’ll dominate the mix, too low and it won’t add the groove we’re looking for. We need to ensure it sits at the back of the mix, adding a techy groove without taking over.
Step 4
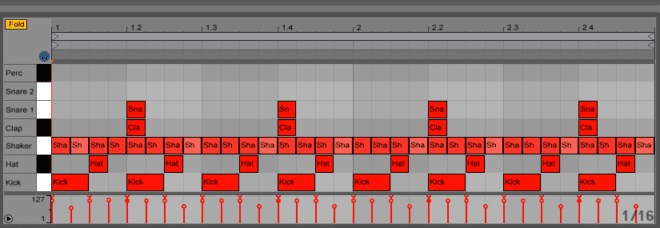
The snare and clap sit together on the second and fourth beat of each bar – a very standard pattern.
We’ve chosen very tight snare and clap sounds. Both sounds begin with TR-707 samples. We’ve shortened the envelope of each one in order to make them short and snappy. Both sounds have been EQd heavily, cutting off the low end from around 120 Hz with a very sharp high-pass filter.
We could layer these two sounds together but we’ve chosen to leave them separate so that we can vary the beat at the arrangement stage, muting and then reintroducing each of the sounds in turn in order to retain a similar groove but add variations.
Step 5
With the basic framework in place, we can begin to introduce more character. We start with a second snare sound. This is a tighter, higher pitched sound which sits in unusual places in the beat, adding a little interest to the groove. The level is relatively low, giving the effect of ghost hits.
Step 6
Finally, we add an additional percussive sound. This is based on a hi-hat sample, but we’ve processed it heavily to create the final sound you hear in the beat. First the envelope is adjusted, giving a very soft attack transient and a short, tight release. Next we’ve run it through SoundToys’ Decaptitator plugin for a little extra grit. To complete the sound, we’ve applied some heavy high-pass filtering to carve away the lower frequencies and avoid clashing with the clap and snare.
The pattern is simple, sitting around the snare and clap hits on every offbeat. This helps to emphasise the groove of those elements without adding syncopation. The swing setting is crucial here, affecting all of the percussion hits. The overall result of the percussion part is to make the beat busier and more interesting without adding complexity. The result is a pattern with a compelling groove.
The very last step is a standard application of the SSL Duende bus compressor, peaking at around 4 dB gain reduction in order to smooth out transients and help the elements to gel together.
To download the samples for this beat, click here. The samples are provided on a completely royalty-free basis. They may not be sold or given away, either in whole or in part.
12.48 PM
Great series!
Is your description of the kick drum correct? It sounds very far off from an 808 kick + a shaker sample and tight compression.
10.14 PM
@Stefan – the description says 909 Kick. This is the core of the kick drum. The shaker sample was also added but it was tucked slightly and amp envelope manipulation was done to create just a layer to add some transient without too much snap. Kick was also processed with the layer with about a 4dB gain reduction and can be done with something like the glue plugin, SSL Duende bus compressor or any kind of compressor in that SSL style.
02.55 PM
@Israel very nice groove, what sample was used for the second snare. Do i get any any nice snare sample and high pitch it. If you can please describe the processing of the snare in detail, i have been tryna get a good sounding additional snare on my productions but i’m not really setisfied with the results. This one sound great. And another question, is the one on the downloadable samples already high pitched?
08.29 PM
can we get the presets?
08.32 PM
nevermind,got it.lol
01.05 PM
nice beat!
thanks.
02.09 AM
Hi, I just discovered this website and I’m in love with the articles and all this deconstructed beats!! Thank you so much for the amazing posts!
I just have a question.. I download the .wav files to construct the beat myself in ableton, but I can’t get it as loud as your final recording. what am I missing… I tried different approaches but I can’t get it. Is it because of the Duende? I used the api2500 with a clipper from t-racks but I hear a distortion when I get the loudness in your recording.. Thanks!
01.49 PM
fl is also best daw to make tech house you have to make tutorial