Often dismissed as overly complex, FM synthesis isn’t necessarily as difficult to get to grips with as its reputation might suggest. Join us as we take a look at the general principles of this uniquely powerful synthesis method.
FM (Frequency Modulation) synthesis has a reputation for being complicated and long-winded, but this isn’t really true in the case of modern software options. While the theory is indeed complex, contemporary FM soft synths are actually very easy to use. What’s more, thanks to their ability to create complex harmonics, FM synths are capable of producing sounds not possible with virtual analogue instruments.
When the Yamaha DX7 arrived in the mid 80s, producers were beguiled by its crystal clear digital tones, and its electric piano, bass and bell presets have become pop and dance staples. More recently, Native Instruments’ FM8 – loosely based on the Yamaha DX – has become the instrument of choice for conjuring up cutting-edge bass growls by the likes of Skrillex, and Logic’s EFM1 can be heard providing the bass tones for dozens of deep house tracks.
Virtual analogue synths start with oscillators generating harmonically rich waveforms such as square or sawtooth waves, and sculpt away frequencies with filters. FM synths work in reverse: their oscillators (usually known as operators) are usually sinusoidal to begin with, and their pitch can be modulated incredibly precisely by other operators. Unlike an LFO, an operator’s pitch is in the audio range, which means rather than a wobbly vibrato effect, this pitch modulation results in the addition of extra harmonics.
NI FM8
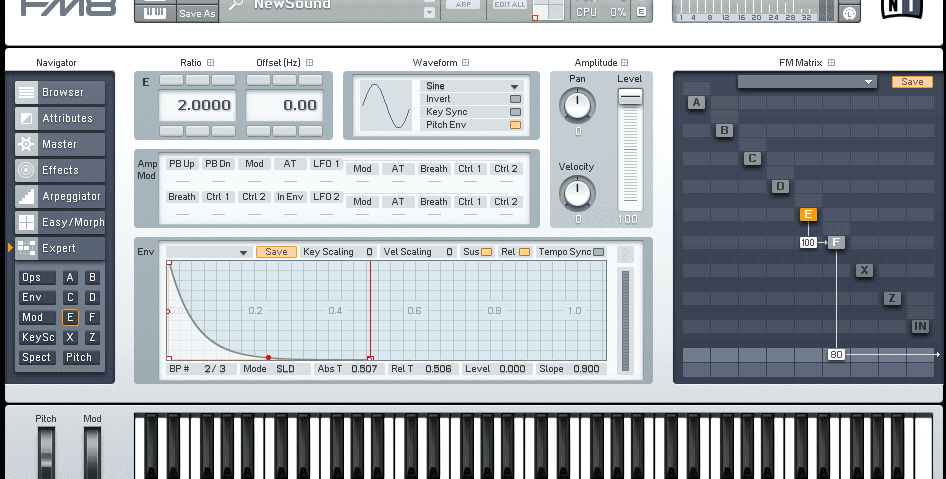
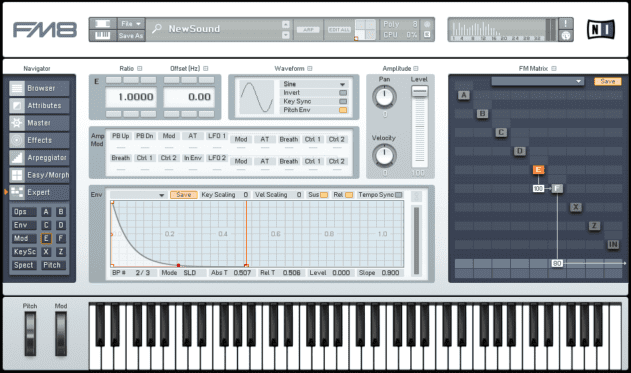
It’s easy to understand FM’s core principle when you can see and hear it in action for yourself. To demonstrate this we’re going to use Native Instruments’ FM8 – if you don’t own this instrument you can download a demo version here. Load the synth up in your DAW, and click the Expert button on the left to bring up the modulation matrix.
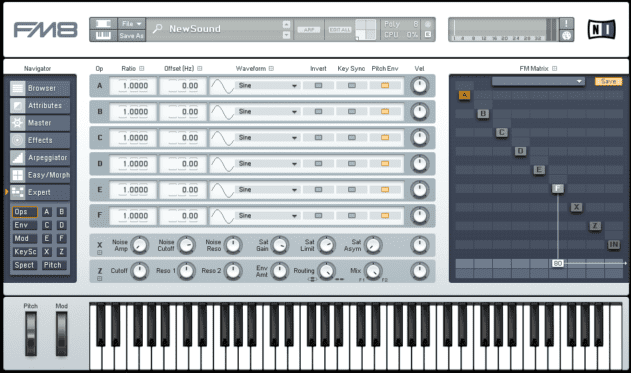
Currently one operator, F, is active. When you play a note you’ll hear that it emits a straightforward sine tone.
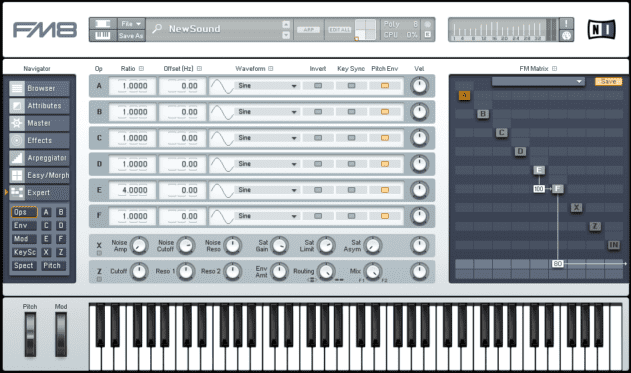
Activate operator E by right-clicking it, and drag up in the box underneath it until it says 100.
You’ll notice that the synth’s output has changed from a simple sine tone into a more complex, sawtooth-esque sound.
We’re still only hearing the output of operator F, but it’s being modulated by operator E, which is changing its timbre. The Ratio parameters on the left-hand side of the interface control the pitch of each operator. Drag down on operator E’s Ratio, and you’ll hear the harmonic content of operator F’s output change, and as you near 0.000 you’ll hear the effect of the modulation slow until it becomes vibrato. Increase the ratio above 1.0000 and you’ll hear more and more high frequency harmonics introduced into the signal. You can see this reflected in the harmonic content display at the top right-hand corner of the interface.
So, the pitch of operator E controls the harmonic content of operator F. In FM jargon, we’d describe operator F as the carrier, and operator E as the modulator. All we’ve managed to create with our carrier and modulator thus far are some fairly unpleasant screeching noises. The key to making usable sounds with FM is volume modulation. If we change the volume level of the modulator over time, the timbre of the carrier will change along with it. This creates something akin to the filter movement in a virtual analogue patch.
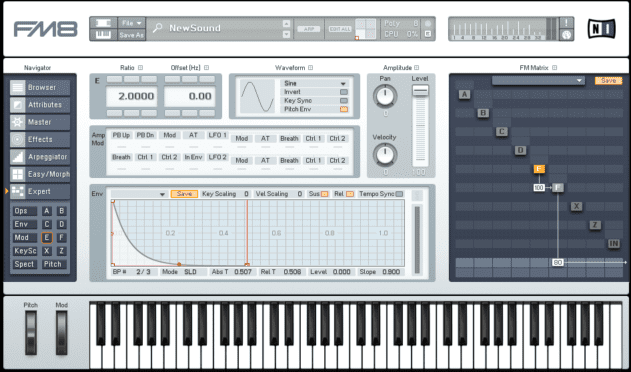
Left-click operator E in the modulation matrix to bring up all its parameters. Set the operator’s Ratio back to 1.0000, then turn your attention to the envelope at the bottom of the panel. Drag the white square at the top right and corner of the envelope down to the bottom, creating a curve.
This gives us something much more musical and natural-sounding: a synth tone with a characteristic burst of harmonics at the start, giving it a percussive feel.
Play the sound back, and turn the Ratio up – you’ll hear how the character of the sound changes as you do so. Set the Ratio to 2.0000. When played on a lower octave, this gives a raw version of that punchy, smooth FM bass that appears in so many deep house tracks.
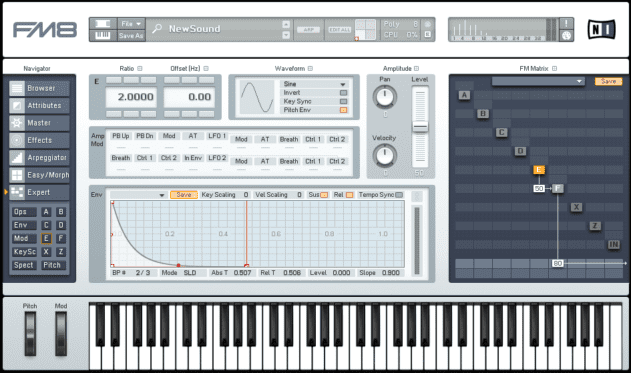
You can make the effect more subtle by turning down the operator E to operator F modulation level in the matrix – a level of 50 gives us a smoother sound.
09.14 PM
Awesome tutorial guys.
01.06 PM
Great! I hope that the next parts will come soon. Thanks
02.09 PM
Excellent walkthrough. I’ve always wanted to take on FM synthesis, most tutorials are just “follow along” types with no actual tuition.
11.50 AM
There is dozens of ‘introduction’ tutorials to FM Synthesis. Really looking forward to any further advanced techniques and instruction.
11.35 AM
Great tutorials once again, any chance you could update this post using FL Studio and Sytrus ?
01.35 PM
tescor – we’ll try to include some advice on Sytrus in the future. Of the three examples here, it’s closest to FM8 – the modulation matrix in Sytrus is a little different to FM8’s matrix but it performs the same duty, allowing you to route operators to each other.
04.24 AM
You guys are just so goddam amazing at doing these articles. This site’s a gem to any startup producers figuring out their way around DAW’s.
08.32 AM
Fantasic tutorial – I’d always wanted a quick, basic intro to FM synthesis, and FM8 by NI is a great tool to do this. What amazes me about NI is they way the design: complex concepts made into a logical user-interface…it’s outstanding!
09.48 AM
FM8 SYSEX
Sound Patches for Yamaha DX7 and FM8
http://dxsysex.com/