In the latest Beat Dissected, we tackle a complex, glitchy techno beat based on analogue drum hits.
Beat Dissected is a regular series in which we deconstruct drum patterns, showing you how to program them in any DAW. Just copy our grid in your own software to recreate the loop.
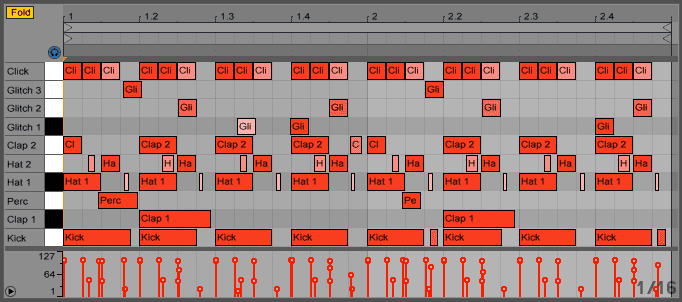
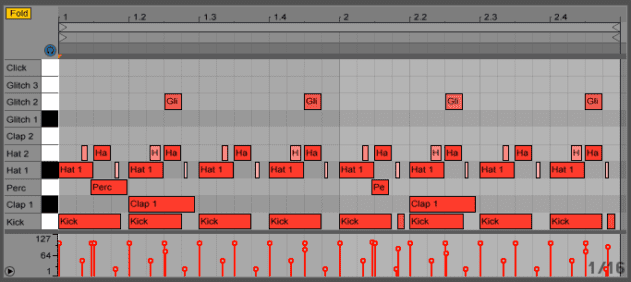
Here’s the beat we’re building today:
Spec
Tempo
125-132bpmSwing
50-65%Sounds
analogue drum machine samplesNote: we use the convention where 50% swing equates to straight timing. Read our full explanation of DAW and drum machine swing here.
Step 1
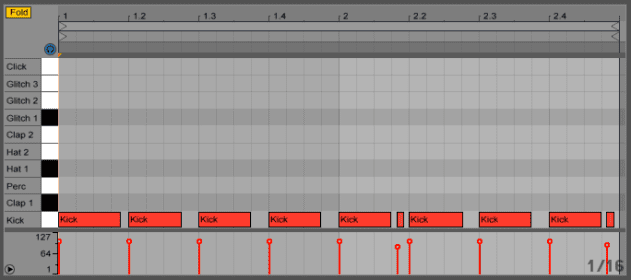
We’ll start with the kick drum, programming a simple four-to-the-floor beat accented by two ghost hits in the second bar. Sound-wise, we’re going for a heavily saturated analogue kick sample with a long release. In this case we’ve used a 909 sample which we’ve run through heavy saturation then mild distortion, with the top end carefully controlled.
Techno beats often twin obviously artificial sounds with deliberate human rhythmic nuances. To breathe a little human feel into the kick line, the two ghost hits are shifted off the grid to inject a subtle swing. The timing offsets are fractionally different in order to sound more interesting.
Step 2
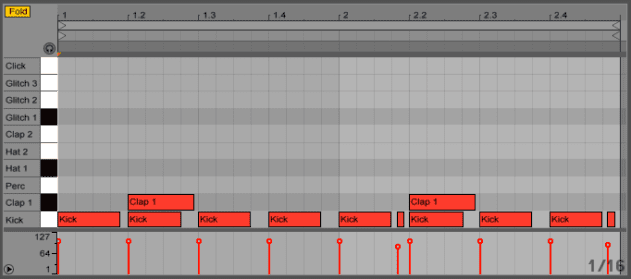
The first clap serves as an underlay, giving structure to the rhythmic backbone. We’ve picked a layered clap combo from an already distorted drum loop and high-pass filtered it to remove much of the low end.
Step 3
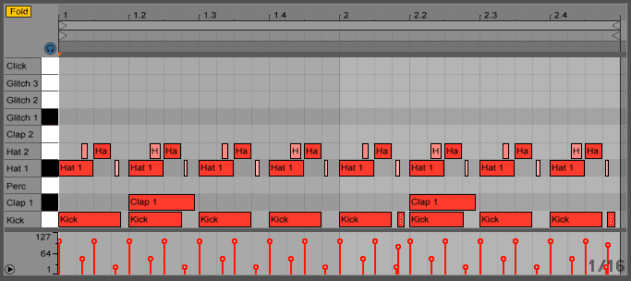
The relentless hi-hat groove is made using two different samples. The first is pitched lower than the second, while the second has a higher volume and is layered with a shaker sample.
Two points are worth noting. Firstly, we’ve deliberately chosen samples without too many high frequencies in order to leave space for what’s to come. Secondly, Hat 2 has some manual swing applied. Although many beats maintain the same swing setting across all constituent elements, techno and some styles of house can benefit from different swing settings across different parts. In this case we’ve done it manually, but you can also do it using your DAW. Anything from straight timing through to about 65% can work here.
Step 4
Time to add layers of detail to the raw beat. First is a harsh analogue growl (called Perc in our project) that plays on the off beat at the start of each bar. Next is a synthesised open ride (Glitch 2) – again driven to distortion – that offers high-end counterweight to the kick and clap.
Step 5
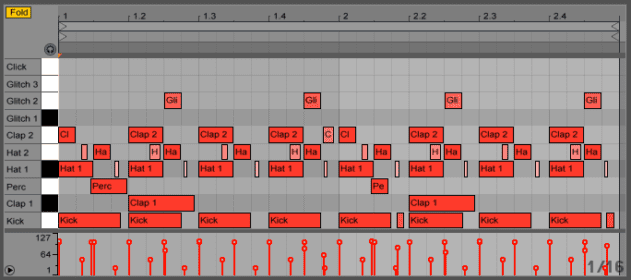
A second clap sound is now added to reinforce the kick and provide a rhythmic interplay with Hat 1. The sound is ripped from vinyl with a lot of its high frequencies rolled away to keep with the lo-fi aesthetic. The pattern is simple, with just a little manual swing applied to the ghost hit at the end of the first bar.
Step 6
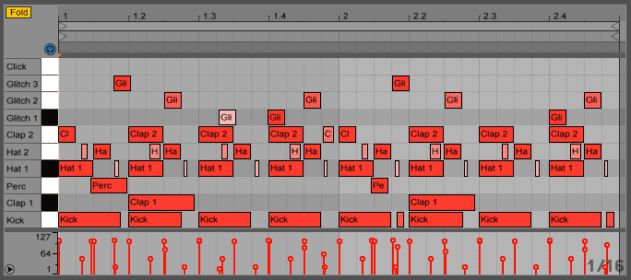
The beat from step 5 is full enough as is but if you fancy fleshing it out further, it will support a few more analogue hits. Glitch 3 is a modulated LFO wobble which pre-empts the second beat of each bar, while Glitch 2 is a tuned cymbal sound.
The key thing when adding these layers of detail is how the sounds work in the context of the wider groove and sonic palette. Expect to spend a good few minutes finding the right raw sound and then a few minutes more sculpting it in both the tonal and time domains so that it fits into its sonic surroundings.
Step 7
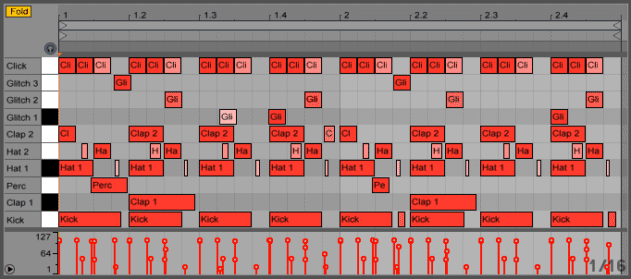
We’ve rounded off the groove with some low-level analogue clicks to glue the beat together. These are passed through a high-pass filter to remove unwanted lower frequencies, just using them to fill in the high end of the beat.
In terms of overall drum mix processing, not much should be needed. A little light drum bus compression can always help tie things together further and EQ can shape the overall tone, but more extensive processing should be unnecessary for the type of sound we’re looking for. If you really want to hammer home the saturated analogue effect, consider a high-quality tape emulation such as U-he Satin as a finishing touch.
11.59 AM
Nice one. Loving the textures here. Would love to see other sub-genres with heavy use of saturation to create the groove.
Anyway, one question. At the moment, I buss together my kick with my bass, and apply subtle tape saturation here to glue those two. I then buss together the rest of the drums with each other separately,
Should I be keeping the kick drum with the rest of the drums instead as suggested here?
01.51 PM
@Plyphon
Do what ever works for you! Either technique can produce good results. Theres no right or wrong. If it sounds good, it is good!
08.03 AM
@Plyphon – What Alex says.
Both can deliver good – if different results. To glue the low-end, bussing kick and bass is pretty normal. But equally if you want a more cohesive full-drum sound, it wouldn’t be unusual to feed the kick to the same ‘full drum’ bus (this would be normal in pop, rock / non-dance genres).
Try both. In dance, that relies more on the low-end, bussing kick/bass might be more useful.
Of course you can do both – which is what I do. I’ll actually keep the bass on its own (unbussed) channel, but I’ll feed up to 80% of its signal to a kick/bass bus and then a similar level to the drum bus. To do that, simply set up two feeds on the bass bus. Doing this does three things: it gives you independent kick level control that won’t interact too much with the buses; it allows the low-end gel of the kick/bass bus; and it allows the kick to play its part in the full drum bus, generating additional cohesion there.